
I worked really hard
on this manual -
so please read it...
XOU24WDZGO
PANEL READY 2 ZONE WINE COOLER
WATCH THE INSTALLATION
VIDEO ON OUR CHANNEL

2
UNDERCOUNTER
When buying any XO appliance
you can be confident you have chosen a
high quality, innovative and stylish product
from a company that cares about you!
If you require service
or have questions,
Help is only a phone call away -
call: 973-403-8900
Talk to one of our undercounter experts.

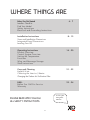
Before You Get Started
Safety Instructions
Electrical and Grounding Instructions
Care and Cleaning
Helpful Hints
Cleaning the Interior / Exterior
Changing the Carbon Air Purification Filter
FAQ’s
Before You Call For Service
Warranty
4 - 7
Installation Instructions
Sizes and Installation Dimensions
Leveling Your XO
8 - 13
21 - 22
23 - 24
3
where things are
please read and follow
all safety instructions
It’s for your
own good...
Honest.
Installer Checklist
Find Your Model
Operating Instructions
Control System Overview
Setting the Temperature
Functions
Wine and Beverage Storage
Shelf Instructions
14
- 20
Integrated Panel Dimensions
Product Overview

4
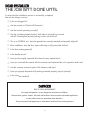
the job isn’t done until
To ensure that the installation process is successfully completed,
here are few things to review...
Is the unit plugged in?
Are the controls on? (Panel will illuminate.)
Are the controls operating correctly?
Has the unit been properly leveled - both side to side and front to back -
with all 4 leveling feet securely making contact with the floor?
This is an OVERLAY unit - have the panels been securely attached and properly aligned?
Is the door sealing properly?
Is the handle secure?
Have you thoroughly inspected all surfaces for any imperfections?
Have you reviewed this manual with the customer and explained the unit’s operation and care?
Has the customer received copies of the literature and keys?
Have you properly disposed of all packing materials properly (recycle, please)?
Is the custo
mer satisfied?
O
O
O
O
O
O
O
O
O
O
O
O
After installation, does the door open sufficiently to fully extend the shelves?
O
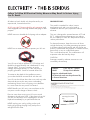
RISK OF CHILD ENTRAPMENT!
An empty refrigerator is a very dangerous attraction to children.
Remove door gaskets, latches, lids, lock and/or doors from unused or discarded appliances,
or take other actions to guarantee them harmless.
Always dispose of old appliances in accordance with local laws and regulations.

5
XOU24WDZGOR
XOU24WDZGOL
WINE COOLERS
2
these are the models
covered in this
book
take a minute to circle your model above
and record your serial number
here in case you need it later

Please read through completely before using your XO Unit
To prevent damage to the door gasket, the door must be opened all the way before pulling racks out.
The appliance must be positioned so that the plug is accessible.
Empty your XO unit before attempting to move the appliance. Moving while loaded may damage or
distort the frame.
The compressor will get HOT during operation / touching it may cause injury.
During installation follow all safety tips provided in this manual / appropriate safety equipment such as
safety glasses and work gloves should be worn.
Two people should move or lift your XO unit to prevent injury or damage.
Remov
e all interior and exterior packing materials prior to installation and dispose of properly.
Never cover the bottle racks with foil or other material which will impede internal air circulation.
For maximum efficiency, keep the door tightly shut unless loading or unloading and never overload your
XO unit.
Before installing, allow your XO unit to sit upright for 2 hours at the install site. This will allow the cooling
system to stabilize after transportation. Failure to follow this step may cause problems.
Location
Your XO unit should be located away from direct sunlight and heat sources (stove, heaters, etc.) which may
increase electrical consumption. High or low ambient temperature may cause units to work improperly.
The floor must be strong enough to support your XO unit fully loaded.
Your XO unit must not be installed in areas of where water or e
xcessive moisture are present.
Your XO unit’s final installation must observe the correct minimum air clearances around and behind the
unit to ensure adequate ventilation. In addition, all ventilation openings must be kept clear and free of
obstructions, failure to do so will result in damage to the unit.
WARNING
NEVER use external heat sources to accelerate defrosting
NEVER permit unauthorized service or modifications to your XO unit
NEVER tamper with the sealed refrigerant system - this unit uses R600A Refrigerant which is flammable.
It should never be used in the vicinity of any flammable or explosive ignition sources.
ALWAYS FOLLOW THE ELECTRICAL SAFETY INSTRUCTIONS OUTLINED IN THIS MANUAL.
6
your safety matters
Never store perishable food products such as meat or cheese in your wine cooler.
Your XO unit must not be installed near
where flammable, corrosive or hazardous materials are present.

Failure To Follow All Electrical Safety Measures May Result in Serious Injury,
Fire Or Death
All electrical work should only be performed by an
experienced, licensed electrician.
All XO units MUST be grounded for safe operation and
come equipped with a
3 Prong molded cord/plug for that
purpose.
NEVER remove or disable the 3rd prong with an adapter.
NEVER use an extension cord to operate your XO unit.
Your XO unit is built to operate on 115V 60Hz and
should be plugged directly into a dedicated 15 amp
3 prong outlet. If you are uncertain as to the
voltage, amperage capacity or if the 3rd prong is
properly grounded - consult a licensed electrician.
To maximize the depth of the installation recess -
your outlet should be mounted flush with the wall.
Your XO unit should not share the circuit with any other
electrical devices as this may cause overloading,
overheating, blown fuses or tripping circuit breakers.
In a worst case this can pose a fire hazard.
NEVE
R handle your XO unit in wet conditions as this
can pose a severe danger of electric shock.
Exercise care when moving your XO unit to avoid
damage to the electrical cord. If the electrical cord of
your XO unit becomes worn or damaged it must be
replaced immediately by a qualified technician.
NEVER unplug your unit by pulling on the cord.
Unplug by gripping the plug firmly and pull out
straight from the outlet.
INDOOR USE ONLY:
This model is intended for indoor/interior
applications only and is not to be used in
installations that are open/exposed to natural
elements.
This unit is designed to operate between 60 F and
90 F. Higher ambient temperatures may reduce
the unit’s ability to reach low temperatures and/or
reduce performance.
For best performance, keep the unit out of direct
sunlight and away from heat generating equipment.
In climates where high humidity and dew points are
present, condensation may appear on outside surfaces,
particularly in non air conditioned spaces.
This is considered normal. The condensation will
evaporate when the humidity drops.
CAUTION
Damages caused by ambient extremes are not
covered by the warranty
SERVICE 115V - 60 Hz - 1 phase
AMPS 15 Amp Circuit Breaker
Requires a Dedicated Outlet
All electrical work must be performed by
a licensed electrician
7
Serious injury, fire or death...
Okay -
o
o

8
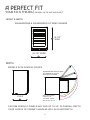
a perfect fit
use free standing - or - install under counter
when installing an overlay door unit,
you might use a recessed outlet or
cut the adjoining cabinet wall to
reach an outlet there...
ALL XO UNDERCOUNTER
UNITS ARRIVE PRE-WIRED
WITH LOW PROFILE PLUGS
FOR EASY INSTALLATION
4"
7"
34 1/8” MIN
24”
90°
Door Swing
WALL
Clearance
Gap
IF THE DOOR CAN’T OPEN FULLY - YOU CAN’T PULL THE SHELVES OUT.
WHEN INSTALLING WITH
THE HINGE SIDE NEXT TO A WALL -
LEAVE ADEQUITE SPACE FOR
CABINET HANDLES
DOOR MUST BE ABLE TO OPEN
A MINIMUM OF 90 .
o
THE DOOR STOP IS SET AT 110 - BUT CAN BE REST TO 90 OR 140 IF NEEDED.
o
oo

9
a perfect fit
your xo is this big ( or small, as the case would be )
XOU24WDZGOR & XOU24WDZGOL 24” WINE COOLERS
34
HIGH
1/8"
W
H
height & width
MODELS WITH OVERLAY DOORS
depth
23 3/4”
D
CUSTOM OVERLAY PANELS MAY ADD UP TO 3/4” IN OVERALL DEPTH
YOUR CHOICE OF CABINET HANDLES WILL ALSO ADD DEPTH
23 7/8" WIDE
90
o
110
o
140
o
DOOR MUST BE ABLE TO OPEN
90 MINIMUM TO ALLOW
SHELVES TO EXTEND
WITH THE DOOR
OPEN AT 90
THE UNIT HAS A
DEPTH OF 46 1/2”
o

MAXIMUM PANEL THICKNESS 3/4”
PANEL MAXIMUM WEIGHT: 20 lbs.
* FOR CABINET DOORS LONGER THAN 30” - CONSULT XO.
10
AFTER INSTALLATION UNDERC OUNTER, OVERLAY DOOR MUST BE ABLE TO OPEN 90 .
o
23 3/4” (603mm)*
3 1/4” (82mm) min
5” (127mm) max
3 1/4” (82mm) min
5” (127mm) max
2 7/8”
(73mm)
min
5”
(127mm)
max
29 3/4”
(756mm)
min
30”
(762mm)
max**
overlay panel dimensions xou24wdzgo
Drill a hole at least 5/16” in diameter and
1” deep into the top and bottom of the
frame in the location shown.
TO ACCOMMODATE THE HINGE PINS
ON THE HINGE SIDE OF THE PANEL
2 7/8”
(73mm)
min
5”
(127mm)
max
** IF FRAME HEIGHT EXCEEDS 30”
ADDITIONAL STEPS MAY BE
REQUIRED.
CONSULT XO
* IF FRAME WIDTH EXCEEDS 23 3/4”
WHEN MOUNTING TO THE DOOR
ALIGN THE FRAME EVEN WITH THE
HINGE SIDE, LETTING THE EXCESS
OVERHANG THE HANDLE SIDE TO
AVOID INTERFERENCE WITH THE
ZERO CLEARANCE HINGE.
3/8”
13/32”
5/16” Dia.
OUTSIDE
DOOR SIDE
3/4” FRAME
3/4” FRAME
COPY AND CUT OUT
THESE HANDY
HOLE TEMPLATES

11
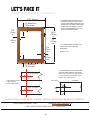
let’s face it
1. Remove the two screws that hold the toe kick in place.
Remove the toe kick and set aside.
2. Remove the three screws holding the lower hinge in place.
Remove the hinge and set aside.
3. Pull the door down away from the upper hinge to remove it
and lay it flat face down on a pad to prevent scratches.
4. Starting at one corner, gently pull the rubber door gasket out
of the channel. Lay it aside, flat. You will reinstall it shortly.
In the channel are 10 screw holes.
5. Attach your door handle to the frame, countersinking the screw
heads so the frame lays flat against the door..
6. Align the frame to the door. If the frame is wider than the door,
set the frame flush with the hinge side of the door, let the other side
overhang the door and clamp securely.
7 Using the (10) ST4-30 self-tapping screws supplied securely fasten
the frame to the door. Do not over tighten as screws may strip out.
WARNING: Screws are sized for 3/4” panel,
DO NOT USE these screws for thinner panels.
BEFORE BEGINNING - REST THE UNIT ON ITS BACK, WITH THE DOOR FACING UP

12
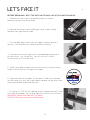
8. Remove the clamps and re-install the rubber gasket by pressing it into the slot making sure
it is evenly seated.
9. Place the door back in position and slide to up onto the upper hinge pin, then square it up
with the cabinet.
10. Replace the lower hinge using the three screws removed in Step 2.
11. Replace the toe kick using the two screws removed in Step 1.
ADJUSTMENT SCREWS
TOP BOTTOM
If the door requires adjustment,
the top and bottom hinge each
have adjustment screws.
Loosen the screws,
then with the door open,
raise the handle side to level
and re-tighten the screws.
The door hinge stop is set at 110 .
change it to either 90 or 140 .
Simply change the position of
the stop screw in the lower hinge
plate as shown.
o
oo
OPTIONAL
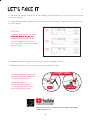
WATCH THE INSTALLATION
VIDEO ON OUR CHANNEL
https://www.youtube.com/channel/UCT-Ip-dM9hoPydpxZfrZzRA
www.xoappliance.com

DO NOT NEGLECT THIS IMPORTANT STEP
Rotate to raise or lower the LEVELING LEGS located at each of the four corners until all four legs
are seated firmly on the floor and the interior floor of the unit is level both front to back and
side to side.
Failure to follow this important step may cause problems with proper door operation, excessive
condensation, vibration and noise.
13
it’s like zen - but cooler
get your level out

14
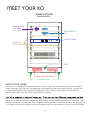
meet your xo
LOCK
FRONT COOLING VENTS
LEVELING LEGS
CARBON FILTER
CARTRIDGE
(replace every 3 to 6 months)
RECIRCULATION
FAN
GLIDE OUT
BOTTLE RACKS
CONTROL PANEL
WINE COOLER
XOU24WDZGO_
WHAT’S THAT NOISE...
You new XO is designed for quiet operation but you may hear some sounds your old unit didn’t
make. Because they are new you might be concerned, but they are usually normal. Sounds can
also be amplified by hard surfaces like flooring or tiles. Here is a description of the types of
sounds you might hear and what might be causing them.
may run longer than your old unit. You might also hear a pulsating or high pitched sound as the
compressor and fans adjust to improve performance. During defrosting cycles you may hear some
water running into the drip pan. The refrigerant may sometimes cause a rattling or gurgling sound
as it flows through the system and the you might hear clicking sounds as the unit starts and stops.

TEMPERATURE: Your XO Wine Cooler is designed to maintain two different temperature zones.
The upper zone is colder, designed to hold white wines at a “ready to serve” temperature. The
lower section has a slightly higher temperature range designed for your red wines.
Heat and variations in temperature can damage wines. Storage below 45 can create dry
conditions that cause corks to shrink and leak. As a general rule, if you are unsure of what
temperature to store a bottle at, 55 is generally considerd to be ideal for most vintages.
LIGHT: Sunlight, specifically ultraviolet light, can be very damaging to wine. For this reason
your XO Wine Cooler is equipped with double glazed glass that has a UV Blocker. But it is
still a good idea to install your unit in an area out of direct sunlight to limit both UV and heat
exposure.
VIBRATION: Vibration is another element that can harm wine. Your XO Wine Cooler has design
features to aid in limiting the transmission of vibration to the bottles, however it is advisable to
install your wine cooler in an area away from loud speakers, power equipment, heavy floor traffic
and similar noise generators
HUMIDITY: High or low humidity conditions can do harm to wine. A range of 50 - 80% humidity
usually not an issue. 70% humidity is generally consider ideal.
For all of these reasons, it is a good idea to limit opening and closing any wine cooler frequently.
It is a good idea to keep it well stocked. Storin only a few bottles can cause excess humidity and
condensation to develop. When loading the wine cooler, add bottles gradually rather than in large
quantities which can cause broader temperature variations for what you have stored already.
...and enjoy!
15
a few tips
dual zone wine cooler
o
o

temperature
Your Wine Cooler remembers your last temperature settings in the event of a power
failure and automatically adjusts to the previous setting(s) when power is restored.
When the +/- button is pressed, your wine cellar automatically enters set up mode.
The LED Display will begin flashing and display the temperature setting.
Each time you press the + button, the temperature setting will increase 1 Degree.
Each time you press the
- button, the temperature setting will decrease 1 Degree.
Once you have reached the desired temperature setting, the display will continue
to flash for 5 seconds, then revert to showing the compartment temperature.
To view the real time temperature, press and hold the +/- button for 5 seconds.
The interior temperature will flash in the LED Display for 5 seconds.
If you wish to change the display from Fahrenheit to Celsius (or vice versa) press and
hold both “+” and “-” simultaneously for 5 seconds.
led lights
L1: When you turn on your wine cellar, the internal light will switch on when the door is opened,
and off when the door is closed.
L2: Press , the internal light will remain on continuously and dim after 3 minutes.
L3: Press twice, the internal light will remain on for 10 minutes and then shut off.
16
Dual Zone Wine Coolers maintain two different temperature zones from one control panel.
Dual Zone Wine Cooler Temp. Settings
Adjustable Range: 41 F to 50 F (upper) 50 F to 64 F (lower)
oo
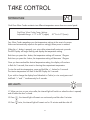
take control
oo

When you turn you XO Unit on, it is set to work in Standard Mode.
Press and ECO Mode is turned on, ECO Mode is an energy saver function.
Press again and ECO Mode is turned off, the unit returns to Standard Mode.
Sabbath Mode was designed for use on the Jewish Sabbath and Holidays.
The Sabbath Mode feature makes it possible to use your appliance during the
duration of the holiday. The Sabbath Mode overrides typical reactions caused
by interactions with the unit. While in Sabbath Mode your appliance will operate,
however it will not respond to your actions.
To initiate Sabbath Mode: Press and hold both + for 5 seconds.
The display will show either “Sb” or “Sb On” depending on the model you have to indicate
Sabbath Mode is engaged.
To turn Sabbath Mode off and return to Standard Mode, Press and hold both +
f
Press for 5 seconds, DEMO mode is turned on.
Press for 5 seconds again, DEMO mode is turned off and your XO returns to standard
mode.
or 5 seconds again.
+"UMU'+
h!!n:MU'+
nd<é"UHUdH<6:n<O6
'+MUMU'+
When you turn your XO wine cooler on, the interior lights will be
white. Press the icon and the lights will change to midnght blue.
Press the icon again and the lights will change to honey amber.
7

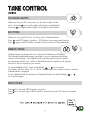
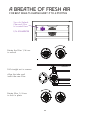
Your controls are simple and intuitive to operate.
ON /OFF Button
Press & Hold for 1 Second to turn ON
Press & Hold for 3 Seconds to turn OFF
Press to Silence Alarm
Light Function Button
Toggle Between 3 Light Functions
L1, L2, L3
TEMPERATURE DISPLAYS
UPPER | LOWER
Indicator Light
Cooling Mode ON
Press to raise temperature
Press to lower temperature
Changes interior light color
Toggles between different
operating modes
18
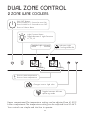
UPPER
LOWER
Upper compartment:The temperature setting can be adjusted from 41-50°F.
Lower compartment:The temperature setting can be adjusted from 50-64°F.
dual zone control
2 zone wine coolers

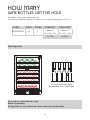
Wine bottles come in many shapes and sizes.
The following MAXIMUM capacities are based on two of the most popular types in 750 ml.
5 Racks of 7 5 Racks of 7
35 + 6(l) + 5 (u) 35 + 6 (l) + 5 (u)
24” 2
MODEL WIDTH ZONES BORDEAUX BURGUNDY
46 TOTAL
46 TOTAL
Shelf capacities
Store wine in sealed bottles only
Avoid overloading
Storing little or no product can cause excessive condensation
19
how many
wine bottles can this hold
XOU24WDZGO
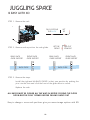
24” Wide Wine Cellar Racks
accommodate up to 7 Bottles Each

Easy to change + more rack positions give you more storage options with XO.
REAR RACK FRONT RACK
GLIDE SUPPORT GLIDE SUPPORT
REAR RACK FRONT RACK
GLIDE SUPPORT GLIDE SUPPORT
RACK GLIDE
LIFT
UP
FULLY EXTEND
THE RACK
STEP 1: Remove the rack
STEP 2: Remove and re-position the rack glides
STEP 3: Reverse the steps.
LIFT THE
FRONT
PULL OUT
STRAIGHT
Install the right and left RACK GLIDES in their new position by pushing the
pins into the slots and click the front of the glide down to secure.
Replace the rack.
ALL RACKS MUST BE PUSHED ALL THE WAY IN BEFORE CLOSING THE DOOR
DOOR MUST BE FULLY OPENED BEFORE PULLING RACKS OUT
20
juggling space
is easy with xo
RACK GLIDE
Page is loading ...
Page is loading ...
Page is loading ...
Page is loading ...
-
 1
1
-
 2
2
-
 3
3
-
 4
4
-
 5
5
-
 6
6
-
 7
7
-
 8
8
-
 9
9
-
 10
10
-
 11
11
-
 12
12
-
 13
13
-
 14
14
-
 15
15
-
 16
16
-
 17
17
-
 18
18
-
 19
19
-
 20
20
-
 21
21
-
 22
22
-
 23
23
-
 24
24


Ask a question and I''ll find the answer in the document
Finding information in a document is now easier with AI
Related papers
Other documents
-
Vinotemp VT-54TS-SM User guide
-
Vinotemp VT54TS Bottle Capacity Guide
-
-
-
Vinotemp VT-7BMSL-FE User guide
-
Element by Vinotemp EL-45BSH Wine Cooler Bottle Capacity
-
Summit CL18WCCSS User guide
-
Candy CWC 021 MK User manual
-
Summit Appliance ALFD24WBVSS Owner's manual
-
 Summit Classic Collection CL18WCCSS User manual
