Page is loading ...

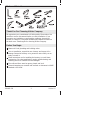
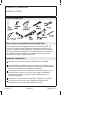
Tools and Materials
Thank You For Choosing Kohler Company
We appreciate your commitment to Kohler quality. Please take a few
minutes to review this manual before you start installation. If you
encounter any installation or performance problems, please don’t
hesitate to contact us. Our phone numbers and website are listed on
the back cover. Thanks again for choosing Kohler Company.
Before You Begin
Observe all local plumbing and building codes.
Prior to installation, unpack the new lavatory and inspect it for
damage. Return the lavatory to its protective carton until you are
ready to install it.
These instructions are for installing the lavatory to wood frame
construction. For other installations, supply suitable bracing and
fastening devices of sufficient size and strength.
The walls and floor must be square, plumb, and level.
Fixture dimensions are nominal and conform to tolerances in ASME
Standard A112.19.2M.
1020685-2-B 2 Kohler Co.

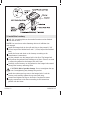
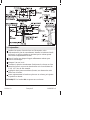
1. Preparation
Install the water supplies and drain piping according to the
roughing-in information. Install the supply stops so the handles will
not touch the pedestal when fully open.
Install sufficient backing behind the finished wall to provide a secure
material for the anchoring devices.
Mark the centerline on the floor.
Refer to the roughing-in information. Position the pedestal on the
centerline so the back edge is 5-3/8″ (13.7cm) from the finished wall.
Apply two self-adhesive gaskets (provided) to each of the three ribs
on the bottom of the basin.
Carefully lift the lavatory into place on the pedestal, and slowly
move the pedestal as required to ensure proper fit in the desired
location.
NOTE: The lavatory must be supported by the pedestal.
Locate the two lavatory anchoring holes, and mark the hole
locations on the finished wall.
4" (10.2cm)
1/2" D.
(1.3cm)
MOUNTING
HOLE IN
PEDESTAL
1/2" D. (1.3cm)
ANCHOR HOLES
13-7/8"
(35.2cm)
35"
(88.9 cm)
FINISHED
FLOOR
27" (68.6cm)
3/8"
HOT
3/8" COLD
4" (10.2cm)
1-1/4"
OUTLET
7-5/8"
(19.4cm)
10"
(25.4cm)
1-1/2" (3.8cm)
2-3/4"
(7cm)
2-3/4"
(7cm)
2-3/4"
(7cm)
4" (10.2cm)
11"
(27.9cm)
FINISHED WALL
L OF
BACKING
20" (50.8cm)
8-1/4"
(21cm)
5-3/8"
(13.7cm)
K-2322-8
K-2322-1
K-2322-4
10-3/8"
(26.4cm)
9-7/8"
(25.1cm)
Kohler Co. 3 1020685-2-B

Preparation (cont.)
Mark a line at the front of the pedestal.
Carefully remove the lavatory from the pedestal and set aside. Move
the pedestal from the area.
Measure a distance of 5″ (12.7cm) from the line at the front of the
pedestal toward the wall and mark the floor. This is the location of
the pedestal mounting hole.
1020685-2-B 4 Kohler Co.

2. Install the Lavatory
Drill 1/4” mounting holes at the marked locations on the finished
wall and the floor.
NOTE: You can also use other fastening devices of sufficient size
and strength.
Install the hanger bolts in the wall and floor so they extend 1-3/8″
(3.5cm) beyond the finished wall and 1″ (2.5cm) beyond the finished
floor.
Install the faucet and drain to the lavatory according to the
manufacturer’s instructions.
Lift the pedestal over the hanger bolt in the floor. The hanger bolt
will prevent the pedestal from shifting out of place. There is no need
to secure the pedestal to the hanger bolt with a nut.
Carefully set the lavatory on the pedestal so the hanger bolts extend
through the lavatory anchoring holes.
CAUTION: Risk of product damage. Do not overtighten the cap
nuts. Overtightening may damage the product.
Install the washers and cap nuts to the hanger bolts. Level the
lavatory, and carefully tighten the cap nuts until snug.
Connect and tighten the trap to the drain. Complete the water
supply connections to the faucet according to the instructions
packed with the faucet.
Kohler Co. 5 1020685-2-B
Page is loading ...
Page is loading ...
Page is loading ...
Page is loading ...
Page is loading ...
Page is loading ...
Page is loading ...
Page is loading ...
Page is loading ...
Page is loading ...
Page is loading ...
-
 1
1
-
 2
2
-
 3
3
-
 4
4
-
 5
5
-
 6
6
-
 7
7
-
 8
8
-
 9
9
-
 10
10
-
 11
11
-
 12
12
-
 13
13
-
 14
14
-
 15
15
-
 16
16


Kohler K-2322-8-0 Installation guide
- Type
- Installation guide
- This manual is also suitable for
Ask a question and I''ll find the answer in the document
Finding information in a document is now easier with AI
in other languages
- français: Kohler K-2322-8-0 Guide d'installation
- español: Kohler K-2322-8-0 Guía de instalación
Related papers
-
Kohler K-2326-8-G9 Installation guide
-
-
-
Kohler K-2338-4-96 Installation guide
-
-
Kohler 2176-1-96 Installation guide
-
Kohler 2296-1-0 Installation guide
-
-
-
Other documents
-
Sterling 442424 User manual
-
-
Danze DC028110BC Installation guide
-
Gerber Hinsdale 8" Centers Standard Pedestal Bathroom Sink User manual
-
Kallista P72000 Installation guide
-
Glacier Bay L-300-B Installation guide
-
-
-
American Standard 0611.100.020 User manual
-
Zurn FD2322-PO3 Installation guide