STEP 1 Excavation
Prior to excavation: Document all underground utilities that may affect the installation of any window wells
(e.g., gas, electric, sprinklers, etc.). Prior to bringing in machinery, verify equipment clearances.
Excavation: Excavate the area to allow adequate work space and clearance for the window well (2 feet
minimum). Remove large rock and debris from the excavated area. Excavate below the window opening
as required for proper sub-drainage (see following instructions regarding sub-drainage) and to provide
clearance for window well side panels and vertical supports (see STEP 6). Verify local frost depth
conditions to avoid heaving of the foundation.
Sub-Drainage: ScapeWEL is designed to drain directly into a free-draining rock bed established below the
well. If a perimeter drainage system exists, it is best to tie the well drainage into this system by running
a pipe extension up from the drain line to the base of the well. Once the window well has been installed,
fill the bottom of the well with clean 3/4” free-draining rock. If a perimeter drain system does not exist, the
area below the well should be excavated to the top of the footing and filled with clean 3/4” free-draining rock
to obtain maximum drainage volume.
STEP 2 Foundation and Measurements
Foundation Preparation: Clean foundation substrate of dirt, debris, or excess concrete that would inter-
fere with the Mounting Flange from having full contact with the foundation wall. Make sure that there is at
least 4” of foundation material between fasteners and the window opening (see Figure 2).
Selecting the method of Wall Attachment: Each side panel is equipped with a universal mounting flange
with pre-drilled keyholes for ease of installation. These versatile aluminum mounting flanges allow the win-
dow well to be attached directly to a foundation wall or metal window buck.
Wall Mount Flange Position: The mounting flanges are supplied from the factory in the position for direct
anchoring to the concrete foundation wall (keyholes in flange are located to the outside of the window well).
Buck Mount Flange Position: In the Buck-mount position, mounting flanges are designed to accommodate
manufactured metal window bucks with screw anchoring systems. To switch the flanges to the Buck-mount
position (keyholes in flange are located to the inside of the window well), remove the screws that hold the
keyhole angles to the panel channels, reverse the right and left angles (ensuring that “keyholes” are right-
side-up) and reattach them to the pre-punched holes in the channel with the keyhole legs to the inside.
(note: the Buck-mount flange position can also be used for wall mounting in retro-fit installations, eliminat-
ing the need to over-excavate).
Measuring Anchor Hole Location for Attachment to the Foundation:
Horizontal Hole Measurements: The ScapeWEL window well should be centered on the window opening in the foundation. Measure and mark the center point of
the window opening on the foundation. Using the table at right, find the dimension for the window well model and flange position that you are using. Center this
dimension on the window opening center point and mark the end points
on the foundation. Snap a plumbed vertical line at these points with a
chalk line.
Vertical Hole Location: Position top of well on the foundation at least four
(4) inches above where the finished grade will be. In order for the window
to open, the well must be positioned with the bottom of the cover notch in
the side panels above the top of the opening window sash. If mounting the
window well against an existing home in which the exterior siding is at or
near grade, it may be necessary to build out from the foundation the width
of the siding with treated lumber at least 5 1/2” wide (e.g., 1 x 6 or 2 x 6).
The notch at the top of the side panels must be clear to allow for an option-
al cover (see STEP 3). It is essential that the anchor penetration be adjust-
ed accordingly to ensure the required depth into the foundation.
Anchor Hole Location for Attachment to a Window Buck: For direct attachment to a window buck with back-out screws, convert the mounting flange to the
Buck-Mount position as described above in this section and use the corresponding holes listed below.
STEP 3 Side Panel Attachment
Wall or Buck Mount Configuration Mounted Directly to the Concrete: Keyholes marked “B” on the flanges will be used for both Wall-Mount flange position (key
holes to the outside of the window well) or Buck-Mount flange position (key holes to the inside of the window well). Use a minimum of six (6) fasteners per Mounting
Flange (12 per well) with (2) at the top and (2) at the bottom. (NOTE: Fasteners are not supplied with the window well. Fasteners must be designed for, and appro-
priate to, the wall material to which attachment will occur. The Mounting Flange holes are designed to accept a 1/4” (.250”) diameter fastener. The method of attach-
ment must be adequate to restrain earth loads imposed on the well.)
SCAPEWEL
®
Assembly and Installation Instructions
READ ALL INSTRUCTIONS BEFORE INSTALLATION
IMPORTANT: Check local building codes regarding window well egress standards & requirements.
MSC303 Rev. 9 062106
Model
Number
4048-42 49-5/8” 40-7/8”
4048-54 61-5/8” 52-7/8”
4048-66 73-5/8” 64-7/8”
4862-42 49-5/8” 40-7/8”
4862-54 61-5/8” 52-7/8”
4862-66 73-5/8” 64-7/8”
Horizontal anchor hole distance for foundation anchoring
Wall-Mount Flange Position Buck-Mount Flange Position
Note: all measurements are the “B” marked holes.
“M” holes in flanges are for Monarch brand window bucks
“B” holes in flanges are for Boman-Kemp brand window bucks
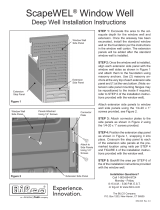
Side panels should be attached to foundation wall or window buck before
snapping on the step panels.
Wall Mount - Flange Out
Buck Mount - Flange In
Figure 1
Figure 2
2” min.
for buck mount
flange position
4” min. for wall mount
flange position
(note: flange
shown in this position)