
IS-9BD
Installation - Service Parts No. 9BD
Backfl ow Preventer Conversion Instructions
For Dole Universal "Temprite" Carbonator
Sizes:
3
⁄8" FCT x
3
⁄8" FCT,
1
⁄4" NPTM x
1
⁄4" NPTM,
3
⁄8" NPTM x
3
⁄8" NPTM,
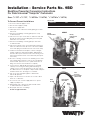
To Convert Present Installations:
1. Disconnect electrical supply to motor.
2. Shut off water supply to pump.
3. Shut off CO
2 supply valve.
4. Relieve pressure in carbonator tank by pulling up on relief
valve stem.
5. Remove hose and fi ttings connecting pump to tee on top
of carbonator tank.
6. Remove tee on top of check valve on carbonator tank and
discard the tee but save the tubing fi ttings from the plain
water take off for use later.
7. Remove hose and fi ttings connecting pump to check valve
on carbonator tank.
8. Remove the top half of the check valve leaving the bottom
half in the carbonator tank. (Be sure to remove the rubber
check and spring from the bottom half of the check valve.)
9. Install the Dole Universal “Temprite” or Amseco Niagara
“Selmix” Carbonator and Seal with Watts 9BD Backfl ow
Preventer directly into the bottom half of the existing check
valve. (Directional fl ow arrow on the valve body must point
to the tank).
10. Disconnect existing connector hose and fi ttings from outlet
side of pump and install new connector hose and fi ttings
where needed. (Attach the hoses or plain water take off
fi ttings from the tee removed above as required).
11. Connect the No. 9BD Backfl ow Preventer to the pump
outlet by reconnecting the existing tube and fi ttings as-
sembly. Connect a vent discharge line to the vent outlet of
No. 9BD and vent to a safe place of disposal with adequate
ventilation where CO
2 discharge is not a hazard.
12. Turn on CO
2 gas and adjust regulator to between 80
and 100 lbs. pressure.
13. Open soda water faucet for at least 30 seconds to blow
all air out of carbonator.
14. Close faucet, turn on water supply and turn on power
supply to pump motor.
15. When pump stops, open faucet again until full stream
of carbonated water is obtained.
16. Use proper wrenches on all fi ttings
do not use pipe wrenches.
AFTER
BEFORE
Existing
Dole Check Valve
Existing
Connector Hose
& Fittings
Water
Supply
New
Connector
Hose & Fittings
(When needed)
Watts
No. 9BD
Half of Existing
Check Valve
Water
Supply
Pump
Pump
Check Kits
ORDERING CODE KIT NO. SIZES
in. mm.
886012 RK 9BD T
1
⁄4 -
3
⁄8 6 - 10
Kit includes: Primary and secondary check assemblies and two gaskets.

IS-9BD 0829 EDP#1910233 © Watts, 2008
USA: 815 Chestnut St., No. Andover, MA 01845-6098; www.watts.com
Canada: 5435 North Service Rd., Burlington, ONT. L7L 5H7; www.wattscanada.ca
Water Safety & Flow Control Products
Limited Warranty: Watts Regulator Co. (the “Company”) warrants each product to be free from defects in material and workmanship under normal usage for a period of one year from the date of
original shipment. In the event of such defects within the warranty period, the Company will, at its option, replace or recondition the product without charge.
THE WARRANTY SET FORTH HEREIN IS GIVEN EXPRESSLY AND IS THE ONLY WARRANTY GIVEN BY THE COMPANY WITH RESPECT TO THE PRODUCT. THE COMPANY MAKES NO OTHER
WARRANTIES, EXPRESS OR IMPLIED. THE COMPANY HEREBY SPECIFICALLY DISCLAIMS ALL OTHER WARRANTIES, EXPRESS OR IMPLIED, INCLUDING BUT NOT LIMITED TO THE IMPLIED
WARRANTIES OF MERCHANTABILITY AND FITNESS FOR A PARTICULAR PURPOSE.
The remedy described in the first paragraph of this warranty shall constitute the sole and exclusive remedy for breach of warranty, and the Company shall not be responsible for any incidental, special
or consequential damages, including without limitation, lost profits or the cost of repairing or replacing other property which is damaged if this product does not work properly, other costs resulting
from labor charges, delays, vandalism, negligence, fouling caused by foreign material, damage from adverse water conditions, chemical, or any other circumstances over which the Company has no
control. This warranty shall be invalidated by any abuse, misuse, misapplication, improper installation or improper maintenance or alteration of the product.
Some States do not allow limitations on how long an implied warranty lasts, and some States do not allow the exclusion or limitation of incidental or consequential damages. Therefore the above
limitations may not apply to you. This Limited Warranty gives you specific legal rights, and you may have other rights that vary from State to State. You should consult applicable state laws to
determine your rights. SO FAR AS IS CONSISTENT WITH APPLICABLE STATE LAW, ANY IMPLIED WARRANTIES THAT MAY NOT BE DISCLAIMED, INCLUDING THE IMPLIED WARRANTIES OF
MERCHANTABILITY AND FITNESS FOR A PARTICULAR PURPOSE, ARE LIMITED IN DURATION TO ONE YEAR FROM THE DATE OF ORIGINAL SHIPMENT.
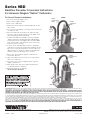
To Convert Present Installations:
1. Disconnect electrical supply to motor.
2. Shut off water supply to pump.
3. Shut off CO
2 supply valve.
4. Relieve pressure in carbonator tank by pulling up on relief
valve system.
5. Disconnect hose and fi ttings connecting at check valve only
on carbonator tank.
6. Remove and discard check valve from carbonator tank.
(Be sure to remove and discard the second rubber check
valve and spring inside the tank fi tting).
7. Install the Dole Universal “Temprite” or Amseco Niagara
“Selmix” Carbonator and Seal with Watts 9BD Backfl ow
Preventer directly into tank tapping. (Be sure white rubber
tanks seal is in place. Directional fl ow arrow on the valve
body must point to the tank).
8. Connect the No. 9BD Backfl ow Preventer to the pump
outlet by reconnecting the existing tube and fi ttings assem-
bly. Connect a vent discharge line to the vent outlet of No.
9BD and vent to a safe place of disposal, with adequate
ventilation where CO
2 discharge is not a hazard.
9. Turn on CO
2 gas and adjust regulator to between 80
and 100 lbs. pressure.
10. Open soda water faucet for at least 30 seconds to blow
all air out of carbonator.
11. Close faucet, turn on water supply and turn on power
supply to pump motor.
12. When pump stops, open faucet again until full stream
of carbonated water is obtained.
13. Use proper wrenches on all fi ttings,
do not use pipe wrenches.
BEFORE
AFTER
Existing
Connector Hose &
Fittings
Existing
Selmix Check
Valve
Water
Supply
Carbonator
Tank
Pump
Existing
Connector Hose &
Fittings
Watts
No. 9BD
Carbonator
Tank
Water
Supply
Pump
Series 9BD
Backfl ow Preventer Conversion Instructions
For Ameseco Niagara "Selmix" Carbonator
-
 1
1
-
 2
2


Watts 9BD Installation guide
- Type
- Installation guide
- This manual is also suitable for
Ask a question and I''ll find the answer in the document
Finding information in a document is now easier with AI
Related papers
-
Watts AS, AS-T Installation guide
-
-
-
Watts SCV 3/8 Installation guide
-
-
Watts G4000-M1 4 Installation guide
-
Watts SD-2-FN 3/8 Installation guide
-
-
Watts G4000-TC 4 Installation guide
-
Other documents
-
 T & S Brass & Bronze Works B-0156-05 Datasheet
-
 T & S Brass & Bronze Works B-0155-05 Datasheet
-
MULTIPLEX Post-Mix Soda Refrigeration & Super-Chil (Non-ERC) 000003912 Owner Instruction Manual
-
-
Weil-McLain AquaLogic User manual
-
-
Manitowoc Ice MULTIPLEX 11M User manual
-
Weil Mclain 383100045 User guide
-
-
Manitowoc MULTIPLEX 11M Specification

