Page is loading ...

English Français Español
Advice to obtain the best results 3
Package contents 4
Description of the product 4
Fitting the battery 4
Fitting the strap 5
Turning On the collar 5
Switching Off the collar 5
Changing modes 6
Adjusting the bark detection sensitivity 6
Checking/replacing battery 7
Changing the sensor 8
Fitting the collar 8
Checking the device operates correctly 8
Cautions for use 8
Maintenance 9
Troubleshooting 9
Technical characteristics 9
Warranty 10
Warranty conditions 10
Spare parts 10
Conseils pour obtenir les 11
meilleures performances
Composition du produit 12
Présentation du produit 12
Mise en place de la pile 12
Mise en place de la sangle 13
Mise en marche 13
Mise à l’arrêt 13
Changement de mode 13
Réglage de la sensibilité de 14
détection des aboiements
Usure et remplacement de la pile 15
Changement du capteur 16
Ajustement du collier 16
Contrôle du bon fonctionnement 16
de votre appareil
Précautions d’emploi 16
Entretien 17
En cas de dysfonctionnement 17
Caractéristiques techniques 17
Garantie 18
Conditions de garantie 18
Accessoires 18
Consejos para un mayor rendimiento 19
Composición del producto 20
Presentación del producto 20
Colocar la pila 20
Colocar la correa 21
Puesta en funcionamiento 21
Puesta fuera de servicio 21
Selección de modo 21
Ajuste de la sensibilidad de 22
detección de los ladridos
Desgaste y sustitución de la pila 23
Elección y sustitución del detector 24
Ajuste del collar 24
Comprobación del funcionamiento 24
correcto de su aparato
Precauciones de empleo 24
Mantenimiento 25
En caso de malfuncionamiento 25
Características técnicas 25
Garantía 26
Condiciones de garantía 26
Accesorios 26

User’s guide
Thank you for choosing this DOGTEK product.
www.DOGTEK.com
Advice to obtain the best results
The owner’s involvement during the rst use of the product
is a key factor in obtaining the best results.
Do not leave your dog unattended with the collar on until he is accustomed to wearing
it and you are satised that it is working correctly. You should ensure that the settings
(bark detection sensitivity / operating mode) are adjusted correctly for your dog.
Closely monitor your pet during the rst few days of use.
When your dog is barking, let the collar operate without interference. Any interference on your
part could be taken as a sign of acknowledgment; consequently the barking would become an
eective mean to attract your attention.
As soon as your dog stops barking, congratulate him (but not excessively) by petting him,
verbally praising him, or giving him a small treat to encourage his good behavior.
Remember that barking can indicate some behavioral issue. This bark control collar will allow
you to minimize excessive barking.
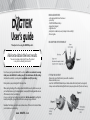
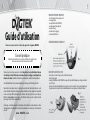
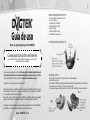
DESCRIPTION OF THE PRODUCT
PACKAGE CONTENTS
- collar equipped with a short bark sensor
- nylon strap
- 3 Volt CR 2450 lithium battery
- magnetic key (magnet)
- long bark sensor
- small plastic screwdriver (use only to adjust collar sensitivity)
- this user’s guide
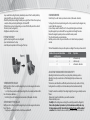
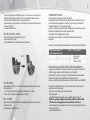
FITTING THE BATTERY
- Remove the screws from the battery cover with a screwdriver.
- Remove the battery cover.
- Insert the 3 Volt CR 2450 lithium battery as indicated under the battery holder (See diagram 2).
- A beep sound is emitted indicating that the battery was properly inserted. If you do not hear any
3 4

5 6
beep sound after inserting the battery, immediately remove it from the battery holder by
tapping briey the case in the palm of your hand.
- Check the polarity before inserting the battery once again. If you still do not hear any beep
sound, check the operation by switching the collar On and O.
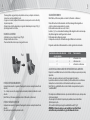
- Put the battery cover back in place taking care to insert rst the little pin at the bottom of
the battery cover (See diagram 3).
- Retighten moderately the 2 screws.
FITTING THE STRAP
- glide the strap alongside the case (See diagram 4)
- place the slide buckle on the strap
- attach the quick-snap buckle to the free edge of the strap
CHANGING MODES
In the factory, the collar’s mode is positioned on mode 3 (ultrasound + vibration).
To change the collar’s mode, when turning on the collar you need to keep the magnetic key
in contact with the orange mark.
A series of beep sounds is emitted (from 1 to 3 beeps) indicating the selected mode.
Keep the magnetic key in contact with the orange mark to run through the modes.
Remove the magnetic key when you have reached the mode you wish.
The collar will memorize your selected mode.
Next time you turn on the collar, your collar will be on to the last mode you previously
selected.
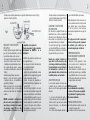
The chart below indicates how your collar operates according to the mode you have selected:
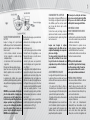
ADJUSTING THE BARK DETECTION SENSITIVITY
Adjusting the bark detection sensitivity is a very important preliminary operation.
Adjusting it correctly ensures detection of the barking but helps avoid unnecessary
detection.
The detection, must therefore be suciently sensitive but not overly sensitive. In factory,
barking detection sensitivity is set on the maximum position (maximum sensitivity).
To adapt the detection sensitivity to the barking strength of your dog, you should proceed as
follows:
- Remove the 2 screws from the battery cover with a screwdriver.
- Remove the battery cover.
- Carefully turn the setting screw according to the sensitivity you wish (See. Diagram 5)
Caution: the adjustment system has a stop for the minimum sensitivity and a stop
for the maximum sensitivity. Turn delicately and without forcing with the supplied
screwdriver. Turn clockwise to reduce sensitivity and counter-clockwise to increase it.
Number of beep sounds heard when Mode Operation
switching modes
1 1 ultrasound only
2 2 vibration only
3 3 ultrasound + vibration
TURNING ON THE COLLAR
Briey place (for less than 1 second) the magnetic key close to the orange mark located on
front of the collar.
1, 2 or 3 short beep sounds are emitted (according to the chosen mode) and indicate that
the collar has been switched on.
In the factory, the collar’s mode is positioned on mode 3 (ultrasound + vibration).
SWITCHING OFF THE COLLAR
Briey place (for less than 1 second) the magnetic key close to the orange mark located on
front of the collar.
1 long beep sound indicates that the collar has been switched o.

7 8
- Put the battery cover back in place taking care to insert rst the little pin at the bottom of
the battery cover (See diagram 3).
- Retighten moderately the 2 screws.
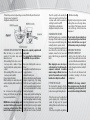
CHECKING/ REPLACING BATTERY
When the battery is too weak for the
operation of the product, beep sounds
indicate it in 2 cases:
- When switching On the collar: a series of
close beep sounds + number of beeps
meant to indicate the operating mode are
emitted
- When switching O the collar: a series of
close beep sounds is emitted
Prepare to replace the battery.
When the battery is too weak, the product
works in safety mode, which means that it is
out of use.
Due to increased use during your dog’s
training, your rst battery may not last as
long as replacement batteries.
DOGTEK advises to use the same type and
same brand of batteries as those supplied
in your new purchased product. Other
brands of batteries may not operate, or
may not be completely compatible with
your product.
You can purchase the suitable batteries
from DOGTEK or from your distributor.
Replace the old battery with a new one as
follows:
- Remove the 2 screws from the battery cover
using a screwdriver.
- Remove the battery cover.
- Knock out the battery by using the supplied
magnet (magnetic key) or by tapping
briey the case in the palm of your hand.-
Insert the new battery paying attention to
the polarity indicated under the battery
holder (See Diagram 2).
- A beep sound is emitted indicating that
the battery was properly inserted. If you
do not hear any beep sound after inserting
the battery, immediately remove it from
the battery holder by using the supplied
magnet (magnetic key) or by tapping
briey the case in the palm of your hand.
Check the polarity before inserting the
battery once again. If you still do not hear
any beep sound, check the operation by
switching the collar On and O.
- Put the battery cover back in place
- Retighten moderately the 2 screws.
CHANGING THE SENSOR
Two dierent length sensors are included in
the package. The size should be long enough
to have proper contact with the dog’s skin,
enabling the device to operate correctly.
If you have a long haired dog and the short
sensor tted to the collar in the factory is
inadequate, remove the short sensor and
replace it with the long one supplied with
the kit.
When changing the sensor, do not press
on the threaded rod, it could damage the
components underneath. A moderate
manual screwing is sucient (do not use
any tools). If you screw the sensor too tight,
bark detection is likely to be inecient.
FITTING THE COLLAR
The strap should be adjusted so that the
sensor comes into contact with the dog’s skin
in order to ensure good barking detection.
- If the strap is too loose, the collar will not
operate properly. Also, it might move
around the dog’s neck, this repeated
rubbing of the sensor on the skin can cause
irritation.
- If the strap is too tight, the dog will have
diculties in breathing.
Regularly check your dog’s neck as repeated
rubbing of the sensor on the dog’s skin may
cause irritation. If this happens, remove the
collar until all signs of skin irritation have
disappeared.
Do not leave the collar more than 8 hours
a day around your dog’s neck and take the
time to check that there are no signs of
irritation when your dog is not wearing it.
CHECKING THE DEVICE
OPERATES CORRECTLY
- Switch on the collar (turn the collar on
mode 3, thus you will be able to check the
operation of the ultrasound and vibration).
- Slowly rub the sensor on a slightly rough
surface (change the detection sensitivity if
necessary).
- The collar will emit ultrasound and/
or vibration (according to the chosen
conguration).
IMPORTANT: after being activated 5
times in quick succession, the collar will
automatically go into safety mode for 15
seconds, before restarting itself normally.

9 10
CAUTIONS FOR USE
●
The collar should be used on dogs 6
months and older.
● Before using the collar, it is important to
have your dog checked by your vet to
ensure it is t to wear a bark control collar.
● Do not use the collar with dogs that
are not in good physical shape (i.e.
cardiac problems, epilepsy …) or have
behavioral problems.
● The collar is weather proof but not
waterproof (do not submerge).
● The system detects only barking from
the dog wearing the collar. This device
is extremely reliable, although it can
be triggered unintentionally. To avoid
unintentional triggering, the dog should
not wear a metal dog tag, metallic collar,
or any other kind of collar together with
the bark control collar.
● Remove the battery from the collar if you
are not using it for 3 months or longer.
● Never leave a discharged battery in the
collar.
● Keep the collar out of reach of children.
MAINTENANCE
● Avoid cleaning the collar with volatile
liquids such as chemical solvents or
cleaning uids. Use a soft cloth and
neutral detergent.
● The nylon strap can be washed with
soapy water.
TROUBLESHOOTING
Before thinking your collar is broken, read
this user’s guide over and make sure that
the problem is not caused by a weak
battery or incorrect settings (barking
detection sensitivity, operating mode).
If the problem persists, contact DOGTEK
Customer Care.
Power 3 Volt CR 2450 lithium battery
Battery life 90 days on a basis of 12 hours use and 24 triggers on
mode 3 (ultrasounds + vibrations) per day
Water tightness weather proof
Low battery indicator Beep sounds indicator
Operation modes 3
Setting of bark detection sensitivity By potentiometer
Dimensions 2.5 x 1.2 x 1 inches 64 x 30 x 25 mm
Weight (battery included) 1.8oz 52 g
Adjustable collar for necks from 6 to 22 inches from 17 to 55 cm
Use temperature between -4°F and 122°F Between –20°C and 50°C
TECHNICAL CHARACTERISTICS
WARRANTY
DOGTEK guarantees the product against manufacturing defects for 1 year (conditions applies).
WARRANTY CONDITIONS
DOGTEK covers labor and parts for the rst year of ownership; after the rst year, a service or
upgrade charge will apply relative to replacement of the product, with new or refurbished
items at DOGTEK’s sole discretion.
This warranty excludes: accidental damage due to dog chews, misuse, loss, or improper
handling is not covered.
DOGTEK will not pay for loss of time, inconvenience, loss of use of your product, or any
incidental or consequential damages.
Return transport costs for the product will be the purchaser’s sole responsibility.
Warranty is void if product resold.
SPARE PARTS
You can purchase spare parts (battery, strap, contact points) from DOGTEK or your retailer.
22065 US 19 N
Clearwater, FL 33765
18002842060
Page is loading ...
Page is loading ...
Page is loading ...
Page is loading ...
Page is loading ...
Page is loading ...
Page is loading ...
Page is loading ...

www.DOGTEK.com
Made in France
by Num’Axes
-
 1
1
-
 2
2
-
 3
3
-
 4
4
-
 5
5
-
 6
6
-
 7
7
-
 8
8
-
 9
9
-
 10
10
-
 11
11
-
 12
12
-
 13
13
-
 14
14
-
 15
15


Ask a question and I''ll find the answer in the document
Finding information in a document is now easier with AI
in other languages
- français: Dogtek NoBark Sonic Manuel utilisateur
- español: Dogtek NoBark Sonic Manual de usuario
Other documents
-
Petsafe UltraLight PUSB-300 Owner's manual
-
SportDOG SBC-18E Owner's manual
-
Garmin Delta Sport™ User manual
-
-
-
-
-
Innotek BC-50E User manual
-
Num'axes Canicom 200 First User manual
-