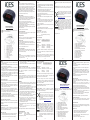
The Ices ICR-210 is a user-friendly clock radio with versatile alarm functions, sleep timer, and various preset memory options, designed to enhance your daily routine and provide a pleasant audio experience.
The Ices ICR-210 is a user-friendly clock radio with versatile alarm functions, sleep timer, and various preset memory options, designed to enhance your daily routine and provide a pleasant audio experience.

MODEL: ICR-210
INSTRUCTION MANUAL
www.ices-electronics.com
READ THIS INSTRUCTION MANUAL BEFORE OPERATING THE APPLIANCE.
AND SAVE IT FOR FUTURE REFERENCE.
1. 1st Alarm Indicator Buzzer
2. 1st Alarm Indicator Music
3. Volume Increase/Alarm 1 Set
4. Volume Decrease/Alarm 2 Set
5. Time Set
6. Tuning + Button/Hour Button
7. Tuning – Button/Minute Button
8. Preset Memory Selection
9. On Off/Alarm Off Button
10. Snooze Indicator
11. 2nd Alarm Indicator Radio
12. 2nd Alarm Indicator Buzzer
13. Sleep Button
14. Snooze Button
SPECIFICATIONS
Frequency Range: FM 87.5–108 MHz
Power Source: AC 230V ~ 50 Hz, 3W
DC 2 x AAA batteries (For back-up)
Power Output: 300 mW
Service and support
For information: http://www.ices-electronics.com/
For support: http://icessupport.zendesk.com
ICES helpdesk:
Germany 0900-1520530 (Local charges)
The Netherlands 0900-23553626 (Local charges + 1ct P/min)
Belgium 02-6200115 (Local charges)
France 0170480005 (Local charges)
The helpdesk is accessible from Monday to Friday from 9 AM till 6
PM.
In case your device needs repair, our helpdesk will redirect you to
your local dealer.
ICES offers service and warranty in accordance to European law,
which means that in case of repair (both during and after the
warranty period), you should contact your local dealer.
NOTES
1. The apparatus shall not be exposed to dripping or splashing and
that no objects filled with liquids, such as vases, shall be placed
on apparatus.
2. To be completely disconnect the power input, the mains plug of
apparatus shall be disconnected from the mains. As the
disconnect devices is the mains plug of apparatus.
3. The mains plug of apparatus should not be obstructed OR should
be easily accessed during intended use.
4. Battery shall not be exposed to excessive heat such as sunshine,
fire or the like.
5. Minimum distances 10cm around the apparatus for sufficient
ventilations.
6. The ventilation should not be impeded by covering the ventilation
openings with items such as newspaper, table-cloths, curtains etc.
7. No naked flame sources such as lighted candles should be
placed on the apparatus.
8. Attention should be drawn to the environmental aspects of battery
disposal.
9. The use of apparatus in moderate climates.
10.The rating label has marked on the bottom panel of the apparatus.
Radio
1. Press the “ON/OFF” button to turn the clock radio on or off.
2. Adjust the “TUNING+” or “TUNING-“ to select the desired station.
3. Press the “VOLUME+” or “VOLUME-“ button to adjust the volume.
4. Press and hold the “PRE/M+” button until the preset memory
display, for example “P01”, is blinking. Then you can select the
desired preset memory by “VOLUME+” or “VOLUME-” button and
press “PRE/M+” button again to store the desired station.
5. Now you can recall the preset station by pressing the “PRE/M+”
button to select the preset memory.
Setting the Alarm
1. You must switch off the radio before you set the alarm time.
2. Press and hold the “AL1” button until the Hour display begins to blink.
3. You can set the alarm time: Press the “Hour” to adjust the hour
and press “Minute” button to adjust the Minute.
4. Press the “AL1” button now to store the alarm time.
5. Now you can enable the alarm and select to wake up by radio or
buzzer by pressing “AL1” in toggle.
The LED with music note logo and bell logo stands for waking up
by radio or by buzzer respectively.
Both LEDs with music note logo and bell logo are off representing
to disable the alarm.
6. Use the same method to set Alarm 2.
Canceling the Daily Alarm
Press the “ON/OFF” button to stop the alarm. The alarm will operate
24 hours later as per alarm time set.
Disabling the Alarm
Press the “AL1” or “AL2” button in toggle until both LEDs with music
note logo and bell logo are off, the alarm is disabled now.
Setting the Clock
1. You must switch off the radio before you set the clock time.
2. Press and hold the “TIME” button until the display begins to blink,
then release the button.
3. Press the “HOUR” and “MIN” button to adjust the hour and minute.
4. Press the “TIME” button to save time.
Setting the Sleep Time
1. Press the “SLEEP” button repeatedly to set the sleep time ( 90,
80, 70, 60, 50, 40, 30, 20, 10 min or OFF ). When the timer is up,
radio will be off automatically.
Snooze
To use the snooze, press the “SNOOZE” bar when the alarm is
sounding. The alarm will stop temporarily, but will resume
sounding after 9 minutes.
Products with the CE marking comply with the EMC
Directive (2004/108/EC) and the Low Voltage
Directive (2006/95/EC) issued by the Commission of
the European Community.
The declaration of conformity may be consulted at
This symbol indicates that the relevant electrical
product or battery should not be disposed of as
general household waste in Europe. To ensure the
correct waste treatment of the product and battery,
please dispose them in accordance to any applicable
local laws of requirement for disposal of electrical
equipment or batteries. In so doing, you will help to
conserve natural resources and improve standards of
environmental protection in treatment and disposal of
electrical waste (Waste Electrical and Electronic
Equipment Directive).
www.ices-electronics.com
Please note: It is not possible to send products directly to ICES for
repair.
Important note: If this unit will be opened, or accessed in any way
by a non-official service center, the warranty expires immediately.
®All rights reserved
MODELL: ICR-210
BEDIENUNGSANLEITUNG
www.ices-electronics.com
1. Anzeige 1. Alarm: Weckton
2. Anzeige 1. Alarm: Musik
3. Lautstärkeerhöhung/Einstellen Alarm 1
4. Lautstärkeverminderung/Einstellen Alarm 2
5. Uhrzeit einstellen
6. Frequenzabstimmung + /Stunden-Taste
7. Frequenzabstimmung - /Minuten-Taste
8. Auswahl Speicherplatz
9. Ein/Aus/Alarm Aus-Taste
10 . Anzeige: Abschaltautomatik
11. Anzeige 2. Alarm: Radio
12. Anzeige 2. Alarm: Weckton
13. Abschaltautomatik-Taste
14. Schlummertaste
Drücken Sie die „ON/OFF”-Taste, um den Radiowecker ein-
oder auszuschalten.
Wählen Sie die gewünschte Sendestation durch Einstellung
mittel „TUNING+” bzw. „TUNING-” aus.
Stellen Sie die Lautstärke durch Drücken der „VOLUME+” bzw.
„VOLUME-”-Tasten ein.
Halten Sie die „PRE/M+”-Taste gedrückt, bis der Speicherplatz
angezeigt wird, z.B. „P01” blinkt. Wählen Sie den gewünschten
Speicherplatz mittels der „VOLUME+” bzw. „VOLUME-”-Taste
aus und drücken Sie die „PRE/M+”-Taste erneut, um die
gewünschte Sendestation zu speichern.
Rufen Sie diesen Speicherplatz durch Drücken der „PRE/M+”-
Taste ab, um ihn auszuwählen.
Schalten Sie das Radio aus, bevor Sie die Alarmzeit einstellen.
Halten Sie die „AL1”-Taste gedrückt, bis die Stundenanzeige
anfängt zu blinken.
Stellen Sie die Alarmzeit wie nachfolgend beschrieben ein:
Drücken Sie die „Hour”-Taste, um die Stunde und die „Minute”-
Taste, um die Minuten einzustellen.
Drücken Sie die „AL1”-Taste, um die Alarmzeit zu speichern.
Aktivieren Sie nun den Alarm und schalten Sie mittels der
„AL1”-Taste zwischen Weckton und Radioalarm um.
Die LED-Anzeige mit der Musiknote und der Glocke stehen
jeweils für Radioalarm oder Weckton.
Leuchtet sowohl die LED-Anzeige mit der Musiknote als auch
die mit der Glocke nicht, ist der Alarm deaktiviert.
Stellen Sie in gleicher Art und Weise den Alarm 2 ein.
Radio
1.
2.
3.
4.
5.
Einstellung des Alarms
1.
2.
3.
4.
5.
6.
Ausschalten des täglichen Alarms
Drücken Sie die „ON/OFF”-Taste, um den Alarm auszuschalten.
Der Alarm wird 24 h später wie in der Alarmzeit eingestellt erneut
ausgelöst.
Deaktivierung des Alarms
Drücken Sie die „AL1” oder „AL2”-Taste solange, bis sowohl die
LED mit der Musiknote als auch die mit der Glocke erloschen
sind, womit der Alarm deaktiviert wurde.
Einstellen der Uhr
1. Schalten Sie das Radio aus, bevor Sie die Uhrzeit einstellen.
2. Halten Sie die „TIME”-Taste gedrückt, bis die Anzeige
anfängt zu blinken und lassen Sie danach die Taste los.
3. Drücken Sie die „HOUR” und „MIN”-Taste, um die Stunden
und Minuten einzustellen.
4. Drücken Sie die „TIME”-Taste, um die Uhrzeit zu speichern.
Einstellen der Abschaltautomatik
Drücken Sie die „SLEEP”-Taste mehrmals, um die Abschaltzeit
(90, 80, 70, 60, 50, 40, 30, 20, 10 min oder aus) auszuwählen.
Wenn diese Zeit abgelaufen ist, schaltet sich das Radio
automatisch aus.
Schlummerfunktion
Um die Schlummerfunktion zu benutzen, drücken Sie die
„SNOOZE”-Taste, wenn der Alarm ausgelöst worden ist. Der
Alarm wird vorübergehend ausgeschaltet, jedoch nach 9 Minuten
erneut ausgelöst.
Das Gerät darf weder Spritz- noch Tropfwasser ausgesetzt
werden und keinerlei mit Flüssigkeit gefüllten Gefäße, wie z.B.
Vasen, dürfen auf dem Gerät platziert werden.
Um das Gerät komplett vom Stromnetz zu trennen, ist der
Netzstecker aus der Netzsteckdose zu ziehen. Die zu
trennende Einheit ist der Netzstecker des Gerätes.
Der Netzstecker des Gerätes darf nicht verbaut werden bzw.
muss während der Nutzungszeit problemlos erreichbar sein.
D i e B a t t e r i e d a r f k e i n e r e x t r e m e n H i t z e w i e z . B .
Sonnenschein, Feuer o.ä. ausgesetzt werden.
Halten Sie einen Mindestabstand von 10 cm zur Umgebung
ein, um eine ausreichende Belüftung sicherzustellen.
D i e Ve n t i l a t i o n d a r f n i c h t d u r c h A b d e c k e n d e r
Ventilationsöffnungen durch Gegenstände wie Zeitungen,
Tischdecken, Gardinen o.ä. behindert werden.
Es dürfen keine offenen Flammen wie z.B. brennende Kerzen
auf dem Gerät platziert werden.
Bei der Batterieentsorgung sind die Entsorgungsvorschriften
einzuhalten.
B e n u t z e n S i e d a s G e r ä t n u r b e i n o r m a l e n
Umgebungstemperaturen.
Das Typenschild finden Sie auf der Unterseite des Gerätes.
HINWEIS
1.
2.
3.
4.
5.
6.
7.
8.
9.
10.
TECHNISCHE DATEN
Frequenzbereich: FM 87,5 - 108 MHZ
Stromquelle: AC: 230 V~/50 Hz/3 W
DC: 2 x Microzelle (AAA/LR03) (zum Puffern)
Ausgangsleistung: 300 mW
Service und Unterstützung
Weitere Informationen: http://www.ices-electronics.com/
Für Unterstützung: http://icessupport.zendesk.com
ICES-Hotline:
Deutschland 0900/1520530 (Ortstarif)
Die Niederlande 0900/23553626 (Ortstarif + 1 ct/min)
Belgien 02/6200115 (Ortstarif)
Frankreich 01/70480005 (Ortstarif)
Unsere Hotline erreichen Sie montags bis freitags von 9 bis 18 Uhr.
unsere Hotline zu
unserem H?ndler vor Ort weiterverbinden.
ICES bietet Leistungen und Garantien im Einklang mit
Euro . Im Falle von Reparaturen (sowohl w hrend als
auch nach Ablauf der Garantiezeit) sollten Sie deshalb Ihren
H ndler vor Ort kontaktieren.
Bitte beachten Sie: Es besteht keine M glichkeit, Produkte zur
Reparatur direkt an ICES zu senden.
Wichtiger Hinweis: Im Falle des ffnens oder jeglichen
anderweitigen Eingriff durch ein unautorisiertes Servicecenter
erlischt jeglicher Garantieanspruch
Im Falle einer nötigen Reparatur wird Sie
opäischem ä
ä
ö
Ö
Produkte mit der CE-Kennzeichnung entsprechen der
E M C - R i c h t l i n i e ( 2 0 0 4 / 1 0 8 / E C ) u n d d e r
N i e d e r s p a n n u n g s r i c h t l i n i e ( 2 0 0 6 / 9 5 / E C ) ,
herausgegeben von der Kommission der Europäischen
Gemeinschaft.
Die Konformitätserklärung kann unter folgendem Link
abgerufen werden
Dieses Symbol zeigt an, dass das entsprechende
Produkt oder dessen Batterien in Europa nicht mit dem
normalen Hausmüll entsorgt werden darf. Um die
ordnungsgemäße Abfallbehandlung des Produkts und
dessen Batterien zu gewährleisten, müssen diese im
Einklang mit allen anwendbaren örtlichen Vorschriften
zur Entsorgung von Elektrogeräten und Batterien
e n t s o r g t w e r d e n . D a b e i h e l f e n Si e n a t ü r l i c h e
Ressourcen zu schonen und Umweltschutzstandards zur
Verwertung und Entsorgung von Altgeräten aufrecht zu
halten (Waste Electrical and Electronic Equipment
Directive).
www.ices-electronics.com
®Alle Rechte vorbehalten
MODELO: ICR-210
MANUAL DE INSTRUCCIONES
www.ices-electronics.com
1. Timbre indicador de la 1ª alarma
2. Música indicadora de la 1ª alarma
3. Subir el volumen/Establecer 1ª alarma
4. Bajar el volumen/Establecer 2ª alarma
5. Ajuste de la hora
6. Botón de sintonización +/Botón de hora
7. Botón de sintonización -/Botón de minutos
8. Selección de presintonía
9. Botón de activación/desactivación de alarma
10. Indicador de Snooze (posponer alarma)
11. Radio indicadora de la 2ª alarma
12. Timbre indicador de la 2ª alarma
13. Botón de apagado automático
14. Botón Snooze (posponer alarma)
LESEN SIE DIESE BEDIENUNGSANLEITUNG VOR DER
BENUTZUNG DES GERÄTES DURCH UND BEWAHREN SIE
SIE FÜR ZUKÜNFTIGE REFERENZEN AUF.
LEA ESTE MANUAL DE INSTRUCCIONES ANTES DE
UTILIZAR EL APARATO Y CONSÉRVELO PARA FUTURAS
CONSULTAS.
Radio
1.
Pulse el botón “ON/OFF” para encender y apagar el radio-reloj
despertador.
Pulse los botones “TUNING+” o “TUNING-” para seleccionar la
emisora deseada.
Pulse los botones “VOLUME +” o “VOLUME -” para ajustar el
volumen.
Pulse y mantenga el botón “PRE/M+” hasta que aparezca la
presintonía, por ejemplo “P01”, parpadeando. Seleccione la
presintonía deseada con los botones “VOLUME +” o “VOLUME
-”; pulse de nuevo el botón “PRE/M+” para guardar la emisora
deseada.
Sintonice la emisora presintonizada pulsando el botón
“PRE/M+” para seleccionarla.
2.
3.
4.
5.
Establecer la alarma
2.
3.
4.
6.
1.
Apague la radio antes de establecer la hora de la alarma.
Pulse y mantenga el botón “AL1” hasta que la hora comience a
parpadear.
Establezca la hora de la alarma como se describe a
continuación: Pulse el botón “Hour” para ajustar las horas y
pulse el botón “Minute” para ajustar los minutos.
Pulse el botón “AL1” para guardar la hora de la alarma.
A continuación active la alarma y escoja si se quiere despertar
con la radio o con el timbre, pulsando “AL1” para alternar entre
ambas opciones.
Los LED con la nota musical y con la campana indican si va a
sonar la radio o el timbre respectivamente.
Si ambos LED, la nota musical y la campana, están apagados,
significa que la alarma está desactivada.
Para establecer la alarma 2, siga el mismo procedimiento.
5.
Cancelar la alarma diaria
Pulse el botón “ON/OFF” para detener la alarma. La alarma
volverá a sonar 24 horas después, a la misma hora establecida.
Desactivar la alarma
Pulse el botón “AL1” o “AL2” para cambiar hasta que los dos LED,
el de la nota musical y el de la campana, estén apagados; así la
alarma quedará desactivada.
Ajustar el reloj
1. Debe apagar la radio antes de establecer la hora del reloj.
2. Pulse y mantenga el botón “TIME” hasta que la hora
comience a parpadear, después suelte el botón
3. Pulse los botones “HOUR” y “MIN” para ajustar las horas y los
minutos respectivamente.
4. Pulse el botón “TIME” para guardar la hora.
GB-1
GB-2
GB- 3
GB-5
DE-1
DE-2
DE-3
DE-4
ES-1
ES-2
Page is loading ...
-
 1
1
-
 2
2


The Ices ICR-210 is a user-friendly clock radio with versatile alarm functions, sleep timer, and various preset memory options, designed to enhance your daily routine and provide a pleasant audio experience.
Ask a question and I''ll find the answer in the document
Finding information in a document is now easier with AI
in other languages
- français: Ices ICR-210 Le manuel du propriétaire
- español: Ices ICR-210 El manual del propietario
- Deutsch: Ices ICR-210 Bedienungsanleitung
- Nederlands: Ices ICR-210 de handleiding