Page is loading ...

Two-Way Radio | Radio Bidireccional
NS-F1112
NS-F1112.fm Page -1 Tuesday, September 19, 2006 11:33 AM

NS-F1112.fm Page 0 Tuesday, September 19, 2006 11:33 AM

www.insignia-products.com
1
Insignia NS-F1112 Two-Way Radio
Contents
Introduction. . . . . . . . . . . . . . . . . . . . . . . . . . . . . . . . . . . . . . . .1
Features . . . . . . . . . . . . . . . . . . . . . . . . . . . . . . . . . . . . . . . . . .2
Setting up your radio. . . . . . . . . . . . . . . . . . . . . . . . . . . . . . . . .5
Using your radio . . . . . . . . . . . . . . . . . . . . . . . . . . . . . . . . . . . .7
Maintaining your radio. . . . . . . . . . . . . . . . . . . . . . . . . . . . . . .14
Troubleshooting. . . . . . . . . . . . . . . . . . . . . . . . . . . . . . . . . . . .15
Specifications . . . . . . . . . . . . . . . . . . . . . . . . . . . . . . . . . . . . .15
Español. . . . . . . . . . . . . . . . . . . . . . . . . . . . . . . . . 22
Introduction
Congratulations on your purchase of a high-quality Insignia product.
Your NS-F1112 represents the state of the art in two-way radio design
and is designed for reliable and trouble-free performance.
This guide explains how to correctly operate and get the best
performance from your radio. Read this user guide carefully before
using your radio, then keep it with your radio for quick reference.
Verify that the packaging contains:
• 2 two-way radios
• 2 belt clips
• Dual desk charger
• AC adapter
• User guide
If any item is missing or damaged, contact Insignia at
(877) 467-4289. Keep the box and packing materials so that you can
store or transport your radio.
NS-F1112.fm Page 1 Tuesday, September 19, 2006 11:33 AM

2
Insignia NS-F1112 Two-Way Radio
www.insignia-products.com
Features
• 22 channels
• Channel scan
• Auto squelch
• Auto battery save
• Keypad lock
• Roger beep
• Microphone/Headphone jacks
• Five call alerts
• 121 Privacy codes
• 3 levels of VOX
• NOAA weather radio
• Weather alert
•Backlit display
• Silent operation
•Monitor
NS-F1112.fm Page 2 Tuesday, September 19, 2006 11:33 AM

3
Insignia NS-F1112 Two-Way Radio
www.insignia-products.com
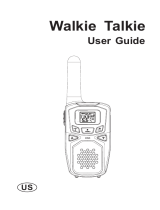
Controls and buttons
Component Description
1 PTT button • Press and hold to transmit.
2 Call/Lock button • Press to send a call alert signal.
• Press and hold to lock the key pad.
3 Up and Down button • Adjust the volume up and down.
• Make adjustment in the menu.
4 Speaker Provides sound when external speakers
are not plugged in.
5 Microphone Talk into the microphone while pressing
the PTT button.
6 Monitor/Scan button • Press to scan.
• Press and hold to monitor channel
activity.
NS-F1112.fm Page 3 Tuesday, September 19, 2006 11:33 AM

4
Insignia NS-F1112 Two-Way Radio
www.insignia-products.com
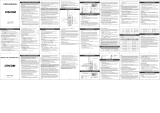
Display
7 Power/Menu button • Press to access the menu.
• Press and hold to turn on or turn
off the radio.
8 External speaker/
microphone jacks
Plug in an external speaker and
microphone or headset.
9 Antenna Sends and receives the radio signals.
Indicator Indicates
1 Key pad lock Key lock is turned on.
2 Battery level The battery level.
3 Receive The radio is receiving a
transmission.
4 Transmit The radio is sending a
transmission.
5 Transmit power level The transmit power setting.
6 Privacy code (CTCSS/DCS) The privacy code setting.
7 Privacy code (oF
~38/oF~83 The user privacy code
setting.
8 Channel The channel (1-22 on
GMRS/FRS band or 1-10 on
WX band).
Component Description
1
2
3
4
6
5
7
8
9
10
NS-F1112.fm Page 4 Tuesday, September 19, 2006 11:33 AM

5
Insignia NS-F1112 Two-Way Radio
www.insignia-products.com
Setting up your radio
Installing the belt clip
To install the belt clip:
• Slide the clip up into the slot on the back of the radio until the
belt clip latch clicks.
To remove the belt clip:
• Gently slide the belt clip down toward the bottom of the radio.
9 NOAA weather (WX) band The radio is switched to
weather radio mode.
10 VOX VOX is active.
Indicator Indicates
Belt clip
lock tab
Belt clip latch
NS-F1112.fm Page 5 Tuesday, September 19, 2006 11:33 AM

6
Insignia NS-F1112 Two-Way Radio
www.insignia-products.com
Installing Batteries
Your radio operates with either four AAA alkaline batteries or an NiMH
rechargeable battery pack.
To install the batteries:
1 Remove the belt clip by sliding it off of the radio.
2 Remove the battery cover by pressing down on the top center and
sliding it down from the radio.
3 Insert four AAA batteries or the battery pack. Make sure that the +
and – symbols on the batteries or battery pack align with the + and
– symbols in the battery compartment.
4 Replace the battery cover.
5 Replace the belt clip.
Caution
Installing the batteries incorrectly will prevent the radio
from operating and can damage the radio.
Battery
compartment
cover
Press here
and push
down to open
Battery
compartment
NS-F1112.fm Page 6 Tuesday, September 19, 2006 11:33 AM

7
Insignia NS-F1112 Two-Way Radio
www.insignia-products.com
Charging the battery pack
Your radio can use a rechargeable NiMH battery pack which can be
recharged by inserting the AC adapter into the radio charge jack or by
using the optional AC desktop charger. Initial charge time is 24 hours.
Charge time is about 12 hours thereafter. Charge the battery pack
when the low battery icon flashes on the display. Remove the radio
from the charger when the battery pack is charged.
To charge the battery pack using the optional desktop charger:
1 Connect the AC adapter into an AC wall outlet.
2 Insert the adapter jack into the desktop charger jack.
3 Place the radio into the desktop charger slot. The desktop charger
lights up to indicate the battery pack is charging.
Using the battery level indicator
Your radio has a battery level indicator that shows the battery level.
The greater the number of bars visible, the stronger the battery level.
When the battery level is low, the indicator does not have any bars
and flashes to indicate your batteries should be replaced or
recharged.
Using your radio
Turning the radio on and off
To turn the radio on or off:
• Press the Power/Menu button for more than three seconds.
While the radio is turning on, you will hear 2 beeps with
different tones. The LCD briefly displays all icons and shows
the last channel selected.
Caution
Use only the batteries or the NiMH battery pack as
indicated in this manual.
Do not attempt to charge alkaline batteries or any
batteries or battery packs other than the ones
indicated in this manual. This may cause leakage and
damage the radio.
For long term storage of the radio, turn off the radio
and remove the batteries.
NS-F1112.fm Page 7 Tuesday, September 19, 2006 11:33 AM

8
Insignia NS-F1112 Two-Way Radio
www.insignia-products.com
Adjusting the volume
To adjust the volume:
• Press the Up button to increase the volume.
• Press the Down button to decrease the volume.
Communicating
To communicate, all radios in your group must be set to the same
channel and privacy code.
To transmit messages:
• Press and hold the PTT button and speak in a normal voice
into the microphone. For maximum clarity, hold the radio two to
three inches from your mouth. The TX icon appears
continuously on the display when transmitting.
To receive messages:
• Release the PTT button. The RX icon appears on the display
when your radio is receiving a transmission.
Monitoring
Using the monitor function, you can hear noise so you can adjust the
volume level of the radio when it is not receiving a signal. You can
also use the monitor function to check for any activity on the current
channel before transmitting.
To turn the monitor function on and off:
• Hold down the Monitor/Scan button for three seconds.
Note
Your radio is designed to give you maximum range
under the following conditions:
•Over water
• In rural areas without obstructions
• In flat areas where you can see the other person
To get the maximum range from your radio:
• Use fresh or fully charged batteries
• Use a GMRS channel. FRS channels are restricted
by the FCC.
• Set the radio to use Hi power.
NS-F1112.fm Page 8 Tuesday, September 19, 2006 11:33 AM

9
Insignia NS-F1112 Two-Way Radio
www.insignia-products.com
Using a call alert
Your radio can transmit a call alert for a fixed length of time.
To send a call alert:
• Press the Call/Lock button. The TX icon appears while
transmitting a call alert. The alert can be heard on the speaker.
To choose a call alert:
1 Press the Power/Menu button until a CA icon appears
accompanied by the current call alert setting.
2 Use the Up or Down button to select one of the five alerts.
3 Press the PTT button to save your selection.
Scanning
Your radio can scan all of the 22 channels to check for any activity.
When you are scanning, the SCAN icon appears on the display.
To scan for activity:
• Press the Monitor/Scan button. Your radio scans each of the
22 channels and stops on any active channel for about four
seconds before resuming the scan.
To stop scanning:
• Press the Monitor/Scan button.
To stop scanning on a channel and transmit:
• Press the PTT button to transmit on an active channel.
To resume scanning:
• Press the Monitor/Scan button.
Locking the keypad
Lock the keypad to avoid accidentally changing the radio settings.
To lock the keypad:
• Press Call/Lock for four seconds. The Key Lock icon appears
on the display. When the keypad is locked, the PTT button and
the Call/Lock buttons are active.
To unlock the keypad:
• Press the Call/Lock button for four seconds.
NS-F1112.fm Page 9 Tuesday, September 19, 2006 11:33 AM

10
Insignia NS-F1112 Two-Way Radio
www.insignia-products.com
Changing channels
Your radio has 22 channels available.
To change channels:
1 With the radio on, press the Power/Menu button until the current
channel segment flashes.
2 Use the Up or Down button to change the channel.
3 Press the PTT button to save the new channel.
Setting privacy codes
Your radio has 121 privacy codes available. You can select a different
privacy code for each channel.
To select a privacy code for the current channel:
1 Press the Power/Menu button twice.
2 Press the Up or Down buttons to select one of the 38 CTCSS
privacy codes.
-OR-
Press the Power/Menu button again and the Up or Down button
to select one of the 83 DCS privacy codes. The Privacy Code icon
on the display indicates whether you set your privacy code in
CTCSS or DCS mode.
3 Press the PTT button to confirm the selection.
Selecting the transmit (TX) power level
Your radio has two power level settings.
To select the power level on channels 1~7 and 15~22:
1 Press the Power/Menu button until a Pr icon appears blinking on
the display.
2 Press the Up or Down buttons to select TRANSMIT POWER
LEVEL icon (H: Hi/L: Lo).
Note
If you select any CTCSS privacy code, any pre-selected
DCS privacy code is cancelled and vice-versa. Selecting a
privacy code of oF disables the privacy feature. To
communicate between two radios, all radios in your group
must be set to the same channel and privacy code
selections.
NS-F1112.fm Page 10 Tuesday, September 19, 2006 11:33 AM

11
Insignia NS-F1112 Two-Way Radio
www.insignia-products.com
3 Press the PTT button to confirm the selection.
Setting the VOX level
Your radio has 3 VOX level settings: (oF/1/2/3).
To set VOX:
1 Press the Power/Menu button until the display shows VOX
blinking and on the right of the CHANNEL NUMBER display, an
oF icon appears.
2 Select 1, 2, or 3 by pressing the Up or Down buttons, then
pressing the PTT key.
VOX is more sensitive on the 1 setting than on the 3 setting.
To turn VOX off:
1 Press the Power/Menu button until the display shows VOX
blinking and on the right of the CHANNEL NUMBER display, a 1,2
or 3 icon appears.
2 Select oF by pressing the Up or Down button, then pressing the
PTT key.
Adjusting the roger beep tone
Whenever you release the PTT button, a roger beep tone may be
transmitted to let your friends know you are finished talking.
To turn the roger beep tone on:
1 Press Power/Menu button until the rb icon appears on the display.
2 Press the Up or Down button to set the roger beep tone on.
3 Press PTT to save your selection.
To turn the roger beep tone off:
1 Press the Power/Menu button until the display shows the rb icon
blinking, while on the right of the rb, an on icon appears.
2 Select oF by pressing the Up or Down buttons, then pressing the
PTT button.
Notes
When the PTT button is pressed during the low battery level
condition, the TX Power automatically switches from Hi(H)
to Lo(L) level.
You cannot adjust the power setting on the FRS channels
(8~14). They are set to Low power per FCC regulations.
NS-F1112.fm Page 11 Tuesday, September 19, 2006 11:33 AM

12
Insignia NS-F1112 Two-Way Radio
www.insignia-products.com
Using silent operation mode
Your radio has a silent operation mode. In this mode, all beeps and
tones are disabled.
To turn the silent operation mode on:
1 Press the Power/Menu button until the display shows a bP icon
and on the right of the bP icon, an on icon appears.
2 Select oF by pressing the Up or Down buttons, then pressing the
PTT or Power/Menu button.
To turn the silent operation mode off:
1 Press the Power/Menu button until the display shows a bP icon
and on the right of the bP icon, an oF icon appears.
2 Select on by pressing the Up or Down buttons, then pressing the
PTT or Power/Menu button.
Using NOAA weather radio
Your radio has a NOAA weather radio function that lets you receive
weather reports from designated NOAA stations.
To turn the NOAA weather (WX) radio on:
1 Press the Power/Menu button until the WX Band icon appears
and an oF icon appears.
2 Select on by pressing the Up or Down button, then pressing the
Power/Menu button to confirm. The display shows the current WX
band channel setting and the WX band icon.
3 While in WX band mode, press the Power/Menu button once,
then press the Up or Down button to select one of the 10 NOAA
weather (WX) band channels.
To turn the NOAA WEATHER RADIO off:
• Press the PTT button. The current GMRS/FRS radio setting is
displayed and the WX BAND icon goes off.
NS-F1112.fm Page 12 Tuesday, September 19, 2006 11:33 AM

13
Insignia NS-F1112 Two-Way Radio
www.insignia-products.com
Using weather alert
Your radio has a NOAA weather alert function that lets you
automatically receive weather alerts from designated NOAA stations.
To turn the NOAA weather (WX) alert on:
1 Press the Power/Menu button twice while in WX Band. The
display shows an AL icon, while on the right of the AL icon, a
blinking oF icon appears.
2 Select on by pressing the Up or Down buttons, then pressing the
PTT or Power/Menu button. The radio returns to WX band and
the WX band icon blinks.
If the radio receives a weather alert signal from a designated
NOAA station while in GMRS/FRS radio mode, the radio beeps for
ten seconds while an AL and In icon appear on the display and
the radio automatically goes to WX band.
If you press any of the buttons while the radio is beeping and it is in
GMRS/FRS radio mode, the radio automatically goes to WX band.
To turn the NOAA weather (WX) alert off:
1 Press the Power/Menu button twice while in WX band. The
display shows an AL icon, while on the right of the AL icon, a
blinking on icon appears.
2 Select oF by pressing the Up or Down buttons, then pressing the
PTT or Power/Menu button.
NS-F1112.fm Page 13 Tuesday, September 19, 2006 11:33 AM

14
Insignia NS-F1112 Two-Way Radio
www.insignia-products.com
Using an external speaker and microphone or
headset
Your radio can be used with an optional external speaker and
microphone or headset.
To use an external speaker and microphone or headset:
1 Insert the plug(s) into the speaker and microphone jacks.
2 Place the earbud into your ear and adjust the microphone to the
level you want.
Maintaining your radio
• Do not use alcohol or cleaning solutions to clean the radio.
• Do not immerse the radio in water.
• Use a soft damp cloth to clean the radio.
• Dry the radio with a dry lint-free cloth should it get wet.
• Turn off the radio and remove the batteries during long-term
storage.
Jacks
NS-F1112.fm Page 14 Tuesday, September 19, 2006 11:33 AM

15
Insignia NS-F1112 Two-Way Radio
www.insignia-products.com
Troubleshooting
Specifications
Specification
Channels: 22 channels
Privacy codes: 121
NOAA weather (WX) band channels: 10
Operating Frequency: UHF 462.5500 ~467.7125 MHz
Power Source: four AAA alkaline or 4.8 V rechargeable Ni-MH battery
pack
GMRS/FRS Frequency Chart (MHz)
Problem Solution
No power • Check the battery installation
• Replace the batteries
Cannot receive
messages
• Make sure that the radios have the same channel and
privacy code settings.
• Make sure that you are within range of the other
transceivers.
• Buildings and other obstructions may interfere with your
communication.
Radio is not
responding to
button presses
• Make sure that the key lock is not on.
• Radio might need to be reset. Turn the radio off then on.
• Make sure that the accessory microphone is set
properly.
Display is dim • Recharge or replace the batteries.
Charger not
functioning
• Contacts on the bottom of the radio may require
cleaning.
• Make sure that the outlet that the charger is plugged into
is functioning properly.
• Check that the batteries are installed into the radio
properly.
Channel number Channel frequency
1 462.5625
2 462.5875
3 462.6125
4 462.6375
NS-F1112.fm Page 15 Tuesday, September 19, 2006 11:33 AM

16
Insignia NS-F1112 Two-Way Radio
www.insignia-products.com
Channels 8-14 are low-power FRS license free channels.
NOAA Weather (WX) Radio Frequency Chart (MHz)
Channels 8, 9, and 10 are designated Canadian Marine frequencies.
5 462.6625
6 462.6875
7 462.7125
8 467.5625
9 467.5875
10 467.6125
11 467.6375
12 467.6625
13 467.6875
14 467.7125
15 462.5500
16 462.5750
17 462.6000
18 462.6250
19 462.6500
20 462.6750
21 462.7000
22 462.7250
Channel number Channel frequency
1162.550
2162.400
3162.475
4162.425
5162.450
6162.500
7162.525
8161.650
9161.775
10 163.275
Channel number Channel frequency
NS-F1112.fm Page 16 Tuesday, September 19, 2006 11:33 AM

17
Insignia NS-F1112 Two-Way Radio
www.insignia-products.com
Privacy Codes Frequency Chart (MHz)
Privacy codes can be programmed for use on any channel.
Code Frequency
167.0
271.9
374.4
477.0
579.7
682.5
785.4
888.5
991.5
10 94.8
11 97.4
12 100.0
13 103.5
14 107.2
15 110.9
16 114.8
17 118.8
18 123.0
19 127.3
20 131.8
21 136.5
22 141.3
23 146.2
24 151.4
25 156.7
26 162.2
27 167.9
28 173.8
29 179.9
30 186.2
31 192.8
32 203.5
NS-F1112.fm Page 17 Tuesday, September 19, 2006 11:33 AM

18
Insignia NS-F1112 Two-Way Radio
www.insignia-products.com
DCS Privacy Code Chart
Privacy codes can be programmed for use on any channel.
33 210.7
34 218.1
35 225.7
36 233.6
37 241.8
38 250.3
No. Code No. Code No. Code
1 023 29 174 57 445
2 025 30 205 58 464
3 026 31 223 59 465
4 031 32 226 60 466
5 032 33 243 61 503
6 043 34 244 62 506
7 047 35 245 63 516
8 051 36 251 64 532
9 054 37 261 65 546
10 065 38 263 66 565
11 071 39 265 67 606
12 072 40 271 68 612
13 073 41 306 69 624
14 074 42 311 70 627
15 114 43 315 71 631
16 115 44 331 72 632
17 116 45 343 73 654
18 125 46 346 74 662
19 131 47 351 75 664
20 132 48 364 76 703
21 134 49 365 77 712
22 143 50 371 78 723
23 152 51 411 79 731
Code Frequency
NS-F1112.fm Page 18 Tuesday, September 19, 2006 11:33 AM
/