See the Important Safety and Product Information guide in
the product box for product warnings and other important
information.
Step 1: Install the Batteries in the
Astro 220
The Astro 220 operates on two AA batteries (not included). Use
alkaline, NiMH, or lithium batteries.
1. Turn the D-Ring on the back of the unit ¼ turn counter-
clockwise and remove the battery cover.
Battery
Compartment
D-Ring
2. Insert the batteries in the battery compartment, observing the
proper polarity.
3. Reinstall the battery cover.
Step 2: Turn the Astro 220 on
To turn the Astro 220 on, press and hold the Power button.
The rst time you turn the Astro 220 on,
a message appears. Follow the prompts
to setup the Astro. Thereafter, when you
turn the Astro 220 on, the Garmin Logo
appears, followed by the Dog Tracker page.
To adjust the backlight level:
1. While the Astro 220 is on, press and
quickly release the Power button on
top of the unit.
2. Press the Rocker up arrow or down
arrow to adjust the brightness levels.
3. Press ENTER to select a brightness level.
Step 3: Acquire GPS Satellite Signals
Before the Astro 220 can nd your current location and the
location of the DC 30, you must acquire GPS satellite signals.
1. Go outdoors to an open area, away from tall buildings and
trees.
2. Turn the Astro 220 and DC 30 on. Acquiring GPS satellite
signals can take a few minutes.
The bars on the Astro 220 indicate satellite strength.
When the bars are black, the Astro 220 has acquired GPS satellite
signals. The two red LEDs on the DC 30 double blink at each
pulse when a location x is achieved.
Step 4: Calibrate the Astro 220 Compass
Calibrate the compass outdoors. Hold the compass level and
away from objects that generate magnetic elds, such as cars or
buildings.
1. On the Dog Tracker page (see Step 3), press MENU.
2. Select Calibrate Compass, and press ENTER.
3. Select Start, press ENTER, and follow the on-screen
directions.
Hold the unit
level and turn
slowly.
“Just Right,” “Too Fast,” or “Too Slow” appears, notifying
you to adjust your turning speed. Hold the unit level while
turning.
•
When “Calibration Successful” appears, press ENTER.
If “Calibration Failed” appears, repeat the process.
Step 5: Turn the DC 30 on
Press and hold the Power button on the end of the DC 30. The
red LEDs blink at a steady pulse.
LEDs blink red
when power is on.
DC 30 power
button
Battery
charging port
To turn the DC 30 off, press and hold the Power button.
Step 6: Establish Communications
between the DC 30 and the Astro 220
The DC 30 that was packaged with your Astro 220 system was
linked with the Astro 220 at the factory. If you purchased an
additional DC 30 separately, refer to the Astro 220 Owner’s
Manual to link the additional DC 30 with the Astro 220.
•
•
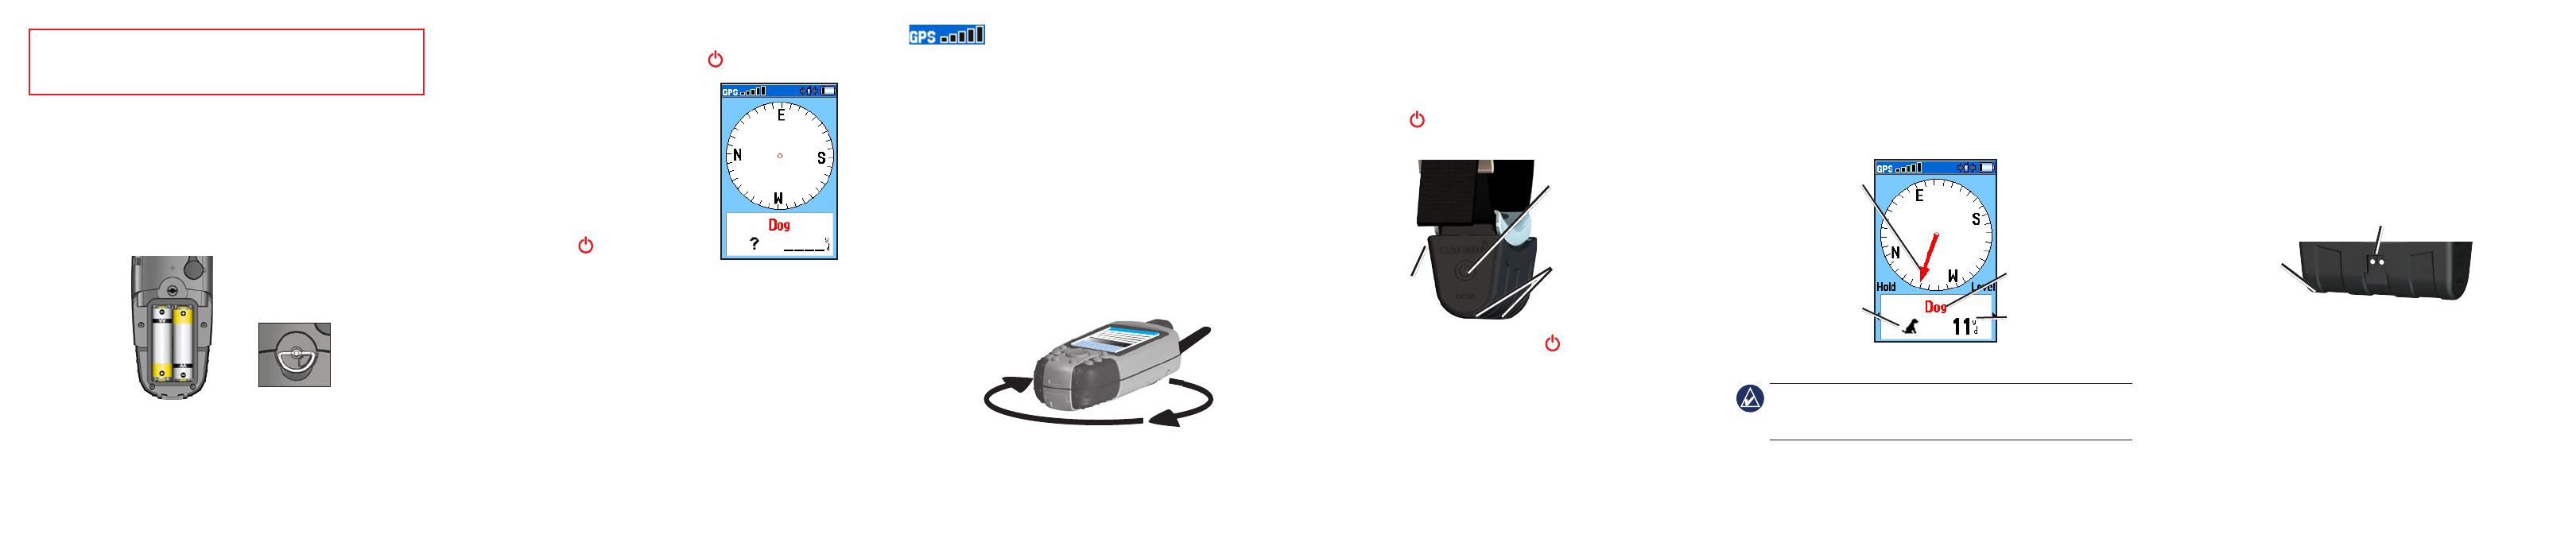
To view communication status with the DC 30:
Press DOG to view the Dog Tracker page. The dog name is
listed below the compass.
When communicating with the DC 30, the Dog Tracker page
indicates the direction of the dog, the distance away from you, and
the status of the dog.
Direction
to the dog
Dog status
icon
Distance to
the dog
Dog Tracker Page
Name of
the dog
NOTE: The DC 30 does not transmit its location to the Astro 220,
and the Astro 220 will not indicate the location of the DC 30, until
both units have acquired satellite signals.
Step 7: Charge the DC 30
Fully charge the DC 30 before using it on a hunt. Charging a
fully-depleted DC 30 battery requires 4½ hours.
To charge the DC 30:
1. Connect the vehicle power cable or the AC adapter to an
appropriate electrical source.
2. Slide the connector into the battery charging port on the side of
the DC 30.
Blue LED
Battery charging port
3. Charge the DC 30 until the blue LED on the bottom of the unit
turns off.
August 2008 Part Number 190-00714-11 Rev. B Printed in Taiwan
Dog Tracker Page

