Xerox 385 User manual

Category
Multifunctionals
Type
User manual

This manual is also suitable for

Pro 385 User Manual
Table of Contents
Chapter 1 Getting Started
Chapter 2 Making a Copy
Chapter 3 Sending a Fax
Chapter 4 Receiving a Fax
Chapter 5 Printing
Chapter 6 Scanning
Chapter 7 Trouble Shooting
Chapter 8 Maintenance
Chapter 9 Appendix
Chapter 10 Glossary
Index
Pro 385 User Manual
http://xww.xedoc.world.xerox.com/data/XEDOC/Central/Multifunction/wc385/user/wc385toc.htm [07/09/1999 14:30:40]
Chapter 1 Getting Started
Set Up Your Machine 1-1
Unpacking 1-1
Control Locations and Functions 1-2
Choosing a Location 1-4
Setting Up Your Machine 1-4
Document Inpute Tray 1-4
Printer Exit Tray 1-5
Document Exit Tray 1-5
Installing the Laser Printer Cartridge 1-6
Telephone Line 1-9
Extension Phone 1-9
PC Cable 1-10
AC Power Cord 1-12
Print Media Specifications 1-13
Core media List 1-14
Loading Paper 1-15
Using the Automatic Paper Feeder 1-15
Using the Manual Paper Feeder 1-20
Paper Guidelines 1-22
Installing Software 1-24
System Requirements 1-24
Overview of the WorkCentre 385 Drivers 1-24
Additional Software 1-25
Software Installation Procedure 1-26
Uninstalling Software 1-30
Using the Control Panel 1-32
System Setup 1-34
Ringer Volume 1-34
Home Resolution and Home Contrast 1-35
Sound Control 1-36
Remote Diagnosis Protection 1-37
Select Language 1-38
Econo Mode Setting 1-38
Last Fax Data Reprint 1-39
Adjusting Speaker Volume 1-40
Setting the Clock Mode 1-41
Setting the Date and Time 1-42
Setting the System ID(your Number and Name) 1-43
Print Priority 1-43
Dual 1-44
Installing the Machine
http://xww.xedoc.world.xerox.com/data/XEDOC/Central/Multifunction/wc385/user/chapter1/chpt1.htm (1 of 2) [07/09/1999 14:30:53]
Reports 1-46
Printing Reports 1-46
User Options (System Data) 1-47
Setting an Option 1-47
Selectable Options 1-48
Installing the Machine
http://xww.xedoc.world.xerox.com/data/XEDOC/Central/Multifunction/wc385/user/chapter1/chpt1.htm (2 of 2) [07/09/1999 14:30:53]
1-1
1
Chapter 1
Getting Started
Set Up Your Machine
Unpacking
* Appearance may vary according to country.
CD-ROM
Parallel cable
Telephone line cord
*
Document Exit tray
Power cord
*
Document Input tray
Printer exit tray
User Guide
One-touch label
Laser Printer
cartridge
WorkCentre 385
1-2 Getting Started
Control Locations and Functions
Take a moment to familiarize yourself with the main components and their
locations.
Note: Your machine may look slightly different than the illustration.
Automatic Paper Feeder
Extension Tray
Paper Guides
Paper Exit Tray
Automatic
Paper
Feeder
Manual
Paper
Feeder
Automatic
Document
Feeder
Document
Guides
Front View
Document
Input
Tray
Control
Panel
Document
Exit Tray
Set Up Your Machine 1-3
1
Rear View
TEL LINE
Jack
EXT. LINE Jack
PC Cable Connector
Power Cord Connector
Laser
Printer
Cartridge
Cover
Release
Buttons
(right and
left sides)
Cover
Inside
1-4 Getting Started
Choosing a Location
To help guarantee trouble-free operation of your machine, place it on a flat,
stable surface near your workstation. Leave enough space to allow for easy
paper loading, paper unloading, and opening of the front cover.
Do not place your machine:
In direct sunlight.
Near heat sources or air conditioners.
In dusty or dirty environments.
Setting Up Your Machine
Document Input Tray
Insert the two tabs on the tray into the slots as shown. Fold out the extender
on the tray, if necessary.
Set Up Your Machine 1-5
1
Printer Exit Tray
While pushing inward on the flexible side tabs of the printer exit tray, insert
them into the corresponding slots. If desired, fold out the extension tray.
Document Exit Tray
Insert the two tabs on the document exit tray into the slots on the front of
your machine. Fold out the extension tray, if necessary.
Extension tray
Side tab
Extension tray
Insert one side tab. Then, while pushing inward on the remaining tab, slide it into place.
Side tab
1-6 Getting Started
Installing the Laser Printer Cartridge
1
Open the cover by pulling the cover release buttons on both sides of the
machine toward you.
2 Unwrap the Laser Printer Cartridge.
3 Shake the Laser Printer Cartridge from side to side five or six times to
distribute the toner evenly.
Cover Release
Button
Set Up Your Machine 1-7
1
4 Carefully remove the sealing tape by pulling straight out on the tab
protruding from the end of the Laser Printer Cartridge.
5 Locate the two Laser Printer Cartridge slots inside the printer, one on
each side.
cartridge slot
1-8 Getting Started
6 Grasp the handle and slide the Laser Printer Cartridge down along the
cartridge slots until it clicks into place.
7 Close the cover. Make sure that the cover is securely closed and both
cover release buttons have clicked into place.
Set Up Your Machine 1-9
1
Telephone Line
Plug one end of the telephone line cord into the TEL LINE jack and the
other end into a standard phone wall jack.
Extension Phone
If you want to use an ordinary phone or answering machine with your
WorkCentre 385, connect it to the jack labelled EXT. LINE on the back of
the machine.
To a
standard
phone wall
jack
To a
regular
phone or
answering
machine
1-10 Getting Started
PC Cable
Your Xerox WorkCentre 385 is equipped with a parallel interface port for
use with IBM PCs and compatible computers. Using the supplied
Centronics parallel cable, connect your WorkCentre 385 to a computer that
supports bi-directional communications (IEEE standard 1284).
Note: If using another parallel cable, ensure that it meets IEEE standard
1284 specifications.
To connect the WorkCentre 385 to a computer, follow the steps
below:
CAUTION: Make sure the computer is turned off, and the WorkCentre 385
is unplugged from the power outlet.
1 Plug the parallel cable into the connector on the back of the
WorkCentre 385. Swing the metal clips of the connector inward until
they lock firmly inside the notches on the parallel cable connector.
Set Up Your Machine 1-11
1
2 Connect the other end of the cable to the parallel port on your computer.
If necessary, refer to your computer documentation for assistance with
this procedure.
Connector
Clips
1-12 Getting Started
AC Power Cord
WARNING: There is NO On/Off switch for the WC 385. When the AC
power cord is plugged in, the machine is fully energized.
Note: To correctly install the WC 385, the AC power cord must remain
unplugged from the grounded wall outlet until software is to be loaded. In
the next step, one end of the power cord will be plugged into the back of the
WC 385. Leave the other end of the cord unplugged until directed to plug it
in during software installation.
1 Plug one end of the AC Power Cord in the back of the WC 385.
Set Up Your Machine 1-13
1
Print Media Specifications
Refer to the Appendix for detailed print media specifications.
There are two locations to load paper, the Automatic Paper Feeder and the
Manual Paper Feeder. The table below illustrates the paper types that can
be loaded into each:
In the table below, the capacities for the various media in the Automatic
Paper Feeder and the Manual Paper Feeder are shown:
Automatic Paper Feeder Manual Paper Feeder
Standard Paper Non-Standard Paper
Transparency Film Transparency Film
Paper Label Paper Label
Envelopes
Card Stock
Odd Size (minimum 10.5 cm x 15 cm)
Type
Automatic Paper
Feeder Capacity
Manual Paper
Feeder Capacity
Paper
150 (20# 80 gm
2
Stock)
1
Transparency Film 1 1
Paper Label 1 1
Card Stock N/A 1
Envelope N/A 1
1-14 Getting Started
In the following table, the capacity of the Automatic Paper Feeder is shown:
Core Media List
The following list reflects the media that has been tested and is guaranteed
to successfully print.
Paper Type Capacity
Letter/A4
100 Sheets (20# 80 gm
2
paper)
Legal
50 Sheets (20# 80 gm
2
paper)
All Other Stock (Label Paper,
Transparency, Envelope)
1
Paper Size Weight
Xerox 4200 Letter (8 1/2 x11) 16#
Xerox 4024DP Bond Letter (8 1/2 x11)
20# 80 gm
2
Xerox 80 Premier 210 X 297 mm
80 gm
2
Xerox Blue, Green and
Red
Letter (8 1/2 x11)
20# 80 gm
2
Xerox 3R9023
Transparency Film
Letter (8 1/2 x11) N/A
Set Up Your Machine 1-15
1
Loading Paper
For best results, use high quality xerographic copy paper as described in
Print Media Specifications on page 1-13.
Using the Automatic Paper Feeder
You can stack paper, envelopes, card stocks, labels, or transparencies in the
Automatic Paper Feeder to feed automatically. The Automatic Paper
Feeder can hold a maximum of 150 sheets of 80 gm
2
plain paper, or 10
envelopes, or other print media. Depending upon media thickness,
maximum capacity may be reduced.
Note: If you experience problems feeding paper, place the media into the
Manual Paper Feeder one sheet at a time.
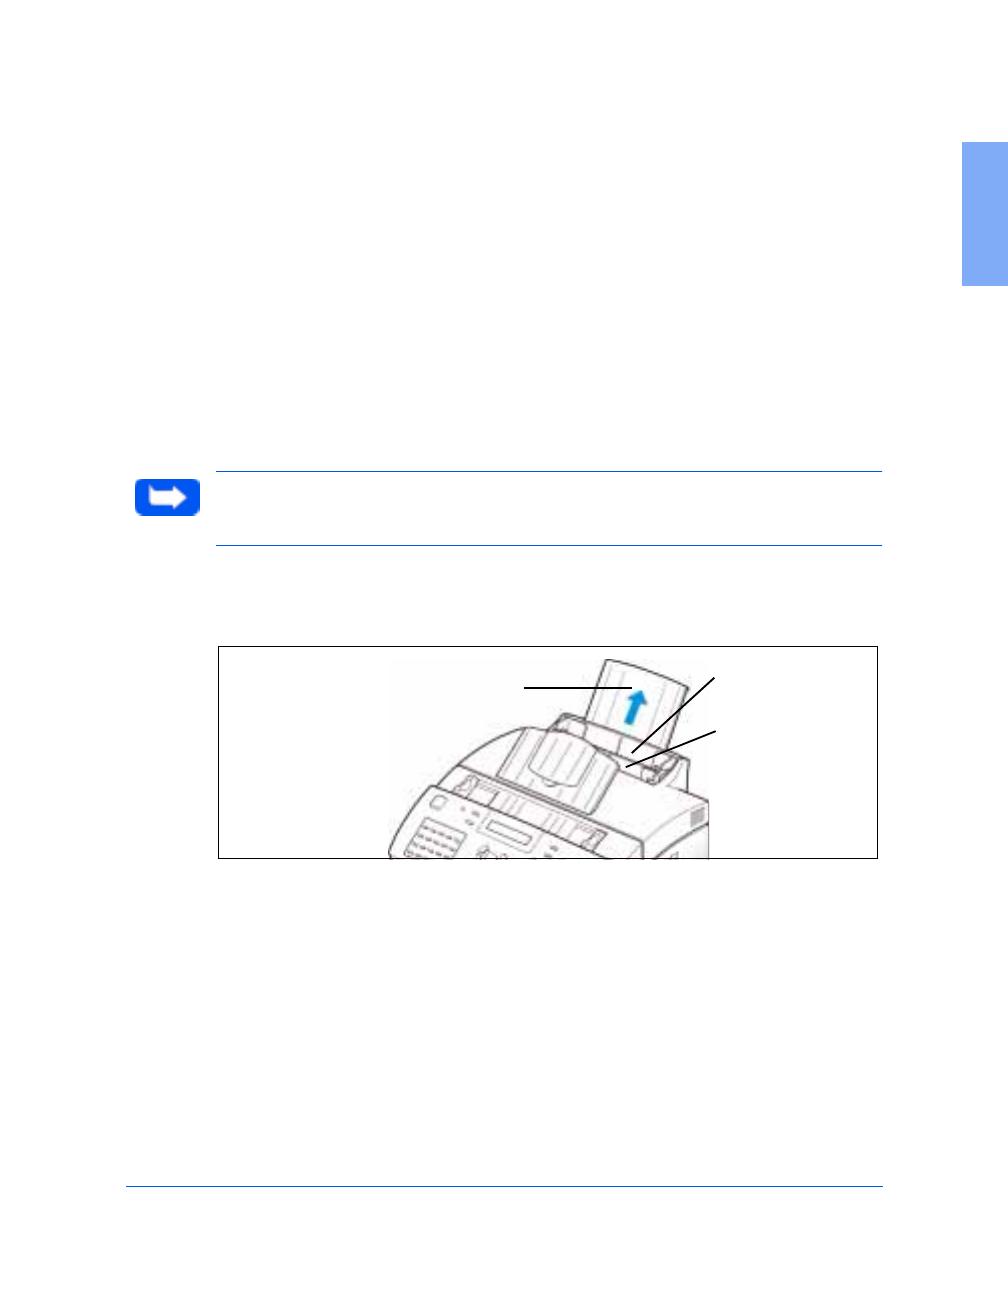
1 Pull the Extension Tray on the Automatic Paper Feeder all the way up.
2 Prepare the print material for loading.
For paper and envelopes, flex paper or fan envelopes back and forth.
Do not fold or crease the paper.
Extension
Tray
Automatic Paper
Feeder
Manual Paper
Feeder
1-16 Getting Started
Straighten the edges on a level surface.
Note: If envelopes jam while printing, try reducing the number of
envelopes in the Automatic Paper Feeder.
For transparencies, refer to the packaging for the transparency stock to
determine the print side. Hold the transparencies by the edges and
avoid touching the print side. Be careful not to scratch or leave
fingerprints on the print side.
Fan the stack of transparencies to prevent feeding failures.
  • Page 1 1
  • Page 2 2
  • Page 3 3
  • Page 4 4
  • Page 5 5
  • Page 6 6
  • Page 7 7
  • Page 8 8
  • Page 9 9
  • Page 10 10
  • Page 11 11
  • Page 12 12
  • Page 13 13
  • Page 14 14
  • Page 15 15
  • Page 16 16
  • Page 17 17
  • Page 18 18
  • Page 19 19
  • Page 20 20
  • Page 21 21
  • Page 22 22
  • Page 23 23
  • Page 24 24
  • Page 25 25
  • Page 26 26
  • Page 27 27
  • Page 28 28
  • Page 29 29
  • Page 30 30
  • Page 31 31
  • Page 32 32
  • Page 33 33
  • Page 34 34
  • Page 35 35
  • Page 36 36
  • Page 37 37
  • Page 38 38
  • Page 39 39
  • Page 40 40
  • Page 41 41
  • Page 42 42
  • Page 43 43
  • Page 44 44
  • Page 45 45
  • Page 46 46
  • Page 47 47
  • Page 48 48
  • Page 49 49
  • Page 50 50
  • Page 51 51
  • Page 52 52
  • Page 53 53
  • Page 54 54
  • Page 55 55
  • Page 56 56
  • Page 57 57
  • Page 58 58
  • Page 59 59
  • Page 60 60
  • Page 61 61
  • Page 62 62
  • Page 63 63
  • Page 64 64
  • Page 65 65
  • Page 66 66
  • Page 67 67
  • Page 68 68
  • Page 69 69
  • Page 70 70
  • Page 71 71
  • Page 72 72
  • Page 73 73
  • Page 74 74
  • Page 75 75
  • Page 76 76
  • Page 77 77
  • Page 78 78
  • Page 79 79
  • Page 80 80
  • Page 81 81
  • Page 82 82
  • Page 83 83
  • Page 84 84
  • Page 85 85
  • Page 86 86
  • Page 87 87
  • Page 88 88
  • Page 89 89
  • Page 90 90
  • Page 91 91
  • Page 92 92
  • Page 93 93
  • Page 94 94
  • Page 95 95
  • Page 96 96
  • Page 97 97
  • Page 98 98
  • Page 99 99
  • Page 100 100
  • Page 101 101
  • Page 102 102
  • Page 103 103
  • Page 104 104
  • Page 105 105
  • Page 106 106
  • Page 107 107
  • Page 108 108
  • Page 109 109
  • Page 110 110
  • Page 111 111
  • Page 112 112
  • Page 113 113
  • Page 114 114
  • Page 115 115
  • Page 116 116
  • Page 117 117
  • Page 118 118
  • Page 119 119
  • Page 120 120
  • Page 121 121
  • Page 122 122
  • Page 123 123
  • Page 124 124
  • Page 125 125
  • Page 126 126
  • Page 127 127
  • Page 128 128
  • Page 129 129
  • Page 130 130
  • Page 131 131
  • Page 132 132
  • Page 133 133
  • Page 134 134
  • Page 135 135
  • Page 136 136
  • Page 137 137
  • Page 138 138
  • Page 139 139
  • Page 140 140
  • Page 141 141
  • Page 142 142
  • Page 143 143
  • Page 144 144
  • Page 145 145
  • Page 146 146
  • Page 147 147
  • Page 148 148
  • Page 149 149
  • Page 150 150
  • Page 151 151
  • Page 152 152
  • Page 153 153
  • Page 154 154
  • Page 155 155
  • Page 156 156
  • Page 157 157
  • Page 158 158
  • Page 159 159
  • Page 160 160
  • Page 161 161
  • Page 162 162
  • Page 163 163
  • Page 164 164
  • Page 165 165
  • Page 166 166
  • Page 167 167
  • Page 168 168
  • Page 169 169
  • Page 170 170
  • Page 171 171
  • Page 172 172
  • Page 173 173
  • Page 174 174
  • Page 175 175
  • Page 176 176
  • Page 177 177
  • Page 178 178
  • Page 179 179
  • Page 180 180
  • Page 181 181
  • Page 182 182
  • Page 183 183
  • Page 184 184
  • Page 185 185
  • Page 186 186
  • Page 187 187
  • Page 188 188
  • Page 189 189
  • Page 190 190
  • Page 191 191
  • Page 192 192
  • Page 193 193
  • Page 194 194
  • Page 195 195
  • Page 196 196
  • Page 197 197
  • Page 198 198
  • Page 199 199
  • Page 200 200
  • Page 201 201
  • Page 202 202
  • Page 203 203
  • Page 204 204
  • Page 205 205
  • Page 206 206
  • Page 207 207
  • Page 208 208
  • Page 209 209
  • Page 210 210
  • Page 211 211
  • Page 212 212
  • Page 213 213
  • Page 214 214
  • Page 215 215
  • Page 216 216
  • Page 217 217
  • Page 218 218
  • Page 219 219
  • Page 220 220
  • Page 221 221
  • Page 222 222
  • Page 223 223
  • Page 224 224
  • Page 225 225
  • Page 226 226
  • Page 227 227
  • Page 228 228
  • Page 229 229
  • Page 230 230
  • Page 231 231
  • Page 232 232
  • Page 233 233
  • Page 234 234
  • Page 235 235
  • Page 236 236
  • Page 237 237
  • Page 238 238
  • Page 239 239
  • Page 240 240
  • Page 241 241
  • Page 242 242
  • Page 243 243
  • Page 244 244
  • Page 245 245
  • Page 246 246
  • Page 247 247
  • Page 248 248
  • Page 249 249
  • Page 250 250
  • Page 251 251
  • Page 252 252
  • Page 253 253
  • Page 254 254
  • Page 255 255
  • Page 256 256
  • Page 257 257
  • Page 258 258
  • Page 259 259
  • Page 260 260
  • Page 261 261
  • Page 262 262
  • Page 263 263
  • Page 264 264
  • Page 265 265
  • Page 266 266
  • Page 267 267
  • Page 268 268
  • Page 269 269
  • Page 270 270
  • Page 271 271
  • Page 272 272
  • Page 273 273
  • Page 274 274
  • Page 275 275
  • Page 276 276
  • Page 277 277
  • Page 278 278
  • Page 279 279
  • Page 280 280
  • Page 281 281
  • Page 282 282
  • Page 283 283
  • Page 284 284
  • Page 285 285
  • Page 286 286
  • Page 287 287
  • Page 288 288
  • Page 289 289
  • Page 290 290
  • Page 291 291
  • Page 292 292
  • Page 293 293
  • Page 294 294
  • Page 295 295
  • Page 296 296
  • Page 297 297
  • Page 298 298
  • Page 299 299
  • Page 300 300
  • Page 301 301
  • Page 302 302
  • Page 303 303
  • Page 304 304
  • Page 305 305
  • Page 306 306
  • Page 307 307
  • Page 308 308
  • Page 309 309
  • Page 310 310
  • Page 311 311
  • Page 312 312
  • Page 313 313
  • Page 314 314
  • Page 315 315
  • Page 316 316
  • Page 317 317
  • Page 318 318
  • Page 319 319
  • Page 320 320
  • Page 321 321
  • Page 322 322
  • Page 323 323
  • Page 324 324
  • Page 325 325
  • Page 326 326
  • Page 327 327
  • Page 328 328
  • Page 329 329
  • Page 330 330
  • Page 331 331
  • Page 332 332
  • Page 333 333
  • Page 334 334
  • Page 335 335
  • Page 336 336
  • Page 337 337
  • Page 338 338
  • Page 339 339
  • Page 340 340
  • Page 341 341
  • Page 342 342
  • Page 343 343
  • Page 344 344
  • Page 345 345
  • Page 346 346
  • Page 347 347
  • Page 348 348
  • Page 349 349
  • Page 350 350
  • Page 351 351
  • Page 352 352
  • Page 353 353
  • Page 354 354
  • Page 355 355
  • Page 356 356
  • Page 357 357
  • Page 358 358
  • Page 359 359
  • Page 360 360
  • Page 361 361
  • Page 362 362
  • Page 363 363
  • Page 364 364
  • Page 365 365
  • Page 366 366
  • Page 367 367
  • Page 368 368
  • Page 369 369
  • Page 370 370
  • Page 371 371
  • Page 372 372
  • Page 373 373
  • Page 374 374
  • Page 375 375
  • Page 376 376
  • Page 377 377
  • Page 378 378
  • Page 379 379
  • Page 380 380
  • Page 381 381
  • Page 382 382
  • Page 383 383
  • Page 384 384
  • Page 385 385
  • Page 386 386
  • Page 387 387
  • Page 388 388
  • Page 389 389
  • Page 390 390
  • Page 391 391
  • Page 392 392

Xerox 385 User manual

Category
Multifunctionals
Type
User manual
This manual is also suitable for

Ask a question and I''ll find the answer in the document

Finding information in a document is now easier with AI