Page is loading ...

INSTALLATION
C1302M-F (11/08)
ExSite
®
Series
Explosionproof
Pan and Tilt System

2 C1302M-F (11/08)

C1302M-F (11/08) 3
Contents
Important Safety Instructions . . . . . . . . . . . . . . . . . . . . . . . . . . . . . . . . . . . . . . . . . . . . . . . . . . . . . . . . . . . . . . . . . . . . . . . . . . . . . . . . . . . . . . . . . . . . 4
Getting Started . . . . . . . . . . . . . . . . . . . . . . . . . . . . . . . . . . . . . . . . . . . . . . . . . . . . . . . . . . . . . . . . . . . . . . . . . . . . . . . . . . . . . . . . . . . . . . . . . . . . . . . 5
Methods of Installation . . . . . . . . . . . . . . . . . . . . . . . . . . . . . . . . . . . . . . . . . . . . . . . . . . . . . . . . . . . . . . . . . . . . . . . . . . . . . . . . . . . . . . . . . . . . 5
Install the Power Module . . . . . . . . . . . . . . . . . . . . . . . . . . . . . . . . . . . . . . . . . . . . . . . . . . . . . . . . . . . . . . . . . . . . . . . . . . . . . . . . . . . . . . . . . . . . . . . 6
Connect Wiring . . . . . . . . . . . . . . . . . . . . . . . . . . . . . . . . . . . . . . . . . . . . . . . . . . . . . . . . . . . . . . . . . . . . . . . . . . . . . . . . . . . . . . . . . . . . . . . . . . . 7
DIP Switch Settings . . . . . . . . . . . . . . . . . . . . . . . . . . . . . . . . . . . . . . . . . . . . . . . . . . . . . . . . . . . . . . . . . . . . . . . . . . . . . . . . . . . . . . . . . . . . . . . 8
Protocol Settings . . . . . . . . . . . . . . . . . . . . . . . . . . . . . . . . . . . . . . . . . . . . . . . . . . . . . . . . . . . . . . . . . . . . . . . . . . . . . . . . . . . . . . . . . . . . . 8
Receiver Address Settings (SW1) . . . . . . . . . . . . . . . . . . . . . . . . . . . . . . . . . . . . . . . . . . . . . . . . . . . . . . . . . . . . . . . . . . . . . . . . . . . . . . . . 8
Termination Setting (SW2) . . . . . . . . . . . . . . . . . . . . . . . . . . . . . . . . . . . . . . . . . . . . . . . . . . . . . . . . . . . . . . . . . . . . . . . . . . . . . . . . . . . . . 8
Baud Settings (SW3) . . . . . . . . . . . . . . . . . . . . . . . . . . . . . . . . . . . . . . . . . . . . . . . . . . . . . . . . . . . . . . . . . . . . . . . . . . . . . . . . . . . . . . . . . . 8
Install the Camera Module . . . . . . . . . . . . . . . . . . . . . . . . . . . . . . . . . . . . . . . . . . . . . . . . . . . . . . . . . . . . . . . . . . . . . . . . . . . . . . . . . . . . . . . . . . . . . 13
Install the Pan and Tilt Unit . . . . . . . . . . . . . . . . . . . . . . . . . . . . . . . . . . . . . . . . . . . . . . . . . . . . . . . . . . . . . . . . . . . . . . . . . . . . . . . . . . . . . . . . . . . . . 16
Install the Sun Shroud . . . . . . . . . . . . . . . . . . . . . . . . . . . . . . . . . . . . . . . . . . . . . . . . . . . . . . . . . . . . . . . . . . . . . . . . . . . . . . . . . . . . . . . . . . . . . . . . . 17
Maintenance . . . . . . . . . . . . . . . . . . . . . . . . . . . . . . . . . . . . . . . . . . . . . . . . . . . . . . . . . . . . . . . . . . . . . . . . . . . . . . . . . . . . . . . . . . . . . . . . . . . . . . . . 18
Camera Module Replacement . . . . . . . . . . . . . . . . . . . . . . . . . . . . . . . . . . . . . . . . . . . . . . . . . . . . . . . . . . . . . . . . . . . . . . . . . . . . . . . . . . . . . . 18
Specifications . . . . . . . . . . . . . . . . . . . . . . . . . . . . . . . . . . . . . . . . . . . . . . . . . . . . . . . . . . . . . . . . . . . . . . . . . . . . . . . . . . . . . . . . . . . . . . . . . . . . . . . 21
Camera/Optics . . . . . . . . . . . . . . . . . . . . . . . . . . . . . . . . . . . . . . . . . . . . . . . . . . . . . . . . . . . . . . . . . . . . . . . . . . . . . . . . . . . . . . . . . . . . . . . . . . 22
List of Illustrations
1 Methods of Installation . . . . . . . . . . . . . . . . . . . . . . . . . . . . . . . . . . . . . . . . . . . . . . . . . . . . . . . . . . . . . . . . . . . . . . . . . . . . . . . . . . . . . . . . . . . . 5
2 Attach Power Module to Mounting Surface . . . . . . . . . . . . . . . . . . . . . . . . . . . . . . . . . . . . . . . . . . . . . . . . . . . . . . . . . . . . . . . . . . . . . . . . . . . . 6
3 Default DIP Switch Settings . . . . . . . . . . . . . . . . . . . . . . . . . . . . . . . . . . . . . . . . . . . . . . . . . . . . . . . . . . . . . . . . . . . . . . . . . . . . . . . . . . . . . . . . . 8
4 Loosen Set Screw . . . . . . . . . . . . . . . . . . . . . . . . . . . . . . . . . . . . . . . . . . . . . . . . . . . . . . . . . . . . . . . . . . . . . . . . . . . . . . . . . . . . . . . . . . . . . . . . 13
5 Remove Back Cap of Enclosure . . . . . . . . . . . . . . . . . . . . . . . . . . . . . . . . . . . . . . . . . . . . . . . . . . . . . . . . . . . . . . . . . . . . . . . . . . . . . . . . . . . . . 13
6 Install Camera Module . . . . . . . . . . . . . . . . . . . . . . . . . . . . . . . . . . . . . . . . . . . . . . . . . . . . . . . . . . . . . . . . . . . . . . . . . . . . . . . . . . . . . . . . . . . . 14
7 Center Wiper. . . . . . . . . . . . . . . . . . . . . . . . . . . . . . . . . . . . . . . . . . . . . . . . . . . . . . . . . . . . . . . . . . . . . . . . . . . . . . . . . . . . . . . . . . . . . . . . . . . . 14
8 Install Wiper Arm . . . . . . . . . . . . . . . . . . . . . . . . . . . . . . . . . . . . . . . . . . . . . . . . . . . . . . . . . . . . . . . . . . . . . . . . . . . . . . . . . . . . . . . . . . . . . . . . 15
9 Factory-Installed Power Module Seal . . . . . . . . . . . . . . . . . . . . . . . . . . . . . . . . . . . . . . . . . . . . . . . . . . . . . . . . . . . . . . . . . . . . . . . . . . . . . . . . 16
10 Attach the Pan and Tilt Unit to the Power Module . . . . . . . . . . . . . . . . . . . . . . . . . . . . . . . . . . . . . . . . . . . . . . . . . . . . . . . . . . . . . . . . . . . . . . 16
11 Install the Sun Shroud . . . . . . . . . . . . . . . . . . . . . . . . . . . . . . . . . . . . . . . . . . . . . . . . . . . . . . . . . . . . . . . . . . . . . . . . . . . . . . . . . . . . . . . . . . . . 17
12 Remove Back Cap of Camera Enclosure. . . . . . . . . . . . . . . . . . . . . . . . . . . . . . . . . . . . . . . . . . . . . . . . . . . . . . . . . . . . . . . . . . . . . . . . . . . . . . . 18
13 Remove or Install Camera Module . . . . . . . . . . . . . . . . . . . . . . . . . . . . . . . . . . . . . . . . . . . . . . . . . . . . . . . . . . . . . . . . . . . . . . . . . . . . . . . . . . . 18
14 Install Camera Module . . . . . . . . . . . . . . . . . . . . . . . . . . . . . . . . . . . . . . . . . . . . . . . . . . . . . . . . . . . . . . . . . . . . . . . . . . . . . . . . . . . . . . . . . . . . 19
15 Center Wiper. . . . . . . . . . . . . . . . . . . . . . . . . . . . . . . . . . . . . . . . . . . . . . . . . . . . . . . . . . . . . . . . . . . . . . . . . . . . . . . . . . . . . . . . . . . . . . . . . . . . 19
List of Tables
A P Protocol Receiver Address. . . . . . . . . . . . . . . . . . . . . . . . . . . . . . . . . . . . . . . . . . . . . . . . . . . . . . . . . . . . . . . . . . . . . . . . . . . . . . . . . . . . . . . . . 9
B D Protocol Receiver Address . . . . . . . . . . . . . . . . . . . . . . . . . . . . . . . . . . . . . . . . . . . . . . . . . . . . . . . . . . . . . . . . . . . . . . . . . . . . . . . . . . . . . . . . 9

4 C1302M-F (11/08)
Important Safety Instructions
1. Read these instructions.
2. Keep these instructions.
3. Heed all warnings.
4. Follow all instructions.
5. Do not block any ventilation openings. Install in accordance with the manufacturer’s instructions.
6. To reduce the risk of ignition of hazardous atmospheres, disconnect the equipment from the supply circuit before opening. Keep assembly
tightly closed when in operation.
7. The maximum ambient temperature range is -76° to 140°F (-60° to 60°C).
8. Only use attachments/accessories specified by the manufacturer.
9. Refer all servicing to qualified service personnel. Servicing is required when the apparatus has been damaged in any way, such as power-
supply cord or plug is damaged, liquid has been spilled or objects have fallen into the apparatus, the apparatus has been exposed to rain or
moisture, does not operate normally, or has been dropped.
10. Installation should be done only by qualified personnel and conform to all local codes.
11. Unless the unit is specifically marked as a NEMA Type 3, 3R, 3S, 4, 4X, 6, or 6P enclosure, it is designed for indoor use only and it must not
be installed where exposed to rain and moisture.
12. Use only installation methods and materials capable of supporting four times the maximum specified load.
13. Use stainless steel hardware to fasten the mount to outdoor surfaces.
14. AN ALL-POLE MAINS SWITCH with a contact separation of at least 3 mm in each pole shall be incorporated in the electrical installation of
the building.
15. A readily accessible disconnect device shall be incorporated in the building installation wiring.
16. CAUTION: These servicing instructions are for use by qualified service personnel only. To reduce the risk of electric shock do not perform
any servicing other that contained in the operating instructions unless you are qualified to do so.
17. Only use replacement parts recommended by Pelco.
The product and/or manual may bear the following marks:
WARNING: This symbol indicates that dangerous voltage constituting a risk of electric shock
is present within this unit.
This symbol indicates that there are important operating and maintenance instructions in the
literature accompanying this unit.
WARNING: HAZARDOUS MOVING PARTS. KEEP FINGERS AND OTHER BODY PARTS AWAY.
WARNING: To reduce the risk of ignition of hazardous atmospheres, disconnect the
equipment from the supply circuit before opening. Keep assembly tightly closed when
operating.
WARNING: To reduce the risk of ignition of hazardous atmospheres, conduit runs must have
a sealing fitting connected within 2 inches of the enclosure.
TO REDUCE THE RISK OF IGNITION DO NOT OPEN WHEN AN EXPLOSIVE GAS ATMOSPHERE
MAY BE PRESENT.
CAUTION:
RISK OF ELECTRIC SHOCK.
DO NOT OPEN.

C1302M-F (11/08) 5
Getting Started
Thank you for purchasing Pelco’s ExSite
®
Series explosionproof integrated positioning system. This manual includes instructions for installing all
the components of the ExSite Series system. Once the system installation is complete, refer to the operation/programming manual shipped with
the camera module for instructions on how to operate and program your system.
METHODS OF INSTALLATION
The system can be installed in a standard or inverted position. When installed for inverted operation, the camera oriention and controller
functions are reconfigured for normal operation through the system’s software. Hardware adjustment is not required for inverted operation.
Refer to Figure 1 for installation methods.
Figure 1. Methods of Installation
WARNING: Total weight of the pan and tilt component is 55 lb (25 kg). Use caution when lifting and assembling the pan and tilt
component on the power module. It is recommended that non-slip gloves be worn during installation.
STANDARD
INSTALLATION
INVERTED
INSTALLATION

6 C1302M-F (11/08)
Install the Power Module
Attach the power module to the mounting surface. Use only installation methods and materials capable of supporting four times the maximum
specified load of the system (220 lb/100 kg).
NOTE: If required, install the optional TXB translator, fiber module, or UTP board before installing the power module. Refer to the installation
instructions supplied with the TXB translator, fiber module, or UTP board for installation instructions.
To install the power module, refer to Figure 2 and do the following:
1. Make sure the threads of the power module and the threads of the supplied M10 x 16 mm stainless steel bolts are free of dirt and debris.
2. Apply a generous amount of thread locking compound (supplied) to the threads of the power module and the threads of the stainless steel
bolts.
3. Face the conduit fitting of the power module towards the mating conduit fitting of the installation.
4. Secure the power module to the mounting surface with the supplied 8 mm Allen wrench and four M10 x 16 mm stainless steel bolts and
lock washers. Tighten the bolts to 25 to 27 ft-lb (34 to 37 Nm). The thread compound supplied must cure for one hour. Allow for this cure
period prior to completing the installation.
Figure 2. Attach Power Module to Mounting Surface
NOTE: Figure 2 shows the power module
being installed on a PXM100 pedestal mount
(not supplied).

C1302M-F (11/08) 7
CONNECT WIRING
Refer to the following information to connect the wires and cables as required.
NOTES:
• Relay 3 is allocated specifically for an external washer (not supplied by Pelco).
• All relays are specified for 32 VDC, 0.5 A.
• Wiring/cable for UTP and fiber optic are not provided on the wire harness. The installer must provide UTP and fiber optic connections.
WARNING: When installing this unit, provide access to the communication wires (TX+ and TX-) to allow connection to the system for
future software upgrades. Connectors must be installed so that the integrity of the hazardous location is maintained.
These communication wires are required even if the system uses Coaxitron
®
control.
Maximum wire distance for RS-422 data wires is 4,000 ft (1,219 m).
Configuration of Wire Harness
Wire Color Function
White/Orange TX+
White/Blue TX-
Red RX+
Green RX-
Violet/White Relay 3 NC (washer only)
White/Red Relay 3 COM (washer only)
Green/Black Relay 3 NO (washer only)
Gray/White Relay 2 NC
Yellow Relay 2 COM
Violet Relay 2 NO
Brown Relay 1 NC
Gray Relay 1 COM
White/Yellow/Black Relay 1 NO
White/Black/Green Alarm COM
White/Red/Black Alarm 7
White/Brown/Black Alarm 6
Orange Alarm 5
White/Orange/Black Alarm 4
White/Blue/Black Alarm 3
White/Brown Alarm 2
White/Black Alarm 1
Power Connections 24 VAC
Wire Color Function
Red AC Hi
Black AC Low
Power Connections 100-240 VAC
Wire Color Function
Black AC Hi
White AC Low
Green/Yellow Earth Ground
*Cable requirements:
75-ohm impedance
All-copper center conductor
All-copper braided shield with 95% braid coverage
Video Coaxial Cable Requirements
Cable Type* Maximum Distance
RG59/U 750 ft (229 m)
RG6/U 1,000 ft (305 m)
RG11/U 1,500 ft (457 m)
Wiring Distances
The following are the recommended maximum distances for 24 VAC and
100-240 VAC applications and are calculated with a 10 percent voltage drop.
(Ten percent is generally the maximum allowable voltage drop for AC-powered
devices.)
NOTE: Power consumption is 120 VA per unit. Use a power source with a
minimum of 150 VA.
Power
Wire Gauge
18
(1.0 mm
2
)
16
(1.5 mm
2
)
14
(2.5 mm
2
)
12
(3.5 mm
2
)
24 VAC
27 ft
(8 m)
43 ft
(13 m)
69 ft
(21 m)
110 ft
(33 m)
100-240
VAC
75 ft
(23 m)
120 ft
(36 m)
190 ft
(58 m)
310 ft
(94 m)

8 C1302M-F (11/08)
DIP SWITCH SETTINGS
Configure the receiver address, termination, and baud setting for the system. The DIP switches to configure these settings are located on the top
of the power module.
NOTE: No DIP switch settings are required for Coaxitron control.
Figure 3 shows the default settings for the DIP switches. Refer to the following to configure the ExSite system settings.
Figure 3. Default DIP Switch Settings
PROTOCOL SETTINGS
The ExSite system automatically detects the type of protocol. No switch settings are required to set Coaxitron or RS-422 P and D protocols.
RECEIVER ADDRESS SETTINGS (SW1)
The default address is 2 for P protocol. Refer to Table A for address settings that use P protocol. Maximum number of receivers is 32.
The default address is 1 for D protocol. Refer to Table B for address settings that use D protocol. Maximum number of receivers is 254.
TERMINATION SETTING (SW2)
When connecting more than one ExSite system to a single controller, terminate the unit farthest from the controller. Termination is required only
for the last unit in the series. The unit is shipped from the factory in the unterminated OFF position. To terminate the unit, set the SW2 switch to
the ON position.
BAUD SETTINGS (SW3)
Pelco’s D-type controllers are set for 2400 baud. The default setting for the unit is 2400 baud. If you are using a Pelco D-type controller, do not
reset the SW3 switches.
P-type controllers can operate at 2400, 4800, and 9600 baud. Set the SW3 switches (6, 7, and 8), located on the top of the power module, to the
same baud as the P-type controller.
Switch Settings for SW3
Switch Number SW3-6 SW3-7 SW3-8
2400 Baud Off Off Off
4800 Baud On Off Off
9600 Baud Off On Off
SW1
SW2
SW3
1
2
3
4
5
6
7
8
1
2
3
45
6
7
8
1
on
on
ON
SW1-1 is set to the ON position.
All other switches are set to the OFF position.

C1302M-F (11/08) 9
ADDRESS
SWITCH SETTING
SW1-1 SW1-2 SW1-3 SW1-4 SW1-5 SW1-6 SW1-7 SW1-8
1 OFF OFF OFF OFF OFF OFF OFF OFF
2 ON OFF OFF OFF OFF OFF OFF OFF
3 OFF ON OFF OFF OFF OFF OFF OFF
4 ON ON OFF OFF OFF OFF OFF OFF
5 OFF OFF ON OFF OFF OFF OFF OFF
6 ON OFF ON OFF OFF OFF OFF OFF
7 OFF ON ON OFF OFF OFF OFF OFF
8 ON ON ON OFF OFF OFF OFF OFF
9 OFF OFF OFF ON OFF OFF OFF OFF
10 ON OFF OFF ON OFF OFF OFF OFF
11 OFF ON OFF ON OFF OFF OFF OFF
12 ON ON OFF ON OFF OFF OFF OFF
13 OFF OFF ON ON OFF OFF OFF OFF
14 ON OFF ON ON OFF OFF OFF OFF
15 OFF ON ON ON OFF OFF OFF OFF
16 ON ON ON ON OFF OFF OFF OFF
ADDRESS
SWITCH SETTING
SW1-1 SW1-2 SW1-3 SW1-4 SW1-5 SW1-6 SW1-7 SW1-8
17 OFF OFF OFF OFF ON OFF OFF OFF
18 ON OFF OFF OFF ON OFF OFF OFF
19 OFF ON OFF OFF ON OFF OFF OFF
20 ON ON OFF OFF ON OFF OFF OFF
21 OFF OFF ON OFF ON OFF OFF OFF
22 ON OFF ON OFF ON OFF OFF OFF
23 OFF ON ON OFF ON OFF OFF OFF
24 ON ON ON OFF ON OFF OFF OFF
25 OFF OFF OFF ON ON OFF OFF OFF
26 ON OFF OFF ON ON OFF OFF OFF
27 OFF ON OFF ON ON OFF OFF OFF
28 ON ON OFF ON ON OFF OFF OFF
29 OFF OFF ON ON ON OFF OFF OFF
30 ON OFF ON ON ON OFF OFF OFF
31 OFFONONONONOFFOFFOFF
32 ON ON ON ON ON OFF OFF OFF
Table A. P Protocol Receiver Address
ADDRESS
SWITCH SETTING
SW1-1 SW1-2 SW1-3 SW1-4 SW1-5 SW1-6 SW1-7 SW1-8
25 ON OFF OFF ON ON OFF OFF OFF
26 OFF ON OFF ON ON OFF OFF OFF
27 ON ON OFF ON ON OFF OFF OFF
28 OFF OFF ON ON ON OFF OFF OFF
29 ON OFF ON ON ON OFF OFF OFF
30 OFF ON ON ON ON OFF OFF OFF
31 ON ON ON ON ON OFF OFF OFF
32 OFF OFF OFF OFF OFF ON OFF OFF
33 ON OFF OFF OFF OFF ON OFF OFF
34 OFF ON OFF OFF OFF ON OFF OFF
35 ON ON OFF OFF OFF ON OFF OFF
36 OFF OFF ON OFF OFF ON OFF OFF
37 ON OFF ON OFF OFF ON OFF OFF
38 OFF ON ON OFF OFF ON OFF OFF
39 ON ON ON OFF OFF ON OFF OFF
40 OFF OFF OFF ON OFF ON OFF OFF
41 ON OFF OFF ON OFF ON OFF OFF
42 OFF ON OFF ON OFF ON OFF OFF
43 ON ON OFF ON OFF ON OFF OFF
44 OFF OFF ON ON OFF ON OFF OFF
45 ON OFF ON ON OFF ON OFF OFF
46 OFF ON ON ON OFF ON OFF OFF
47 ON ON ON ON OFF ON OFF OFF
48 OFF OFF OFF OFF ON ON OFF OFF
ADDRESS
SWITCH SETTING
SW1-1 SW1-2 SW1-3 SW1-4 SW1-5 SW1-6 SW1-7 SW1-8
1 ON OFF OFF OFF OFF OFF OFF OFF
2 OFF ON OFF OFF OFF OFF OFF OFF
3 ON ON OFF OFF OFF OFF OFF OFF
4 OFF OFF ON OFF OFF OFF OFF OFF
5 ON OFF ON OFF OFF OFF OFF OFF
6 OFF ON ON OFF OFF OFF OFF OFF
7 ON ON ON OFF OFF OFF OFF OFF
8 OFF OFF OFF ON OFF OFF OFF OFF
9 ON OFF OFF ON OFF OFF OFF OFF
10 OFF ON OFF ON OFF OFF OFF OFF
11 ON ON OFF ON OFF OFF OFF OFF
12 OFF OFF ON ON OFF OFF OFF OFF
13 ON OFF ON ON OFF OFF OFF OFF
14 OFF ON ON ON OFF OFF OFF OFF
15 ON ON ON ON OFF OFF OFF OFF
16 OFF OFF OFF OFF ON OFF OFF OFF
17 ON OFF OFF OFF ON OFF OFF OFF
18 OFF ON OFF OFF ON OFF OFF OFF
19 ON ON OFF OFF ON OFF OFF OFF
20 OFF OFF ON OFF ON OFF OFF OFF
21 ON OFF ON OFF ON OFF OFF OFF
22 OFF ON ON OFF ON OFF OFF OFF
23 ON ON ON OFF ON OFF OFF OFF
24 OFF OFF OFF ON ON OFF OFF OFF
Table B. D Protocol Receiver Address
(Continued on next page)

10 C1302M-F (11/08)
ADDRESS
SWITCH SETTING
SW1-1 SW1-2 SW1-3 SW1-4 SW1-5 SW1-6 SW1-7 SW1-8
49 ON OFF OFF OFF ON ON OFF OFF
50 OFF ON OFF OFF ON ON OFF OFF
51 ON ON OFF OFF ON ON OFF OFF
52 OFF OFF ON OFF ON ON OFF OFF
53 ON OFF ON OFF ON ON OFF OFF
54 OFF ON ON OFF ON ON OFF OFF
55 ON ON ON OFF ON ON OFF OFF
56 OFF OFF OFF ON ON ON OFF OFF
57 ON OFF OFF ON ON ON OFF OFF
58 OFF ON OFF ON ON ON OFF OFF
59 ON ON OFF ON ON ON OFF OFF
60 OFF OFF ON ON ON ON OFF OFF
61 ON OFF ON ON ON ON OFF OFF
62 OFF ON ON ON ON ON OFF OFF
63 ON ON ON ON ON ON OFF OFF
64 OFF OFF OFF OFF OFF OFF ON OFF
65 ON OFF OFF OFF OFF OFF ON OFF
66 OFF ON OFF OFF OFF OFF ON OFF
67 ON ON OFF OFF OFF OFF ON OFF
68 OFF OFF ON OFF OFF OFF ON OFF
69 ON OFF ON OFF OFF OFF ON OFF
70 OFF ON ON OFF OFF OFF ON OFF
71 ON ON ON OFF OFF OFF ON OFF
72 OFF OFF OFF ON OFF OFF ON OFF
73 ON OFF OFF ON OFF OFF ON OFF
74 OFF ON OFF ON OFF OFF ON OFF
75 ON ON OFF ON OFF OFF ON OFF
76 OFF OFF ON ON OFF OFF ON OFF
77 ON OFF ON ON OFF OFF ON OFF
78 OFF ON ON ON OFF OFF ON OFF
79 ON ON ON ON OFF OFF ON OFF
80 OFF OFF OFF OFF ON OFF ON OFF
81 ON OFF OFF OFF ON OFF ON OFF
82 OFF ON OFF OFF ON OFF ON OFF
83 ON ON OFF OFF ON OFF ON OFF
84 OFF OFF ON OFF ON OFF ON OFF
85 ON OFF ON OFF ON OFF ON OFF
86 OFF ON ON OFF ON OFF ON OFF
87 ON ON ON OFF ON OFF ON OFF
88 OFF OFF OFF ON ON OFF ON OFF
89 ON OFF OFF ON ON OFF ON OFF
90 OFF ON OFF ON ON OFF ON OFF
91 ON ON OFF ON ON OFF ON OFF
92 OFF OFF ON ON ON OFF ON OFF
93 ON OFF ON ON ON OFF ON OFF
94 OFF ON ON ON ON OFF ON OFF
95 ON ON ON ON ON OFF ON OFF
Table B. D Protocol Receiver Address (Continued)
ADDRESS
SWITCH SETTING
SW1-1 SW1-2 SW1-3 SW1-4 SW1-5 SW1-6 SW1-7 SW1-8
96 OFF OFF OFF OFF OFF ON ON OFF
97 ON OFF OFF OFF OFF ON ON OFF
98 OFF ON OFF OFF OFF ON ON OFF
99 ON ON OFF OFF OFF ON ON OFF
100 OFF OFF ON OFF OFF ON ON OFF
101 ON OFF ON OFF OFF ON ON OFF
102 OFF ON ON OFF OFF ON ON OFF
103 ON ON ON OFF OFF ON ON OFF
104 OFF OFF OFF ON OFF ON ON OFF
105 ON OFF OFF ON OFF ON ON OFF
106 OFF ON OFF ON OFF ON ON OFF
107 ON ON OFF ON OFF ON ON OFF
108 OFF OFF ON ON OFF ON ON OFF
109 ON OFF ON ON OFF ON ON OFF
110 OFF ON ON ON OFF ON ON OFF
111 ON ON ON ON OFF ON ON OFF
112 OFF OFF OFF OFF ON ON ON OFF
113 ON OFF OFF OFF ON ON ON OFF
114 OFF ON OFF OFF ON ON ON OFF
115 ON ON OFF OFF ON ON ON OFF
116 OFF OFF ON OFF ON ON ON OFF
117 ON OFF ON OFF ON ON ON OFF
118 OFF ON ON OFF ON ON ON OFF
119 ON ON ON OFF ON ON ON OFF
120 OFF OFF OFF ON ON ON ON OFF
121 ON OFF OFF ON ON ON ON OFF
122 OFF ON OFF ON ON ON ON OFF
123 ON ON OFF ON ON ON ON OFF
124 OFFOFFONONONONONOFF
125 ON OFF ON ON ON ON ON OFF
126 OFF ON ON ON ON ON ON OFF
127 ON ON ON ON ON ON ON OFF
128 OFF OFF OFF OFF OFF OFF OFF ON
129 ON OFF OFF OFF OFF OFF OFF ON
130 OFF ON OFF OFF OFF OFF OFF ON
131 ON ON OFF OFF OFF OFF OFF ON
132 OFF OFF ON OFF OFF OFF OFF ON
133 ON OFF ON OFF OFF OFF OFF ON
134 OFF ON ON OFF OFF OFF OFF ON
135 ON ON ON OFF OFF OFF OFF ON
136 OFF OFF OFF ON OFF OFF OFF ON
137 ON OFF OFF ON OFF OFF OFF ON
138 OFF ON OFF ON OFF OFF OFF ON
139 ON ON OFF ON OFF OFF OFF ON
140 OFF OFF ON ON OFF OFF OFF ON
141 ON OFF ON ON OFF OFF OFF ON
142 OFF ON ON ON OFF OFF OFF ON
(Continued on next page)

C1302M-F (11/08) 11
Table B. D Protocol Receiver Address (Continued)
ADDRESS
SWITCH SETTING
SW1-1 SW1-2 SW1-3 SW1-4 SW1-5 SW1-6 SW1-7 SW1-8
143 ON ON ON ON OFF OFF OFF ON
144 OFF OFF OFF OFF ON OFF OFF ON
145 ON OFF OFF OFF ON OFF OFF ON
146 OFF ON OFF OFF ON OFF OFF ON
147 ON ONOFFOFFONOFFOFFON
148 OFF OFF ON OFF ON OFF OFF ON
149 ON OFF ON OFF ON OFF OFF ON
150 OFF ON ON OFF ON OFF OFF ON
151 ON ON ON OFF ON OFF OFF ON
152 OFF OFF OFF ON ON OFF OFF ON
153 ON OFF OFF ON ON OFF OFF ON
154 OFF ON OFF ON ON OFF OFF ON
155 ON ON OFF ON ON OFF OFF ON
156 OFF OFF ON ON ON OFF OFF ON
157 ON OFF ON ON ON OFF OFF ON
158 OFF ON ON ON ON OFF OFF ON
159 ONONONONONOFFOFFON
160 OFF OFF OFF OFF OFF ON OFF ON
161 ON OFF OFF OFF OFF ON OFF ON
162 OFF ON OFF OFF OFF ON OFF ON
163 ON ON OFF OFF OFF ON OFF ON
164 OFF OFF ON OFF OFF ON OFF ON
165 ON OFF ON OFF OFF ON OFF ON
166 OFF ON ON OFF OFF ON OFF ON
167 ON ON ON OFF OFF ON OFF ON
168 OFF OFF OFF ON OFF ON OFF ON
169 ON OFF OFF ON OFF ON OFF ON
170 OFF ON OFF ON OFF ON OFF ON
171 ON ON OFF ON OFF ON OFF ON
172 OFF OFF ON ON OFF ON OFF ON
173 ON OFF ON ON OFF ON OFF ON
174 OFF ON ON ON OFF ON OFF ON
175 ONONONONOFFONOFFON
176 OFF OFF OFF OFF ON ON OFF ON
177 ON OFF OFF OFF ON ON OFF ON
178 OFF ON OFF OFF ON ON OFF ON
179 ON ON OFF OFF ON ON OFF ON
180 OFF OFF ON OFF ON ON OFF ON
181 ON OFF ON OFF ON ON OFF ON
182 OFF ON ON OFF ON ON OFF ON
183 ON ON ON OFF ON ON OFF ON
184 OFF OFF OFF ON ON ON OFF ON
185 ON OFF OFF ON ON ON OFF ON
186 OFF ON OFF ON ON ON OFF ON
187 ON ON OFF ON ON ON OFF ON
188 OFF OFF ON ON ON ON OFF ON
189 ON OFF ON ON ON ON OFF ON
190 OFF ON ON ON ON ON OFF ON
ADDRESS
SWITCH SETTING
SW1-1 SW1-2 SW1-3 SW1-4 SW1-5 SW1-6 SW1-7 SW1-8
191 ONONONONONONOFFON
192 OFF OFF OFF OFF OFF OFF ON ON
193 ON OFF OFF OFF OFF OFF ON ON
194 OFF ON OFF OFF OFF OFF ON ON
195 ON ON OFF OFF OFF OFF ON ON
196 OFF OFF ON OFF OFF OFF ON ON
197 ON OFF ON OFF OFF OFF ON ON
198 OFF ON ON OFF OFF OFF ON ON
199 ON ON ON OFF OFF OFF ON ON
200 OFF OFF OFF ON OFF OFF ON ON
201 ON OFF OFF ON OFF OFF ON ON
202 OFF ON OFF ON OFF OFF ON ON
203 ON ON OFF ON OFF OFF ON ON
204 OFF OFF ON ON OFF OFF ON ON
205 ON OFF ON ON OFF OFF ON ON
206 OFF ON ON ON OFF OFF ON ON
207 ONONONONOFFOFFONON
208 OFF OFF OFF OFF ON OFF ON ON
209 ON OFF OFF OFF ON OFF ON ON
210 OFF ON OFF OFF ON OFF ON ON
211 ON ON OFF OFF ON OFF ON ON
212 OFF OFF ON OFF ON OFF ON ON
213 ON OFF ON OFF ON OFF ON ON
214 OFF ON ON OFF ON OFF ON ON
215 ON ON ON OFF ON OFF ON ON
216 OFF OFF OFF ON ON OFF ON ON
217 ON OFF OFF ON ON OFF ON ON
218 OFF ON OFF ON ON OFF ON ON
219 ON ON OFF ON ON OFF ON ON
220 OFF OFF ON ON ON OFF ON ON
221 ON OFF ON ON ON OFF ON ON
222 OFF ON ON ON ON OFF ON ON
223 ONONONONONOFFONON
224 OFF OFF OFF OFF OFF ON ON ON
225 ON OFF OFF OFF OFF ON ON ON
226 OFF ON OFF OFF OFF ON ON ON
227 ON ON OFF OFF OFF ON ON ON
228 OFF OFF ON OFF OFF ON ON ON
229 ON OFF ON OFF OFF ON ON ON
230 OFF ON ON OFF OFF ON ON ON
231 ONONONOFFOFFONONON
232 OFF OFF OFF ON OFF ON ON ON
233 ON OFF OFF ON OFF ON ON ON
234 OFF ON OFF ON OFF ON ON ON
235 ON ON OFF ON OFF ON ON ON
236 OFF OFF ON ON OFF ON ON ON
237 ON OFF ON ON OFF ON ON ON
238 OFF ON ON ON OFF ON ON ON
(Continued on next page)

12 C1302M-F (11/08)
ADDRESS
SWITCH SETTING
SW1-1 SW1-2 SW1-3 SW1-4 SW1-5 SW1-6 SW1-7 SW1-8
239 ONONONONOFFONONON
240 OFF OFF OFF OFF ON ON ON ON
241 ON OFF OFF OFF ON ON ON ON
242 OFF ON OFF OFF ON ON ON ON
243 ONONOFFOFFONONONON
244 OFF OFF ON OFF ON ON ON ON
245 ONOFFONOFFONONONON
246 OFF ON ON OFF ON ON ON ON
ADDRESS
SWITCH SETTING
SW1-1 SW1-2 SW1-3 SW1-4 SW1-5 SW1-6 SW1-7 SW1-8
247 ON ON ON OFF ON ON ON ON
248 OFF OFF OFF ON ON ON ON ON
249 ONOFFOFFONONONONON
250 OFF ON OFF ON ON ON ON ON
251 ON ON OFF ON ON ON ON ON
252 OFF OFF ON ON ON ON ON ON
253 ON OFF ON ON ON ON ON ON
254 OFF ON ON ON ON ON ON ON
Table B. D Protocol Receiver Address (Continued)

C1302M-F (11/08) 13
Install the Camera Module
To install the camera module do the following:
1. Refer to Figure 4. Loosen the set screw at the back of the enclosure with the provided 1.5 mm Allen wrench.
Figure 4. Loosen Set Screw
2. Use the supplied spanner wrench to loosen the back of the camera enclosure (refer to Figure 5). Once the back is loose, use your hands to
continue to loosen it until it can be removed.
Figure 5. Remove Back Cap of Enclosure
WARNING: To avoid thread damage carefully remove the back of the camera enclosure. Never use force to remove the back of the camera
enclosure.
SET SCREW
CAMERA
ENCLOSURE
BACK
SPANNER
WRENCH

14 C1302M-F (11/08)
3. Slide the camera module into the enclosure. Refer to Figure 6 to position the camera module properly in the enclosure. Carefully mate the
camera’s power connector to the mating connector located inside the enclosure.
Models with a wiper: The tab located inside the enclosure must be pointing down before installing the camera module (refer to Figure 6).
To position the tab, place the wiper located at the front of the enclosure in the center of the viewing window (refer to Figure 7).
Figure 6. Install Camera Module
Figure 7. Center Wiper
WARNING: Do not force the camera module into the enclosure.
CENTER
NOTCHES
TAB
CAMERA
MODULE
CAMERA
ENCLOSURE
CENTER WIPER

C1302M-F (11/08) 15
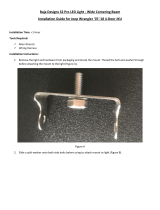
4. Refer to Figure 8 and do the following to install the arm of the wiper:
a. Place the supplied green bushing on the stud located behind the handle of the camera module. The bushing should be in the same
orientation as shown in Figure 8.
b. Install the wiper arm. Place the ridge of the arm in the notch of the enclosure tab and the slot of the arm over the green bushing.
5. Secure the arm of the wiper and the camera module with the supplied 8-32 Phillips flat head screw (refer to Figure 8).
Figure 8. Install Wiper Arm
6. Reinstall the back cap on the enclosure by doing the following:
a. Use your hands and turn the back cap clockwise until you can no longer turn it with your hands. The back cap should turn easily until
it comes in contact with the O-ring. If it does not turn easily the threads are not aligned and thread damage will occur.
b. Continue tightening the back cap with the supplied spanner wrench. There should be no gap between the back cap and the enclosure
when the back cap is tightened and properly installed.
c. Once the back cap is installed, secure the back cap with the set screw using the supplied 1.5 mm Allen wrench.
WARNINGS:
• To avoid thread damage carefully install the back cap to the enclosure.
• Never force the back cap onto the end of the enclosure.
• When installation is completed there should be no gap between the back cap and the enclosure.
BUSHING
SET TAB IN
CENTER POSITION
CAMERA
MODULE
HANDLE
8-32 PHILLIPS FLAT
HEAD SCREW
ARM
STUD

16 C1302M-F (11/08)
Install the Pan and Tilt Unit
1. Check for proper seating of the power module seal. Make sure the seal is fully seated in the groove on the top of the power module.
Figure 9. Factory-Installed Power Module Seal
2. Refer to Figure 10 and attach the pan and tilt unit to the power module. Align the pins of the pan and tilt unit with the holes of the power
module. Carefully mate the pan and tilt connector to the power module connector.
Figure 10. Attach the Pan and Tilt Unit to the Power Module
3. With your hands carefully thread the pan and tilt’s locking ring on the threads of the power module until the threads are completely
engaged and can no longer be tightened by hand.
4. Use the supplied spanner wrench and continue to tighten the locking ring. After the locking ring has been tightened, tap the end of the
handle of the wrench with a hammer or the palm of your hand to ensure a secure fit.
5. Tighten the set screw of the locking ring with the supplied 2 mm Allen wrench to secure the assembly.
WARNING: Use caution when attaching the enclosure unit to the power module. If the grooves on the top of the power module are
damaged, the integrity of the unit could be compromised.
WARNINGS:
• Total weight of the pan and tilt component is 55 lb (25 kg). Use caution when lifting and assembling the pan and tilt component on the
power module.
• The weight of the pan and tilt unit must be safely supported during installation.
• It is recommended that non-slip gloves be worn during installation.
• Avoid thread damage. Never use force when assembling and tightening the threaded components of the system.
POWER MODULE SEAL
POWER MODULE
PIN
HOLE
LOCKING
RING

C1302M-F (11/08) 17
Install the Sun Shroud
1. Place the supplied nylon washers on the 6-32 Phillips pan head screws. Refer to Figure 11.
2. Align the mounting holes of the sun shroud with the holes on top of the enclosure.
3. Use the supplied nylon washers and screws to secure the sun shroud to the enclosure.
Figure 11. Install the Sun Shroud
SUN SHROUD
NYLON
WASHER
6-32 PHILLIPS PAN
HEAD SCREW

18 C1302M-F (11/08)
Maintenance
CAMERA MODULE REPLACEMENT
To replace the camera module do the following:
1. Remove the back cap of the camera enclosure. Refer to Figure 12 and do the following:
a. Loosen the set screw with a 1.5 mm Allen wrench.
b. Use the supplied spanner wrench to loosen the back cap of the camera enclosure. Once the back is loose, use your hands to continue
to loosen it until it can be removed.
Figure 12. Remove Back Cap of Camera Enclosure
2. Remove the 8-32 Phillips flat head screw that secures the camera module inside the enclosure, refer to Figure 13.
Figure 13. Remove or Install Camera Module
DANGER: To reduce the risk of ignition of hazardous atmospheres, disconnect the equipment from the power supply before opening.
Keep assembly tightly closed when operating.
CAMERA
ENCLOSURE
BACK
SPANNER
WRENCH
SET SCREW
BUSHING
SET TAB IN
CENTER POSITION
CAMERA
MODULE
HANDLE
8-32 PHILLIPS FLAT
HEAD SCREW
ARM
STUD

C1302M-F (11/08) 19
3. For models with wipers, also remove the wiper arm and the green bushing from the unit (see Figure 13).
4. Slide the camera module out of the enclosure.
5. Install the new camera module by doing the following:
Slide the camera module into the enclosure. Refer to Figure 14 to position the camera module properly in the enclosure. Carefully mate the
camera’s power connector to the mating connector located inside the enclosure.
Models with a wiper: The tab located inside the enclosure must be pointing down before installing the camera module (refer to
Figure 14). To position the tab, place the wiper located at the front of the enclosure in the center of the viewing window (refer to Figure 15).
Figure 14. Install Camera Module
Figure 15. Center Wiper
WARNING: Never force the camera module into the enclosure.
CENTER
NOTCHES
TAB
CAMERA
MODULE
CAMERA
ENCLOSURE
CENTER WIPER

20 C1302M-F (11/08)
6. Refer to Figure 13 and do the following to reinstall the arm of the wiper:
a. Reinstall the green bushing on the stud located behind the handle of the camera module.
b. Reinstall the wiper arm. Place the ridge of the arm in the notch of the enclosure tab and the slot of the arm over the green bushing.
7. Secure the camera module and the wiper arm with the 8-32 Phillips flat head screw (refer to Figure 13).
8. Reinstall the back cap on the enclosure by doing the following:
a. Use your hands and turn the back cap clockwise until you can no longer turn it with your hands. The back cap should turn easily until
it comes in contact with the O-ring. If it does not turn easily, the threads are not aligned and thread damage will occur.
b. Continue tightening the back cap with the supplied spanner wrench. There should be no gap between the back cap and the enclosure
when the back cap is tightened and properly installed.
c. After the back cap is installed, secure the back cap with the set screw using a 1.5 mm Allen wrench.
WARNINGS:
• To avoid thread damage, carefully install the back cap to the enclosure.
• Never force the back cap onto the end of the enclosure.
• When installation is completed, there should be no gap between the back cap and the enclosure.
/