Page is loading ...

1
GB
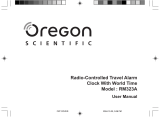
MULTI-BAND RADIO-CONTROLLED
TRAVEL ALARM CLOCK
MODEL: RMB383A
USER'S MANUAL
Congratulations on your purchasing the RMB383A Multi-Band
Radio-controlled Travel Alarm Clock.
Innovative in design and features, this unit is a unique
radio-controlled travel clock which can receive the clock radio signal
from Frankfurt-Germany, Colorado-USA, Rugby-England,
Fukushima-East-Japan and Kyushu-West-Japan by one device.
Simply plug in the exchangeable antenna for your location - without
any setting you can travel the world with this radio-controlled clock
and know the accurate time and date immediately. The effective
reception range is around 1,500km radius from the selected signal.
The unit also comes with other great features such as indoor
temperature display, EL back-light, dual time and calendar, dual
daily alarm with 8-minute snooze function, hourly chime and key-
lock function.

2
GB
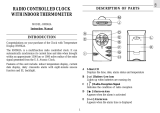
MAIN FEATURES
1. LCD DISPLAY
2. MAIN UNIT
3. PLUGGED-IN ANTENNA
CONTROL BUTTONS
A. [ SNOOZE
] BUTTON
Press to activate the snooze function or turn on the back-light
for 5 seconds
B. [ ] BUTTON
Press to toggle between the 2 daily alarms or press and hold to
enter the setting routine
C. [▲] AND [▼] BUTTONS
Press to change the value of a setting
D. [MODE] BUTTON
Press to change the display mode or press and hold to enter the
setting routine
E. [TEMP] BUTTON
Press to display the indoor temperature or press and hold to
change the temperature display unit
F. [RESET] BUTTON
Press to return all settings to default values
G. [RELEASE] PUSH BUTTON
Press to release the plugged-in antenna
2
B
3
1
A
F
G
D
E
C

3
GB
BATTERY INSTALLATION
This unit is operated by 2 pieces of UM-4 or AAA-sized 1.5V
batteries.
Battery Installation:
1. Remove the battery compartment door.
2. Insert two AAA-sized (UM-4) 1.5V batteries as shown.
3. Press [RESET] .
4. Replace the battery compartment door.
Note: Make sure the polarities are correct.
When the power level of the installed batteries is low, the low battery
indicator [
] will light up. In this case, replace with new batteries.
ANTENNA SELECTION
To utilize the radio-controlled clock function, first you must select
an antenna to be applied.
The following antennas are included in the package:
1. EUROPE (DCF-77 signal)
2. JAPAN-WEST/ USA/ UK (JJY-60/ WWVB-60/ MSF-60
signal)
3. JAPAN-EAST (JJY-40 signal)
Simply plug in the antenna as shown and the auto-reception of the
radio signal will be activated automatically.
The respective icon for the plugged in antenna will be shown on the
top-right corner of the LCD display accordingly.

4
GB
ANTENNA DISPLAYED ICONS
EUROPE
JAPAN-WEST/ USA/ UK
JAPAN-EAST
For the JAPAN-WEST/USA/UK antenna, follow the steps below
to pick up one of the three signals.
1. Plug in this antenna as instructed and the icon display will be
flashing. This unit is able to store the last used signal (e.g. if the
UK antenna was the last one used, after re-plugging in the
antenna, the
icon will be displayed first).
2. Use [▲] or [▼] to select between the 3 signals.
3. Press [MODE] to confirm or simply leave it idle for 1 minute.
The entry will be confirmed and auto-reception will be activated
accordingly. The radio-reception icon will be flashing.
4. If the US signal is chosen, the ZONE icon will appear. Press
[MODE] then use [▲] or [▼] to toggle among the 4 US
time-zones: Pacific (P), Mountains (M), Central (C) or Eastern
(E).
5. Press [MODE] to confirm or simply leave it idle for 1 minute.
The entry will be confirmed and auto-reception will be activated
accordingly. The radio-reception icon will be flashing.
Without plugging-in the antenna, the main unit can be used alone
and act as a multi-functional digital clock.
To unplug the antenna, simply press the [RELEASE] button and
then pull out the antenna.
HOW TO ACTIVATE THE BACK-LIGHT
Press [ SNOOZE ] to turn on the back-light for 5 seconds.
Note:
- The EL panel that provides illumination will lose power after
extensive usage.
- The unit may emit a quiet hissing sound whenever the display
is illuminated by the EL backlight. This is due to vibration of
the EL panel used for illumination and does not indicate
malfunction of the unit.
DISPLAY MODES
Press [MODE] to display the following in sequence:
1)
Current Time 2)
Current Time with Second Indication
Calendar Calendar

5
GB
3) Current Time 4) 2 zone-time________
2
nd
zone-time 2
nd
zone-time Calendar
To display the alarm clock and details, press [ALARM]. The alarm
time will appear in the lower line of the display. Press [TEMP] to
display the indoor temperature.
ABOUT RADIO RECEPTION
When the unit is within range of its respective radio signal, the radio
control mechanism will override all manual settings unless radio
reception has been deactivated.
After battery installation (with the antenna plugged in), the unit will
start to search for a radio signal automatically. When it is receiving
radio signal, the radio-reception icon will start to blink. A complete
reception generally takes about 2 to 10 minutes, depending on the
strength of the radio signal.
The antenna icon indicates the quality of reception.
Strong Weak No Reception Receiving
When the reception is complete, the radio-reception icon will appear
as [
] and the received radio-controlled time will be displayed
accordingly.
Interference
Reception can be affected by a number of factors. For best reception,
place the device away from metal objects and electrical appliances.
Note: Interference from sources such as TV sets can affect the signal.
If, after batteries have been inserted for ten minutes, the signal is
not received, then set the time manually (see section: How To Set
The Clock & Calendar Manually).
HOW TO ENABLE OR DISABLE
AUTO-RECEPTION
If you wish to disable the auto reception of a radio signal when the
unit is within range of a transmitter, simply unplug the antenna or
press and hold [ ▼ ] for 3 seconds. The radio-reception icon will
disappear and the unit will NOT respond to radio signals.
To enable the feature again, plug in the antenna again or press and
hold [▲] for 3 seconds to force signal reception. The radio-reception
icon will be shown again and it will start blinking to initiate reception
automatically.
HOW TO SET THE CLOCK &
CALENDAR MANUALLY
1. Press and hold [MODE] for 2 seconds.
2. Enter the 2
nd
time-zone offset hour using [▲] / [▼]. You can
select between + 23 and - 23 hours. Hold down either button to
rapidly increase or decrease the value. Press [MODE] .
nd

6
GB
Time zone setting allows you to display hours for many other
cities , e.g. if the unit is at San Francisco (-8 GMT) and you
want to know Hong Kong (+8 GMT) hour you should set 16 as
offset.
3. Enter the clock format using [▲] / [▼]. You can select 12-hour
or 24-hour display.
4. Press [MODE] .
5. Enter the hours using [▲] / [▼].
6. Press [MODE] .
7. Enter the minutes using [▲] / [▼].
8. Press [MODE] .
9. Follow the same pattern to set the year, date format (month-day
or day-month), month and day.
10. Press [MODE] button to save the changes and exit.
11. Press [MODE] button right after (within one minute) to set the
hourly chime on/off function. Use [▲] / [▼] to activate
deactivate this function.
12. Press [MODE] buttonto confirm.
Note: The unit will also save all changes and return to normal display
automatically after the unit has been left idle for a minute.
ABOUT THE HOURLY-CHIME FUNCTION
When the Hourly-Chime is set to the on-mode, the indicator [ ]
will light up and a beep sound as a reminder will be given out at the
beginning of each hour.
To enable/ disable this function, please refer to Section "How to set
the clock and calendar manually".
ABOUT THE ALARM
This unit is equipped with 2 daily alarm functiones.
To set the alarm,
1. Press [
] to change to the alarm-time display mode.
2. Press [
] again to select ALARM-1 or ALARM-2.
3. Press and hold [
] for 2 seconds.
4. Use [▲] / [▼] to enter the hours.
5. Press [
].
6. Use[▲] / [▼] to enter the minutes.
7. Press [
].
The alarm will be automatically activated. The [
] or [ ] icon
will appear. To deactivate the alarm, press [▲] / [▼] when the alarm
time is displayed.

7
GB
HOW TO USE THE DAILY ALARM
An alarm will go off for 2 minutes in two stepped crescendo patterns
if not cancelled. The [
] icon will flash and the back-light will be
activated for 5 seconds. To mute the alarm, press any key. Pressing
[ SNOOZE
] will activate the snooze function.
SNOOZE FUNCTION
When the snooze function is activated, the alarm will be muted
temporarily and set off again after 8 minutes. To disable the snooze
function, press any key (except [ SNOOZE
] ) when the alarm
goes off. Alternatively you can press and hold [ SNOOZE ] for
3 seconds when the snooze function is on.
INDOOR TEMPERATURE DISPLAY
This unit is capable of measuring the indoor temperature within a
range of -5°C to +50°C (23°F to 122°F).
To display the temperature, press [TEMP]. To change the
temperature display unit, press and hold [TEMP] for 2 seconds to
toggle between degree Celsius (°C) or degree Fahrenheit (°F).
If the temperature goes below or above the range measured, the
display will show "LLL" or "HHH" respectively.
KEY-LOCK FUNCTION
To lock all key operations when travelling, press and hold both [▲]
and [▼] buttons for 2 seconds. The key-lock icon [
] will appear
and all key functions (except [RESET]) will be locked.
To unlock, press and hold both [▲] and [▼] again for 2 seconds.
The key-lock icon [
] will disappear.
THE RESET BUTTON
The [RESET] button is used to reactivate synchronization of signals
after battery replacement or when the unit is malfunctioning. Use a
blunt stylus to hold down the button. All settings will return to their
default values.
NOTES ON ANTENNA
Warning: Do not touch the inner parts of the main unit and/or the
antenna as this may damage or cause malfunction to this device.

8
GB
PRECAUTIONS
This unit is engineered to give you years of satisfactory service if
you handle it carefully. Here are a few precautions.
1. Do not immerse the unit in water. If you spill liquid over it, dry
it immediately with a soft, lint-free cloth.
2. Do not clean the unit with any liquid containing alcohol,
detergent, abrasive or corrosive materials. They may scratch
the plastic parts and corrode the electronic circuit.
3. Do not subject the unit to excessive force, shock, dust,
temperature or humidity, which may result in malfunction,
shorter electronic life span, damaged battery and distorted parts.
4. Do not tamper with the unit’s internal components. Doing so
will invalidate the warranty on the unit and may cause
unnecessary damage. The unit contains no user-serviceable parts.
5. Only use fresh batteries as specified in the user’s instructions.
Do not mix new and old batteries as the old ones may leak.
6. Always read the user’s instructions thoroughly before operating
the unit.
SPECIFICATIONS
Radio Control : Auto Synchronization of current time and
date
Calendar : Month / Day or Day / Month format
Clock Time : 12 / 24-hour format
Dual Alarm : 2-minute crescendo alarm with 8-minute
snooze function
Indoor Temperature
:-5°C to +50°C
Measuring Range (23°F to 122°F)
Resolution : 0.1°C (0.2°F)
Power : 2 pcs of UM-4 or AAA-size 1.5V batteries
Weight : 200 g (without battery)
Dimensions (mm) :
- main unit : 80.8 x 62.6 x 21.1 mm ( H x W x D )
- antenna : 29.4 x 62.6 x 20.2 mm ( H x W x D )
Includes carrying Pouch
CUSTOMER ASSISTANCE
Should you require assistance regarding this product and its
operation, please contact our customer care department at 1-800-
853-8883 or via email at [email protected].
WARRANTY
This product is warranted to be free of manufacturing defects for a
period of 3 months from date of retail purchase. Defective product
should be directed to the place of retail purchase for exchange.
Should this not be possible, contact our customer care department
for assistance and a return material authorization. No returns may
be made without a return authorization. Warranty exchanges require
proof of date of purchase (purchase receipt showing date, place and
product purchased).
This warranty does not cover product subjected to abuse, misuse,
accidental damage or tampering.

9
GB
CAUTION
- The content of this manual and technical specification are
subject to change without further notice.
- Due to printing limitation, the displays shown in this manual
may differ from the actual display.
- The contents of this manual may not be reproduced without
the permission of the manufacturer.
/