Samsung AE090MNYDEH/EU User guide

Category
Heat pumps
Type
User guide
SPLIT/TDM PLUS Hydro Unit
User manual
AE090JNYDEH / AE090JNYDGH / AE160JNYDEH / AE160JNYDGH /
AE090MNYDEH / AE090MNYDGH / AE160MNYDEH / AE160MNYDGH
Thank you for purchasing this Samsung air conditioner.
Before operating this unit, please read this user manual carefully and retain it for future reference.
2
English
Contents
PREPARATION 4
Safety Information 4
Description of each icon 11
Description of each control 13
BASIC OPERATION 15
Operating basic mode of Hydro unit 15
Domestic Hot Water (DHW) mode operation 16
Outing mode 17
Silent mode 17
Checking current temperature 18
Checking set temperature 18
TDM (Time-Division Multi) Variables (TDM product Only) 19
Setting weekly timer 20
Setting a holiday with weekly timer 22
Canceling a weekly timer 23
Initializing a weekly timer 24
Setting daily timer 25
ADVANCED OPERATION 27
How to set the detailed setting (User setting mode) 27
Wired remote controller installation 31
Use of wired remote controller installation / service mode 33
Field specification setting mode of wired remote controller 36
Field setting mode 38
3
English
OTHERS 53
Maintaining the unit 53
Troubleshooting tips 55
Error codes 58
Product specification 60
Correct Disposal of This Product
(Waste Electrical & Electronic Equipment)
(Applicable in countries with separate collection systems)
This marking on the product, accessories or literature indicates that the product and its electronic accessories (e.g.
charger, headset, USB cable) should not be disposed of with other household waste at the end of their working life. To
prevent possible harm to the environment or human health from uncontrolled waste disposal, please separate these
items from other types of waste and recycle them responsibly to promote the sustainable reuse of material resources.
Household users should contact either the retailer where they purchased this product, or their local government office, for
details of where and how they can take these items for environmentally safe recycling.
Business users should contact their supplier and check the terms and conditions of the purchase contract. This product
and its electronic accessories should not be mixed with other commercial wastes for disposal.
For information on Samsung’s environmental commitments and product specific regulatory obligations e.g. REACH visit
samsung.com/uk/aboutsamsung/samsungelectronics/corporatecitizenship/data_corner.html
Safety Information
4
English
4
English
PREPARATION
Before using your new Air to Water Heat pump, please read this manual
thoroughly to ensure that you know how to safely and efficiently operate the
extensive features and functions of your new appliance.
Because the following operating instructions cover various models, the
characteristics of your Air to Water Heat pump may differ slightly from those
described in this manual. If you have any questions, call your nearest contact
center or find help and information online at www.samsung.com.
WARNING
Hazards or unsafe practices that may result in severe personal injury or death.
CAUTION
Hazards or unsafe practices that may result in minor personal injury or property
damage.
Follow directions.
Do NOT attempt.
Make sure the machine is grounded to prevent electric shock.
Cut-off the power supply.
Do NOT disassemble.
FOR INSTALLATION
WARNING
Use the power line with the power specifications of the product or higher
and use the power line for this appliance only. In addition, do not use an
extension line.
• Extending the power line may result in electric shock or fire.
• Do not use an electric transformer. It may result in electric shock or fire.
• If the voltage/frequency/rated current condition is different, it may cause
fire.
The installation of this appliance must be performed by a qualified
technician or service company.
• Failing to do so may result in electric shock, fire, explosion, problems with
the product, or injury.
Safety Information
PREPARATION
5
English
5
English
PREPARATION
Install a switch and circuit breaker dedicated to the Air to Water Heat
pump.
• Failing to do so may result in electric shock or fire.
Fix the outdoor unit firmly so that the electric part of the outdoor unit is
not exposed.
• Failing to do so may result in electric shock or fire.
Do not install this appliance near a heater, inflammable material. Do
not install this appliance in a humid, oily or dusty location, in a location
exposed to direct sunlight and water (rain drops). Do not install this
appliance in a location where gas may leak.
• This may result in electric shock or fire.
Never install the outdoor unit in a location such as on a high external wall
where it could fall.
• If the outdoor unit falls, it may result in injury, death or property damage.
This appliance must be properly grounded. Do not ground the appliance to
a gas pipe, plastic water pipe, or telephone line.
• Failure to do so may result in electric shock, fire, an explosion, or other
problems with the product.
• Never plug the power cord into a socket that is not grounded correctly
and make sure that it is in accordance with local and national codes.
CAUTION
Install your appliance on a level and hard floor that can support its weight.
• Failing to do so may result in abnormal vibrations, noise, or problems with
the product.
Install the draining hose properly so that water is drained correctly.
• Failing to do so may result in water overflowing and property damage.
When installing the outdoor unit, make sure to connect the draining hose
so that draining is performed correctly.
• The water generated during the heating operation by the outdoor unit
may overflow and result in property damage. In particular, in winter, if a
block of ice falls, it may result in injury, death or property damage.
Safety Information
6
English
6
English
PREPARATION
• Our units must be installed in compliance with the spaces indicated in the
installation manual to ensure either accessibility from both sides or ability
to perform routine maintenance and repairs. The units’components must
be accessible and that can be disassembled in conditions of complete
safety either for people or things. For this reason, where it is not observed
as indicated into the Installation Manual, the cost necessary to reach
and repair the unit (in safety, as required by current regulations in force)
with slings, trucks, scaffolding or any other means of elevation won’t be
considered in-warranty and charged to end user.
Do not disassemble and alter the heater at your own discretion.
FOR POWER SUPPLY
WARNING
When the circuit breaker is damaged, contact your nearest service center.
Do not pull or excessively bend the power line. Do not twist or tie the
power line. Do not hook the power line over a metal object, place a heavy
object on the power line, insert the power line between objects, or push
the power line into the space behind the appliance.
• This may result in electric shock or fire.
CAUTION
When not using the Air to Water Heat pump for a long period of time or
during a thunder/lightning storm, cut the power at the circuit breaker.
• Failing to do so may result in electric shock or fire.
7
English
7
English
PREPARATION
FOR USING
WARNING
If the appliance is flooded, please contact your nearest service center.
• Failing to do so may result in electric shock or fire.
If the appliance generates a strange noise, a burning smell or smoke,
unplug the power plug immediately and contact your nearest service
center.
• Failing to do so may result in electric shock or fire.
In the event of a gas leak (such as propane gas, LP gas, etc.), ventilate
immediately without touching the power line. Do not touch the appliance
or power line.
• Do not use a ventilating fan.
• A spark may result in an explosion or fire.
To reinstall the Air to Water Heat pump, please contact your nearest
service center.
• Failing to do so may result in problems with the product, water leakage,
electric shock, or fire.
• A delivery service for the product is not provided. If you reinstall the
product in another location, additional construction expenses and an
installation fee will be charged.
• Especially, when you wish to install the product in an unusual location
such as in an industrial area or near the seaside where it is exposed to the
salt in the air, please contact your nearest service center.
Do not touch the circuit breaker with wet hands.
• This may result in electric shock.
Do not turn the Air to Water Heat pump off with the circuit breaker while it
is operating.
• Turning the Air to Water Heat pump off and then on again with the circuit
breaker may cause a spark and result in electric shock or fire.
Safety Information
8
English
8
English
PREPARATION
After unpacking the Air to Water Heat pump, keep all packaging materials
well out of the reach of children, as packaging materials can be dangerous
to children.
• If a child places a bag over its head, it may result in suffocation.
Do not insert your fingers or foreign substances into the outlet when the
Air to Water Heat pump is operating.
• Take special care that children do not injure themselves by inserting their
fingers into the product.
Do not insert your fingers or foreign substances into the air inlet/outlet of
the Air to Water Heat pump.
• Take special care that children do not injure themselves by inserting their
fingers into the product.
Do not strike or pull the Air to Water Heat pump with excessive force.
• This may result in fire, injury, or problems with the product.
Do not place an object near the outdoor unit that allows children to climb
onto the machine.
• This may result in children seriously injuring themselves.
Do not use this Air to Water Heat pump for long periods of time in badly
ventilated locations or near infirm people.
• Since this may be dangerous due to a lack of oxygen, Open a window at
least once an hour.
If any foreign substance such as water has entered the appliance, cut the
power by unplugging the power plug and turning the circuit breaker off
and then contact your nearest service center.
• Failing to do so may result in electric shock or fire.
Do not attempt to repair, disassemble, or modify the appliance yourself.
• Do not use any fuse (such as cooper, steel wire, etc.)other than the
standard fuse.
• Failing to do so may result in electric shock, fire, problems with the
product, or injury.
9
English
9
English
PREPARATION
CAUTION
Check that the installation frame of the outdoor unit is not broken at least
once a year.
• Failing to do so may result in injury, death or property damage.
Max current is measured according to IEC standard for safety and current
is measured according to ISO standard for energy efficiency.
Do not stand on top of the appliance or place objects (such as laundry,
lighted candles, lighted cigarettes, dishes, chemicals, metal objects, etc.)
on the appliance.
• This may result in electric shock, fire, problems with the product, or injury.
Do not operate the appliance with wet hands.
• This may result in electric shock.
Do not spray volatile material such as insecticide onto the surface of the
appliance.
• As well as being harmful to humans, it may also result in electric shock,
fire or problems with the product.
Do not drink the water from the Air to Water Heat pump.
• The water may be harmful to humans.
Do not apply a strong impact to the remote controller and do not
disassemble the remote controller.
Do not touch the pipes connected with the product.
• This may result in burns or injury.
Do not use this Air to Water Heat pump to preserve precision equipment,
food, animals, plants or cosmetics, or for any other unusual purposes.
• This may result in property damage.
Avoid directly exposing humans, animals or plants from the air flow from
the Air to Water Heat pump for long periods of time.
• This may result in harm to humans, animals or plants.
Safety Information
10
English
10
English
PREPARATION
This appliance is not intended for use by persons (including children) with
reduced physical, sensory or mental capabilities, or lack of experience and
knowledge, unless they have been given supervision or instruction concerning
use of the appliance by a person responsible for their safety. Children should
be supervised to ensure that they do not play with the appliance.
For use in Europe : This appliance can be used by children aged from 8 years
and above and persons with reduced physical, sensory or mental capabilities
or lack of experience and knowledge if they have been given supervision or
instruction concerning use of the appliance in a safe way and understand the
hazards involved. Children shall not play with the appliance. Cleaning and
user maintenance shall not be made by children without supervision.
FOR CLEANING
WARNING
Do not clean the appliance by spraying water directly onto it. Do not use
benzene, thinner or alcohol to clean the appliance.
• This may result in discoloration, deformation, damage, electric shock or
fire.
Before cleaning or performing maintenance, unplug the Air to Water Heat
pump from the wall socket and wait until the fan stops.
• Failing to do so may result in electric shock or fire.
CAUTION
Take care when cleaning the surface of the heat exchanger of the outdoor
unit since it has sharp edges.
• To avoid cutting your fingers, wear thick cotton gloves when cleaning it.
Do not clean the inside of the Air to Water Heat pump by yourself.
• For cleaning inside the appliance, contact your nearest service center.
• Failure to do may result in damage, electric shock or fire.
11
English
11
English
PREPARATION
Description of each icon
Display
01
02
03
13
14
10
11
04 05
06 07
08 09
12
LED indicator (Green: Normal / Red: Need to be checked)
On/Off button
Temperature control button
NOTE
• Without opening the cover of your wired remote controller, you can turn Hydro unit on or off
or set the desired temperature.
Description of each icon
12
English
12
English
PREPARATION
Classification Indication Function
Hydro unit
01
Hydro unit operation (heat/cool/auto/outing/
silent)
02
System temperature (water Law temp./indoor
temp./outdoor temp./discharge water temp./
hot water temp.)
03
Temperature (current/desired)
Timer
04
Timer (Daily/Weekly/Holiday)
05
Current day or timer function
06
Timer number
07
Current time/summer time/ On or Off time
General
function
08
Operation status (COMP operation/Back up
heater/Booster heater/Solar/Back up boiler)
09
Operation status (water pump/water tank/
defrost operation/freezing control/water tank
sterilization operation)
10
Indoor thermostat installation(connection)
status/air to air operation/no function
11
Trial operation/check/partial lock/all lock
12
+
Centralized control
Hot water
mode (DHW)
13
DHW (economic/standard/power/forced)
ECO level
information
14
ECO level operation (Step 1~5)
13
English
13
English
PREPARATION
Description of each control
Buttons
01
02
03
13
14
15
10
11
04
05
06
07
08
09
12
Description of each control
14
English
14
English
PREPARATION
Classification Button Function
Basic
operation
button
01
Turn Hydro unit on or off
02
Select operation mode (Cool/Heat/Auto)
03
Select desired temperature (discharge water/indoor/hot
water)
04
Outdoor unit silent operation mode
05
Select outing mode
06
Check current temperature of the system
07
Set desired temperature of the system
08
Select timer setting mode
09
Select user setting mode
10
Exit to normal mode when setting timer or detailed
setting
11
Delete a set timer
12
Move to another section or change section value.
13
Save settings
Hot water
function
button
(DHW)
14
Turn hot water mode on or off
15
Select hot water mode (economic/standard/power/
forced)
NOTE
• When pressing a button that is not supported by your model, will be displayed.
15
English
15
English
BASIC OPERATION
Water Law
Hydro unit will automatically adjust the
temperature of discharge water with auto mode
for indoor heating.
NOTE
• When “Water Law” is active, the target
supply water temperature will be
determined automatically depending on
the outdoor temperature: For heating
mode, colder outdoor temperatures will
result in warmer water.
Cool
You can adjust cooling temperature as you like
with cool mode to cool indoor place.
• When selecting the heat mode during the
cool mode, the cool mode will be canceled.
Heat
Floor heating is available with heat mode by
providing hot water in the spring, autumn and
winter.
• Frost removal indicator ( )
The frost removal indication will be
displayed when the frost formed around
the outdoor unit starts being removed
during the heat mode and then the
indication will disappear when the frost
removal is finished. (When frost is being
removed, hot water does not come out
from Hydro unit.)
• When selecting cool mode during the heat
mode, heat mode will be canceled.
NOTE
• When setting standard cooling
& heating temperature as indoor
temperature, auto mode cannot be
selected.
Operate basic mode by pressing the Mode button.
Operating basic mode of Hydro unit
BASIC OPERATION
Start Hydro unit operation by pressing the button.
Select the mode you want to operate by pressing the
button.
Adjust desired temperature by pressing the button.
Temperature of
cooling discharge
water
You can adjust the desired
temperatureby0.5°C.
Indoor cooling
temperature
You can adjust the desired
temperatureby0.5°C.
Temperature of
heating discharge
water
You can adjust the desired
temperatureby0.5°C.
Indoor heating
temperature
You can adjust the desired
temperatureby0.5°C.
Domestic Hot Water (DHW) mode operation
16
English
16
English
BASIC OPERATION
You can adjust temperature of hot water tank by providing hot water.
Press the Mode button in DHW.
Domestic Hot Water (DHW) mode operation
• Select (economic), (standard), and (power),
(forced) by pressing the Mode button in DHW
section.
NOTE
• To operate hot water mode, you need to set the hot
water function '1 or 2' in the field specification setting
mode (#3011) of wired remote controller and connect
the temperature sensor of hot water tank.
• When cool/heat mode and DHW mode are selected at
the same time, the heat/cool mode and DHW mode
will operate alternately.
• (power) for DHW mode cannot be used when the
Booster heater is not in use.
• If you want to enjoy a leisurely bath or need a lot of
warm water urgently, select the Forced DHW mode.
When this mode is enabled, it is assured that the
full capacity of the heat pump is only delivered for
domestic water heating.
CAUTION
• By default field setting value option, this function will
not be turned off automatically.
• If you want a Forced DHW function for a certain
amount of duration time, change the field setting
value of remote controller.
17
English
17
English
BASIC OPERATION
Heating can operate at low temperature while you are out with the Outing mode.
Select outing mode by pressing the Outing button.
• will be displayed and outing mode will operate.
Cancel Press any button on the remote controller.
NOTE
• When pressing the Outing button while Hydro unit
stops its operation, indication will appear.
Outing mode
Silent mode
• will be displayed and Silent mode will operate.
• Current set temperature will be maintained.
Cancel Press the Silent button once again.
NOTE
• If you press the Silent button while the unit is not in
operation, will be displayed.
• If the Silent mode operates by outdoor unit external
contact, will be displayed but Silent button on the
wired remote controller will not work. If you press the
Silent button on the wired remote controller, will
be displayed.
• In the Silent mode, the capacity of the product may be
less than rated capacity.
Noise from operation can be reduced with the Silent mode.
Press the Silent button to operate the Silent mode.
Checking current temperature
18
English
18
English
BASIC OPERATION
You can check current temperature.
Check the current temperature by pressing the View button.
• Current temperature can be checked in order of
(indoor)→ (outdoor)→ (dischargewater)→
(hot water) by pressing the View button.
• The temperature which a connected indoor unit does not
support will not be displayed.
• After 10 seconds from current temperature display, the set
desired temperature will appear.
Checking current temperature
Checking set temperature
You can check the set temperature of current operation mode by the set temperature check
function.
Check the set temperature by pressing the Set button.
• The set temperature of basic operation mode and hot
water mode can be checked by pressing the Set button
repeatedly.
• When either basic operation mode or hot water mode is in
operation, the set temperature of the mode in operation
will be displayed.
19
English
19
English
BASIC OPERATION
• Under the installation of both A2A (Air-To-Air type air conditioner) and A2W (Air-To-Water type hydro unit) at the same
time, our outdoor machine can supply its full capacity to the operating indoor machines (including A2A or A2W). If there
are simultaneous operating demands from many A2A machines with A2W, the priority of controlling the outdoor machine
(ex: compressor frequency) will be given to A2A, because of their fast response for use’s comfort. Only the remaining
capacity of outdoor machine will be given to A2W during A2As normal operation. In this case, it might take very long time
for A2W heating, so the outdoor machine will alternate the controlling priorities between A2A and A2W with time basis.
• Priority maximum operation time (at FSV #5033=0): FSV #5031 (Default “30 min., Range 10 ~ 90 min.), After
elapsing A2A maximum time, the outdoor machine will operate only for A2W to speed up the A2W’s heating/cooling
performance, even though there are A2As continuous operation demands.
• Non priority minimum operation time (at FSV #5033=0): FSV #5032(Default “5 min., Range 3 ~ 60 min.), in this minimum
time, the outdoor machine will operate only for A2W, even though there are no more A2W’s continuous operation demands.
<Operating specifications of Time Division Switching (TDS) in accordance with FSV #5033 setting
(In case of the A2A & A2W simultaneous operation is "ON")>
FSV setting
A2A Cooling + A2W Cooling A2A Cooling + A2W Heating A2A Heating + A2W Cooling A2A Heating + A2W Heating
A2A Priority
(#5033=0)
A2A Cooling
A2W Cooling
"Same cooling Mode TDS
Control"
A2A Cooling
A2W Cycle Off (The heater just
operates without heating.)
"Cooling Operation"
A2A Heating
A2W x (Not operation)
"Heating Operation"
A2A Heating
A2W Heating
"Same heating Mode TDS
Control"
DHW Priority
(#5033=1)
Same with A2A Priority
setting
A2W Heating
A2A Cooling
"(Heating + Cooling)
TDS Control"
Same with A2A Priority
setting
Same with A2A Priority
setting
※A2A:AirtoAir,A2W:AirtoWater
When DHW Priority is enabled, hot water (heating) operation is given priority only if the A2A & A2W
simultaneous operation is on. Other operations are the same as when A2A Priority is enabled.
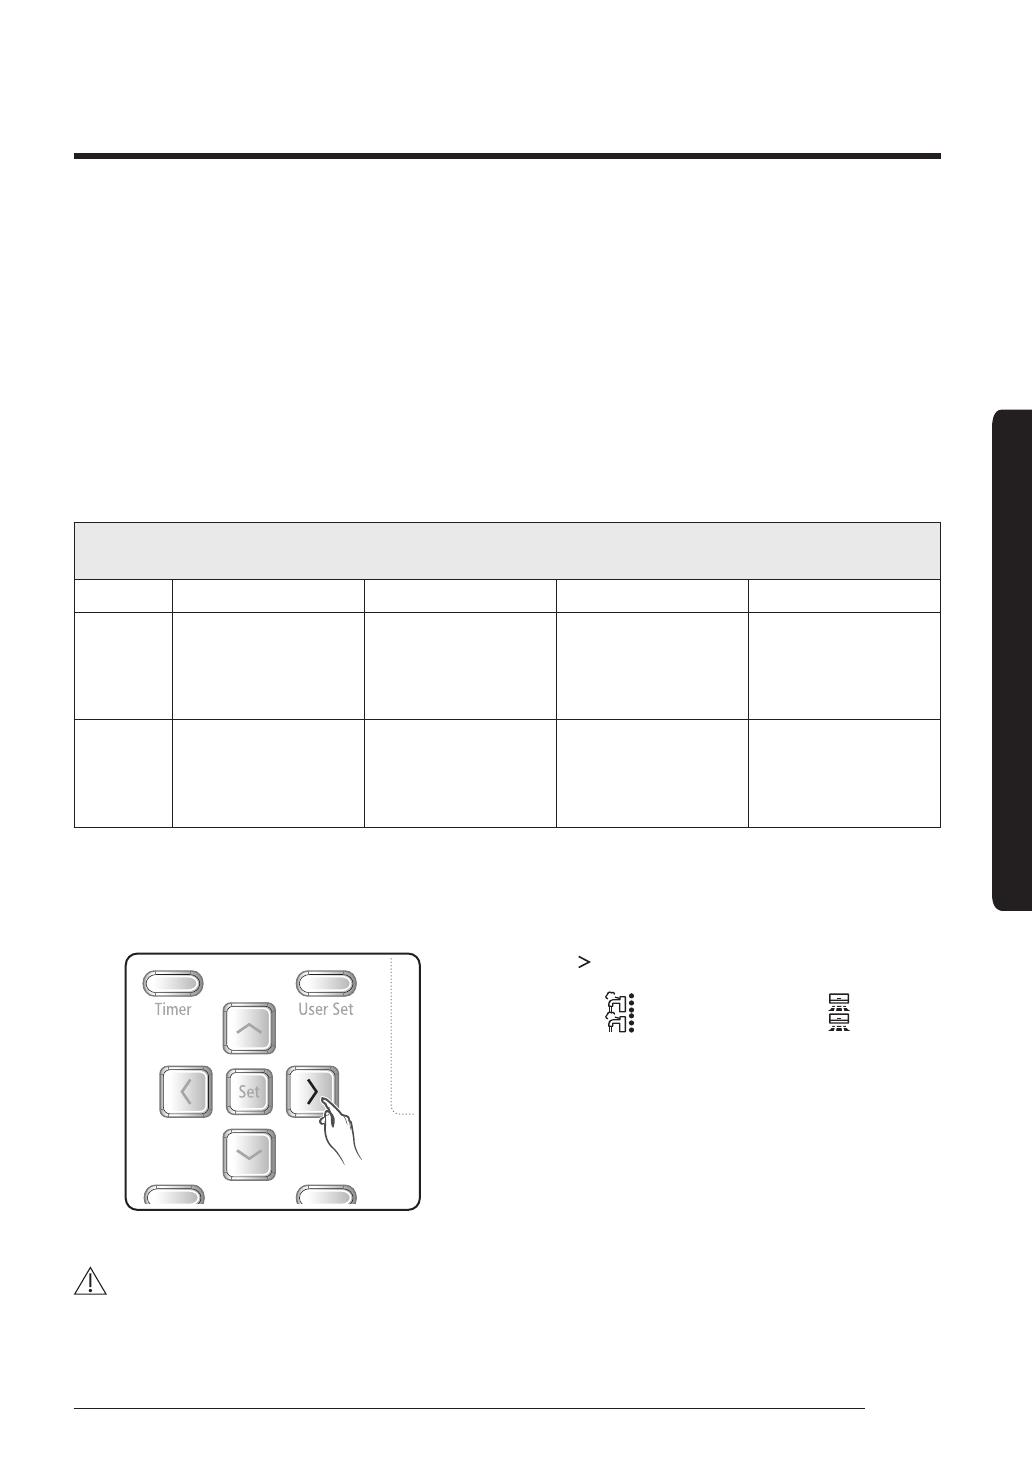
How to set DHW Priority:
1 Press the " " key on the wired remote controller for
3 seconds. The setting value is changed in order of
DHW Priority ( :blink)→A2APriority( :blink)→
DHW Priority ( :blink)→A2APriority( :blink)
repeatedly.
2 Setting FSV #5033 to ‘0’ becomes A2A Priority, and
setting to ‘1’ becomes ‘DHW Priority.
CAUTION
• While A2W is in operation, A2A does not operate. This is a normal operation.
• While A2A or A2W is not in simultaneous operation, you can use any mode without operation mode restriction.
TDM (Time-Division Multi) Variables (TDM product Only)
20
English
20
English
BASIC OPERATION
You can operate or stop a desired mode on the day and time you reserve.
Setting weekly timer
1 Press the Timer button.
• (Timer) will be displayed and then select 'Weekly' among
'Daily', 'Weekly', or 'Holiday' by pressing the [ ]/[ ] button.
2 After pressing the [ ] button, select the 'Day' you want to
reserve.
• Select the day you want to reserve (Sun~Sat) by pressing
the [ ]/[ ] button.
NOTE
• You can set multiple timers by selecting multiple days
and when multiple timers are set, you will move on to
the time setting for the timer.
3 Select 'Timer number' by pressing the [ ] button until
timer number is displayed.
(When entering, the last available number for timer setting
is set.)
• The timer already set is assigned with number in time
sequence order.
• You can select timer number(1~8) by pressing the [ ]/[ ]
button.
• If there is no timer, the edge of the box for the timer
number and the timer number will blink.
NOTE
• If the timer is already set, the square box surrounding
the timer number will blink. If you want to change it,
select the set timer number and change it.
4 After pressing the [ ] button, select ‘AM/PM’.
• You can select AM or PM by pressing the [ ]/[ ] button.
5 After pressing the [ ] button, select ‘Hour.
• You can set hour by pressing the [ ]/[ ] button.
  • Page 1 1
  • Page 2 2
  • Page 3 3
  • Page 4 4
  • Page 5 5
  • Page 6 6
  • Page 7 7
  • Page 8 8
  • Page 9 9
  • Page 10 10
  • Page 11 11
  • Page 12 12
  • Page 13 13
  • Page 14 14
  • Page 15 15
  • Page 16 16
  • Page 17 17
  • Page 18 18
  • Page 19 19
  • Page 20 20
  • Page 21 21
  • Page 22 22
  • Page 23 23
  • Page 24 24
  • Page 25 25
  • Page 26 26
  • Page 27 27
  • Page 28 28
  • Page 29 29
  • Page 30 30
  • Page 31 31
  • Page 32 32
  • Page 33 33
  • Page 34 34
  • Page 35 35
  • Page 36 36
  • Page 37 37
  • Page 38 38
  • Page 39 39
  • Page 40 40
  • Page 41 41
  • Page 42 42
  • Page 43 43
  • Page 44 44
  • Page 45 45
  • Page 46 46
  • Page 47 47
  • Page 48 48
  • Page 49 49
  • Page 50 50
  • Page 51 51
  • Page 52 52
  • Page 53 53
  • Page 54 54
  • Page 55 55
  • Page 56 56
  • Page 57 57
  • Page 58 58
  • Page 59 59
  • Page 60 60
  • Page 61 61
  • Page 62 62

Samsung AE090MNYDEH/EU User guide

Category
Heat pumps
Type
User guide

Ask a question and I''ll find the answer in the document

Finding information in a document is now easier with AI