Page is loading ...

ABRASIVES
USER GUIDE
1-85-JOOLTOOL BUY SUPPLIES AT WWW.JOOLTOOL.COM

THANK YOU
ABRASIVES
by
HI, I’M ANIE
Thank you for purchasing the award-winning JOOLTOOL™ X System. I designed it with YOU in mind.
In case you didn’t know, I began my career at a very young age as a jeweler, designer and gemologist for my father’s
business. That’s me in the picture above, working at the bench when I was just 11 years old. Customers’ pieces had to be
nished quickly and beautifully so I constantly created new tools to make work easier and more productive. This strong
inventive spirit led me to develop the multi-functional JOOLTOOL™ System.
I partnered with the 3M Company because we share a passion for quality. Their industrial-grade abrasives are a perfect
match for our rugged JOOLTOOL™ for nishing, grinding, sharpening and polishing. The JOOLTOOL™ is trusted by top
professionals in various industries: automotive, woodworking, jewelry, metalworking, military, aerospace, medical and
many more. Now you can become a PRO too!
The JOOLTOOL™ X is intuitive to learn and easy to master. Simply follow this guide to help you get started.
Within these pages you will nd my “ANIE’S TIPS” ; read them for useful info.
Visit WWW.JOOLTOOL.COM for instructional videos, MSDS info and to buy supplies and accessories.
Be part of the community check out our fun posts on Facebook, Youtube, Twitter, Instagram, and more!
If you have any questions, just contact us.
We value our customers and our team is always here to help.
Sincerely,
PRESIDENT & CEO
Toll Free: 1-85-JOOLTOOL Buy supplies at WWW.JOOLTOOL.COM

ABRASIVES
by
TABLE OF CONTENTS
SAFETY
p.4
KNOW YOUR JOOLTOOL
p.5
QUICK START
QUICK REFERENCE
p.6
ABRASIVES, BACKPADS & CUSHIONS
p.7
USE & MAINTENANCE
p.8
DRAWER, HOOD & ATTACHMENTS
p.9
PORTABLE & HORIZONTAL MODES
p.10
TOOL REST - CHISEL SIDE
p.11
TOOL REST - DRILL BIT SIDE
p.12
SHARPENING BASICS
p.13
SHARPENING
p.14
POLISHING BASICS
JEWELRY POLISHING
p.15
LAPIDARY HARD STONES
LAPIDARY SOFT STONES
p.17
POLYMER CLAY & RESIN - FLAT OR DETAILED PIECES
p.16
POLYMER CLAY & RESIN - DOMED OR ROUND PIECES
GLASS WATCH CRYSTAL
p.18
MINERAL WATCH CRYSTAL
p.18
HARD GLASS
p.18
ENAMEL / FUSED GLASS +
Lamp Work
QUICK-MOUNT FLEXSHAFT
p.19
DRILLING
p.20
SILVERSMITHING & PEARL VISE
p.21
3M BRUSHES
p.22
TROUBLESHOOTING
p.23
TECHNICAL
p.24
p.25
p.26
p.27
p.28
p.29
p.30
p.31
WARRANTY
TRAVEL TIPS
(BACK COVER)
ABRASIVE CHART
Toll Free: 1-85-JOOLTOOL Buy supplies at WWW.JOOLTOOL.COM

SAFETY
PLEASE READ & UNDERSTAND THIS BEFORE OPERATING THE JOOLTOOL™
ALWAYS work in a well-lit, distraction-free environment. Keep work area clean and clutter free.
Keep bystanders and all pets (animals) AWAY from work area while operating the unit.
GRINDING MAY CAUSE SPARKS. NEVER operate tool in the presence of flammable materials.
DO NOT VACUUM SPARKS into canisters containing flammable particles.
Use separate collection containers when performing metal and wood applications.
ALWAYS make sure JOOLTOOL switch is set to “OFF” BEFORE plugging it in the power outlet.
Leaving the switch “ON” before plugging can lead to accidents. See “POWER ON” p.6
ALWAYS Remove all adjusting tools (keys and/or wrenches) from unit before turning “ON.”
A key or wrench that is left attached on a rotating part can cause personal injury.
NEVER reach over the machine while the wheel or disc is in motion.
A rotating wheel or disc can grab any object in its path, potentially resulting in injury
ALWAYS wear eye, hand/ finger protection and use a NIOSH-approved respirator for all grinding, sanding and finishing.
A thick apron is recommended for industrial applications.
ALWAYS Keep loose clothes, jewelry and hair AWAY from rotating parts. Long hair should be contained properly.
Wear non-skid shoes or stand on non-slip surface/rubber mat and always keep proper footing and balance at all times.
ALWAYS use a properly grounded 110 / 240V electrical outlet.
ALWAYS use approved electrical outlet adaptors when using the unit outside of the U.S.A.
NEVER alter the plug or tamper with the converter box in any way to fit into an electrical outlet other
than the ones described above. Serious electrical shock and injury can occur.
ALWAYS routinely inspect the power cord for any nicks, cracks, cuts or damages.
(Make sure unit has been unplugged prior to inspection.) If any physical damage is found, contact the
manufacturer or an authorized service center for information on replacement or repair. Refer to the
warranty page for correct instructions on returning your product, regardless if it is under warranty or not.
NEVER use the tool if it is damaged; electrical shock and injury may occur.
NOTICE: SAFETY INSTRUCTIONS CANNOT ADDRESS EVERY POSSIBLE SITUATION
PLEASE USE THE INFORMATION CONTAINED IN THIS DOCUMENT AS GENERAL GUIDELINES.
ALWAYS USE COMMON SENSE AND KEEP SAFETY A PRIORITY WHEN OPERATING YOUR JOOLTOOL SYSTEM.
Keep water AWAY from ELECTRICAL CONNECTIONS. Water increases risk of electrical shock.
!
!
STAY ALERT & FOCUSED at all times, do not use the JOOLTOOL while tired or under the influence of
medication, drugs, or alcohol. A lack of concentration may result in serious personal injury.
Always use common sense and pay attention to what you are doing when using this unit.
!
If an extension cord is necessary, an adequate UL approved cord no longer than 8 feet in length is
recommended. This will prevent any damage to the power adaptor or power tool unit.
ELECTRICAL SAFETY
WORK AREA SAFETY
PERSONAL SAFETY
Toll Free: 1-85-JOOLTOOL p.4 Buy supplies at WWW.JOOLTOOL.COM

HOW TO REFER TO PARTS BY NAME
KNOW YOUR
VACUUM PORT
RETRACTABLE
HANDLE
& BUILT-IN
HOOKS
ALIGNMENT
HOLES
POWER
CONNECTOR
ALIGNMENT
PIN
ALIGNMENT
PIN
BACKPAD
SEE-THRU DISC
MAIN PLATE
OF TOOL REST
(IF EQUIPPED)
RIGHT POST
OF TOOL REST
(IF EQUIPPED)
LOCKING KNOBS
FOR TOOL REST POSTS
HOOD
(REMOVABLE)
SPINDLE
(REMOVABLE)
LEFT POST
OF TOOL REST
(IF EQUIPPED)
LOCKING KNOB
FOR TOOL REST
MAINPLATE
(IF EQUIPPED)
ON/OFF
SWITCH
WITH SPEED
CONTROL
DRAWER &
WATER TRAY
(REMOVABLE)
ALUMINIUM
BODY
SLOT
FOR SNAP HOOK
IN HORIZONTAL MODE
BASE
DOCK
EJECT BUTTON
& BUILT-IN SNAP HOOK
Toll Free: 1-85-JOOLTOOL p.5 Buy supplies at WWW.JOOLTOOL.COM

CONNECT POWER ON ENJOY!
SETUP ABRASIVES
SECURE THE BASE
QUICK START
Connect power supply to the rear
of your Jooltool as shown, then
plug the cord into electrical outlet.
2
3
1
a
b
HOW TO QUICKLY SETUP YOUR JOOLTOOL™
Press EJECT BUTTON to release the
tool from the BASE/DOCK
Lightly tilt machine upwards
Slide machine away from ALIGNMENT
PINS to detach from BASE/DOCK
To re-attach after Step 3:
-Align and slide tool onto PINS.
-Push down until HOOK snaps in place.
Set the BASE close to edge of bench or
table and secure with screws of your
choice. Refer to 4 locations above.
Use non-slip pads at 4 corners if installing
on glass or similar surface.
Re-attach machine onto base (see Step 2)
S
P
E
E
D
L
O
W
H
I
G
H
OFF ON
Turn switch clockwise to turn machine
ON and increase speed.
Turn counterclockwise to reduce speed
or turn machine OFF
GRIND, SHARPEN, RESTORE, POLISH & more
while SEEING it all in REAL-TIME!
Some Abrasives may need a Cushion Pad
Remove protective
lm from abrasive
Align See-Thru
design with Backpad
slots and press
rmly to adhere.
With abrasive side
DOWN, place the
disc onto your
Jooltool Spindle.
Twist the disc
assembly onto your
Jooltool Spindle.
Twist until locked,
but do NOT
overtighten.
1 3 42
Remove protective
lm from Cushion.
Align See-Thru
design with Back-
pad and press rmly
to adhere.
A B
Fine Grades such as Trizact or Diamond
a
b
Toll Free: 1-85-JOOLTOOL p.6 Buy supplies at WWW.JOOLTOOL.COM

QUICK REFERENCE
SUMMARY OF ITEMS AND THEIR USES
Toll Free: 1-85-JOOLTOOL p.7 Buy supplies at WWW.JOOLTOOL.COM
FOR FINAL HIGH POLISH
Use COTTON BUFFING WHEEL for a
show-quality shine on your pieces.
Use WITH compound and HIGH speed.
BUFFING WHEEL
Item# B-9335
Twist onto the
spindle to INSTALL
CASTING CLEAN-UP, DEEP SCRATCHES & WATCHES
3M™ EXL SCRATCH-ERASER discs available in 4 grades:
COARSE Use on VERY ROUGH surfaces for smoothing
out deep scratches in metals. Can also be used to sharpen.
MEDIUM Use on VERY FLAT surfaces for at “lap” nish
on shanks, bezels and channel settings.
Cleans Castings and Porosity.
FINE Use on FLAT or COUNTOUR-SHAPED shanks &
surfaces. Cleans Castings and Porosity.
VERY FINE Use on ROUND & COUNTOUR-SHAPED
shanks & surfaces. Use HIGH speed.
POLISHING
Use SEE-THRU FELT DISC for crisp, precise polishes. Use
WITH compound and HIGH speed.
FELT DISC
Item# B-301
GRINDING & FILING
Use 3M™ PURPLE CERAMIC abrasives for:
- Sprue removal from castings
- Grinding & ling your piece
Use HIGH speed for 80 Grit, 120 Grit, 220 Grit
Use these with CUSHIONS to improve contouring.
LAPPING & SANDING
Use 3M™ TRIZACT abrasives for:
- Flat lapping, Knife-edge nishing, Fine Sanding on Metals
- Light beveling and scratch removal on Glass
Finish with CERIUM OXIDE and FELT DISC on Glass (p.22)
Anie recommends using CUSHIONS with these grades.
Use HIGH speed for metals
Use SLOW speed with water for Glass
EXL COARSE
Item# S-3603
a
CERAMIC
Item# AC-13080-6
Item# AC-13120-6
Item# AC-13220-6
a
b
c
COARSE
Item#
AT-13035-6
a
MEDIUM
Item#
AT-13020-6
b
FINE
Item#
AT-13010-6
c
VERY FINE
Item#
AT-13005-6
d
a
b
c
d
Apply COMPOUND on FELT DISC & BUFFING WHEEL
Item#: C-103
THIS KIT SHAPE AND POLISHES STONES AND GLASS OF ANY HARDNESS!
This kit uses 3M DIAMOND abrasives to take stone/glass from a
ROUGH state to a HIGH POLISH or trim pieces to t into a bezel.
Perfect for agate, quartz, sapphire and more!
Also works great for removing scratches from Watch Crystal.
Includes all necessary Abrasives, Backpads and Cushion Pads
(See p.18)
ADD-ON LAPIDARY HARD & SOFT STONE KIT
Item# K-1001
THIS KIT TAKES YOUR POLYMER CLAY AND RESIN PIECES TO A SHOW SHINE!
This kit is perfect for shaping and polishing your favorite
polymer clay pieces, from start to nish. This Kit makes it a breeze
to get your projects to showcase-quality nishes. No more hand
ling or melting your pieces with old buers… Just JOOLTOOL it!
POLYMER CLAY UPGRADE KIT
Item# K-1005-5
ADD-ON POLYMER CLAY KIT
Item# K-1005
See p.20
EXL MEDIUM
Item# S-3602
b
EXL FINE
Item# S-3601
c
EXL VERY FINE
Item# S-3600
d
See p.21

ABRASIVES, BACKPADS & CUSHIONS
Remove all protective film from new ABRASIVE before applying it onto the BACKPAD.
NOTE: Adhesive cures rapidly when ABRASIVE is applied onto BACKPAD.
ANIE’S TIP: At first, apply the ABRASIVE very lightly onto the BACKPAD. This will give you the
opportunity to make corrections and adjust the SEE-THRU™ pattern alignment if necessary
before the adhesive cures. Press firmly to adhere when the SEE-THRU™ alignment is correct.
HOW TO REMOVE LEFTOVER ADHESIVE FROM BACKPAD: When changing worn abrasives,
you can leave the leftover adhesive on the BACKPAD as the new abrasive will likely fuse
with it upon use. If you prefer a clean surface, you can remove leftover adhesive by
dabbing with the sticky side of your old abrasive or sticky tape. Do NOT use solvents!
ALWAYS change ABRASIVE if it is damaged, torn or is excessively worn.
3M recommends to DISCARD an abrasive once it’s been removed/unstuck from the BACKPAD
as the ADHESIVE on the Abrasive is designed for SINGLE APPLICATION ONLY.
Failure to follow this rule can potentially cause property damage and/or personal injury!
NEVER use an ABRASIVE if it is not adhering to the BACKPAD.
NEVER apply ABRASIVES on BACKPAD when wet.
NEVER use disc if the ABRASIVE has been improperly installed onto the BACKPAD.
Improperly installed abrasive increases risk of property damage and/or personal injury!
NEVER cut, change, or distort the shape of the SEE-THRU ™ design on the abrasive.
ALWAYS place abrasive on the FLAT (BOTTOM) surface of the BACKPAD.
ALWAYS install abrasives on the BACKPAD by aligning correctly with the SEE-THRU™ design.
ALWAYS press firmly to ensure full adherence between ABRASIVE and BACKPAD.
HOW TO SETUP
ALWAYS turn JOOLTOOL “OFF” before installing/changing BACKPADS or ACCESSORIES.
NEVER install BACKPADS while the motor is “ON”. This can cause personal injury.
The motor rotation is COUNTER CLOCKWISE
Use for ABRASIVES that require CUSHION BACKING
(ex: Polishing Diamond, Trizact™ and other FINE Abrasives)
ALWAYS apply CUSHIONS BEFORE applying ABRASIVES.
ALWAYS remove all protective film from CUSHIONS
before applying it onto the BACKPADS.
ALWAYS apply CUSHIONS to flat surface of BACKPADS.
NOTE: DO NOT APPLY CUSHIONS UNDER FELT DISC OR SCRATCH-ERASER ABRASIVES.
ALWAYS install BACKPADS with ABRASIVE side DOWN.
ALWAYS tighten your BACKPADS snuggly onto the spindle before use.
ALWAYS use GENUINE JOOLTOOL™ BACKPADS & ORIGINAL spindle.
This will guarantee that your discs will be perfectly centered and give you optimal results.
NEVER use third-party (non-JOOLTOOL™ brand) Spindles.
NEVER use damaged or cracked BACKPADS as they may break apart during use, potentially causing injury.
NEVER place workpiece on top or the side of spinning disc. The disc can eject workpiece and may cause loss of control.
ALWAYS Turn the Jooltool “OFF” if excessive vibration occurs during use. See “TROUBLESHOOTING” p.28
ABRASIVE
(CUSHION)
BACKPAD
!
1
2
3
!
CUSHIONS - SETUP & SAFETY
ABRASIVES - RECOMMENDED SETUP & SAFETY
Toll Free: 1-85-JOOLTOOL p.8 Buy supplies at WWW.JOOLTOOL.COM

ALWAYS use light, gentle pressure when working.
NEVER use excessive pressure on the disc, the spindle or any attached accessory while using the tool.
!
JOOLTOOL VACCUUM Item# V-FW11
USE & MAINTENANCE
PROPER OPERATION & CARE OF YOUR TOOL
ALWAYS make sure electrical connections and switch are clean and dry BEFORE powering the JOOLTOOL™
Wet or Damp connections or electrical components may result in electrical shock, injury or death.
NEVER attempt to clean by inserting rigid objects through openings or electrical connections.
NEVER use cleaning agents/solvents that may damage plastic parts: gasoline, ammonia-based cleaners,
chlorinated solvents, carbon tetrachloride (brake cleaner), some paint thinners and others.
ALWAYS pay close attention around rotating wheels or discs. Moving parts may cause injury.
NEVER try to stop the discs or wheels with your hands or with any object. Spinning disc may cause injury.
ALWAYS let the tool to come to a complete stop BEFORE changing attachments or accessories.
ALWAYS use accessories and attachments for their intended applications.
ALWAYS use only JOOLTOOL™-approved accessories with this JOOLTOOL™ unit.
NEVER use the tool with any accessories that seem damaged or excessively worn.
If in doubt, turn the tool “OFF” IMMEDIATELY and inspect thoroughly. Replace any badly worn or broken accessories.
Anie designed the JOOLTOOL™ System to bring you years of service without requiring maintenance.
If your unit needs special attention, it should only be performed by an authorized service center or
directly by the manufacturer, JOOLTOOL™.
NEVER attempt to repair or service any part of the tool yourself.
Doing so may result in damage to the unit and accessories, electrical shock, injury or death.
!
!
The JOOLTOOL automatically directs dust and sparks
toward the VACCUUM PORT. For a cleaner and safer work area,
use a firmly-secured, strong dust collection (vacuum) system.
For best visibility and control, work WITHIN
the SEE-THRU™ area of your spinning Backpad.
ANIE’S TIP: PLEASE USE COMMON SENSE WHEN WORKING ON THE JOOLTOOL™ SYSTEM
If you are not sure how to accomplish a particular task, please consult us BEFORE starting your project.
Stay within the Jooltool’s designed limits to achieve great results as well as a safe & enjoyable experience.
!
MAINTENANCE
CLEANING
ANIE’S TIP: CLEAN YOUR JOOLTOOL REGULARLY TO KEEP YOUR WARRANTY VALID.
Although the JOOLTOOL is designed to work as cleanly as possible, the warranty does not cover
neglect. Ex: failure to discard excess dust collected near or in the motor shaft/bearings.
NOTE: A LWAYS wear EYE PROTECTION when using compressed air for cleaning.
The removable HOOD can be washed with soap & water.
ALWAYS remove the HOOD before washing!
ALWAYS Dry the Hood before re-installing onto the JOOLTOOL™.
ALWAYS disconnect power from the tool before cleaning the JOOLTOOL System or Accessories.
Wipe clean with a cotton rag or soft brush.
Toll Free: 1-85-JOOLTOOL p.9 Buy supplies at WWW.JOOLTOOL.COM

DRAWER, HOOD & ATTACHMENTS
2
3
1
Pull the tab under the speed control
switch to slide the DRAWER out from
under your Jooltool. Push to slide in.
Great for storing small items!
The drawer transforms into a handy
water tray. Slide it completely o the
tool, then mount it by inserting the
2 locator pins into the 2 holes at the
top of the Jooltool.
The drawer/water tray can hold water
for quick access to lubrication when
performing lapidary work. (p.18-19)
WARNING! DO NOT OVERFILL!
WATER CONTACT WITH WIRES MAY
CAUSE RISK OF ELECTRIC SHOCK!
Push OUT on both sides of the hood.
Slide the Hood out and away from the
Jooltool. Reverse steps 1 & 2 to reinstall
(Center the rear tab, pull towards you,
snap tabs back into their slots)
With the Hood removed, you can
now work on very large items and
have even more freedom with the
exshaft & accessories (see below).
Use the multi-functional TOOL REST to quickly
sharpen drill bits or chisels to precise, repeatable
angles. (See p.12-13) Can also be used as a
convenient hand-rest when handling smaller items.
(may be sold separately)
USEFUL FEATURES
The Flexshaft attaches to heavy-duty Handpieces
to use Dremel-type bits, Drilling burrs, power
carvers, sanders and more...
(see FLEXSHAFT (p. 24) in this booklet)
(may be sold separately)
Item# K-FH33Item# TR-1
321
STORAGE DRAWER & WATER TRAY
HOOD REMOVAL
TOOL REST FLEXSHAFT & ACCESSORIES
Toll Free: 1-85-JOOLTOOL p.10 Buy supplies at WWW.JOOLTOOL.COM

Undock the Jooltool from its
base per steps above (1 to 4)
Set the Jooltool to its side and
align the Holes at the rear of
the Tool with the ALIGNMENT
PINS on the BASE. Speed
control switch will be pointing
upward when properly docked.
Press DOWN to lock in position,
front HOOK will snap into the
SLOT of the JOOLTOOL body.
To reset Vertical Mode, press
EJECT then reverse steps 1 & 2.
This is a classic, bench style
of polishing and nishing.
NOTE: The Vacuum Port is
fully functional in both
Horizontal & Vertical modes.
PORTABLE & HORIZONTAL MODES
Press EJECT BUTTON to
release the tool from base.
Use the retractable handle at
the rear of your JOOLTOOL to
work in PORTABLE mode.
Use the PORTABLE mode for
sanding or polishing large
items such as silver trays,
furniture, hardware, and more.
The Jooltool is also great for
removing scratches from
headlight lenses and gently
bung clear-coated surfaces.
The Handle has 2 convenient built-in hooks.
You can hang the JOOLTOOL upright or
upside-down, wherever you see t.
Perfect when using the Flexshaft accessory!
HOW TO SWITCH
GENTLY tilt machine upwards Slide machine away from
ALIGNMENT PINS to fully
detach from docking base.
1 2
5 6
3 4
1
2 3 4
WARNING:
NEVER USE THE JOOLTOOL WITH SEE-THRU BACKPADS IN HORIZONTAL OR PORTABLE MODES!
THESE MODES ARE ONLY FOR USE WITH 3M RADIAL BRISTLE BRUSHES & PURPOSELY DESIGNED ACCESSORIES.
ALWAYS DOCK THE TOOL VERTICALLY ON ITS BASE WHEN USING SEE-THRU BACKPADS!
NEVER TRY TO SHARPEN WITH SEE-THRU DISCS WHILE IN HORIZONTAL OR PORTABLE MODES,
THIS NULLIFIES THE SEE-THRU EFFECT AND CAN CAUSE YOU TO LOSE CONTROL OF THE WORKPIECE.
FAILURE TO FOLLOW THESE DIRECTIONS CAN RESULT IN PERSONAL INJURY OR PROPERTY DAMAGE!
!
BUILT-IN HOOKS
PORTABLE MODE
HORIZONTAL MODE
Toll Free: 1-85-JOOLTOOL p.11 Buy supplies at WWW.JOOLTOOL.COM

The Tool Rest has a rotating MAIN
PLATE which has 2 sides/functions:
-One side helps set bevel angles on
square-edged Tools such as Chisels
-The other side helps you sharpen
Drill Bits to precise degrees.
TOOL REST - CHISEL SIDE
21
MULTIPLE FUNCTIONS
SETUP & SHARPEN COMMON CHISELS
Slide the Posts into the mounting
holes as shown. Spacers (”S”) provide
additional height if needed
(Late availability.)
Locking knob will be on left-hand
side when properly mounted.
Lock the Tool Rest in place by
tightening the post locking screws
(Turn Clockwise to lock)
LOCK
UNLOCK
UNLOCK MAIN PLATE BEFORE ROTATING
Turn knob counterclockwise to loosen,
but do NOT unscrew completely.
LOCK MAIN PLATE AFTER SETTING ANGLE
Turn knob clockwise to lock the position,
but do NOT overtighten.
Rotate the main PLATE to
set the desired angle by
aligning indicators on
RIGHT-HAND post with
the ANGLES indicator.
Lock with LOCKING KNOB
For precise & even angles,
slide the Guides to the
corresponding width of
your tool. Make sure the full
face to be sharpened is in
contact with the abrasive.
Tool must slide in/out freely.
Sharpen the Chisel by sliding
the cutting edge it into the
spinning disc. Use coarse grades
such as 3M Purple Ceramic for
regrinding a damaged edge.
Use ne grades (3M Trizact™)
for honing existing bevels.
Always make uniform contact
with the spinning abrasive. Use
coarse abrasives to re-grind
edges and ne abrasives to
polish (see p. 15). When done,
slide the Chisel away from the
disc and turn the JOOLTOOL OFF.
Toll Free: 1-85-JOOLTOOL p.12 Buy supplies at WWW.JOOLTOOL.COM
LEFT-HAND
POST
RIGHT-HAND
POST
MAIN PLATE
GUIDE(s)
LOCKING
KNOB
MODE ICON
SEE DEBURRING INFO ON NEXT PAGE
!
S
S
INSTALL THE TOOL REST
CHISEL / FLAT-BLADE SIDE
(UN)LOCKING THE PLATE

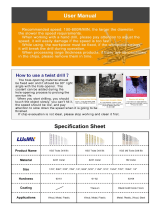
TOOL REST - DRILL BIT SIDE
SHARPEN COMMON DRILL BITS
Toll Free: 1-85-JOOLTOOL p.13 Buy supplies at WWW.JOOLTOOL.COM
Rotate the main PLATE to the DRILL BIT side (ICON).
Set the desired angle by aligning indicators on
LEFT-HAND post with the ANGLES indicator.
The most common setting is 118 degrees
Lock with LOCKING KNOB.
Select the guide slot of corresponding Bit diameter.
Sizes shown next to SLOTS are recommendations. Slide
the drill bit into the spinning disc. Ensure a secure, at
contact with the full length of the slot.
ICON
1
3
Rotate the drill bit on its main axis to sharpen all CUTTING
EDGES. Make sure each cutting edge is higher than its RELIEF.
(back of the ank). This will ensure the bit cuts well and extracts
drilled material properly. Slide the bit along the slot, away from
the disc and turn the JOOLTOOL OFF when done.
CUTTING
EDGE
RELIEF
4
(OPTIONAL)
Use 3M Radial Brushes (6 & 1 Micron)
to sweep the burr away from the
cutting edge or flute.
6 Micron
Item# R-362-6
1 Micron
Item# R-361-1
SLOT
SLOT
SLOT
RECOMMENDED
DRILL BIT SIZES
F
L
U
T
E
D
I
S
C
R
O
T
A
T
I
O
N
CUTTING
EDGE
RELIEF
ABRASIVE
D
I
S
C
R
O
T
A
T
I
O
N
ABRASIVE
The resulting drill bit angle will be as set in STEP 1. Use
coarse grade abrasives such as 3M Purple Ceramic to
regrind damaged bits. Use 3M Trizact™ for honing edges.
Tip: Use 3M Diamond Abrasives for Carbide Bits.
2
NOTE: Do not sharpen the FLUTES,
see “DEBURRING” below.
DRILL BIT
ANGLE
D
I
S
C
R
O
T
A
T
I
O
N
DEBURRING DRILL BITS & OTHER TOOLS

FEED THIS WAY
F
O
L
L
O
W
R
O
U
N
D
E
D
G
E
D
I
S
C
R
O
T
A
T
I
O
N
CUTTING EDGE
DIRECTION
!
AVOID WORKING OR SLIDING OFF THE EDGE OF THE DISC!
This will prevent damage to the BACKPAD or the workpiece.
SHARPENING BASICS
STEP 1:
Lightly make
contact with
the “back” of
the edge to
the disc.
STEP 2:
Touch the entire
width of the
edge flat against
the disc.
Hold in place.
STEP 3:
When desired result is achieved,
disconnect the tool from the
abrasive by lowering it.
DO NOT SLIDE OFF THE DISC! THIS
CAN RUIN THE ANGLE OF THE EDGE
To maintain the angle of your flat workpieces. Follow these steps.
ANIE’S TIP: Know what you want to accomplish and use the correct abrasive for the task.
Using the right abrasives increases productivity, the quality of your work and the longevity of your abrasives.
Always start off with a finer abrasive, you can use a coarser grade if you need more abrasive power.
- With BOTH hands, Hold the workpiece directly UNDER the disc.
- Make GENTLE, uniform contact between the SPINNING disc and
the EDGE to be sharpened.
- ALWAYS WORK WITHIN THE SEE-THRU AREA OF THE DISC!
DISC
WORKPIECE
ANIE’S TIP: To improve visibility of the surface or
edge you are working on, darken it with a black
marker (Sharpie
™) or use a marker color that
contrasts with the surface to be worked. The
marker gets erased on contact with abrasive.
FIND THE EDGE ANGLE (as shown in STEPS 1-2 above), then GRADUALLY FEED the workpiece’s
edge under the disc while keeping a FULL and FLAT contact. Work from the inner to the outer
edge.
- ALWAYS KEEP SHARP EDGES OR TIPS IN THE SAME DIRECTION AS THE ROTATION!
- AVOID “SEE-SAWING” THE PIECE ON THE DISC! (NOTE: This can cause unnecessary roundness)
- LOWER THE WORKPIECE WHEN DONE, DO NOT SLIDE OFF THE EDGE OF THE DISC!
For workpieces with rounded edges, keep in mind that they generally have a FLAT EDGE which
simply contours the rounded surface of the workpiece.
A- Make contact with the FLAT EDGE to be worked on. (See STEP 2 above)
B- Then, in a GRADUAL MOTION, move the workpiece so as to follow its ROUNDED SHAPE while
maintaining full contact with the FLAT EDGE. Stop when the desired result is achieved.
For lathe gouges with a fingernail shape:
Move the handle of the tool with pendulum-like motion while performing steps A & B here.
WORKPIECE
The motor rotation is COUNTER CLOCKWISE.
ALWAYS KEEP SHARP EDGES OR TIPS IN THE SAME DIRECTION AS THE ROTATION!
D
I
S
C
R
O
T
A
T
I
O
N
CUTTING EDGE
DIRECTION
HOW TO SHARPEN , FREE-HAND STYLE
!
HOLDING THE WORKPIECE
MAINTAINING THE CORRECT ANGLE
TIPS FOR SHARPENING LONG FLAT TOOLS (Knives, Planer Blades & Similar)
TIPS FOR SHARPENING BEVELED TOOLS (Gouges, Auger Bits & Similar)
Toll Free: 1-85-JOOLTOOL p.14 Buy supplies at WWW.JOOLTOOL.COM

SHARPENING
FOLLOW THESE STEPS TO SHARPEN
Toll Free: 1-85-JOOLTOOL p.15 Buy supplies at WWW.JOOLTOOL.COM
STEP 2 SHARPEN, HONE and MAINTAIN EDGES
Follow these steps for re-sharpening and honing.
Use 3M Trizact abrasives, the colorful discs.
Speed: Maximum
Follow this order:
Coarse Green
Medium Pink
Fine Blue
Very Fine Orange
2
STEP 3 POLISH METALS
Use the FELT DISC to get a final polish on your metal.
SEE “POLISHING BASICS” (p. 16)
Speed: Maximum
3
STEP 1 GRIND, SHAPE and BEVEL EDGES
Follow these steps for grinding and shaping.
Use 3M Purple Ceramic abrasives.
Speed: Maximum
Follow this order:
80 Grit, 120 Grit, then 220 Grit.
1
FOLLOW FROM
TOP TO BOTTOM
80 Grit
Item# AC-13080-6
1a
120 Grit
Item# AC-13120-6
1b
220 Grit
Item# AC-13220-6
1c
IMPORTANT: Stay within your see-thru area of the disc. Avoid pointing the cutting edge towards rotating disc
NOTE: You can use the TOOL REST accessory to sharpen your edges to precise angles. (p.8-9)
FELT DISC
Item# B-301
3
FOR CARBIDE AND EXOTIC METALS
Use 3M Micronishing Diamond Abrasives
to sharpen high-carbon steels, cobalt, titanium and others.
Use with CUSHION PADS (Item # N-3103)
Available in 4 grades & KIT: 74, 45, 30, 20 Micron
MICROFINISHING DIAMOND KIT
Item# K-3600-4
Y
DEBURRING (OPTIONAL)
Use 3M Radial Brushes (6 & 1 Micron) to sweep
the burr away from the cutting edge or flute.
Speed: Maximum
6 Micron
Item# R-362-6
Xa
1 Micron
Item# R-361-1
Xb
OPTIONAL
OPTIONAL
Apply COMPOUND on FELT DISC
Item#: C-103
Coarse
Item# AT-13035-6
2a
Medium
Item# AT-13020-6
2b
Fine
Item# AT-13010-6
2c
Very Fine
Item# AT-13005-6
2d
Apply CUSHIONS to BACKPADS.
FELT does not need a cushion.
Apply abrasives onto BACKPADS
(with the CUSHIONS applied).
Prepare FELT DISC as shown in your
USER’S GUIDE and VIDEO
SETUP
!
SAFETY FIRST!
Always wear eye
and respiratory
protection.
1
2
3

ANIE’S TIP:
You can also use the FELT and COMPOUND
to polish soft stones such as opals, turquoise.
SEE-THRU Felt: Item# B-301
POLISHING BASICS
HOW TO USE YOUR SEE-THRU™ FELT DISC
ANIE’S EXTRA TIP: IF YOUR FELT STARTS TO LEAVE BLACK SMEARS ON YOUR WORKPIECE, YOU MAY BE USING TOO MUCH COMPOUND.
TO REMOVE THE SMEARS, SIMPLY “PREPARE THE FELT DISC” (AS SHOWN ABOVE) AND POLISH OVER THE AFFECTED AREAS.
DO NOT FORCE THE TIP OF SHARP TOOLS OR OBJECTS DIRECTLY INTO THE SPINNING FELT DISC!
This can create a groove and you will need to redress the disc to a flat surface. See PREPARE THE FELT WHEEL
!
APPLY COMPOUND:
With your JOOLTOOL running at FULL SPEED,
Apply Compound generously
1
POLISH:
Polish freely as needed to achieve a high luster.
Harder materials may require more compound.
DO NOT USE WITH WATER!
ALWAYS STORE IN DRY LOCATION!
2
1-Remove protective film from adhesive side.
2-Align SEE-THRU pattern to BACKPAD
3-Adhere fully to flat surface of BACKPAD.
PREPARE THE FELT DISC BEFORE FIRST USE
ALTERNATE METHOD ALTERNATE METHOD (PORTABLE MODE)
Although not SEE-THRU, the BUFFING WHEEL
is great as a final step to remove fingerprints
from polished metal. Can also be used on
plastics at slow speeds.
Compound: Item# C-103 (large bar)
Item# C-104-V (small bar)
ANIE’S TIP: For a showcase shine, use 3M™ EXL
SCRATCH-ERASER (item # S-3601) to prepare piece
BEFORE polishing. JEWELRY POLISHING (p.17 Step 2)
Item# B-9335
Toll Free: 1-85-JOOLTOOL p.16 Buy supplies at WWW.JOOLTOOL.COM
BACKPAD & CERAMIC
BACKPAD & FELT
FELT is naturally uneven and may need truing.
Run the disc at full speed, sand it flat until it feels smooth and even to the touch.
You can use a COARSE CERAMIC abrasive applied to a BACKPAD.
This technique can also be used to RE-DRESS the disc if it develops grooves.
NOTE: Loose particles of felt may be released into the air during this process, wear eye
and respiratory protection and use strong vacuum attached to the port on the HOOD.
NEVER use felt with WATER. It can absorb it and disintegrate!
NEVER force a sharp tip into the spinning FELT DISC. It will DAMAGE it.
NEVER use outer perimeter of FELT DISC to polish, it may cause loss of control of workpiece.
ALWAYS apply compound from UNDERNEATH of wheel, NOT from the EDGE or the TOP.
ALWAYS store FELT and compound in a DRY location. It can absorb moisture and disintegrate.
!
AVOID CROSS-CONTAMINATING FELT !
Have a FELT DISC for polishing metals and
another FELT DISC for polishing stones.
Mount them onto separate BACKPADS.
This will prevent metal particles built-up
on the FELT from scratching your finished
lapidary pieces.
!
!
SAFETY FIRST!
Always wear eye
and respiratory
protection.
Use JOOLTOOL’S portable
mode with the BUFFING WHEEL
for removing scratches from
headlight lenses or other
sensitive bung jobs. (p.11)
!
MOUNT THE FELT DISC ONTO A BACKPAD
USE THE FELT DISC

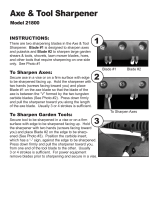
JEWELRY POLISHING
HOW TO SHAPE & POLISH
Toll Free: 1-85-JOOLTOOL p.17 Buy supplies at WWW.JOOLTOOL.COM
KEEP YOUR FINGERS CLEAN AND PROTECTED
Use 3M™ SELF-ADHERING VETRAP™ to keep ngers and nails clean!
Simply cut to size, wrap over and around.
Don’t overtighten so you can re-use your “nger caps”!
Replacement item#: T-10G
ANIE’S TIPS:
- Use these steps for jewelry, car parts, custom metal work, etc..
- Always let your abrasives do the work, use a gentle touch, do NOT use force!
- Gently apply your piece to the spinning abrasive disc, making full contact.
- Keep moving your piece to achieve a much-desired uniform shape (or polish)
- You can also use a certain step individually if that is your desired nal nish.
FULL METALWORKING AND
POLISHING KIT Item# K-1003
!
SAFETY FIRST!
Always wear eye
and respiratory protection.
REMOVE SCRATCHES & PRE-POLISH
Use 3M™ EXL SCRATCH-ERASER abrasive to rub
o scratches, scu marks and porosity,
all without removing material!
POLISH
Use SEE-THRU FELT DISC for crisp, precise polishes.
Use WITH compound.
BUFF TO A HIGH-POLISH
Use COTTON BUFFING WHEEL for a
show-quality shine on your pieces.
Use WITH compound.
POLISH DETAILS AND PLATING
Use 3M™ RADIAL BRUSH to polish hard-to reach
details and reliefs.
Safe for rhodium plating.
Does NOT damage stones.
Use WITHOUT compound.
GRIND and SHAPE the piece
Use 3M™ PURPLE CERAMIC abrasive to remove
sprues from castings, grind or shape your piece.
Apply COMPOUND on FELT DISC & BUFFING WHEEL
Item#: C-103
Twist onto the
spindle to INSTALL
Bristles must sweep,
not grab, when spinning .
NOTE: A JEWELRY PROJECT IS PICTURED
BELOW. SAME STEPS CAN ALSO BE APPLIED
TO OTHER INDUSTRIES
1
4a
BONUS STEP
4b
2
3
FOLLOW FROM
TOP TO BOTTOM
SCOTCHBRITE EXL
Item# S-3601
2
PURPLE CERAMIC
Item# AC-13120-6
1
FELT DISC
Item# B-301
3
BUFFING WHEEL
Item# B-9335
4a
RADIAL BRUSH
Item# R-341-1
4b
Apply Abrasives
onto BACKPADS.
Apply Scratch Eraser
on BACKPAD
Apply and Prepare
FELT DISC
SETUP
1
2
3
* Except Carbides
ALL METALS*

HARD-STONE LAPIDARY ADD-ON KIT: Item# K-1001 (Hard Stones: Mohs 7 +) ALSO WORKS ON SOFT STONES (as on p.19)
FOR CABOCHONS AND FLAT PIECES
TO REMOVE SCRATCHES OR CHIPS
STEP 2
REFINE the shape and
remove scratches:
Use 3M Microfinishing Diamond
abrasives to nalize the shape and
remove any leftover scratches.
Speed: Medium-High speed with water
STEP 3
PREPARE your piece for POLISHING
Prepare your piece for nal polish
using 3M Premium Diamond abrasives,
the brown discs.
Speed: Slow Speed (with lots of water)
Pressure: Use gentle, consistent pressure.
STEP 1
GRIND and SHAPE your piece
Use 3M Flex-Diamond (COARSE ) abrasive
Speed:High speed with water
FLEX DIAMOND DOES NOT NEED A CUSHION
1
FINAL STEP HIGH-POLISH your piece.
Use 3M Cerium Oxide to get a final polish
WARNING: Do NOT use on porous surfaces
Speed: Slow (with lots of water)
Pressure: Use Use gentle, consistent pressure.
4
ALTERNATE FINAL STEP: POLISHING
Some stones polish easily with our FELT DISC
Try this after step 1b on Turquoise, Opal, etc.
Speed: High Speed. DO NOT USE WATER
ALTERNATE STEP
4
LAPIDARY MINERAL CRYSTAL HARD GLASS
Toll Free: 1-85-JOOLTOOL p.18 Buy supplies at WWW.JOOLTOOL.COM
CLEANING: Clean abrasives with damp cloth for longer life & performance.
Repairing scratched or chipped pieces is similar to working on raw (rough) material.
For DEEP Scratches: Start at Step 2c, then continue up to FINAL STEP.
For LIGHT scratches: Start at Step 3a, then continue up to FINAL STEP. Also try ALTERNATE FINAL STEP.
FELT DISC
Item# B-301
2
3
This 4-Grade Kit Item# K-3600-4This 4-Grade Kit Item# K-3650-5
Apply COMPOUND on FELT DISC
Item#: C-103
SOLD SEPARATELY
FOLLOW FROM
TOP TO BOTTOM
X Coarse
Item# D-36250-1
1
Coarse
Item# D-3074-2
2a
Medium
Item# D-3045-2
2b
Fine
Item# D-3030-2
2c
Very Fine
Item# D-3020-2
2d
3000 Grit
Item# D-33000
3a
8000 Grit
Item# D-38000
3b
50 000 Grit
Item# D-50000
3c
FINAL STEP:
Cerium Oxide
Item# AT-13000-2
4
Apply CUSHIONS to BACKPADS.
FLEX DIA. & FELT don’t need cushions.
Apply abrasives onto BACKPADS
(with the CUSHIONS applied).
Use Water Tray to apply water to the
workpiece during every step.
SETUP
!
SAFETY FIRST!
Always wear eye
and respiratory
protection.
1
2
3
ANIE’S TIP: To avoid scratches on nished piece, follow ALL steps THOROUGHLY & inspect your piece after each step.

ABRASIVES
by
SOFT-STONE LAPIDARY ADD-ON KIT: K-1002 (Soft Stones: Mohs 7 and under)
FOR CABOCHONS AND FLAT PIECES
SOFT STONES
STEP 2
REFINE the shape and
remove scratches:
Use 3M Microfinishing Diamond
abrasives to nalize the shape and
remove any leftover scratches.
Speed: Medium-High speed with water
STEP 1
GRIND and SHAPE your stone
Use 3M Flex-Diamond (COARSE ) abrasive
Speed:Medium/-High speed with water
1
FINAL STEP HIGH-POLISH your stone.
Use 3M Cerium Oxide to get a nal polish
WARNING: Do NOT use on porous surfaces
Speed: Very Low (with a lot of water)
Pressure: Use gentle but consistent pressure.
ALTERNATE FINAL STEP: POLISHING
Some stones polish easily with our FELT DISC
Try this after step 2d on Turquoise,
Opal and other soft stones.
Speed: High Speed. DO NOT USE WATER
ALTERNATE STEP
LAPIDARY
HOW TO SHAPE & POLISH
Toll Free: 1-85-JOOLTOOL p.19 Buy supplies at WWW.JOOLTOOL.COM
2
3
This 4-Grade Kit Item# K-3600-4
FOLLOW FROM
TOP TO BOTTOM
X Coarse
Item# D-36250-1
1
Coarse
Item# D-3074-2
2a
Medium
Item# D-3045-2
2b
Fine
Item# D-3030-2
2c
Very Fine
Item# D-3020-2
2d
FINAL STEP:
Cerium Oxide
Item# AT-13000-2
3
Apply CUSHIONS to BACKPADS.
FELT & BUFF don’t need cushions.
Apply abrasives onto BACKPADS
(with the CUSHIONS applied).
Use Water Tray to apply water to the
workpiece during every step.
SETUP
!
SAFETY FIRST!
Always wear eye
and respiratory
protection.
1
2
3
USE WITH COMPOUND
Item#: C-103
FELT DISC
Item# B-301
+
TO REMOVE SCRATCHES OR CHIPS
CLEANING: Clean abrasives with damp cloth for longer life & performance.
Repairing scratched or chipped stones is similar to working on rough stones.
For DEEP Scratches: Start at Step 2c, then continue up to FINAL STEP.
For LIGHT scratches: Often, the FINAL STEP is enough to get rid of light scratches. Also try ALTERNATE FINAL STEP.
ANIE’S TIP: To avoid scratches on nished piece, follow ALL steps THOROUGHLY & inspect your piece after each step.

STEP 1 SHAPE your clay
Use 3M Micronishing Film 15 Mic. (Orange/Translucent)
Hold the piece FLAT against the spinning abrasive.
Speed: Medium / Low Speed
1
STEP 2 REMOVE Scratches
Use 3M Micronishing Film 9 Mic. (Translucent abrasive)
Hold the piece FLAT against the spinning abrasive.
Speed: Low Speed
2
STEP 3 Rene the surface to produce a smooth satin nish
Use the FELT DISC WITH COMPOUND.
Make FLAT contact, then move piece to polish desired areas.
SPEED: Very Low Speed TIP: Higher speeds remove material!
The speed determines the amount of material that is polished off.
3
STEP 4 BUFF your clay
Use Bung Wheel with LIGHT PRESSURE!
DO NOT PUSH hard against the edge of the spinning Bu.
Speed: High Speed, Finish with Slow Speed.
DO NOT USE COMPOUND!
4
FOLLOW FROM
TOP TO BOTTOM
POLYMER CLAY & RESIN
FLAT OR DETAILED PIECES
HOW TO SHAPE & POLISH
Toll Free: 1-85-JOOLTOOL p.20 Buy supplies at WWW.JOOLTOOL.COM
STEP 1 SAND your clay
Use 3M Radial Brushes (Pumice -Pink)
Gently hold the pice against the outer EDGE of the brush.
Speed: High Speed
STEP 3 POLISH your clay
Use the Bung Wheel WITH COMPOUND
Use LIGHT PRESSURE! DO NOT PUSH HARD on bu.
Speed: High Speed
TIP: The speed affects the amount of
material that is polished off.
STEP 4 BUFF your clay
Use the CLEAN Bung Wheel WITHOUT COMPOUND
Use LIGHT PRESSURE! DO NOT PUSH HARD on bu.
Speed: High Speed
REMINDER: DO NOT USE COMPOUND FOR THIS STEP (4)!
STEP 2 PRE-POLISH (OPTIONAL)
Use 3M Radial Brushes (6 & 1 Micron - Peach and Green)
Hold the piece against the edge of the spinning brush.
Speed: High Speed
1
4
2
3
Apply CUSHIONS to BACKPADS.
FELT & BUFF don’t need cushions.
Apply abrasives onto BACKPADS
(with the CUSHIONS applied).
Prepare FELT DISC as shown in your
USER’S GUIDE and VIDEO
SETUP
!
SAFETY FIRST!
Always wear eye
and respiratory
protection.
1
2
3
IMPORTANT: Stay within your see-thru area of the disc. Avoid using the edge to prevent cutting grooves in the clay.
FINE 15 Mic
Item# AM-13015-6
1
FLAT PIECES
FOR DETAILED PIECES
VERY FINE 9 Mic
Item# AM-13009-3
2
FELT DISC
Item# B-301
3
BUFFING WHEEL
Item# B-9335
4
FOLLOW FROM
TOP TO BOTTOM
Pumice (pink)
Item# R-343-PUM
1
BUFFING WHEEL
Item# B-9335
3
BUFFING WHEEL
Item# B-9335
4
6 Micron
Item# R-342-6
2a
1 Micron
Item# R-341-1
2b
Use with COMPOUND
Item#: C-103
+
Use with COMPOUND
Item#: C-103
+
POLYMER CLAY ADD-ON KIT: Item# K-1005
/