Page is loading ...

CPFAFFD
INSTRUCTION
B00K

CPFAFFD
Automatic
332-260
iNSTRUCTIONS
FOREWORD
Your
dream
has
come
true!
You
are
now
the
proud
owner
of
a
PFAFF
332-260
Automatic
—
—
the
sewing
machine
with
unlimited
possibilities.
This
instruction
book
will
help
you
understand
the
machine
and
give
you
valuable
tips
to
make
sewing
more
fun
for
you.
Even
if
you
are
on
experienced
seamstress,
you
will
find
this
book
a
valuable
guide
to
easy
sewing
—
—
PFAFF
Automatic
Sewing.
Follow
these
simple
instructions
and
famitiarize
yourself
with
the
exclusive
automatic
features
of
your
machine.
You
will
find
sewing
exciting
on
your
easy-to-operate
PFAFF
Automatic.
If
you
hove
any
sewing
problems,
please
contact
your
Pfaff
dealer.
He
will
be
glad
to
help
you
at
any
time.
G-M.PFAFFAG
¶1
Sewing
Machine
Factory
Ka
ise
rsta
utern

1
Thread
take-up
lever
2
Top
control
cover
(A)
3
Dial
(B)
4
Embroidery
pattern
length
lever
(E)
5
Buttonhole
slide
lever
6
Bobbin
winder
7
Slop
motion
knob
8
Stitch
length
stop
control
9
Stitch
length
(forward-reverse)
lever
10
Light
switch
11
Drop
feed
control
12
Needle
plate
R
7379
13
free
arm
cover
(enclosing
transverse
rotary
sewing
hook)
14
Needle
15
Upper
tension
16
SewlighI
swing-out
fever
17
Needle
position
lever
(C)
18
Stitch
width
control
(D)
4
5
6
/
I
5-
14-
19
20
21
22
23
2

R
7383
30
29
—j
19
Balance
wheel
20
Collapsible
5pOol
pins
21
Top
cover
22
Face
cover
23
Presser
bar
lever
24
Needle
threader
lever
25
Automatic
needle
threader
26
Sewing
foot
27
Snap-out
workplate
28
Free
arm
3
Receptacle
for
foot
control
plug
Receptacle
for
power
cord
plug
Sewlight
Needle
set
screw
Free
arm
fop
cover
29
30
31
32
33

Make
sure
stop
motion
knob
6
is
tightened
be
fore
you
begin
sewing
(clockwise
as
indicated
by
white
arrow).
0
Whenever
you
have
to
turn
the
balance
wheel
a,
turn
it
toward
you
(counter-clockwise
as
shown
by
black
arrow).
Raise
presser
bar
lever
c
and
place
both
threads
under
and
behind
the
sewing
foot.
Slide
ma
terial
under
needle,
lower
sewing
foot
——
and
you’re
ready
to
sew.
Never
run
a
threaded
machine
unless
you
have
fabric
under
the
presser
foot.
naI%.nea1s
/iac.4i,w
Ceaticn
4

R
6808
--4
Luqctant
7cins
ic
chine
under
A
woman
sewing
by
hand
will
nor
mally
draw
one
stitch
tight
before
making
another.
On
a
sewing
ma
chine,
this
is
done
automatically
by
take-up
lever
d.
Therefore,
always
turn
the
balance
wheel
toward
you
until
the
take-up
lever
is
at
its
highest
position
before
you
begin
and
after
you
have
completed
a
seam.
Failure
to
observe
this
rule
may
cause
the
thread
to
tangle
under
the
needle
plate
or
slip
out
of
the
needle
eye.
5
I
t
The
machine
will
feed the
material
under
the
sewing
foot
automatically.
All
you
have
to
do
is
guide
the
work.
Never
try
to
hasten
feeding
by
pushing
or
pulling
the
fabric
while
stitching
because
the
needle
may
bend
or
break.

‘7he
$nq-Cs.t
tOorkvtae
Your
PFAFF
Automatic
has
a
snap-out
work-
plate
which
can
be
raised
to
give
you
a
full
size
work
area
for
flat
sewing
and
embroi
dery.
To
raise
workplate,
pull
it
out
to
the
left
as
for
as
it
will
go,
then
lift
it
until
it
is
flush
with
the
needle
plate.
Now
let
it
snap
into
position.
When
you
want
to
use
the
free
arm
for
darn
ing,
lower
the
workplote,
proceeding
in
re
verse
order.
Larger
articles
may
require
a
larger
work
surface.
To
further
increase
the
sewing
area,
attach
the
workptate
extension
which
is
in
the
carrying
case.
Swing
out
the
collapsible
legs.
6

cL2c&iat
Dn&Hssthn
Make
sure
that
the
voltage
indicated
on
the
motor
label
(110
V)
corresponds
to
the
volt
age
in
your
home.
(Check
other
appliances).
Push
plug
I
of
power
cord
into
receptacle
2
on
bock
of
machine,
and
plug
3
(at
other
end
of
cord)
into
wall
outlet
4.
Conned
plug
of
foot
control
cord
5
with
receptacle
at
balance-
wheel
end
of
machine.
Place
the
foot
control
under
the
table
within
easy
reach
of
your
foot.
Place
your
foot
on
the
control
and
press.
The
harder
you
press,
the
faster
the
machine
will
run.
During
pauses
in
stitching,
completely
remove
your
foot
from
the
control
—
do
not
allow
it
to
rest
there.
R
7132
jr
7

Dial
B
—O
Control
D
—
0
Forward
Sewing
Set
eon
number
that
indicates
stitch
length
you
want(1—5;
the
higher
the
number,
the
longer
the
stitch).
Turn
fright
as
far
as
it
will
go.
Reverse
Sewing
Turn
f
left
as
far
as
it
will
go.
(The
reverse
stitches
will
be
the
same
length
as
forward
stitches).
.1
A
Le’
5th
dc
sa
cr
to
si
.4
Set:
Lever
E
—0
Lever
C
—
Centered
R6629
Lever
f
regulates
the
stitch
length
and
controls
forward
and
reverse
sewing.
(Lever
should
be
in
vertical
position
be
fore
setting
stitch
length).
Control
e
stops
stitch
on
length
desired.
8
R
7066

R
7071
ifyza9
4
ewtn9
Set:
DiolB—O
Lever
E—O
Turn
control
D
left
to
desired
stitch
width
(indicoted
by
numbers
I
to
4;
the
higher
the
number,
the
wider
the
stitch).
Do
not
move
C
or
D
while
needle
is
in
fabric.
2
Al
Lever
C
changes
needle
position
from
left
to
right.
Thus
the
stitching
can
be
moved
from
the
center
to
the
left
or
right
of
the
needle
plate
slot.
To
change
needle
position,
press
ever
C
down
and
mov,
into:
Notch
I
—
The
needle
is
at
the
extreme
left of
the
needle
plate
slot
in
straight
sewing
and
swings
to
the
right
in
zigzag
stitching.
Notch
2—
The
needle
is
centered
is
the
needle
plate
slot
in
straight
sewing,
and
swings
both
ways
in
zigzag
stitching.
Notch
3—The
needle
is
at
the
extreme
right
of
the
needle
plate
slot
in
straight
sewing,
and
swings
to
the
left
in
zigzag
stitching.
Pointer
z
indicates
the
position
of
the
needle
on
the
top
scale.
A
Lever
f
lengthens
zigzag
stitches
or
pocks
them
more
closely
together.
To
form
the
satin
stitch
graduolly
de
crease
stitch
length
almost
to
0
until
you
get
the
de
sired
effect.
9

$etémn9
/i’Za€.
4
in
6,t
Au,iatic
cm
6
z1.i?eg
Set:
Lever
E.-3
Swing
back
the
cover
on
control
A.
R
6631
B
___
D
__
If
embroidery
design
dial
shows
no
symbol
for
lever
C
or
control
D,
disregard
them.
For
such
designs
C
and
D
will
operate
automatically.
Do
not
touch
Your
embroidery
design
dial
shows
all
the
pri
mary
designs
you
con
make
with
the
Automatic.
Pick
your
design
and
turn
the
dial
so
it
points
to
that
design.
The
numbers
in
the
slot
indicate
the
machine
dial
settings
which
will
give
you
the
design
you
have
chosen.
A
B
C
D
For
example:
Turn
A
(clockwise)
so
3
is
opposite
n.
Turn
B
(clockwise)
so
5
is
at
top.
A
If
a
won
,,1,,
C
Set
stitch
length
lever
f
(page
8)
so
stitches
are
closely
packed.
them.
AB
Ea
c
con
pea
poi
fou
len
sett
dis
10
R7072

Au
B4’
123
If
number
1,
2
or
3
appears
in
box
C,
move
lever
C
to
the
ap
propriate
slot.
An
arrow
*
or
0
in
box
D
indicates
that
control
D
should
be
turned
to
the
right
as
far
as
it
will
go
without
applying
force.
A
If
a
2
appears
in
box
D,
you
may
set
the
dial
exactly
at
“2”;
or,
if
you
want
a
narrower
design,
you
may
set
it
somewhat
lower,
soy
between
“1”
and
“2”.
Pattern
is
not
clear,
if
D
is
set
above
“2”.
A
Big
Advantage
of
the
PFAFF
Automatic
Each
of
the
primary
designs
pictured
on
the
embroidery
design
dial
con
be
sewn
in
different
lengths.
Therefore
you
can
vary
the
ap
pearance
of
the
pattern
without
changing
the
stitch
length.
The
pattern
length
is
controlled
by
lever
E,
which
has
seven
graduations
—
four
numbered
(1,3,5
and
7)
and
three
unnumbered.
Maximum
pattern
length
is
obtained
by
setting
lever
E
on
“7”,
and
minimum
length
by
setting
it
on
“1”.
When
it
is
set
on
“0”,
the
Automatic
mechanism
is
disengaged.
A
A
Machine
Setting:
A
3,
B
4,
C
2
R
7095
Lever
E
at:
I
3
5
7

3
/Oin?in
9
th
2o6in
Hold
balance
wheel
a
and
turn
stop
motion
knob b
all the
way
to
the
left
(counter-clockwise).
Place
spool
of
thread
on
right-hand
spool
pin.
The
bobbin
thread
should
always
be
the
same
size
as
that
used
on
the
spool,
or
a
little
finer.
Pull
thread
from
spool
and
lead
it
clockwise
around
thread
retainer
g,
crossing
the
thread.
2
7100
h.

Pull
it
through
thread
guide
h.
Pass
end
of
thread
through
slot
in
bobbin,
from
in
side.
Set
bobbin
on
bobbin
winder
spindle
so
that
key
ot
base
of
spindle
enters
slot
in
bobbin.
Press
in
lever
i.
Hold
end
of
threod
and
slowly
start
machine.
Having
wound
a
few
turns,
break
off
end
of
thread
and
continue
winding
at
a
faster
pace.
0
Bobbin
winder
will
stop
automatically
when
bobbin
is
full.
If
you
don’t
wont
a
full
bobbin,
press
out
lever
i
when
sufficient
amount
of
thread
has
been
wound.
You
may
continue
sewing
while
you
are
winding
bobbin
without
disconnecting
balance
wheel.
R
7099
R71O0
6
R7067
7
R
7097

Raise
needle
to
its
highest
point
and
open
cover
j.
Lift
latch
k
with
your
forefinger.
Pull
out
bobbin
case
with
bobbin
by
holding
the
latch.
When
you
release
latch
k,
the
empty
bobbin
drops
out.
0
case.
.Dnwrtin
9
i9idt
73c66in
into
3o
66
mn
Case
As
shown
in
illustration
1,
hold
bobbin
in
left
hand
so
that
the
thread
end
falls
from
the
top
down
toward
you,
and
insert
bobbin
into
bobbin
Hold
the
bobbin
firmly
in
the
bobbin
case
and
pull
the
thread
into
the
Pull
the
thread
under
the
tension
spring
until
it
emerges
from
the
open
ing
at
the
end
of
the
spring.
Leave
about
three
inches
of
thread
hanging
from
the
bobbin
case.
Hold
the
case
by
its
open
latch,
so
that
the
bobbin
cannot
fall
out.
case
slot.
_________
6030
eu.ovin
the
7o6
6in
Ca5e
14

Dn.stin
9
th
73
c
66
in
Casz
Make
sure
the
needle
is
still
in
its
highest
position.
With
thumb
arid
forefinger
of
left
hand,
lift
latch
k
and
turn
bobbin
case
until
slot
at
end
of
latch
points
up.
Then
place
it
on
center
stud
I
of
hook.
In
replacing
the
bobbin
case,
it
is
best
to
hold
the
loose
end
of
thread
so
that
it
will
not
get
jammed
between
bobbin
case
and
hook.
Release
Press
against
bobbin
case
until
you
hear
it
snap
into
place.
An
improperly
inserted
bobbin
case
will
cquse
needle
breakage.
Close
cover
15
latch
k.
I
I.
I
R
7380
A

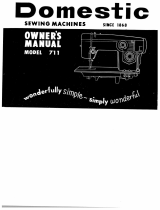
The
appearance
of
the
finished
seam
is
dependent
on
the
correct relationship
between
needle,
thread
and
fabric.
Select
the
proper
thread
sizes
and
needles
from
this
chart.
The
same
size
threads
should
be
used
in
the
needle
and
on
the
bobbin.
Some
experienced
seamstresses
prefer
a somewhat
thinner
bobbin
thread. How
ever,
the
bobbin
thread
never
should
be
thicker
than
the
needle
thread.
iftuwn?
/l4?e?1
an
‘7h&’a?
$i.c
Or
ar
sy
13
n<
Typos
of
Fabrics
Mercerized
Silk
Needle
Cotton
Size
0
Fine
Fabrics
80 60
to
such
as
georgette,
chiffon,
batiste,
to
000
or
voile,
lawn,
silk.
ioo
70
twist
Lightweight
Fabrics
70
such
as
dress
silks
and
cottons,
A
&
B
to
80
sheers,
woolens,
shirting,
dra.
twist
80
peries.
Medium
Fabrics
50
such
as
lightweight
woolens,
to
B
&
C
90
madras,
muslin,
brocades,
heavy
twist
70
silks
and
rayon,
gabardine.
Heavy
Fabrics
40
such
ascoatlng,denim,
corduroy,
to
C&D
slipcover
fabrics,
bed
tickings,
twist
lightweight
canvas.
50
Very
Heavy
Fabrics
24
90
such
as
heavy
TIcKrngz,
canvas,
to
E
to
overcodting,
sailcloth,
up
twist
40
110
hoistery,
Synthetics,
Rayon,
Acetate
Determined
by
Determined
including
nylon,
orion,
dacron,
weight
of
fabric
bythresdsiz
plastics,
etc.
40
to
50
60
to
80
16

R
6798
Dit,1tant
9acts
4&14t
/Ve&2ks
On
PFAFF
Automatic
sewing
machines,
System
130R,
flat-shank
needles
are
used
for
all
ordinary
sewing
and
embroidery
work.
The
needle
system
is
stamped
on
The
needle
plate.
Genuine
Pfaff
needles,
System
130,
are
available
from
every
Pfoff
dealer.
Bent
or
blunt
needles
should
not
be
used.
C
6
aqinq
the
/Vete
Bring
needle
bar
to
its
highest
point
and
lower
sewing
foot.
Loosen
needle
set
screw
o
half
a
turn
,c—’tEC
and
pull
old
needle
out
of
needle
clomp.
Insert
new
needle
into
opening
of
needle
clamp
and
push
it
up
as
far
as
it
will
go.
Make
sure that
the
flat
side
of
shank
faces
toward
the
back
and
long
groove
toward
you.
Tighten
needle
set
screw
0.
The
illustration
(left)
shows
you
how
the
needle
clamp
works.
The
needle
set
screw
presses
against
the
tapered
needle
positioning
roller
which
presses
against
the
flat
side
of
the
needle
shank
and
holds
the
needle
in
place.
17

Place
thread
on
spool
pin
I
and
lead
thread
end
through
holes
in
thread
guides
2
and
3
and
through
both
thread
retainer
openings
4
(see
illustration
opposite).
Pull
thread
between
any
two
of
the tension
discs
5,
(Fig.
I)
and
lead
it
clockwise
(Fig.
II)
until
it
snaps
into
the
square
notch
in
the
tension
cup
(Arrow,
Fig.
Ill).
The
thread
passes
underneath
the
thread
check
spring
which
holds
it
down
permanently.
Bring
take-up
lever
7
as
high
as
it
will
go
and
pass
thread
from
right
to
left
through
one
of
the
holes
at
its
end.
Pull
thread
into
slots
at
left
of
thread
guides
8
and
9,
and
then
into
the
slot
at
left
of
needle
clamp
10.
Then
thread
needle,
front
to
back.
PFAFF’s
Automatic
needle
threader
will
do
this
for
you
easily
and
quickly.
11
18
HI

R
7378
19
/