Page is loading ...
Page is loading ...

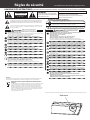
CAUTION
RISK OF ELECTRIC SHOCK
DO NOT OPEN
Important Safety Instructions Read all the instructions before using the product.
AVIS : RISQUE DE CHOC ELECTRIQUE - NE PAS OUVRIR.
TO REDUCE THE RISK OF ELECTRIC SHOCK, DO NOT REMOVE COVER (OR BACK).
NO USER-SERVICEABLE PARTS INSIDE.
REFER SERVICING TO QUALIFIED SERVICE PERSONNEL.
The lighting ash with arrowhead symbol, within an equilateral triangle, is intended to alert the
user to the presence of uninsulated "dangerous voltage" within the product's enclosure that
may be of sucient magnitude to constitute a risk of electric shock to persons.
The exclamation point within an equilateral triangle is intended to alert the user to
the presence of important operating and maintenance (servicing) instructions in
the leterature accompanying the product.
WARNING
TO REDUCE THE RISK OF FIRE OR ELECTRIC
SHOCK, DO NOT EXPOSE THIS PRODUCT
TO RAIN OR MOISTURE.
INSTRUCTIONS PERTAINING TO A RISK OF FIRE, ELECTRIC SHOCK, OR INJURY TO PERSONS
SAVE THESE INSTRUCTIONS
denotes that care should be taken.
The example instructs the user to take care not to allow ngers to be trapped.
denotes a prohibited operation.
The example instructs that disassembly of the product is prohibited.
denotes an operation that should be carried out.
The example instructs the user to remove the power cord plug from the AC outlet.
Examples of Picture Symbols
WARNING
Indicates a potential hazard that could result in death
or serious injury if the product is handled incorrectly.
CAUTION
Indicates a potential hazard that could result in injury
or damage to the product or other property if the
product is handled incorrectly.
The product should be connected to an AC outlet of the specied voltage.
If you are going to use an AC power cord, make sure that its has the correct plug shape and
conforms to the specied power voltage.
Failure to do so may result in re.
L
L
Do not use the product in the following areas.
L Areas, such as those near windows, where the product is exposed to direct sunlight
L Extremely hot areas, such as near a heater
L Extremely cold areas, such as outside
L Extremely humid areas
L Areas where a large amount of sand or dust is present
L Areas where the product is exposed to excessive vibrations
L Do not stand the main unit on its side for extended periods of time.
L Do not attempt to play the main unit at unusual angles.
Doing so may place stress on the keyboard action,resulting in breakdown of the product.
Use only the AC adaptor included with this instrument to power the instrument.
L Do not use other AC adaptor included with this instrument.
L Do not use the included AC adaptor or AC power cord to power other equipment.
Before connecting cords, make sure that the power to this product and other devices is turned OFF.
Using the product in such areas may result in product breakdown.
Use the product only in moderate climates (not in tropical climates).
Failure to do so may cause breakdown of this product and other devices.
Do not drag the product on the oor. Take care not to drop the product.
Please lift up the product when moving it. Please note that the product is heavy and must
be carried by more than two persons. Dropping the product may result in breakdown.
When connecting the AC power cord and other cords, take care not to get them tangled.
Failure to do so may damage them, resulting in re, electric shock or short-circuit.
Do not wipe the product with benzene or thinner.
L Doing so may result in discoloration or deformation of the product.
L When cleaning the product, put a soft cloth in lukewarm water, squeeze it well, then wipe the product.
Do not stand on the product or exert excessive force.
L Doing so may cause the product to become deformed or fall over, resulting in breakdown or injury.
Do not place naked ame, such as lighted candles on the product.
L Doing so may cause the illumination to fall over, resulting in re.
Ensure that the ventilation is not impeded by covering the ventilation openings with
items, such as newspaper, table-cloths, curtains, etc.
L Failure to do so may over-heat the product, resulting in re.
The product should be located so that its location or position does not interfere with its proper
ventilation. Ensure a minimum distance of 5cm around the product for sucient ventilation.
The product should be serviced by qualied service personnel when:
L The power supply cord or the plug has been damaged.
L Objects have fallen, or liquid has been spilled into the product.
L The product has been exposed to rain.
L The product does not appear to operate normally or exhibits a marked change in performance.
L The product has been dropped, or the enclosure damaged.
Do not insert or disconnect the powercord plug with wet hands.
Doing so may cause electric shock.
L
Take care not to allow any foreign matter to enter the product.
Entry of water, needles or hair pins may result in breakdown or short-circuit.
The product shall not be exposed to dripping or splashing. No objects lled with liquids,
such as vases, shall be placed on the product.
When using the headphones, do not listen for long periods of time at high volume levels.
Doing so may result in hearing problems.
Do not lean against the keyboard.
Doing so may cause the product to fall over, resulting in injury.
Do not use the product in wet areas, or areas close to water.
Doing so may cause ashort circuit, leading to an electric shock, or a re.
Do not disassemble, repair or modify the product.
Doing so may result in product breakdown, electric shock or short-circuit.
When disconnecting the AC power cord's plug, always hold the plug and pull it to remove it.
Pulling the AC power cord itself may damage the cord, causing a re, electric shock or short-circuit.
L
The product is not completely disconnected from the power supply even when the power
switch is turned o. If the product will not be used for a long time, unplug the AC power
cord from the AC outlet.
This product shall be near the AC outlet and the power cord plug in a position so that it can
readily be disconnected in an emergency because electricity is always charging while the
plug is in the AC outlet even in a power switch o condition.
Failure to do so may cause re in case of lightning.
Failure to do so may over-heat the product, resulting in re.
L
Notes on Repair
Should an abnormality occur in the product, immediately turn the power OFF, disconnect the
power cord plug, and then contact the shop from which the product was purchased.
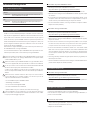
CAUTION:
To prevent electric shock, match wide blade of plug to wide slot, fully insert.
ATTENTION:
Pour éviter les chocs électriques, introduire la lame la plus large de la che dans la borne
correspondante de la prise et pousser jusqu'au fond.
An information on Disposal for users
If your product is marked with this recycling symbol it means that, at the end of its
life, you must dispose of it separately by taking it to an appropriate collection point.
You should not mix it with general household waste. Disposing of this product correctly
will prevent potential negative eects on the environment and human health which
could otherwise arise due to inappropriate waste handling.
For further details, please contact your local authority.
(European Union only)
Instruction for AC power cord (U.K.)
IMPORTANT
THE WIRES IN THIS MAINS LEAD ARE COLOURED IN ACCORDANCE WITH THE FOLLOWING CODE.
BLUE : NEUTRAL
BROWN : LIVE
As the colours of the wires in the mains lead of this apparatus may not correspond with the
coloured markings identifying the terminals in your plug, proceed as follows:
The wire which is coloured BLUE must be connected to the terminal which is marked with the
letter N or coloured BLACK.
The wire which is coloured BROWN must be connected to the terminal which is marked with
the letter L or coloured RED.
Do not plug either terminal of the power cord to the the ground od AC outlet on the wall.
Canadian Radio Interference Regulations
This instrument complies with the limits for a class B digital apparatus, pursuant to the Radio
Interference Regulations, C.R.C., c. 1374.
FCC Information (U.S.A)
CAUTION : Changes or modications not expressly approved by the party responsible for compliance
could void the user’s authority to operate the equipment.
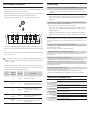
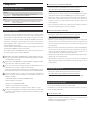
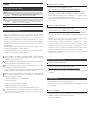
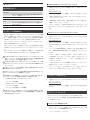
The nameplate label is located on the
underside of the instrument, as indicated below.
NOTE : This equipment has been tested and found to comply with the limits for a Class B digital
device, pursuant to Part 15 of the FCC Rules. These limits are designed to provide reasonable
protection against harmful interference in a residential installation. This equipment generates, uses
and can radiate radio frequency energy and, if not installed and used in accordance with the
instructions, may cause harmful interference to radio communications. However, there is no guarantee
that interference will not occur in a particular installation. If this equipment does cause harmful
interference to radio or television reception, which can be determined by turning the equipment o
and on, the user is encouraged to try to correct the interference by one or more of the following
measures:
• Reorient or relocate the receiving antenna.
• Increase the separation between the equipment and receiver.
• Connect the equipment into an outlet on a circuit dierent from that to which the receiver is
connected.
• Consult the dealer or an experienced radio/TV technician for help.
Nameplate

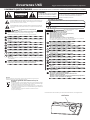
Getting Started
Thank you for purchasing the Kawai VPC1.
This owner’s manual contains important information regarding the usage and
operation of the VPC1. Please read all sections carefully, keeping this manual
handy for future reference.
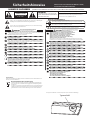
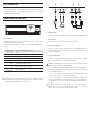
Part Names and Functions
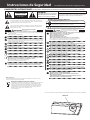
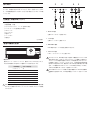
1
POWER button
This button is used to turn the instrument on and o. The LED will be lit when
the power is turned on.
The status of the VPC1 will be indicated by the colour and appearance of the POWER
button LED as follows:
Instrument Status Power button LED colour and appearance
Preset 1 Red
Preset 2 Orange
Preset 3 Green
Preset 4 Orange blinking
Preset 5 Green blinking
Updating VPC1 Red and Green blinking slowly (2 second intervals)
Updating error Red and Green blinking rapidly (0.2 second intervals)
Power error Red blinking
The VPC1 features a power saving function that can be used to automatically turn
o the instrument after a specied period of inactivity.
Please refer to the PDF manual of the VPC Editor Software for further information.
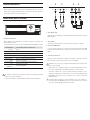
1.
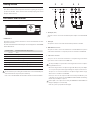
2 3 4 5
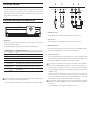
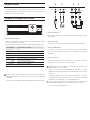
DC IN jack (12 V)
This jack is used to connect the included AC power adapter to the VPC1’s DC IN
jack.
Pedal jack
The jacks are used to connect the included Kawai pedal unit to the VPC1.
MIDI IN/OUT connectors
The jacks are used to connect the instrument to external MIDI devices (such as
other musical instruments or a computer) in order to send and receive MIDI data.
USB to Host connector
This port is use to connect the instrument to a computer using a USB ‘B to A’
type cable in order to send and receive MIDI data
The AC power adapter is required when connecting the VPC1 to a device/computer
using the MIDI connectors.
When connecting the VPC1 to a computer using a USB cable, the AC power adapt-
er is not required as power will be supplied through the computer’s USB connector.
This port is use to connect the instrument to a computer using a USB ‘B to A’ type
cable in order to send and receive MIDI data
However, in some cases the computer’s USB connector may be insucient to pow-
er the VPC1 correctly. In this case, the POWER button LED will blink red, indicating
that the AC power adaptor is required.
If VPC1 update is not completed successfully, the POWER button LED will blink red
and green rapidly (0.2 second intervals).
In this case, please try to update the VPC1 again.
2.
3.
4.
5.

Setup
System Requirements (VPC1)
Windows
Computer
Computer that has a USB port and satises the requirements
for running Microsoft Windows 8/7/Vista/XP
OS Windows 8/7/Vista/XP (With the latest service pack)
Mac
Computer
Apple Macintosh computer that has a USB port and satises
the requirements for running Mac OS X
OS Mac OS X 10.4 or later
Installation (Windows)
The VPC1 will be automatically recognized by the computer without having
to install additional drivers. When the instrument keyboard is connected to
the USB port of your computer using the included USB cable and the power is
turned on, the OS standard USB-MIDI driver will be installed automatically, then
the instrument will be ready to use.
At this point, you can congure the instrument setting from your computer or
you can create touch curves using the VPC Editor software.
Before using the VPC Editor software, use the following steps to install the Kawai
USB-MIDI driver and the VPC Editor software.
It is recommended to install the Kawai USB-MIDI driver for establishing a more
stable environment even if you do not use the VPC Editor software.
In order to install or uninstall the Kawai USB-MIDI driver and the VPC Editor soft-
ware, you must have “Administrator” privileges. For further information, please
contact your system administrator.
When you install the Kawai USB-MIDI driver and the VPC Editor software, detach
all USB devices except the computer keyboard and mouse device.
When you have connected the VPC1 to your computer using a USB cable, it may
take some time to establish the communication.
If the VPC1 and your computer are connected via a USB hub and your notice that the
behavior is unstable, please connect it directly to a USB port of your computer.
When you turn the VPC1 on/o, or you connect/disconnect the USB cable during
the following operations, you may notice that the behavior of the VPC1 or of the
computer to become unstable.
-
While installing the Kawai USB-MIDI Driver
-
While the computer starts
-
While a MIDI application is running.
-
While communicating with the computer
-
While the computer is ready an waiting in power saving mode
Depending on the configuration of your computer, the USB function might not
work properly. Please carefully read the owner’s manual for your computer, then
make the appropriate settings.
Installing the Kawai USB-MIDI Driver
Download the Kawai USB-MIDI driver from the Kawai website:
http://www.kawai.co.jp/worldwide/support/downloads.html
Extract the zip le and run the “DPInst.exe” installation program.
When the “Kawai USB MIDI Device Installer” dialog appears, click “Next”.
The “End User License Agreement” will be displayed. To agree with the terms,
select “I accept this EULA”, then click “Next”.
When the installation is nished and the message “Installation complete!” is
displayed, click “Finish”.
Installing the VPC Editor software
Download the Kawai VPC Editor Software from the Kawai website:
http://www.kawai.co.jp/worldwide/support/downloads.html
Extract the zip le and run the “SETUP.exe” installation program.
When the “Kawai VPC Editor - InstallShield Wizard” dialog appears, click “Next”.
The “License Agreement” will be displayed. To agree with the terms, select “I
accept the terms in the license agreement”, then click “Next”.
The destination folder for the installation will be displayed. If you want to
install the VPC editor to this folder, click “Next”. If you want to install the VPC
editor to a dierent folder, click “Change..” to change the installation path and
click “Next” when you have selected the desired installation location.
The message “Ready to Install the Program” is displayed, click “Install”.
When the installation is nished and the “Installshield Wizard Completed” dia-
log is displayed, click “Finish”.
Installation (Mac OS X)
Installing the VPC Editor software
Download the Kawai VPC Editor Software from the Kawai website:
http://www.kawai.co.jp/worldwide/support/downloads.html
Extract the zip le and run the “VpcEditorForMac.pkg” installation program.
About the PDF Manual
A PDF manual is included with the VPC Editor software.
For details on the overview and operations on the VPC Editor software, please
refer to the PDF manual.
Using the PDF Manual
When the VPC Editor software is launched, click the KAWAI logo button to
display the version information screen.
Click the HELP button.
1.
2.
3.
4.
5.
1.
2.
3.
4.
5.
6.
7.
1.
2.
1.
2.

Troubleshooting
Power does not turn on
- Is the VPC1 connected to your computer via a USB hub?
Please connect it directly to a USB port on your computer without using a hub.
- Is the POWER button LED blinking red?
If the POWER button is lit with a red blinking light, the power supplied by the
computer through the USB bus is insucient. In such a case, please use the
included AC power adapter.
The connected device or software does not respond
- Is the USB cable or MIDI cable connected correctly?
- Has your computer detected the VPC1?
Please carefully read the manual for your computer and make sure that the VPC1
can be recognized by the computer.
Depending on the conguration of your computer hardware, the VPC1 may not
be detected properly when using the USB connection.
- The connected device or software might not support this feature. Please refer to
the manual of the connected device or software.
No sound is produced when the keys are pressed
- Please check the MIDI transmit channel and output settings for the VPC Editor
software.
- Has the software sound source been congured correctly?
The velocity of the keyboard does not work
- Please check the settings of Touch Curve and Velocity Oset of the VPC Editor
software.
Sound increases only at certain key(s) of the keyboard
- Please check the setting of Velocity Oset of the VPC Editor software.
Messages are not sent or received from the MIDI or USB port
- Please check the MIDI transmit channel and output settings for the VPC Editor
software.
The included foot pedal does not work
- Has the foot pedal been connected properly?
- Please check the Pedal CC# settings for the VPC Editor software.
- Has the software sound source to be used been set correctly?
Technical Specications
Keyboard
88 wooden keys with Ivory Touch key surfaces
RM3 Grand II action with Let-o and Triple Sensor
Connection
terminals
Pedal jack, MIDI (IN/OUT) connectors, USB to HOST port,
Power supply connector (DC IN 12V)
Power supply USB Bus powered (via USB port), DC 12 VAC adapter
Power
consumption
- With USB Bus power supply :1.0 W
- With AC power adapter :3.0 W
Dimensions 138 (W) x 42.5 (D) x 18.5 (H) cm
Weight 29.5 kg
Package
Contents
Owner’s manual (this manual), USB cable, AC power adapter,
Power cord, F-30 foot pedal, Music rack/rest
※
Appearance and specications are subject to change without notice.
※
'Ivory', 'Pianoteq', 'Galaxy', and 'Alcia's Keys' are all trademarks of their respective owners.
Selecting a Preset Mode
Five preset modes are provided with the VPC1, which allow you to save the vari-
ous touch curves created by using the included VPC Editor software or the set-
tings of the instrument.
For further information on how to save the settings as presets, please refer to
the PDF manual of the VPC Editor software.
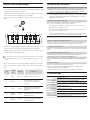
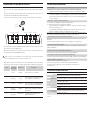
The section below describes how to select the preset modes using the VPC1.
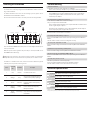
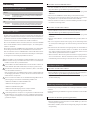
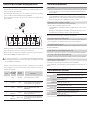
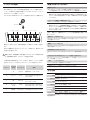
Hold
Preset 1 Preset 2 Preset 3 Preset 4 Preset 5
Press and hold the POWER button, then press one of the highest 5 black keys to
select a preset mode.
When the preset mode assigned to the pressed key is selected, the LED color of
the POWER button will change.
When the power is turned on, the previously used preset will be selected automati-
cally. When the power is turned on for the very rst time, Preset1 will be selected.
In addition to a standard touch curve, several touch curves suitable for popular
software pianos are provide as factory presets.
Preset
Power LCD
state
Touch Curve Description
1 Red Normal A standard touch curve.
2 Orange Ivory
A touch curve suitable for the Ivory
software developed by Synthogy.
3 Green Pianoteq
A touch curve suitable for the
Pianoteq software developed by
MODARTT.
4
Orange
blinking
Galaxy
A touch curve suitable for the Galaxy
Pianos software developed by
Galaxy Instruments.
5
Green
blinking
Alicia's Keys
A touch curve suitable for the Alicia's
Keys software developed by Native
Instruments.
Page is loading ...
Page is loading ...
Page is loading ...
Page is loading ...
Page is loading ...
Page is loading ...
Page is loading ...
Page is loading ...
Page is loading ...
Page is loading ...
Page is loading ...
Page is loading ...
Page is loading ...
Page is loading ...
Page is loading ...
Page is loading ...
Page is loading ...
Page is loading ...
Page is loading ...
Page is loading ...

ソフトウェア使用許諾契約書
本使用許諾契約書(以下「本契約書」という)は、KAWAI USB MIDI ドラ
イバ及び VPC エディタソフトウェアのプログラム、文書、アイコン、イメー
ジと設定ファイル(以下「本ソフトウェア」という)に関して株式会社河
合楽器製作所(以下「当社」という)とお客様(個人または法人のいずれ
かであるかを問いません)との間に締結される契約です。お客様は本契約
書の条項を承諾した場合のみ、本ソフトウェアをインストール、コピー、
もしくは、使用することができます。本ソフトウェアをインストール、コ
ピー、もしくは、使用した場合は、お客様は本契約書の条項を承諾したも
のとします。
1. 使用許諾
(1)本ソフトウェアは当社の USB MIDI の機能を持つ製品とともに使用す
る場合に限り、コンピュータ上で使用することができます。
(2)本ソフトウェアは、一時に 1 台のコンピュータのみで使用する場合
に限り、使用することができます。
(3)本ソフトウェアは保管のためにコピーすることができます。
2. 使用制限
(1)本ソフトウェアは再配布、公衆送信、または送信可能化することは
できません。
(2)本ソフトウェアは二次著作物を作る目的で、改変、リバースエンジ
ニアリング、逆コンパイル、逆アセンブルはすることはできません。
(3)本ソフトウェアを貸与、販売、リース、担保設定、または権利譲渡
の対象にすることはできません。
3.著作権
(1)本ソフトウェアは当社または第三者の著作物であり、法令や条約に
より保護されています。
4. 無保証
(1)本ソフトウェアは現状有姿で提供され、当社は本ソフトウェアが正
常に動作することを保証するものではありません。
(2)当社は本ソフトウェアの商品性および特定の目的に対する適合性に
ついて明示または黙示を問わず一切保証をしません。
(3)当社は本ソフトウェアを修正する義務は負いません。また、当社は
本ソフトウェアを修正する場合に予告する義務を負いません。
5.損害賠償責任
(1)当社は本ソフトウェアの使用または使用不能による損害の責任は負
いません。たとえ、当社が当該の損害の可能性について予め知らされてい
た場合も同様です。
(2)お客様は本契約を履行して頂けなかったことに関して、当社および
第三者に発生したすべての損失および損害、およびこれを補填するための
費用を当社および第三者に対してご負担頂くものとします。
6. 期間
(1)本契約はお客様が本ソフトウェアのインストール時に本契約を承認
した時に始まり、お客様が本ソフトウェアの使用を停止し、関連するすべ
てのファイルを削除するまでとします。
(2)お客様が本契約の条項に違反した場合は、その時点で当社はお客様
に本契約を停止させることができるものとします。その場合は、お客様は
本ソフトウェアと関連するすべてのファイルを破棄しなければいけませ
ん。
7.雑則
(1)本契約は日本国法に準拠します。
(2)本契約について紛争が生じた時は、静岡地方裁判所浜松支部または
浜松簡易裁判所を第一審の専属的合意管轄裁判所とします。
(3)本契約は当社とお客様との間の完全なる合意によるものとします。
SOFTWARE END USER LICENSE AGREEMENT
This End User License Agreement (“AGREEMENT”) is between Kawai Musical
Instruments Mfg. Co., Ltd. (“KAWAI”) and you (as an individual or legal entity) for
the Kawai USB MIDI Driver and VPC Editor Software which includes computer
software and may include electronic documentation, icon, image, and congu-
ration les (“SOFTWARE”). Only after agreeing to this AGREEMENT may you in-
stall, copy or use the SOFTWARE. By installing, copying or using the SOFTWARE
you are agreeing to be bound by the terms of this AGREEMENT.
GRANT OF LICENSE
(1) You may use the SOFTWARE on a computer only for using the USB MIDI func-
tion of KAWAI products.
(2) You may use the SOFTWARE on a single computer at a time.
RESTRICTIONS
(1) You may not redistribute, transfer and make transmittable the SOFTWARE.
(2) You may not alter, reverse engineer, decompile and disassemble the SOFT-
WARE for creating any derivative works thereof.
(3) You may not rent, sell or lease the SOFTWARE, and may not grant of security
interest and assign any right in the SOFTWARE.
COPYRIGHT
(1) The SOFTWARE is copyrighted work of KAWAI and/or third party, and is pro-
tected by relevant copyright laws and all applicable treaty provisions.
DISCLAIMER OF WARRANTY
(1) This SOFTWARE is provided “AS IS” and KAWAI does not warrant that this
SOFTWARE works correctly.
(2) KAWAI disclaims all warranties as to this SOFTWARE, express, and implied, in-
cluding but not limited to the implied warranties of merchantability, tness for a
particular purpose.
(3) KAWAI does not warrant that defects in the SOFTWARE will be corrected.
Also the SOFTWARE can be modied without notice.
LIABILITY IN DAMAGES
(1) KAWAI shall not be liable for any direct, indirect, special, incidental or conse-
quential damages arising from the use or inability to use the SOFTWARE, even if
KAWAI has been advised of the possibility of such damages.
(2) You shall indemnify KAWAI and/or third party against any loss, damage, costs
or expenses related to any material breach of this AGREEMENT by you.
TERM AND TERMINATION
(1) This AGREEMENT becomes effective at the moment that you accept this
AGREEMENT during the installation, and is terminated by stopping using the
SOFTWARE and deleting all les of this SOFTWARE.
(2) If you breach this AGREEMENT, KAWAI may immediately terminate this
AGREEMENT. Upon such termination, you must immediately delete all les of
this SOFTWARE.
MISCELLANEOUS
(1) This AGREEMENT shall be construed and controlled by the laws of Japan.
(2) The Hamamatsu Branch of Shizuoka District Court or the Hamamatsu Sum-
mary Court shall be the exclusive agreement jurisdictional court of the first
hearing for any and all disputes arising from this AGREEMENT.
(3) This AGREEMENT constitutes the entire agreement between the parties and
supersedes any previous written or oral agreement, negotiations, commitments
and representations in respect thereto.
1.
2.
3.
4.
5.
6.
7.

VPC1 Owner’s Manual
KPSZ-0566
OW1059EGFSIJ-J1403
Printed in Indonesia
Copyright © 2014 Kawai Musical Instruments Mfg. Co.,Ltd. All Rights Reserved.
817648-R102
-
 1
1
-
 2
2
-
 3
3
-
 4
4
-
 5
5
-
 6
6
-
 7
7
-
 8
8
-
 9
9
-
 10
10
-
 11
11
-
 12
12
-
 13
13
-
 14
14
-
 15
15
-
 16
16
-
 17
17
-
 18
18
-
 19
19
-
 20
20
-
 21
21
-
 22
22
-
 23
23
-
 24
24
-
 25
25
-
 26
26
-
 27
27
-
 28
28


Ask a question and I''ll find the answer in the document
Finding information in a document is now easier with AI
in other languages
- italiano: Kawai ATX2 Manuale del proprietario
- français: Kawai ATX2 Le manuel du propriétaire
- español: Kawai ATX2 El manual del propietario
- Deutsch: Kawai ATX2 Bedienungsanleitung
- 日本語: Kawai ATX2 取扱説明書
Related papers
Other documents
-
VPC 26-M512111001 User manual
-
Casio AP-80R Précautions concernant la sécurité
-
JVC RM-HP250AU User manual
-
Fluke FlukeView® Forms Software with Cable Installation guide
-
dfb TECHNOLOGY DFOX User manual
-
M-Audio TRIGGERFINGER User manual
-
Yamaha TYROS 4 Owner's manual
-
-
-