Page is loading ...

Dear Customer,
Thank you for having purchased one of our products.
We are certain that this new, modern, functional and practical appliance, built with the very
highest quality materials, will meet your requirements in the best possible way. This hob is easy
to use. It is, however, important to thoroughly read the instructions in this handbook in order to
obtain the best results.
The manufacturer shall not be held responsible for any damages to persons or property
caused by incorrect installation or use of the appliance.
The Manufacturer shall not be held responsible for any inaccuracies in this handbook due to printing or
transcription errors; the designs in the figures are purely indicative. The Manufacturer also reserves the right
to make any modifications to the products as may be considered necessary or useful, also in the interests
of the user, without jeopardizing the main functional and safety features of the products themselves. This
cook top was designed to be used exclusively as a cooking appliance: any other use (such as
heating rooms) is to be considered improper and dangerous.
COD. 01075SMSM011 (01075UK) - 05.09.2013
INSTRUCTIONS AND ADVICE FOR THE
USE, INSTALLATION AND MAINTENANCE
OF BUILT-IN ELECTRIC HOBS
SMEG S.p.A.
Via Leonardo da Vinci, 4
42016 GUASTALLA - ITALIA
TIPO: PAZ04
MOD.: SE435S

26
WARNING: the appliance and its accessible parts become hot during
use.
Care should be taken to avoid touching heating elements. Children
less than 8 years of age shall be kept away unless continuously
supervised.
This appliance can be used by children aged from 8 years and above
and persons with reduced physical, sensory or mental capabilities or
lack of experience and knowledge if they have been given
supervision or instruction concerning use of the appliance in a safe
way and understand the hazards involved.
Children shall not play with the appliance.
Cleaning and user maintenance shall not be made by children without
supervision.
WARNING: unattended cooking on a hob with fat or oil can be
dangerous and may result in fire. NEVER try to extinguish a fire with
water, but switch off the appliance and then cover flame e.g. with a lid
or a fire blanket.
WARNING: danger of fire: do not store items on the cooking
surfaces.
The instructions regarding the stove, hobs and ovens must
indicate that you should not use an appliance for steam cleaning.
The instructions for hobs shall state that the appliance is not
intended to be operated by means of an external timer or separate
remote-control system.
27
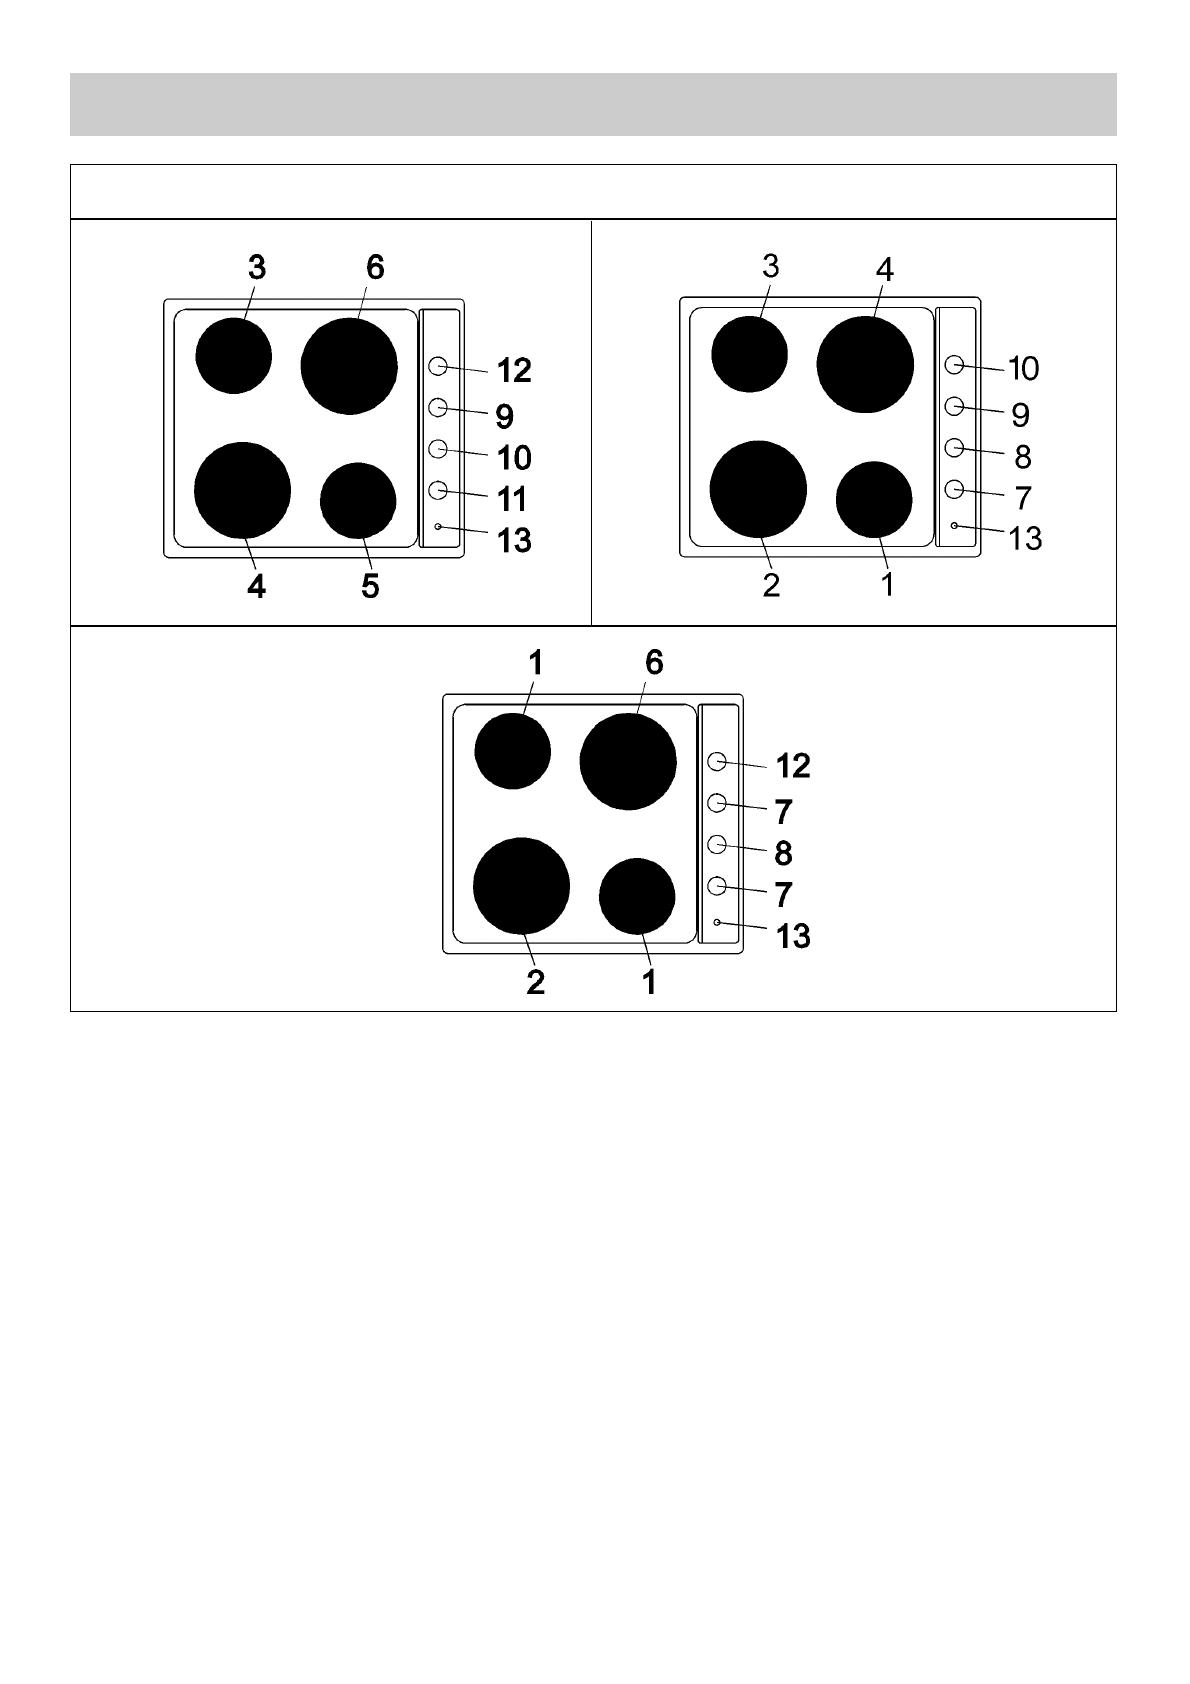
1 Normal plate Ø 145 of 1000 W
2 Normal plate Ø 180 of 1500 W
3 Rapid plate Ø 145 of 1500 W
4 Rapid plate Ø 180 of 2000 W
5 Thermostat plate Ø 145 of 1500 W
6 Thermostat plate Ø 180 of 2000 W
7 Control knob for electric plate n° 1
8 Control knob for electric plate n° 2
9 Control knob for electric plate n° 3
10 Control knob for electric plate n° 4
11 Control knob for electric plate n° 5
12 Control knob for electric plate n° 6
13 Warning light indicating that one or more plates are operating
DESCRIPTION OF THE HOT PLATES
TYPE: PAZ04
28
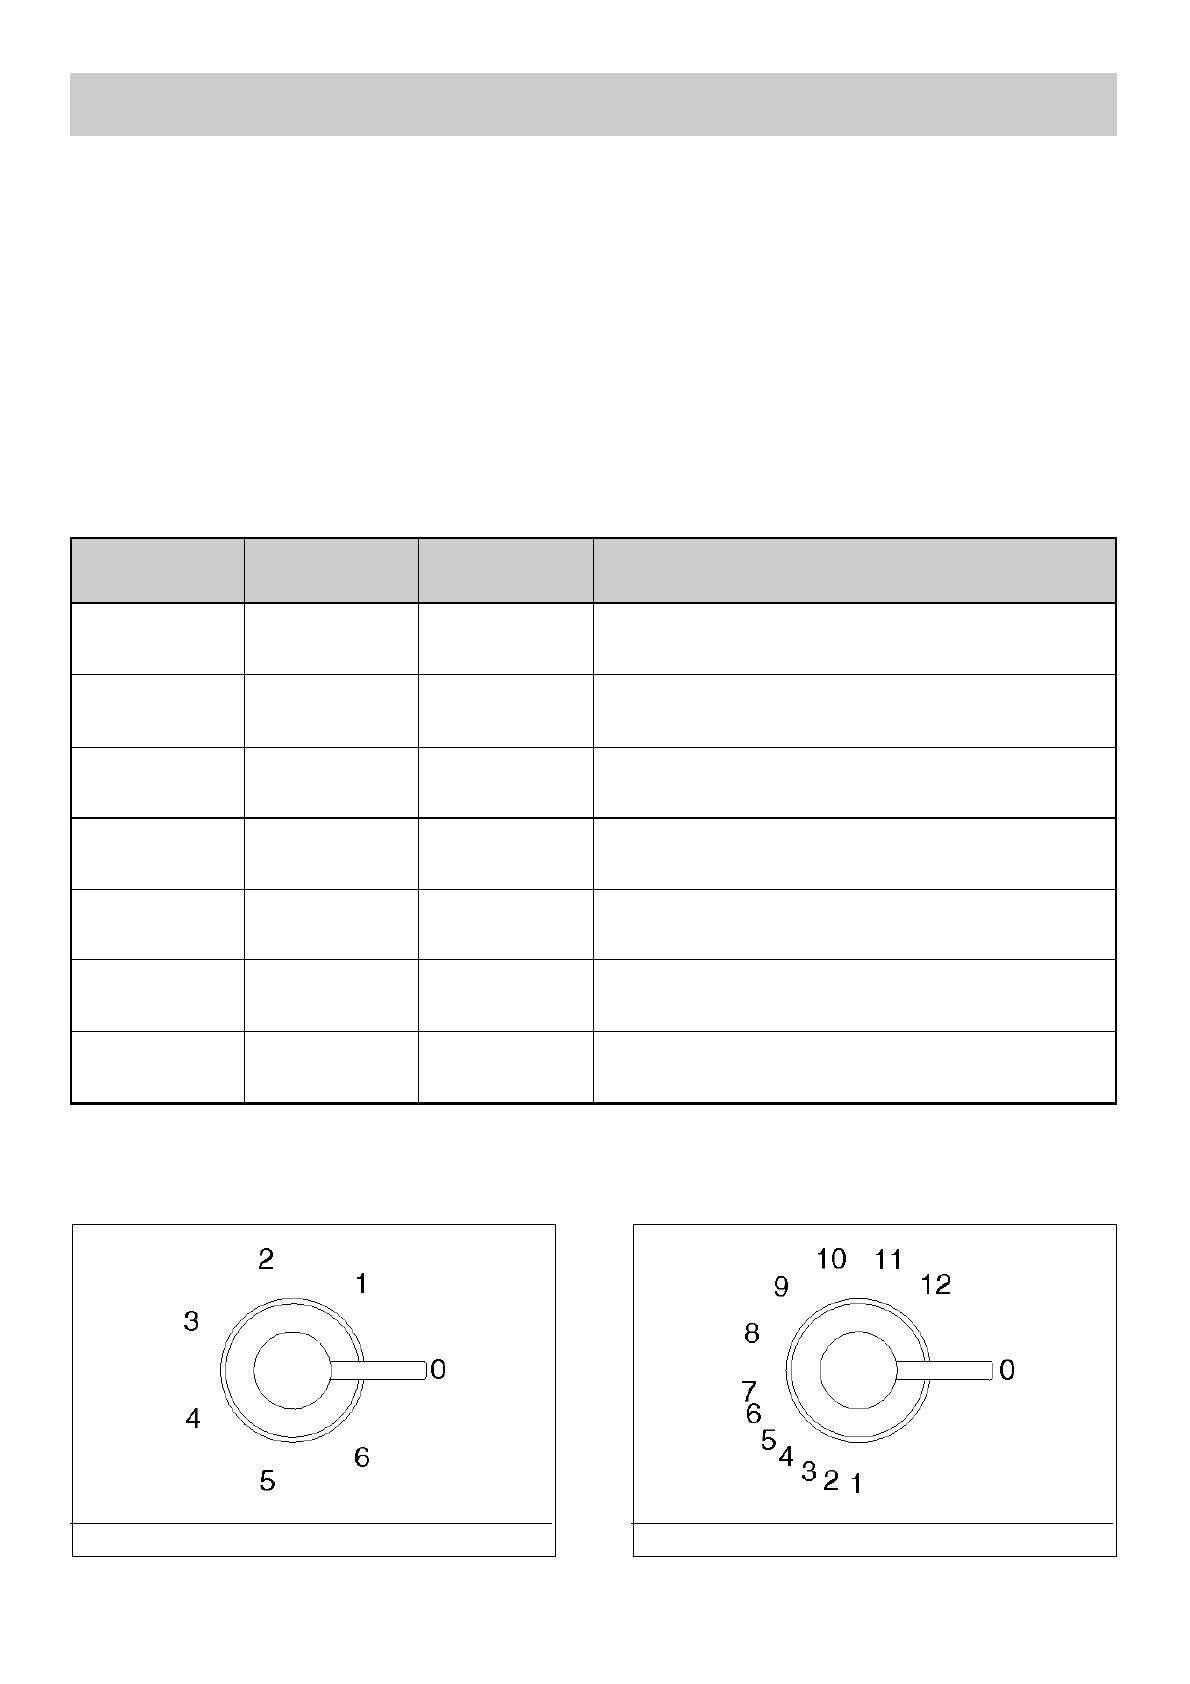
USE
1) SWITCHING ON THE ELECTRIC
PLATES
The hobs may be equipped with three types of
electric plates: normal, thermostat and rapid plates
indicated by a red mark. The normal plates and the
rapid plates are controlled by a 7 - position switch
(see fig. 1). The thermostat plates are controlled by
12 - position switch (see fig. 2).
Switch on the plates by turning the knob to the
required position.
A diagram is screen-printed on the front panel. This
diagram indicates to which electric plate the knob in
question corresponds (see fig. 1 - 2).
A red warning light will come on to indicate that the
plate has been ignited.
2) HOW TO USE THE ELECTRIC PLATES
A purely indicative plate regulation chart is given
below.
FIG. 1 FIG. 2
0 Off
1 1 Weak
2 1 - 4 Low
3 4 - 8 Slow
4 8 - 10 Medium
5 10 - 12 Strong
6 12 High
NORMAL AND THERMOSTAT HEAT POSSIBLE COOKING
RAPID PLATE PLATE INTENSITY PROCESSES
TABLE
To dissolve butter, chocolate, etc.. To heat small
amounts of liquid.
To heat larger amounts of liquid. To prepare cremes
and suces requiring long slow cooking times.
To thaw frozen foods and prepare stews, heat to boiling
point or simmer.
To heat foods to boiling point. To brown delicate
meats and fish.
For escalopes and steaks. To simmer large amounts
of food.
To bring large amounts of liquid to the boil. For frying.

USE
WARNINGS:
when the plate is switched on for the first time, or
if it has remained unused for a long period, it
should be dried for 30 minutes on switch position
n° 1. This will eliminate any moisture that may
have been absorbed by the insulating material.
To correctly use the appliance, remember:
- to place a pan on the plate before switching this
on.
- To always use pans with flat and very thick
bottoms (see fig. 3).
- To never use pans that are smaller than the
plate diameters.
- To dry the bottom of the pan before placing it on
the plate.
- Correctly preserve the plate after use by treating
it with special products, easily available on the
market. This will keep the surface of the plate
clean and bright. The operation will also prevent
the formation of rust. Never allow children to
play near the appliance when using the plates.
Check that the pan handles are positioned
correctly. The user should never leave the
appliance unattended when cooking with easily
inflammable oil and fat.
- The plates will remain hot for a long period of
time even after use. Never touch them with the
hands or other objects in order to prevent
scorching.
- If the appliance has a glass lid, this could shatter
when the cooker becomes hot. Always
disconnect all the plates before closing the lid.
- Immediately disconnect the appliance from the
electricity main as soon as cracks are noted on
the surfaces of the plates.
- The machine must not be used by people
(including children) with impaired mental or
physical capacities, or without experience of
using electrical devices, unless supervised or
instructed by an expert adult responsible for
their care and safety. Children should not be
allowed to play with the equipment.
- Containers wider than the unit are not
recommended.
- The appliance must not be operated with an
external timer or a separate remote-control
system.
- Do not attempt to change the technical
characteristics of the product because it can
be dangerous.
- If you should not to use this appliance any
more (or replace an old model), before
disposing of it, make it inoperative in
conformity with current law on the protection
of health and the prevention of environmental
pollution by making its dangerous parts
harmless, especially for children who might
play on an abandoned appliance.
WARNINGS AND ADVICE FOR THE USER:
- do not touch the appliance with wet or damp
hands or feet.
- Do not use the appliance barefoot.
- The manufacturer will not be liable for any
damage resulting from improper, incorrect or
unreasonable use.
- During, and immediately after operation,
some parts of the cook top are very hot:
avoid touching them.
- After using the cook top, make sure that the
knob is in the closed position.
29
FIG. 3
Never cook food directly on the
electric plates but always in a pot or
container.

30
CLEANING
IMPORTANT:
always disconnect the appliance from the
electricity main before carrying out any cleaning
operation.
3) HOTPLATE
If you want to preserve the surface clean and bright,
periodically wash the hot plate with lukewarm soapy
water.
Following this, all parts should be thoroughly rinsed
and dried. Never wash them while they are still
warm and never use abrasive powders.
Do not allow vinegar, coffee, milk, salted water,
lemon or tomato juice from remaining in contact
with the enamelled surfaces for long periods of
time.
WARNINGS:
- correctly preserve the plate after use by
treating it with special products, easily
available on the market. This will keep the
surface of the plate clean and bright. The
operation will also prevent the formation of
rust.
- Any liquid overflowed the pans, must be
always remove with a rag.
- Don’t use steam jets for the equipment
cleaning.
- Burned food on an electric plate must be
removed dry.
- After use, pour a little lukewarm oil on the
plate and wipe it with a cloth.
CORRECT USE OF THE ELECTRIC PLATES
When using the electric plates, you must:
●absolutely not operate them empty (without a container);
●try not to pour liquids on the plates when they are hot;
●cook with a cover whenever possible to save electricity;
●an indicator light near the knob shows when the electric plates are turned on.

31
INSTALLATION
Installation and maintenance must only be
carried out by a qualified installer.
The appliance must be correctly installed in
conformity with current law and the
manufacturer's instructions.
Incorrect installation could cause damage to
persons, animals and property for which the
manufacturer cannot be held responsible.
4) INSTALLING THE HOT PLATE
Check that the appliance is in a good condition
after having removed the outer packaging and
internal wrappings from around the various loose
parts. In case of doubt, do not use the appliance
and contact qualified personnel.
Never leave the packaging materials
(cardboard, bags, polystyrene foam, nails, etc.)
within children's reach since they could
become potential sources of danger.
The measurements of the opening made in the top
of the modular cabinet and into which the hot plate
will be installed are indicated in either fig. 4, comply
with the measurements given for the hole into which
the appliance will be recessed (see fig. 5).
If a wood is installed above the hob, please look at
the hood manufacturer instructions regarding the
minimum distance between hood and hob (fig. 5).
5) FIXING THE HOT PLATE
The hob has a special seal which prevents liquids
from infiltrating into the cabinet. Strictly comply
with the following instructions in order to correctly
apply this seal:
- detach the seals from their backing, checking
that the transparent protection still adheres to the
seal itself.
- Overturn the hob and correctly position seal “E”
(fig. 6) under the edge of the hob itself, so that
the outer part of the seal itself perfectly matches
the outer perimetral edge of the hob. The ends of
the strips must fit together without overlapping.
- Evenly and securely fix the seal to the hob,
pressing it in place with the fingers.
- Remove the strip of protective paper from the
seal “F” it the hooks into their relative housings
“K” in the unit and set the hob into the hole in the
cabinet. Lock it in place with the relative fixing
screws “F” (see fig. 7).
WARNINGS:
be aware that the glue that join the laminated
plastic to the furniture, has to resist to
temperature not below 150 °C, to avoid the
unstuck of the panelling.
The rear wall, adjacent and surrounding
surfaces must therefore be able to withstand
an temperature of 90 °C.
FIG. 4 FIG. 5 FIG. 6
FIG. 7

32
INSTALLATION
6) ELECTRICAL CONNECTIONS
Electrical connection must be carried out in
compliance with the specifications and
provisions in force.
Before proceeding with the connections, check that:
- the voltage matches the value shown on the
specification plate and the section of the wires of
the electrical system can support the load, which
is also indicated on the specification plate.
- The voltage rating of the appliance and the
current sockets suits the maximum power draw
of the appliance (see data label affixed to the
lower part of the appliance itself).
- The system is equipped with an efficient earth
connection in compliance with the pertinent
provisions in force. The manufacturer declines all
responsibility for failure to comply with these
provisions.
- If the appliance has no power cable, connect a
cable of adeguate section to the terminal strip
(consult the table on next page) complying with
the wiring diagram of fig. 8. This diagram is also
affixed to the hot plate.
When connection to the electricity main is made
by using a socket (gas version only):
- fit a standard plug to power cable (if supplyied).
This plug should be able to bear the load
indicated on the data label. Connect the wires
according to the diagram in fig. 8, remembering
to comply with the following instructions:
Letter L (live) = brown wire;
Letter N (neutral) = blue wire;
Earth symbol = yellow-green wire.
- The powering cable must be positioned so that it
is never able to reach an temperature of 90 °C in
any part.
- Never use reductions, adapters or shunts for the
connection since these could cause false
contacts and dangerous overheating.
- The outlet must be accessible after the built-in.
When the appliance is connected straight to the
electricity main:
- install an omnipolar cutout between the
appliance itself and the main. This circuit-breaker
should be sized according to the rating of the
appliance and the opening between its contacts
should be at least 3 mm.
- Remember that the earth wire must not be cutout
by the switch.
- The electrical connection may also be protected
by a high sensitivity differential switch.
Installers are strongly advised to connect the
yellow- green earthing wire to an efficient earthing
system.
The manufacturer cannot be responsible for the
missing earthing of the appliance.
Before performing any service on the electrical
part of the appliance, it must absolutely be
disconnected from the electrical network.
WARNINGS:
all our appliances are designed and
manufactured in compliance with European
standards EN 60 335-1 and EN 60 335-2-6 plus
the relative amendments.
The appliance complies with the provisions of
the following EEC Directives:
- CEE 2004/108/CE regarding to
electromagnetic compatibility.
- CEE 2006/95 regarding electrical safety.
IMPORTANT: the appliance must be
installed following the manufacturer's
instructions. The manufacturer will not be
liable for injury to persons or animals or
property damage caused by an incorrect
installation.
If the installation requires modifications
to the home's electrical system or if the
socket is incompatible with the
appliance's plug, have changes or
replacements performed by
professionally-qualified person. In
particular, this person must also make
sure that the section of the wires of the
socket is suitable for the power absorbed
by the appliance.
FIG. 8

33
CONVERSIONS
Disconnect the appliance from the mains
supply prior to any conversions being carried
out.
7) CHANGING THE TYPE OF POWER
SUPPLY
Although they leave our factory preset for single-
phase connection, certain appliances may by
converted to the threephase system.
Comply with the following instructions:
a) remove the hotplate from the top of the cabinet,
overturn it, unscrew screw "Z" and remove under
part (see fig. 9).
b) Shift connecting plate on terminal according to
the following chart. This chart is also affixed to the
hob.
c) Insert a supply cable of adequate section (see
chart par. 10) through core hitch on the terminal
board.
d) Connect the phase and earth wires to the relative
terminal board.
e) Fix the supply cable in place using clamp.
f) Refit the hotplate, complying with the above
instructions in reverse.
FIG. 9 FIG. 10

34
SERVICING
Always disconnect the appliance from the
electricity main before proceeding with any
servicing operation.
8) REPLACING THE ELECTRICAL
COMPONENTS
For access to the various parts, remove the hotplate
from the top of the cabinet. Then overturn it, unscrew
screw “Z” and remove under part. (see fig. 9).
After these actions is possible to work on the
plates, commutators, clamps and input cable.
N.B. In case of substitution of the input cable,
the installer must keep the “earth” conductor
longer than “live” ones, and must respect the
cautions in paragraph “Electrical connection”.
To reassemble the appliance repeat the inverse
process.
9) TECHNICAL CHARACTERISTICS OF
THE ELECTRICAL COMPONENTS
To facilitate the job of the installer we present a
scheme with the characteristics of the components.
POWER OF ELECTRICAL COMPONENTS DENOMINATIONS W
Normal plate Ø 145 mm – 7 positions with the protector 1000
Normal plate Ø 180 mm – 7 positions with the protector 1500
Rapid plate Ø 145 mm – 7 positions 1500
Rapid plate Ø 180 mm – 7 positions 2000
Thermostat plate Ø 145 mm – 12 positions 1500
Thermostat plate Ø 180 mm – 12 positions 2000
Denominations W
TYPE AND SECTION OF THE POWER CABLES
Rubber
3 X 2.5 mm
2
(*)
5 X 1.5 mm
2
(*) 4 X 1.5 mm
2
(*)
H05 RR-F
Polycroropene
3 X 2.5 mm
2
(*)
H05 RN-F
Single phase Three phase Three phase
Cable type
power power 400 V 3N ~ power
230 - 240 V~ 400 - 415 V 3N~ 400 - 415 V 2N~
(*) keeping in mind the contemporaneousness factor

VOLTAGE 230 - 240 V~
FREQUENCY 50/60 Hz
TOT. RATING 7000 W
MODEL WITH
2 RAPID PLATES + 2 THERMOSTAT PLATES
VOLTAGE 230 - 240 V~
FREQUENCY 50/60 Hz
TOT. RATING 6000 W
MODEL WITH
2 RAPID PLATES + 2 NORMAL PLATES (with protector)
VOLTAGE 230 - 240 V~
FREQUENCY 50/60 Hz
TOT. RATING 5500 W
MODEL WITH
3 NORMAL PLATES (with protector) + 1 THERMOSTAT PLATE
35
TECHNICAL DATA
WARNING: MAINTENANCE MUST ONLY BE
PERFORMED BY AUTHORIZED PERSONS.

36
TECHNICAL ASSISTANCE AND SPARE PARTS
This appliance, before leaving the factory, has been carefully tested and regulated by expert and
specialized personnel in order to guarantee the best performances.
Any repairs or adjustments which may be subsequently required may only be carried out by qualified
personnel with the utmost care and attention.
For this reason, always contact your Dealer or your nearest After Sales Centre whenever repairs or
adjustments are required, specifying the type of fault and the model of appliance in your possession.
Please also note that genuine spare parts are only available from our After Sales Service Centres and
authorized retail outlets.
The above data are printed on the data label put on the inferior part of the appliance and on the packing
label.
The above informations give to the technical assistant the possibility to get fit spare parts and a heaven-
sent intervention. We suggest to fill the table below.
MARK: .............................^^^.
MODEL: ...........................^^^.
SERIES: ...........................^^^.
This appliance is marked according to the European directive 2002/96/EC on Waste Electrical and
Electronic Equipment (WEEE).
This guideline is the frame of a European-wide validity of return and recycling on Waste Electrical and
Electronic Equipment.
/