Kodak EASYSHARE M320 User manual

Category
Camera flashes
Type
User manual

Kodak EASYSHARE M320 is a digital camera designed to make taking and sharing pictures easy. It features multiple modes to optimize picture quality for various scenarios like night shots, portraits, or landscapes. It also includes a variety of settings to adjust the camera's behavior, such as flash modes, self-timer, and white balance. The camera has a built-in Help system to guide users through its features.

Kodak EASYSHARE M320 is a digital camera designed to make taking and sharing pictures easy. It features multiple modes to optimize picture quality for various scenarios like night shots, portraits, or landscapes. It also includes a variety of settings to adjust the camera's behavior, such as flash modes, self-timer, and white balance. The camera has a built-in Help system to guide users through its features.

www.kodak.com/go/m320support 1
ENGLISH
Installing the software
Loading the KLIC-7001 battery
See the Extended user guide www.kodak.com/go/m320support
After installing the software, return to this user guide.
Before connecting any cables, install the software
that was included with your camera. Follow the
on-screen instructions.
urg_00968.book Page 1 Wednesday, February 4, 2009 10:36 AM
Downloaded from www.Manualslib.com manuals search engine
2 www.kodak.com/go/easysharecenter
ENGLISH
Charging the battery
See the Extended user guide www.kodak.com/go/m320support
Turn OFF
the camera.
1
Connect the
KODAK USB
Cable, Model
U-8.
2
Battery Charging light:
• Steady: charging
• Off: finished
urg_00968.book Page 2 Wednesday, February 4, 2009 10:36 AM
Downloaded from www.Manualslib.com manuals search engine
www.kodak.com/go/m320support 3
ENGLISH
Turning on the camera
Setting the language and date/time
See the Extended user guide www.kodak.com/go/m320support
to change current field.
for previous/next field.
OK
to accept.
At the prompt, press OK.
to change.
OK
to accept.
Language:
Date/Time:
OK (press)
urg_00968.book Page 3 Wednesday, February 4, 2009 10:36 AM
Downloaded from www.Manualslib.com manuals search engine
4 www.kodak.com/go/easysharecenter
ENGLISH
Taking a picture
See more about Auto and other modes page 11
See the Extended user guide www.kodak.com/go/m320support
1
Turn the Mode dial to Auto
Compose the picture.
2
Press the Shutter button halfway to focus and set exposure.
When the framing marks turn green, press the Shutter
button completely down.
Framing
marks
.
urg_00968.book Page 4 Wednesday, February 4, 2009 10:36 AM
Downloaded from www.Manualslib.com manuals search engine
www.kodak.com/go/m320support 5
ENGLISH
Reviewing pictures/videos
See the Extended user guide www.kodak.com/go/m320support
View previous/next picture/video.
Press the Review
button to enter/exit Review.
Play a video.
OK
Review
urg_00968.book Page 5 Wednesday, February 4, 2009 10:36 AM
Downloaded from www.Manualslib.com manuals search engine
6 www.kodak.com/go/easysharecenter
ENGLISH
Transferring pictures/videos
See the Extended user guide www.kodak.com/go/m320support
Purchase accessories www.kodak.com/go/m320accessories
Turn on the camera.
1
2
Connect the KODAK
USB Cable, Model U-8.
urg_00968.book Page 6 Wednesday, February 4, 2009 10:36 AM
Downloaded from www.Manualslib.com manuals search engine
www.kodak.com/go/m320support 7
ENGLISH
Getting help from your camera
You want the most from your camera. You want to understand:
What it can do for you
And how to take the best possible pictures and videos
Great news!
Your camera offers a built-in Help system. It describes every setting for every menu
choice. If you learn nothing else about your camera, learn how to use on-camera Help.
Because the more you know your camera, the more confident you become.
See the Extended user guide www.kodak.com/go/m320support
Scroll through a Help topic
Press the Menu button, then
highlight a menu choice.
Press the Telephoto (T) button.
1
2
Turn off Help
OK
urg_00968.book Page 7 Wednesday, February 4, 2009 10:36 AM
Downloaded from www.Manualslib.com manuals search engine
8 www.kodak.com/go/easysharecenter
ENGLISH
Keep learning about your camera!
See the Extended user guide www.kodak.com/go/m320support
Visit www.kodak.com/go/m320support:
• the extended user guide
• interactive troubleshooting and repairs
• interactive tutorials
• FAQs
• downloads
• accessories
• printing information
• product registration
Congratulations!
You have:
• set up your camera
• taken pictures
• transferred pictures to your computer
Keep learning!
Finish reading this book, so you can take and share your best pictures!
urg_00968.book Page 8 Wednesday, February 4, 2009 10:36 AM
Downloaded from www.Manualslib.com manuals search engine
www.kodak.com/go/m320support 9
ENGLISH
Front View
1 Shutter button 7 USB/AV Out
2 Mode dial 8 DC-In (5V)
3 Flash button 9 Microphone
4 Power button 10 Self-timer light
5 Speaker 11 Flash
6 Lens/Lens cover
3
1
7
9
11
2
4
6
8
10
5
urg_00968.book Page 9 Wednesday, February 4, 2009 10:36 AM
Downloaded from www.Manualslib.com manuals search engine
10 www.kodak.com/go/easysharecenter
Back View
1 LCD 7 SD/SDHC Card slot
2 Battery charging light 8 Share button
3 Zoom (Telephoto/Wide Angle) button 9 Menu button
4 Delete button 10 Review button
5 , OK button 11 Tripod socket
6 Battery compartment
3
1
6
8
7
5
910
11
2
4
urg_00968.book Page 10 Wednesday, February 4, 2009 10:36 AM
Downloaded from www.Manualslib.com manuals search engine
www.kodak.com/go/m320support 11
1 Doing more with your camera
Turn the Mode dial to the mode that best suits your
subjects and surroundings.
Use this mode For
Auto
General picture taking—it offers excellent image quality and ease
of use.
The scene is analyzed for other content and for lighting.
You can choose the best picture size and aspect ratio for your
needs—just press the Menu button and choose Picture Size.
Landscape Distant scenes.
Scene Point-and-shoot simplicity when taking pictures in practically any
situation. (See
page 12.)
Close-up Close range. Use available light instead of flash, if possible.
Blur Reduction Reducing blur due to subject motion.
High ISO Pictures of people indoors, in low light.
Video Capturing video with sound.
urg_00968.book Page 11 Wednesday, February 4, 2009 10:36 AM
Downloaded from www.Manualslib.com manuals search engine
Doing more with your camera
12 www.kodak.com/go/easysharecenter
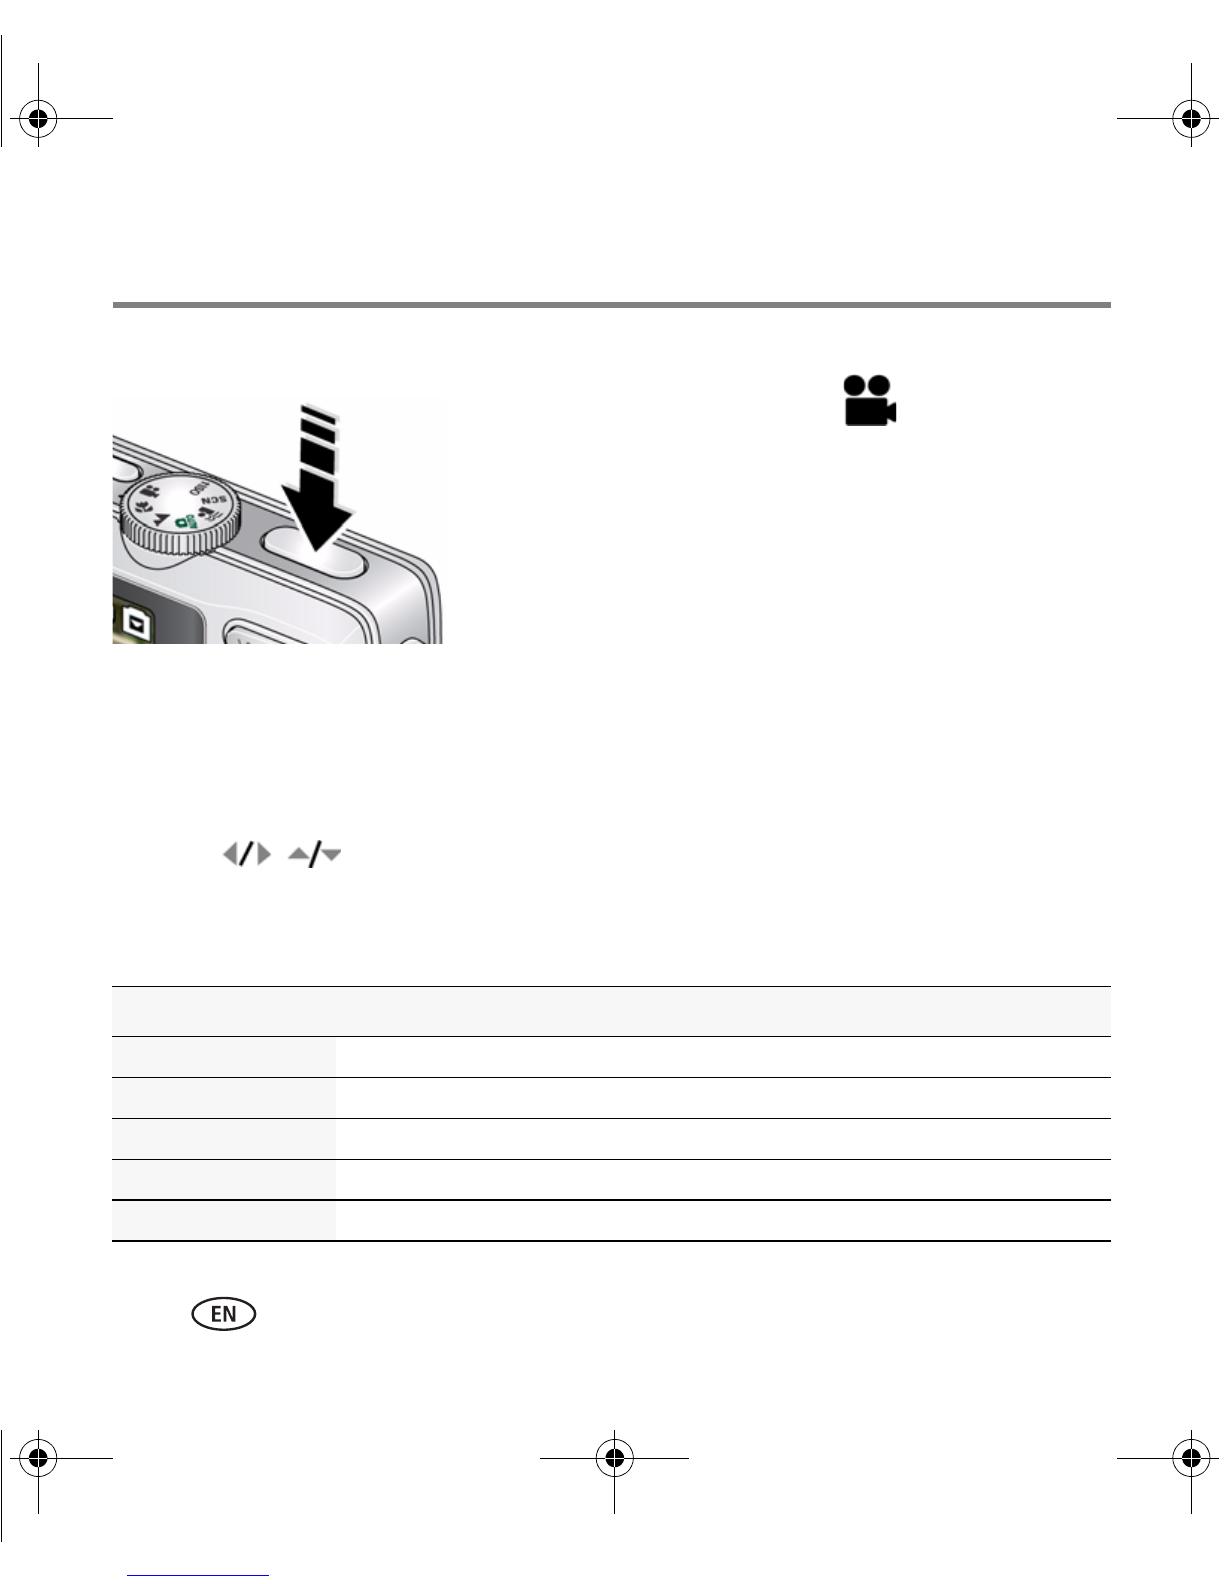
Taking a video
1 Turn the Mode dial to Video .
2 Press the Shutter button completely down,
then release it. To stop recording, press and release
the Shutter button again.
To review videos, see page 18.
Using Scene (SCN) modes
Choose a Scene mode—for great pictures in practically any situation.
1 Turn the Mode dial to SCN.
2 Press to view scene mode descriptions.
If the mode description turns off before you finish reading it, press OK.
3 Press OK to choose a Scene mode.
SCN mode For
Portrait Full-frame portraits of people.
Flower Close-ups of flowers or other small subjects in bright light.
Sunset Subjects at dusk.
Backlight Subjects that are in shadow or “backlit” (when light is behind the subject).
Candle Light Subjects illuminated by candle light.
urg_00968.book Page 12 Wednesday, February 4, 2009 10:36 AM
Downloaded from www.Manualslib.com manuals search engine
Doing more with your camera
www.kodak.com/go/m320support 13
Children Action pictures of children in bright light.
Manner/
Museum
Quiet occasions, like a wedding or lecture. Flash and sound are disabled.
Place the camera on a steady surface or tripod.
Text Documents. Place the camera on a steady surface or tripod.
Beach Bright beach scenes.
Snow Bright snow scenes.
Fireworks Fireworks. Place the camera on a steady surface or tripod.
Self-Portrait Close-ups of yourself. Assures proper focus and minimizes red eye.
Night Portrait Reduces red eye of people in night scenes or low-light conditions.
Night Landscape Distant scenery at night. Flash does not fire.
Sports Action pictures.
Panorama “Stitching” 2 or 3 pictures into a panorama. (Choose Right-to-Left, or
Left-to-Right.)
SCN mode For
urg_00968.book Page 13 Wednesday, February 4, 2009 10:36 AM
Downloaded from www.Manualslib.com manuals search engine
Doing more with your camera
14 www.kodak.com/go/easysharecenter
Using the optical zoom
1 To zoom in picture-taking mode, press Telephoto (T).
To zoom out, press Wide Angle (W).
2 Take the picture.
To use the 5X digital zoom:
In video mode, press the Telephoto (T) button.
In picture-taking mode, press the Telephoto (T) button until the slider on the LCD is
at the maximum optical zoom range. Release Telephoto (T), then press it again.
NOTE: Optical zoom is not available in Video mode. You may notice decreased image quality when using
digital zoom. The slider pauses and turns red when the picture quality reaches the limit for an
acceptable 4 x 6-in. (10 x 15 cm) print.
urg_00968.book Page 14 Wednesday, February 4, 2009 10:36 AM
Downloaded from www.Manualslib.com manuals search engine
Doing more with your camera
www.kodak.com/go/m320support 15
Using the flash
Flash modes Flash fires
Auto When the lighting conditions require it.
Fill (Flash On) Every time you take a picture, regardless of the lighting
conditions. Use when the subject is in shadow or is
“backlit” (when the light is behind the subject). In low
light, hold the camera steady or use a tripod.
Red Eye
To turn the red eye
preflash feature on/off,
press the Menu button
and see Red Eye
Preflash.
If Red-eye Pre-flash is
turned off:
The flash fires once and
the camera
automatically corrects
red-eye in the picture.
If Red-eye Pre-flash is turned
on:
The flash fires once so the
eyes become accustomed
to the flash, then fires
again when the picture is
taken.
Off Never
Press the flash button repeatedly
to scroll through flash modes.
The current flash mode is shown in the LCD status area.
urg_00968.book Page 15 Wednesday, February 4, 2009 10:36 AM
Downloaded from www.Manualslib.com manuals search engine
Doing more with your camera
16 www.kodak.com/go/easysharecenter
Using the menu button to change settings
IMPORTANT:
Your camera offers a built-in Help system. To get the most from your camera,
see page 7.
You can change settings to get the best results from your camera.
NOTE: Some modes offer limited settings. Some settings remain until you change them; others, until you
change modes or turn off the camera.
1 Press the Menu button.
2 Press to highlight a tab:
Capture/Video for the most common picture/video-taking settings
Setup for other camera settings
3 Press to highlight a setting, then press OK.
4 Highlight an option, then press OK. (Some options let you use to choose a
setting.)
urg_00968.book Page 16 Wednesday, February 4, 2009 10:36 AM
Downloaded from www.Manualslib.com manuals search engine
Doing more with your camera
www.kodak.com/go/m320support 17
Understanding the picture-taking icons
urg_00968.book Page 17 Wednesday, February 4, 2009 10:36 AM
Downloaded from www.Manualslib.com manuals search engine
18 www.kodak.com/go/easysharecenter
2 Working with pictures/videos
Deleting pictures/videos
1 Press the Review button.
2 Press for previous/next picture/video.
3 Press the Delete button.
4 Follow the screen prompts.
NOTE: To delete protected pictures/videos, remove protection before deleting.
Viewing pictures as thumbnails
1 Press the Review button.
The camera shows the last picture that was taken.
2 Press the Wide Angle (W) button to view pictures/videos as thumbnails. (Press it
again to see more, smaller thumbnails.)
3 To see a single picture/video, press to highlight it. Then press Telephoto (T).
Press the Shutter button halfway down to return to Capture mode.
urg_00968.book Page 18 Wednesday, February 4, 2009 10:36 AM
Downloaded from www.Manualslib.com manuals search engine
Working with pictures/videos
www.kodak.com/go/m320support 19
Understanding the review icons
Pictures
Videos
PERFECT TOUCH tech.
Favorite tag
Print tag/number of prints
Protected
Picture number
Review
Battery level
Selected picture
Email tag
Previous/next picture
Storage location
Video length
Video number
Review
Battery level
Image storage
location
Volume control
indicator
Play time
urg_00968.book Page 19 Wednesday, February 4, 2009 10:36 AM
Downloaded from www.Manualslib.com manuals search engine
20 www.kodak.com/go/easysharecenter
3 Share your stories!
Prints
Photo gifts
Digitally
• 4 x 6 pictures
• Enlargements, posters
• Collages
• Photo books
• Cards
• Calendars
• Mugs
• Ties
• Shirts
• EASYSHARE Digital Picture Frame
• HDTV devices
• Email
...and much more!
How do you tell yours?
A thousand ways to tell a story...
and each begins with a picture.
urg_00968.book Page 20 Wednesday, February 4, 2009 10:36 AM
Downloaded from www.Manualslib.com manuals search engine
  • Page 1 1
  • Page 2 2
  • Page 3 3
  • Page 4 4
  • Page 5 5
  • Page 6 6
  • Page 7 7
  • Page 8 8
  • Page 9 9
  • Page 10 10
  • Page 11 11
  • Page 12 12
  • Page 13 13
  • Page 14 14
  • Page 15 15
  • Page 16 16
  • Page 17 17
  • Page 18 18
  • Page 19 19
  • Page 20 20
  • Page 21 21
  • Page 22 22
  • Page 23 23
  • Page 24 24
  • Page 25 25
  • Page 26 26
  • Page 27 27

Kodak EASYSHARE M320 User manual

Category
Camera flashes
Type
User manual

Kodak EASYSHARE M320 is a digital camera designed to make taking and sharing pictures easy. It features multiple modes to optimize picture quality for various scenarios like night shots, portraits, or landscapes. It also includes a variety of settings to adjust the camera's behavior, such as flash modes, self-timer, and white balance. The camera has a built-in Help system to guide users through its features.

Ask a question and I''ll find the answer in the document

Finding information in a document is now easier with AI