Panasonic CQVX2000U Operating instructions
- Category
- CD players
- Type
- Operating instructions

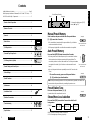
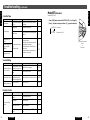
Human
Equalizer
CQ-VX2000
561234
SOURCE
POWER
REPSCANRANDOM
CLOCK
DISP
REVERSE
S
•
ANALYZER DISPLAY MTL B NR TPS SKIP REPEAT
S
•
A
SPACE
SPC
D
·
M
LIVE
HALL
JAZZ
STADIUM
DISCO
VOCAL
CINEMA
M
U
T
E
VOL
AUTO
·
P
SENSOR
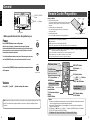
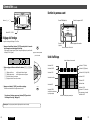
INTEGRATED CD/CASSETTE RECEIVER WITH DSP
OPEN
FM
DISC
AM
DISC
SEL
TUNE
TRACK
564
SOURCE
OPEN
DISP
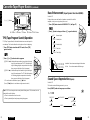
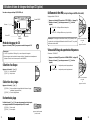
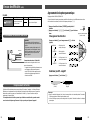
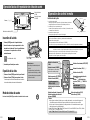
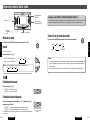
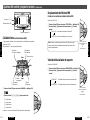
CD Player Basics
E
N
G
L
I
S
H
10
CQ-VX2000U
18
Press and hold for more
than 0.5 seconds.
Track Selection
Track Search
Cautions:
¡
Do not load a MD into the CD slot.
¡Do not disturb the front panel
opening.
¡Do not force down the front panel
and do not put anything on it.
¡Do not insert a CD when the disc
indicator lights.
Press [SOURCE] button.
CD Insertion
CD Mode
q Press [OPEN] button in the main unit to
open the front panel.
w Load a CD with labeled face up into the
slot to start CD playing.
(Disc indicator)
e Raise the front panel to close it.
CD Ejection
q Press [OPEN] button in the main unit to open
the front panel.
w Press [
u] button to eject the CD.
When a CD is ejected while the CD mode is activated,
the power is turned off.
Press [k] or [l] button.
[k](TUNE k ) : Goes back to the beginning of the current program, then
goes back to the beginning of a previous program corre-
spondent to how many times you press this button.
[l](TUNE l ) : Goes to the beginning of the next program.
Release [k] or [l] button when your favorite part comes after
pressing and holding it for more than 0.5 seconds.
[k](TRACK k) : Fast backward
[l](TRACK l) : Fast forward
SCAN
Button
RANDOM
Button
REP Button
SOURCE
PWR
TUNE
TRACK
TUNE
TRACK
OPEN
C
D
E
J
E
C
T
M
D
E
J
E
C
T
u
u
MD IN
INTEGRATED CD/CASSETTE RECEIVER WITH DSP
VX303
SOURCE Button
OPEN Button
DISP Button
klButtons
CD u(Eject) Button
Label Side
CQ-VX2000U
3
❏ Use This Product Safely
When Driving
Keep the volume level low enough to be aware of road and traffic conditions.
When Car Washing
To avoid electrical shorts which may cause fire, or other damage, do not expose this product (including the
speakers and CDs/cassette tape) to water or excessive moisture.
When Parked
Parking in direct sunlight can produce very high temperatures inside your vehicle. Give the interior a
chance to cool down before switching the unit on.
Use the Proper Power Supply
This product is designed to operate with a 12 volt, negative ground battery system (the normal system in a
North American car.)
Disc Mechanism
Do not insert coins or any small objects. Keep screwdrivers and other metallic objects away from the disc
mechanism and disc.
Tape Mechanism
Keep magnets, screwdrivers and other metallic objects away from the tape mechanism and tape head.
Use Authorized Servicenters
Do not attempt to disassemble or adjust this precision product. Please refer to the Servicenter list included
with this product for service assistance.
For Installation
The product should be installed in a horizontal position with the front end up at a convenient angle, but not
more than 30˚.
Panasonic welcomes you to our ever growing family of electronic product owners. We know that this product
will bring you many hours of enjoyment. Our reputation is built on precise electronic and mechanical engineer-
ing, manufactured with carefully selected components and assembled by people who take pride in their work.
Once you discover the quality, reliability, and value we have built into this product, you too will be proud to be
a member of our family.
❏ Components
1. Operating Instructions ............................................................................................................................ 1
2. Installation Hardware.................................................................................................... 1set (a page.41)
3. Power Connector.................................................................................................................................... 1
4. Remote Control Unit............................................................................................................................... 1
Find the model number and serial number on either the back or bottom of the unit. Please record them in the
space below and retain this booklet as a permanent record of your purchase to help with identification in case of
theft.
MODEL NUMBER SERIAL NUMBER
DATE PURCHASED FROM
CQ-VX2000U

E
N
G
L
I
S
H
9
CQ-VX2000U
17
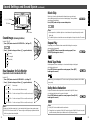
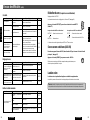
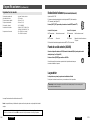
Select a station, and press and hold one of the preset buttons
[1] – [6] for more than 2 seconds.
¡The current station is memorized in the pressed button. (Up to 6 stations
can be memorized for each band.)
¡The frequency display blinks once after the memorization is completed.
Preset Station Tune
Press one of the preset buttons [1] – [6].
A preset station in the current band is tuned in.
Stereo/Mono Local selection
Press and hold [SEL] for more than 2 seconds to switch the fol-
lowing modes.
Note: In the preset memory operation or the auto preset memory operation, new stations can
be memorized on the preset buttons by overwriting the previous ones.
Manual Preset Memory
Auto Preset Memory
CTo cancel the scanning, press one of the preset buttons
[1] – [6], and select your favorite station.
Press and hold [AUTO•P] button for more than 2 seconds.
¡The tuning starts from the lowest frequency in the current band. 6 stations
that are received most clearly are memorized in the preset button, The
more clearly a station is received, the smaller from 1 to 6 the preset number
is assigned to the station. (Up to 6 stations can be memorized for each
band.)
¡Once set, the preset stations are sequentially scanned for 5 seconds each.
(Scan)
Press and hold for more
than 2 seconds.
Press and hold for more
than 2 seconds.
Band
Preset Memory Number
Frequency
(Example) Regular Display
To change the display, press [DISP]
button. (B Page 15)
1 2
M
U
T
E
AUTO
·
P
1 2
1 2
STEREO
MONO ON
LOCAL OFF
MONO ON
LOCAL ON
MONO OFF
LOCAL ON
(example)
(example)
(example)
MONO: Reduce noise during a weak FM broadcast.
LOCAL: Searching stops at a strong signal only.
CQ-VX2000U
4
Contents
Label Indication and Location............................................................ Page 2
Radio frequency interference Statement (Part 15 of the FCC Rules) ........ 2
Use This Product Safely / Components...................................................... 3
❏ Remote Control Preparation ............................................................. 9
❏ Names of Controls ........................................................................... 10
❏ General ............................................................................................. 12
❏ Radio Basics .................................................................................... 16
❏ CD Player Basics ............................................................................. 18
❏ Cassette Tape Player Basics .......................................................... 20
❏ CD Changer Basics (Option) .......................................................... 24
❏ Sound Settings and Sound Space ................................................. 27
❏ Other Settings .................................................................................. 32
❏ Useful Functions ............................................................................. 36
❏ Maintenance ..................................................................................... 40
❏ Installation Guide ............................................................................ 41
❏ Electrical Connections .................................................................... 46
❏ Troubleshooting .............................................................................. 48
❏ Specifications .................................................................................. 53
Page is loading ...

E
N
G
L
I
S
H
7
CQ-VX2000U
15
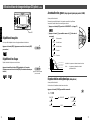
Display Change
Regular Display in Each Sound Source
Clock Time Display
Dot Spectrum Analyzer Display
(Light moves respondent to a sound like the spectrum analyzer.)
Press [DISP] button to change the display as follows.
Note: "ADJUST" is displayed when a time is supposed to be displayed until the clock is set.
Clock / Standby
Clock
No Display
When [DISP] button is pressed while the power is off, the display
changes as follows.
DISP
CLOCK
DISPLAY
CQ-VX2000U
6
Table des matières
❏ Préparatif de la télécommande ...................................................... 55
❏ Nomenclature ................................................................................... 56
❏ Généralités ....................................................................................... 58
❏ Utilisation de base de l'autoradio .................................................. 62
❏ Utilisation de base de lecteur de CD ............................................. 64
❏ Utilisation de base du lecteur cassettes ....................................... 66
❏ Utilisation de base de changeur de disque CD (Option) .............. 70
❏ Réglages acoustiques et d'ambiophonie ...................................... 73
❏ Autres types de configurations ...................................................... 78
❏ Fonctions utiles ............................................................................... 82
❏ Entretien ........................................................................................... 86
❏ Guide d'installation ......................................................................... 87
❏ Branchements électriques .............................................................. 92
❏ En cas de difficulté .......................................................................... 94
❏ Données techniques ....................................................................... 99
Page is loading ...

E
N
G
L
I
S
H
5
CQ-VX2000U
13
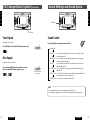
Notes:
¡When a disc or a cassette tape is not loaded, when a changer is not connected or when
there is no magazine in a CD changer, a corresponding sound source can not be selected.
¡Skipping “AUX IN” can be set If “AUX IN” (the external input) is not used. (B Page 34)
Sound Source Selection
Press [SOURCE] button to change the mode as follows.
TUNER CD TAPE
AUX IN CD CHANGER
SOURCE
PWR
Warning: DO NOT OPERATE THE SYSTEM WHILE DRIVING.
Operating the system will distract the driver from looking ahead of the car and cause
accidents. Always stop the car in a safe location before operating the system.
CQ-VX2000U
8
Índice
Cláusula sobre interferencias de radiofrecuencia (Parte 15 de las normas de FCC) .................. 2
❏ Operación de control remoto ....................................................... 101
❏ Nomenclatura de los controles .................................................... 102
❏ Generalidades ................................................................................ 104
❏ Operación básica de la radio ........................................................ 108
❏ Operación básica del reproductor de CD .................................... 110
❏ Operación básica del reproductor de cintas de casete ............. 112
❏ Operación básica del cambiador de CD (Optional) .................... 116
❏ Ajustes del sonido y espacio sonoro .......................................... 119
❏ Otros ajustes .................................................................................. 124
❏ Funciones útiles ............................................................................ 128
❏ Mantenimiento ............................................................................... 132
❏ Guía de instalación ........................................................................ 133
❏ Conexiones eléctricas ................................................................... 138
❏ Solución de problemas ................................................................. 140
❏ Especificaciones ........................................................................... 145

E
N
G
L
I
S
H
4
CQ-VX2000U
12
Human
Equalizer
CQ-VX2000
561234
SOURCE
POWER
REPSCANRANDOM
CLOCK
DISP
REVERSE
S
•
ANALYZER DISPLAY MTL B NR TPS SKIP REPEAT
S
•
A
SPACE
SPC
D
·
M
LIVE
HALL
JAZZ
STADIUM
DISCO
VOCAL
CINEMA
M
U
T
E
VOL
AUTO
·
P
SENSOR
INTEGRATED CD/CASSETTE RECEIVER WITH DSP
OPEN
FM
DISC
AM
DISC
SEL
TUNE
TRACK
SOURCE
VOL
DISP
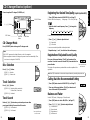
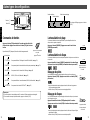
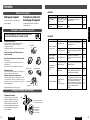
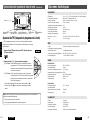
General
Press and hold
SOURCE / POWER
Button
VOL jiButtons
Press and hold [POWER] button for more than one second to turn
off the power.
Note: Because the volume can be set for each sound source (respective volumes for even FM
and AM), the volume level changes when the sound source changes. <Intelligent Volume
Function>.
Volume
Press [VOL j] or [VOL i] button to adjust the volume.
CBefore operate this unit, turn the ignition key on.
Power
Press [POWER] button to turn on the power.
When turning on the power, a demonstration message is displayed.
(Demonstration Mode)While the demonstration mode is activated, pressing-
button-operations can not be performed.Press [DISP] button to cancel the
Demonstration mode before operation.
To activate the Demonstration mode, turn off the power once, and press
and hold [POWER] button on the main unit for more than 1 second.
SOURCE
POWER
SOURCE
POWER
VOL
DISP Button
DISP
CLOCK
E
N
G
L
I
S
H
1
CQ-VX2000U
9
E
N
G
L
I
S
H
1
E
N
G
L
I
S
H
1
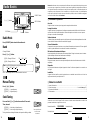
(Back side)
Lithium
battery
Position B
Battery holder
Position A
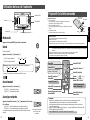
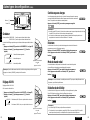
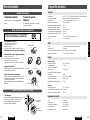
Remote Control Preparation
Battery Installation
1. Remove the battery holder.
Take hold of the holder at position B and pull it out to remove
the battery by pushing position A in the direction shown by
the arrow.
2. Install the battery on the battery holder.
Set a new battery properly with its (+) side facing up as
shown in the figure.
3. Insert the battery holder.
Push in the battery holder back into its original position.
Notes:
Remove and dispose of an old battery immediately.
Battery Information:
¡Battery type: Panasonic lithium battery (CR2025)
¡Battery Life: Approximately 6 months under normal use (at room temperature)
Caution: Improper use of batteries may cause overheating, an explosion or ignition, resulting in injury or a
fire. Battery leakage may damage the unit.
¡Do not disassemble or short the battery. Do not throw a battery into a fire.
¡Keep batteries away from children to avoid the risk of accidents.
¡Be careful to the disposal rules when you dispose of batteries.
Notes:
¡There are some buttons names that are not concerned with this unit because the remote
control is designed to be used together with other models.
¡Because the following buttons are not equipped on the remote control, operate those
buttons on the main unit.
OPEN Button, CD u Button, D*M Button, 1 - 6 Buttons, RANDOM Button, SCAN Button,
REP (REPEAT) Button and REVERSE Button
CST u Button, MTL Button, B NR Button, TPS Button and SKIP Button
AUTO•P (Auto
preset) Button
S
•A (Spectrum•Analyzer)
Button
DIMMER Button
DIMMER
PWR
MUTE
SEL
DISP
BAND
PRG/
VOL
SOURCE
Car Audio
(ATT)
PRG/
These buttons are the same
button in the main unit.
MUTE (ATT) Button
DISP (Display) Button
CLOCK Button
SEL(Select) Button
BAND Button
ji (DISC ji) Buttons
kl (TUNE kl,
TRACK a f) Buttons
VOL(Volume) ji
Buttons
PRG (A B) / F Button
SPC (Space) Button
SOURCE Button
PWR(Power) Button
Tape Fast Forward /
Rewind Button

E
N
G
L
I
S
H
1
CQ-VX2000U
11
E
N
G
L
I
S
H
1
E
N
G
L
I
S
H
3
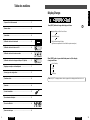
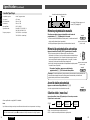
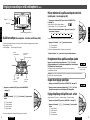
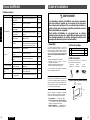
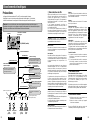
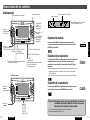
Behind the Front Panel
Display Unit
ST (Stereo) Indicator
EQ (Equalizer)
Indicator
B NR (Dolby B NR)
Indicator
DISC Indicator
REP(Repeat) Indicator
R 5(Random)Indicator
SCAN Indicator
MUTE Indicator
TPS (Tape Program
Search) Indicator
SKIP Indicator
SPACE Indicator
POSI(Position)
Indicator
Standby Indicator
MTL Indicator
SDBB (Super Dynamic
Bass Boost) Indicator
Spectrum Analyzer Indicator
CD EJECT
CST EJECT
CD IN
CST IN
LARGE FLUORESCENT DISPLAY
37W 4CH AMPLIFIER
15 BAND SPECTRUM ANALIZER
FLIP DOWN PANEL
INTEGRATED CD/CASSETTE RECEIVER WITH DSP
u
u
VX2000
Other Operation Indicator
CD Slot
CD u(Eject) Button
Cassette Tape Slot
CST u(Eject)
Button
Reset Switch
RESET
E
N
G
L
I
S
H
1
CQ-VX2000U
10
E
N
G
L
I
S
H
1
E
N
G
L
I
S
H
2
Human
Equalizer
CQ-VX2000
561234
SOURCE
POWER
REPSCANRANDOM
CLOCK
DISP
REVERSE
S
•
ANALYZER DISPLAY MTL B NR TPS SKIP REPEAT
S
•
A
SPACE
SPC
D
·
M
LIVE
HALL
JAZZ
STADIUM
DISCO
VOCAL
CINEMA
M
U
T
E
VOL
AUTO
·
P
SENSOR
INTEGRATED CD/CASSETTE RECEIVER WITH DSP
OPEN
FM
DISC
AM
DISC
SEL
TUNE
TRACK
Human
Equalizer
CQ-VX2000
561234
SOURCE
POWER
REPSCANRANDOM
CLOCK
DISP
REVERSE
S
•
ANALYZER DISPLAY MTL B NR TPS SKIP REPEAT
S
•
A
SPACE
SPC
D
·
M
LIVE
HALL
JAZZ
STADIUM
DISCO
VOCAL
CINEMA
M
U
T
E
VOL
AUTO
·
P
SENSOR
INTEGRATED CD/CASSETTE RECEIVER WITH DSP
OPEN
FM
DISC
AM
DISC
SEL
TUNE
TRACK
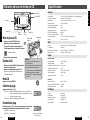
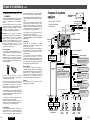
Name of Controls
Main Unit
Sensor (Remote Control Receiver)
OPEN Button
jiButtons
¡BAND
¡DISC
klButtons
¡TUNE
¡TRACK
SEL(Select)
Button
DISP (Display) Button
CLOCK Button
S•A (Spectrum•Analyzer)
Button
REVERSE Button
SOURCE Button
POWER Button
VOL(Volume) ji
Buttons
MUTE (ATT) Button
AUTO•P(Auto Preset)
Button
D•M(Direct Memory) Button
SPC (Space) Button
1- 6 Buttons
¡Preset [1- 6]
¡RANDOM [4]
¡SCAN [5]
¡REP [6]
1- 6 Buttons
¡MTL [1]
¡B NR [2]
¡TPS [4]
¡SKIP [5]
¡REPEAT [6]
<Cassette Tape>
jiButtons
¡
3 / 4 5
(Stop)(Program)
k lButtons
¡
1 / 2

Other Settings
(continued)
E
N
G
L
I
S
H
26
CQ-VX2000U
34
AUX will be excluded not to be selected.
AUX IN Setting
Dimmer
Display brightness with the side-marker lamps on or off can be set.
Default: DIMMER MID When side-maker lamp on
DIMMER HIGH When side-maker lamp off
Note: When using the remote control, the dimmer selection can be changed by pressing
[DIMMER] button for more than 2 seconds.
Human
Equalizer
CQ-VX2000
561234
SOURCE
POWER
REPSCANRANDOM
CLOCK
DISP
REVERSE
S
•
ANALYZER DISPLAY MTL B NR TPS SKIP REPEAT
S
•
A
SPACE
SPC
D
·
M
LIVE
HALL
JAZZ
STADIUM
DISCO
VOCAL
CINEMA
M
U
T
E
VOL
AUTO
·
P
SENSOR
INTEGRATED CD/CASSETTE RECEIVER WITH DSP
OPEN
FM
DISC
AM
DISC
SEL
TUNE
TRACK
SEL
klButtons
SEL Button
DIMMER HIGH : Light grows brighter.
DIMMER MID : medium brightness
DIMMER LOW : Lower brightness
q Press [SEL] button to select <DIMMER SEL>. ( B Page 32)
w
Press [l] button to change as follows. ([k] : opposite direction)
FM
DISC
AM
DISC
SEL
Press and hold for more than 2
seconds.
<
Press again
FM
DISC
AM
DISC
SEL
Press and hold for more than 2
seconds.
<
Press again
Default : AUX IN ON
AUX IN ON : External input (AUX-IN) is an object of source selection
AUX IN OFF
:
External input (AUX-IN) is not an object of source selection.
q Press [SEL] button to select <AUX IN SET>. ( B Page 32)
w
Press [l] button to change as follows. ([k] : opposite direction)
E
N
G
L
I
S
H
11
CQ-VX2000U
19
Random Play
Press [RANDOM] button in the main unit to play tracks in the current
disc in random order. (Press [RANDOM] button again to cancel.)
Scan Play
Press [SCAN] button in the main unit to play the first 10 seconds
of all tracks in the current disc. The first played track is the cur-
rent track. (Press [SCAN] button again to cancel.)
¡After playing 10 seconds of all tracks, the scan play is finished and the
starting position goes to the beginning of the first played track.
¡Cancel the scan play when finding your favorite track.
Repeat Play
Press [REPEAT] button in the main unit to repeat the current
track. (Press [REPEAT] button again to cancel.)
Caution: Keep your fingers or hands off from moving parts. Do
not put your fingers or hands into the disc slot or
cassette tape slot.
Failure to do so may result in injury or malfunction.
Watch your child or baby not to do so.
Track Number
Track Play Time
(Example) Regular Display
To change the display, press [DISP]
button. (B Page 15)
3 4
RANDOM
5 6
REPSCAN
5 6
REPSCAN

E
N
G
L
I
S
H
25
CQ-VX2000U
33
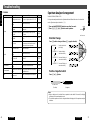
Default : SPEANA FAST
Spectrum Analyzer Speed
FM
DISC
AM
DISC
SEL
SPEANA FAST : The spectrum Analyzer changes in Fast speed
SPEANA SLOW
: The spectrum Analyzer changes in Slow speed
q Press [SEL] button to select <SPEANA SPEED>. ( B Page 32)
w
Press [l] button to change as follows. ([k] : opposite direction)
Press and hold for more than 2
seconds.
<
Press again
Default : SCROLL ON
Note: If you press and hold [DISP] button for more than 2 seconds when
the setting of MD title scroll is OFF, one round scroll is performed.
MD Title Scroll (When a MD changer is connected)
FM
DISC
AM
DISC
SEL
Press and hold for more than 2
seconds.
<
Press again
SCROLL ON : The display continuously scrolls.
SCROLL OFF : The display scrolls one round and stops.
q Press [SEL] button to select <TITLE SCROLL>. ( B Page 32)
w
Press [l] button to change as follows. ([k] : opposite direction)
Human
Equalizer
CQ-VX2000
561234
SOURCE
POWER
REPSCANRANDOM
CLOCK
DISP
REVERSE
S
•
ANALYZER DISPLAY MTL B NR TPS SKIP REPEAT
S
•
A
SPACE
SPC
D
·
M
LIVE
HALL
JAZZ
STADIUM
DISCO
VOCAL
CINEMA
M
U
T
E
VOL
AUTO
·
P
SENSOR
INTEGRATED CD/CASSETTE RECEIVER WITH DSP
OPEN
FM
DISC
AM
DISC
SEL
TUNE
TRACK
SOURCE
DISP
OPEN
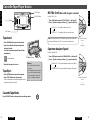
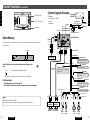
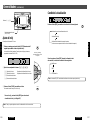
Cassette Tape Player Basics
E
N
G
L
I
S
H
12
CQ-VX2000U
20
Press [SOURCE] button to change to the cassette tape mode.
Tape Insert
Cassette Tape Mode
q Press [OPEN] button to open the front panel.
w Insert a cassette with the exposed tape side
facing to the right.
Close the front panel manually. Play will start
automatically.
(Tape indicator)
e Raise the front panel to close it.
Tape Eject
q Press [OPEN] button to open the front panel.
w Press [CST
u] button to eject the tape.
When a cassette tape is ejected while the tape mode is
activated, the power is turned off.
Cautions:
¡Do not disturb the front panel
opening.
¡Do not apply a strong downward
force onto the face plate and do
not put anything on it while it is
open, or it might be damaged.
C
D
E
J
E
C
T
C
S
T
E
J
E
C
T
u
u
CST IN
INTEGRATED CD/CASSETTE RECEIVER WITH DSP
VX2000
CD IN
SOURCE
PWR
DISP Button
SOURCE Button
jiklButtons
OPEN Button
CST u(Eject) Button

Other Settings
E
N
G
L
I
S
H
24
CQ-VX2000U
32
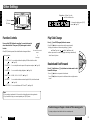
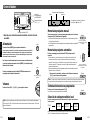
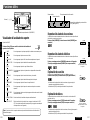
Function Controls
Notes:
¡If no operation is performed for 10 seconds, the display will return to the regular mode.
¡If you would like to stop your current operation, press [DISP] button.
Press and hold [SEL] button for more than 2 seconds to be ready to
select other functions. Then, press [SEL] button again to select a
function.
When [SEL] button is pressed, the selected function changes as follows.
SEL
Press and hold for more than 2
seconds.
<
Press again
Human
Equalizer
CQ-VX2000
561234
SOURCE
POWER
REPSCANRANDOM
CLOCK
DISP
REVERSE
S
•
ANALYZER DISPLAY MTL B NR TPS SKIP REPEAT
S
•
A
SPACE
SPC
D
·
M
LIVE
HALL
JAZZ
STADIUM
DISCO
VOCAL
CINEMA
M
U
T
E
VOL
AUTO
·
P
SENSOR
INTEGRATED CD/CASSETTE RECEIVER WITH DSP
OPEN
FM
DISC
AM
DISC
SEL
TUNE
TRACK
SEL
klButtons
SEL Button
Regular Mode
TITLE SCROLL: You can decide whether the display of MD title should be scrolled.
( B Page 33)
SPEANA SPEED
: You can adjust the motion speed of the spectrum analyzer. ( B Page 33)
DIMMER SEL : You can select the display brightness. ( B Page 34)
MONO LOCAL : MONO / LOCAL ON / OFF ( B Page 17)
AUX IN SET : You can decide whether an external input (AUX IN) should be activated.
( B Page 34)
MUTE KEY SEL
: You can select between MUTE and ATT. ( B Page 35)
E
N
G
L
I
S
H
13
CQ-VX2000U
21
To change the display, press [DISP]
button. (B Page 15)
5 PLAY 5 : Top side
4 PLAY 4 : Bottom side
Playing side
Play Side Change
Press [i] (4 5PRG(Program)) button to reverse.
(Press [PRG/3] button to reverse when using the remote control.)
¡Playing side switches as follows when pressing [i] button.
5 PLAY 5 (Top side)
4 PLAY 4 (Bottom side)
¡When a tape comes to an end, the playing side changes automatically.
<Auto Reverse System>.
Rewind and Fast Forward
Press[k] (1) button or [l] (2) button to activate rewind or fast
forward for the tape.
CPress [j](3) button to stop rewind or fast forward.
Press [PRG/3] button to stop rewind or fast forward when using the remote
control.
FM
DISC
AM
DISC
SEL
TUNE
TRACK
Caution: Keep your fingers or hands off from moving parts.
Do not put your fingers or hands into the disc slot or cassette tape slot.

E
N
G
L
I
S
H
23
CQ-VX2000U
31
Bass Enhancement (Super Dynamic Bass Boost/SDBB)
Enhanced bass comes out from the 4 speakers connected to the built-in
amplifier, so that you can enjoy heavy bass sound.
OFF : Normal output
TYPE 1: Variable, low
TYPE 2: Variable, high
TYPE 3: Fixed, low
TYPE 4: Fixed, high
q Press [SEL] button to select <SDBB SELECT>. ( B Page 27)
w
Press [l] button to change as follows. ([k] : opposite direction)
¡Variable :
Bass enhancement along with the volume
¡Fixed : Bass enhancement with fixed range
Default : OFF
SPACE OFF LIVE HOUSE CONCERT HALL
CINEMA JAZZ CLUB
VOCAL DISCO STADIUM
This function creates following presence in your car
Sound Space Reproduction (Space)
Press [SPACE] button to change space as follows.
Default : OFF
FM
DISC
AM
DISC
SEL
SPC
SPACE
22
CQ-VX2000U
E
N
G
L
I
S
H
14
Human
Equalizer
CQ-VX2000
561234
SOURCE
POWER
REPSCANRANDOM
CLOCK
DISP
REVERSE
S
•
ANALYZER DISPLAY MTL B NR TPS SKIP REPEAT
S
•
A
SPACE
SPC
D
·
M
LIVE
HALL
JAZZ
STADIUM
DISCO
VOCAL
CINEMA
M
U
T
E
VOL
AUTO
·
P
SENSOR
INTEGRATED CD/CASSETTE RECEIVER WITH DSP
OPEN
FM
DISC
AM
DISC
SEL
TUNE
TRACK
5612 4
Cassette Tape Player Basics
(continued)
TPS (Tape Program Search) Operation
TPS (Tape Program Search) is function that detects an unrecorded part of a
cassette tape. This function allows the unit to play music from its beginning.
q Press [TPS] button to activate the TPS mode. (Press [TPS]
again to cancel.)
w Press [k] or [l] button to select a program.
[k](TRACK 1) : Activates the tape rewind and goes back to the begin-
ning of the current program. The TPS finds the begin-
ning of following program correspondent to how many
times you press this button. (Up to 9 programs)
[l](TRACK 2) : Activates the tape fast forward and goes to the begin-
ning of the next program. The TPS finds the beginning
of a following program correspondent to how many
times you press this button. (Up to 8 programs)
CTo cancel rewind or fast forward, press [j](3) button.
(Press [PRG/3] button to cancel when using the remote control.)
Note: The TPS mode may not work correctly in the following cases. This, however, does not
mean that the unit is defective.
¡There is an interval less than 4 seconds.
¡There is particularly low-level passage during the program.
FM
DISC
AM
DISC
SEL
TUNE
TRACK
4
TPS
REPEAT ButtonSKIP ButtonTPS ButtonB NR ButtonMTL Button
jiklButtons

Sound Settings and Sound Space
(continued)
E
N
G
L
I
S
H
22
CQ-VX2000U
30
Sound Image (Listening Position)
OFF (All seats)
RIGHT(Front right)
LEFT (Front left)
FRONT
REAR
q Press [SEL] button to select <POSITION SEL>. ( B Page 27)
w
Press [l] button to change as follows. ([k] : opposite direction)
Default : POSI OFF
Rear Speakers for Sub-Woofer
(Super base Control Sub-Woofer/SBC-SW)
q Press [SEL] button to select <SUPER BASS>. ( B Page 27)
w
Press [l] button to change as follows. ([k] : opposite direction)
Notes :
¡
Adjust the Sub-Woofer output level. It is also interlocked with the preout (rear speaker output).
¡Set SBC-SW in the main unit to FLAT when using the cutoff frequency adjustment function
built in an optional external amplifier.
FM
DISC
AM
DISC
SEL
FM
DISC
AM
DISC
SEL
SBC-SW OFF : Stereo output
SBC-SW FLAT : Does not cut the treble (Monaural output)
SBC-SW 100Hz : Cut the sound range of 100 Hz or more (Monaural output)
SBC-SW 150Hz : Cut the sound range of 150 Hz or more (Monaural output)
SBC-SW 200Hz : Cut the sound range of 200 Hz or more (Monaural output)
Human
Equalizer
CQ-VX2000
561234
SOURCE
POWER
REPSCANRANDOM
CLOCK
DISP
REVERSE
S
•
ANALYZER DISPLAY MTL B NR TPS SKIP REPEAT
S
•
A
SPACE
SPC
D
·
M
LIVE
HALL
JAZZ
STADIUM
DISCO
VOCAL
CINEMA
M
U
T
E
VOL
AUTO
·
P
SENSOR
INTEGRATED CD/CASSETTE RECEIVER WITH DSP
OPEN
FM
DISC
AM
DISC
SEL
TUNE
TRACK
SPC
SEL
jiklButtons
SEL Button
SPACE Button
Default : OFF
E
N
G
L
I
S
H
15
CQ-VX2000U
23
Blank skip is a function that activates fast forward at an unrecorded part,
detects the beginning of the next music and starts playing. These operations
are performed automatically.
Press [SKIP] button to skip an unrecorded portion.
Notes:
¡When repeat is on, the blank skip does not work because the repeat has priority over the
blank skip.
¡The blank skip does not work when an unrecorded portion of a tape is less than 15 seconds.
Blank Skip
Repeat play is a function that activates rewind after finishing the current pro-
gram and plays it repeatedly.
Press [REPEAT] button to repeat the current program. (Press
[REPEAT] button again to cancel.)
Repeat Play
Metal tape mode allows a metal tape or a chromium dioxide tape to be played
with a high quality sound.
Press [MTL] button to repeat the current program. (Press [MTL]
button again to cancel.)
Note: Playing non-metal tapes in MTL mode causes high frequency imbalance, which affects
tone quality.
Metal Tape Mode
Dolby noise reduction allows a tape that is recorded with Dolby B NR activat-
ed to be played with reduced hiss noise in the treble.
Press [B NR] button to repeat the current program. (Press [B NR]
button again to cancel.)
Dolby Noise Reduction
5
SKIP
6
REPEAT
1
MTL
2
B NR
Notes:
¡Dolby B NR is not available under the radio mode.
¡If a tape that is not recorded in Dolby B NR mode is played in Dolby B NR mode, tone quali-
ty will be adversely affected by an imbalance in the high frequency range.

FM
DISC
AM
DISC
SEL
E
N
G
L
I
S
H
21
CQ-VX2000U
29
Registration of Adjusted Sound Quality
Note:
New GEQ characteristic can be saved on the preset buttons by overwriting the previous one.
Press one of the preset buttons, [1] to [6], on the main unit for
more than 2 seconds to save the current GEQ characteristic in the
pressed button.
The display of the preset memory number blinks once after completion of the
registration.
Press and hold for more
than 2 seconds.
w Adjust the level for each frequency. Press [l] to change the
frequency.
80 160 320 640 1.6k 4k 10k (Hz)
Registering Your Desired Tone Quality
(Graphic Equalizer=GEQ)
q Press [SEL] button to select <GRAPHIC EQ>. ( B Page 27)
Default : 0 dB for each frequency Setting range : –12 to +12 by 2 dB step
e Press [j] or [i] button to adjust the level.
[j] : Upper level
[i] : Lower level
A cursor moves vertically and blinks at the adjusted level.
CRepeat the steps w and e to set the level for each frequency.
A cursor moves horizontally and blinks at the selected frequency.
Calling Back the Recommended Setting
w Press one of the preset buttons, [1] to [6], on the main unit
to recall the saved GEQ characteristic.
q Press [SEL] button to select <GRAPHIC EQ>. ( B Page 27)
Balance and Fader
q Press [SEL] button to select <BAL//FAD>. ( B Page 27)
Default : CNT(Center) Setting range: 15 levels for each
w Press [j], [i], [k] or [l] button to adjust the level.
[
j
] : Front enhanced
[
i
] : Rear enhanced
[l] : Right enhanced
[k] : Left enhanced
3 4
RANDOM
FM
DISC
AM
DISC
SEL
3 4
RANDOM
Human
Equalizer
CQ-VX2000
561234
SOURCE
POWER
REPSCANRANDOM
CLOCK
DISP
REVERSE
S
•
ANALYZER DISPLAY MTL B NR TPS SKIP REPEAT
S
•
A
SPACE
SPC
D
·
M
LIVE
HALL
JAZZ
STADIUM
DISCO
VOCAL
CINEMA
M
U
T
E
VOL
AUTO
·
P
SENSOR
INTEGRATED CD/CASSETTE RECEIVER WITH DSP
OPEN
FM
DISC
AM
DISC
SEL
TUNE
TRACK
54
SOURCE
DISP
CD Changer Basics (option)
E
N
G
L
I
S
H
16
CQ-VX2000U
24
Notes:
¡“NO DISC” appears on the display if there is no disc in the magazine.
¡When a magazine is loaded into a changer, the power is turned on automatically. (Then,
sound source is changed to CHANGER.)
Disc Selection
Press [j] or [i] button.
[
j
](DISC j) : Next disc
[
i
](DISC i) : Previous disc
Track Selection
Track Search
Press [SOURCE] button to change to CD changer mode.
CD Changer Mode
Press [k] or [l] button.
[k](TRACK k) : Beginning of the current track.
Previous track. (Press twice)
[l](TRACK l) : Next track
Release [k] or [l] button when your favorite part comes after
pressing and holding it for more than 0.5 seconds.
[k](TRACK k) : Fast backward
[l](TRACK l) : Fast forward
Connect an optional CD changer (CX-DP88U, etc.)
Press and hold for more
than 0.5 seconds.
SOURCE
PWR
TUNE
TRACK
TUNE
TRACK
AM
DISC
SEL
FM
DISC
SCAN Button
RANDOM
Button
SOURCE Button
DISP Button
jiklButtons

Human
Equalizer
CQ-VX2000
561234
SOURCE
POWER
REPSCANRANDOM
CLOCK
DISP
REVERSE
S
•
ANALYZER DISPLAY MTL B NR TPS SKIP REPEAT
S
•
A
SPACE
SPC
D
·
M
LIVE
HALL
JAZZ
STADIUM
DISCO
VOCAL
CINEMA
M
U
T
E
VOL
AUTO
·
P
SENSOR
INTEGRATED CD/CASSETTE RECEIVER WITH DSP
OPEN
FM
DISC
AM
DISC
SEL
TUNE
TRACK
561234
SEL
Sound Settings and Sound Space
(continued)
E
N
G
L
I
S
H
20
CQ-VX2000U
28
49 patterns are already prepared, so that you can make complicated adjustment easily.
Default : FLAT(0)
Setting range : 1 - 3 for each patterns (49 patterns)
w Press [j], [i], [k] or [l] button to adjust the level.
A cursor moves in the HEQ display and blinks at the adjusted point.
[
j
] : Heavy bass
[
i
] : Light bass
[l] : Sharp treble
[k] : Soft treble
Tone Quality (Human Equalizer=HEQ)
q Press [SEL] button to select <HUMAN EQ>. ( B Page 27)
Recreation
Enjoyable drive
Calm down
Concentration
Safe drive
Untie stress
Refresh
Listen to the music
Rhythmical
Awakening
Heavy
Light
Sharp
Soft
FM
DISC
AM
DISC
SEL
Preset 1 - 6 Buttons
jiklButtons
SEL Button
E
N
G
L
I
S
H
17
CQ-VX2000U
25
Press and hold for more
than 2 seconds.
Track Random
Disc Random
All the available tracks on all discs in the magazine are played in a random
sequence.
Press [RANDOM] button. (Press [RANDOM] button again to cancel.)
All the available tracks on current disc are played in a random sequence.
Press and hold [RANDOM] button for more than 2 seconds.
(Press and hold [RANDOM] button again to cancel.)
Track Scan
Disc Scan
The first track of all the discs in the magazine is played for 10 seconds each.
Press and hold [SCAN] button for more than 2 seconds.
(Press and hold [SCAN] button again to cancel.)
¡With the scanning of all tracks over, the original disc starts playing from the
beginning.
¡Release [SCAN] button when you find your favorite disc.
The first 10 seconds of each track on the discs plays in sequence.
Press [SCAN] button. (Press [SCAN] button again to cancel.)
¡With the scanning of all tracks over, the original program starts playing from
the beginning.
¡Release [SCAN] button when you find your favorite track.
Disc Number
Track Number
Track Play Time
(Example) Regular Display
Press [DISP] button to change the display.
( B Page 15)
3 4
RANDOM
3 4
RANDOM
5 6
REPSCAN
5 6
REPSCAN
Press and hold for more
than 2 seconds.

Human
Equalizer
CQ-VX2000
561234
SOURCE
POWER
REPSCANRANDOM
CLOCK
DISP
REVERSE
S
•
ANALYZER DISPLAY MTL B NR TPS SKIP REPEAT
S
•
A
SPACE
SPC
D
·
M
LIVE
HALL
JAZZ
STADIUM
DISCO
VOCAL
CINEMA
M
U
T
E
VOL
AUTO
·
P
SENSOR
INTEGRATED CD/CASSETTE RECEIVER WITH DSP
OPEN
FM
DISC
AM
DISC
SEL
TUNE
TRACK
SEL
Sound Settings and Sound Space
E
N
G
L
I
S
H
19
CQ-VX2000U
27
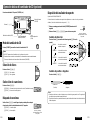
Sound Control
Press [SEL] button to change the mode as follows.
Regular Mode
HUMAN EQ : You can adjust sound quality to suit the music or your feeling. (Human
Equalizer) ( B Page 28)
GRAPHIC EQ : You can adjust sound quality by adjusting the level for each frequency.
(Graphic Equalizer) ( B Page 29)
BAL//FAD : You can adjust the sound balance among the front, rear, right and left
speakers. ( B Page 29)
POSITION SEL: You can adust the sound image in accordance with a listener position.
( B Page 30)
SUPER BASS : You can utilize the rear speaker connected to the built-in amplifier as sub-
woofer that outputs only bass. ( B Page 30)
SDBB SELECT: You can enjoy enhanced bass. ( B Page 31)
Notes:
¡If you would like to stop your current operation, press [DISP] button.
¡If no operation is performed for 10 seconds, the display will return to the regular mode.
SEL
SEL Button
Human
Equalizer
CQ-VX2000
561234
SOURCE
POWER
REPSCANRANDOM
CLOCK
DISP
REVERSE
S
•
ANALYZER DISPLAY MTL B NR TPS SKIP REPEAT
S
•
A
SPACE
SPC
D
·
M
LIVE
HALL
JAZZ
STADIUM
DISCO
VOCAL
CINEMA
M
U
T
E
VOL
AUTO
·
P
SENSOR
INTEGRATED CD/CASSETTE RECEIVER WITH DSP
OPEN
FM
DISC
AM
DISC
SEL
TUNE
TRACK
6
CD Changer Basics (option)
(continued)
E
N
G
L
I
S
H
18
CQ-VX2000U
26
Track Repeat
Disc Repeat
Press [REP] button. (Press [REP] button again to cancel.)
Press and hold [REP] button for more than 2 seconds.
(Press and hold [REP] button again to cancel.)
Repeat the current selection.
Repeat the current disc selection.
Press and hold for more
than 2 seconds.
5 6
REPSCAN
5 6
REPSCAN
REP Button

Troubleshooting
(continued)
E
N
G
L
I
S
H
1
CQ-VX2000U
50
E
N
G
L
I
S
H
42
Trouble
Playing does not stop.
Soon after loading a tape,
playing side switches
repeatedly.
–
Poor sound quality
Page
StepCauseTrouble
A cassette tape is not
ejected.
¡
The cassette tape is defec-
tive.
¡
Mechanism trouble
20
52
Cassette Tape
The head is dirty.
Clean the head.(Ask a service representative
for advice.)
Press the eject button.
Check whether the mechanism works well by
using a different cassette tape.
If the mechanism does not work well, press
the reset switch.
If the mechanism does not work well yet, con-
tact a dealer or a servicenter.
TPS unavailable
An interval between programs is
too short.
Confirm that TPS works by using a different
cassette tape.
–
Use a different cassette tape.
–
Poor quality tape
Page
StepCause
Batteries have run down.
Remote control is in the wrong
direction.
Battery polarities (+) (–) are
reversed.
Buttons are invalid for
operation.
Replace the batteries.
Direct the remote controller at SENSOR on the
panel.
Insert the batteries correctly.
9
9
Wrong batteries Check the batteries.
9
–
Remote Control
46-47
Left and right sounds are
reversed in stereo listen-
ing.
Page
StepCauseTrouble
Only bass or monaural
sound from rear speaker
SBC-SW is set to ON. Set SBC-SW to OFF.
30
Sound Setting
The right speaker wire is connected
to the left speaker and the left
speaker wire to the right speaker.
Connect the speaker wires to the correct ones.
No sound from left, right,
front, or rear speaker
Left and right balance, or front and
rear balance is off on one side.
Adjust BAL/FAD as appropriate.
29
Connect the cables correctly.
46-47
Cables are not correctly con-
nected.
E
N
G
L
I
S
H
27
CQ-VX2000U
35
Mute/ATT(Attenuator)
Default : MUTE KEY
MUTE KEY : No sound
ATT KEY : Decrease to 1/10
q Press [SEL] button to select <MUTE KEY SEL>. ( B Page 32)
w
Press [l] button to change as follows. ([k] : opposite direction)
FM
DISC
AM
DISC
SEL
Press and hold for more than 2
seconds.
<
Press again

E
N
G
L
I
S
H
1
CQ-VX2000U
49
E
N
G
L
I
S
H
41
Preset station is reset.
Page
StepCauseTrouble
Much noise in FM stereo
and monaural broadcasts
Radio
Battery cable is not correctly
connected.
Connect the battery cable to the terminal that
is always live.
16
46
Select other stations of higher signal level.
Station is too far, or signals
are too weak.
18
52
CD is not ejected.
Instable mounting
Sound skips due to vibra-
tion.
CD is dirty.
CD is dirty.
CD
CD sound skips, tone
quality is low.
40
40
Clean CD, referring to the section on Care of
Discs.
Mount the unit securely with the mounting
parts, referring to the section on Installation.
–
41
Mounting angle is over 30
degrees.
Adjust mounting angle to less than 30
degrees.
¡
CD is defective.
¡
Mechanical trouble
Open the panel and press [
u
] button. If failure
persists, press the reset switch. If normal oper-
ation is not restored yet, call the store where
you purchased the unit or the nearest servi-
center to ask for repairs.
CD is inside but no sound
CD is upside down.
Place CD in the correction direction, the label
side up.
18
Page
StepCauseTrouble
Clean CD, referring to the section on Care of
Discs.
Useful Functions
E
N
G
L
I
S
H
28
CQ-VX2000U
36
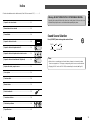
Press [S•A] button to change to the spectrum analyzer display in
the 13 patterns .
Note: The indication pattern can not be changed at letter indicating part of the spectrum ana-
lyzer indication.
Spectrum Analyzer Display
q WAVE : This is an image that is simply but implies the opening of space fantasy.
w AURORA : This is an image that implies an aurora across the sky.
e MILKY WAY : This is an image that implies the Milky Way majestically flowing in the
space.
r TWINKLE STAR: This is an image that implies twinkling of innumerable stars.
t SUN : This is an image that implies the brilliant rays of warmth.
y
SPC SARGASSO
: This is an image that implies an eternal journey of a drifting piece of broken
star.
u BIG BANG : This is an image that implies the creation of the universe and stars.
i FLARE : This is an image that implies energy radiation from the sun to the space.
o PROMINENCE : This is an image that implies flames on the surface of the sun.
!0 METEOR : This is an image that implies a meteor stream in the infinitely expanding
space.
!1 SPACE FEVER : This is an image that implies a slot machine rolling when the unit receives
a certain frequency.
!2 BLANK SPEANA: In this display, the spectrum analyzer is switched off.
!3 ALL DISP OFF : The whole display, including the lights, goes out if ALL DISP OFF is select-
ed. (It lights when this operation is performed, and goes out again in about
5 seconds after the operation.)
Default : WAVE
S
•
A
REVERSE
S
•
ANALYZER
Human
Equalizer
CQ-VX2000
561234
SOURCE
POWER
REPSCANRANDOM
CLOCK
DISP
REVERSE
S
•
ANALYZER DISPLAY MTL B NR TPS SKIP REPEAT
S
•
A
SPACE
SPC
D
·
M
LIVE
HALL
JAZZ
STADIUM
DISCO
VOCAL
CINEMA
M
U
T
E
VOL
AUTO
·
P
SENSOR
INTEGRATED CD/CASSETTE RECEIVER WITH DSP
OPEN
FM
DISC
AM
DISC
SEL
TUNE
TRACK
S
•
A
jiklButtons
S•A / REVERSE Button

E
N
G
L
I
S
H
1
CQ-VX2000U
48
E
N
G
L
I
S
H
40
Trouble
Troubleshooting
No sound
12
Clock unadjustable
Condensation (dew)
Cables are not correctly con-
nected.
Connect cables correctly.
Wait for a while before use.
Excessive low volume Increase the volume
39
46-47
–
No power
Car
’
s engine switch is not on.
Battery cable is not correctly
connected.
Accessory cable is not correctly
connected.
Fuse is burnt.
Cables are not correctly con-
nected.
Turn your car’s ignition switch to ACC or ON.
Call the store where you purchased the unit, or
your nearest servicenter (see the attached
sheet) and ask for fuse replacement.
Connect cables correctly.
Connect the battery cable to the terminal that
is always live.
Connect the accessory cable to your car's
ACC source.
12
46-47
46
46
–
Page
StepCause
Common
Grounding wire is not correctly
connected.
Connect the grounding wire to a metal part of
the car.
46
Mute is set to ON Set it to OFF.
12
Spectrum analyzer is in demo
mode.
Buttons unusable
Press [DISP] to cancel demo mode.
12
Press [POWER] button to turn on the power,
then adjust the clock.
The power has not been turned
on yet.
–
Noise Detach the cellular phone from the main unit.
There is a cellular phone close
to the main unit.
E
N
G
L
I
S
H
29
CQ-VX2000U
37
Each spectrum analyzer indication has 8 patterns that are different in the tone of color and the
motion. (Spectrum analyzer indication q - !1)
Spectrum Analyzer Arrangement
Press and hold for more
than 2 seconds.
q Press and hold [REVERSE] button for more than 2 seconds.
w Press [j], [i], [k] or [l] button to select a pattern.
Notes:
¡When a setting mode is selected but no operation is made within 10 seconds, the display
will return to the normal operation mode.
¡The indication pattern can not be changed at letter indicating part of the spectrum analyzer
indication.
Direction Change
Press [l] button to change as follows. ([k] : opposite direction)
Positive - Negative Switch
Press [j] or [i] button.
SPEANA NEGA
(Negative)
SPEANA POSI
(Positive)
S
•
A
REVERSE
S
•
ANALYZER
FM
DISC
AM
DISC
SEL
Default : NORMAL/SPEANA POSI
NORMAL :
Regular spectrum ana-
lyzer display
REVERSE 1 : Regular display is
reversed vertically.
REVERSE 2 : Reversed 1 display is
reversed horizontally.
REVERSE 3 : Reversed 2 display is
reversed vertically.

E
N
G
L
I
S
H
1
CQ-VX2000U
47
E
N
G
L
I
S
H
39
CD Changer
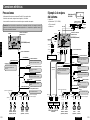
CX-DP88U
PRE-OUT (F)
CD/MD•CH IN
R
L
AUX-IN PRE-OUT (R)
CD Changer Connector
CQ-VX2000U (Rear)
(White) (L)
(Red) (R)
Extension Cord
(DIN/RCA/BATT/GND)
RCA Cord
(Optional)
RCA Cord
(Optional)
Power
Amplifer
Power
Amplifer
Speakers for system up grade
Fuse (3A)
(Yellow)
REAR
FRONT
to AUX
(Red)
(R)
(Red) (R)
(Red)
(R)
(White)
(L)
(Red)
(R)
(White)
(L)
(Red)
(R)
(White)
(L)
(White)
(Red)
(R)
(White)
(L)
(Red)
(R)
(White)
(L)
(White)
(L)
(White)(L)
Car TV etc.
CD•C IN
Power Connector
(Orange w/white stripe)
Illumination Lead
(AMP-CONT MAX 0.1A)
External Amplifier Control
Power Lead
(Blue w/white stripe)
(ACC 3A)
(Black)
Ground Lead
(White w/black stripe)
(Green w/black stripe)
(Gray)
(Gray w/black stripe)
(Green)
(Violet w/bladk stripe)
(Violet)
Front
Speaker
(Left)
Front
Speaker
(Right)
Rear
Speaker
(Left)
Rear
Speaker
(Right)
(+) (–)(+) (–)(+) (–)(+) (–)
Battery Lead
(BATTERY 10A)
(Yellow)
ACC Power Lead
(Red)
(ILLUMINATION)
(ANT-CONT MAX0.1A)
(Blue)
Ground lead
Battery Lead
Fuse (3A)
Fuse (10A)
Antenna
To the power line connected to
the clearance lights of the car
To ACC power, +12V DC
To a clean, bare metallic part of
the car chassis
To the car battery, continuous +12V
To an external amplifier+12V DC
To the auto antenna control power
cord of the car
Antenna Control Cord
System Upgrade Example
Combination
¡ CD changer (CX-DP88U)
¡ A car TV
¡ 8 Speakers
Useful Functions
(continued)
E
N
G
L
I
S
H
30
CQ-VX2000U
38
Human
Equalizer
CQ-VX2000
561234
SOURCE
POWER
REPSCANRANDOM
CLOCK
DISP
REVERSE
S
•
ANALYZER DISPLAY MTL B NR TPS SKIP REPEAT
S
•
A
SPACE
SPC
D
·
M
LIVE
HALL
JAZZ
STADIUM
DISCO
VOCAL
CINEMA
M
U
T
E
VOL
AUTO
·
P
SENSOR
INTEGRATED CD/CASSETTE RECEIVER WITH DSP
OPEN
FM
DISC
AM
DISC
SEL
TUNE
TRACK
SOURCE
D
·
M
M
U
T
E
SOURCE Button
MUTE (ATT) Button
D•M Button
Direct Memory
Even if the power is off or source of sound is not radio, a memorized channel can be received at a
touch of button.
D•M Registration
q Select the station you like ( B Page 16)
w Press [D•M] for more than 2 seconds to register the station into memory.
Frequency
When [D•M] button is pressed, the selected mode changes as fol-
lows.
Notes:
¡Default of D•M is FM 88.1 MHz.
¡Setting of sound space or others can not be performed during D•M mode.
D
·
M
D•M : The direct memoried station is received.
Regular mode : Returns to previous source of sound. (or turned off)

E
N
G
L
I
S
H
1
CQ-VX2000U
46
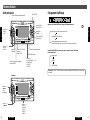
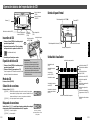
Electrical Connections
E
N
G
L
I
S
H
38
Precautions
¡This unit only operates in a 12-volt DC negative ground system.
¡Prevent short-circuits, remove the negative(–) terminal of the battery.
¡Please carefully read the operating instructions of any equipment connected to this unit.
Caution: For installation to cars with trip or navigational computers, all electronic memory settings
previously registered in the computer will be lost when the battery terminal is disconnected.
PRE-OUT (F)
CD/MD•CH IN
R
L
AUX-IN PRE-OUT (R)
CD Changer
Connector
Power Connector
Orange w/white stripe
Illumination Lead
(AMP-CONT MAX 0.1A)
External Amplifier Control Power Lead
Blue w/white stripe
(ACC 3A)
Black
Ground Lead
White w/black stripe
Green w/black stripe
White
Gray
Gray w/black stripe
Green
Violet w/black stripe
Violet
Front
Speaker
(Left)
Front
Speaker
Right
Rear
Speaker
(Left)
Rear
Speaker
(Right)
To the power line connected to
the clearance lights of the car
To ACC power, +12V DC
to a clean, bare metallic part of the
car chassis
To the car battery, continuous +12V
To the auto antenna control power
cord of the car
(+) (–)(+) (–)(+) (–)(+) (–)
Battery Lead
(BATTERY 10A)
Yellow
ACC Power Lead
Red
(ILLUMINATION)
CQ-VX2000U (Rear)
(ANT-CONT MAX0.1A)
Antenna Control Cord
Blue
Fuse (3A)
Fuse (10A)
Antenna
To an external amplifier
E
N
G
L
I
S
H
31
CQ-VX2000U
39
Connect an external device to AUX IN (AUX input terminal) on the rear of the main
unit. ( B Page 47)
External Sound Source (AUX-IN)
Refer to respective operating instructions of external devices for details.
Press [SOURCE] button to change to <AUX IN>.
Caution: Install the black light more than 20 cm apart from the main unit. Failure to do so
might cause malfunction or noise.
Black Light
The whole panel lights deep blue and shows up when the black light is activated.
The black light is optional and requires additional installation.
Volume Down (Mute/Attenuator)
The mute indicator blinks while the MUTE or ATT is on.
The volume decreases depending on which setting you selected Mute or ATT.
( B Page 35)
Press [MUTE] (ATT) to switch the MUTE mode (ATT mode)
between on and off.
When MUTE is set When ATT is set
Default : MUTE OFF
M
U
T
E
SOURCE
PWR
MUTE OFF : Regular volume level
MUTE ON : No sound
ATT OFF : Regular volume level
ATT ON : Decrease to 1/10 volume level

E
N
G
L
I
S
H
1
CQ-VX2000U
45
E
N
G
L
I
S
H
1
E
N
G
L
I
S
H
37
❏ Typical Installation (For vehicle with double-DIN size)
1. Remove Car radio or little object box from the vehicle and the stopping brackets.
2. Use the appended screws q or w to install the brackets on this unit.
3. Install this unit into the vehicle.
¡If a special kit (Sold separately) is necessary for a certain year’s, model or grade of vehicle,
please consult your dealer.
¡For electrical connecting simply to your vehicle, you can buy a prepared power connector from
your dealer.
❏ Installation for except for the above motors
For general use kit (Sold separately) or motor’s special kit (Sold Separately), Please consult your
dealer.
Note:
Use a pench to bend the fingers
on the bracket vertically.
Bracket (L)
Bracket (R)
CQ-VX2000U
Appended Screws (q or w)... Select appropriate ones matching the hole shape of the
bracket.
w Flat-Head
Screw x 8
(5 mmφ x 8 mm)
Note: Binding-Head screws (5 mmφ x 8 )
q are appended four pieces, the
other four pieces are fixed on the
transportation bracket. [Screw
with washer (5 mmφ x 8 mm)]
q Binding-Head
Sdrew x 8
(5 mmφ x 8 mm)
E
N
G
L
I
S
H
1
CQ-VX2000U
40
Maintenance
E
N
G
L
I
S
H
32
Notes on CD
Care of the Unit
Notes on Cassette Tape
ONLY USE DISCS CARRYING THE LABEL
How to hold the CD
¡Do not touch the underside of the disc.
¡Do not make scratches on the disc.
¡Do not bend disc.
¡When not in use, keep CD in the case.
Do not use irregularly shaped CDs
Do not leave discs in the following places:
¡Direct sunlight
¡Near car heaters
¡Dirty, dusty and damp areas
¡Seats and dashboards
Disc Cleaning
Use a dry, soft cloth to wipe from the center
outward.
Caution on New Discs
A new disc may have rough edges on its inner and
outer perimeter. These may cause malfunction.
Remove the rough edges using a pencil, etc.
Tape Slack:
Use a pencil or similar object to take up the
slack as shown. If a loose tape is used, this
may result in the tape becoming tangled in the
rotating parts of the unit.
Exposed end
(Open end)
Pencil
Do not touch or
pull out the tape.
Cleaning this unit
Use a dry, soft cloth to wipe.
Caution on cleaning
Never use solvents such as benzine, thinner
as they may mar the surface of the unit.
Label side
<Right>
Rough edge
<Wrong>
Page is loading ...
Page is loading ...
Page is loading ...
Page is loading ...
Page is loading ...
Page is loading ...
Page is loading ...
Page is loading ...
Page is loading ...
Page is loading ...
Page is loading ...
Page is loading ...
Page is loading ...
Page is loading ...
Page is loading ...
Page is loading ...
Page is loading ...
Page is loading ...
Page is loading ...
Page is loading ...
Page is loading ...
Page is loading ...
Page is loading ...
Page is loading ...
Page is loading ...
Page is loading ...
Page is loading ...
Page is loading ...
Page is loading ...
Page is loading ...
Page is loading ...
Page is loading ...
Page is loading ...
Page is loading ...
Page is loading ...
Page is loading ...
Page is loading ...
Page is loading ...
Page is loading ...
Page is loading ...
Page is loading ...
Page is loading ...
Page is loading ...
Page is loading ...
Page is loading ...
Page is loading ...
Page is loading ...
Page is loading ...
Page is loading ...
Page is loading ...
-
 1
1
-
 2
2
-
 3
3
-
 4
4
-
 5
5
-
 6
6
-
 7
7
-
 8
8
-
 9
9
-
 10
10
-
 11
11
-
 12
12
-
 13
13
-
 14
14
-
 15
15
-
 16
16
-
 17
17
-
 18
18
-
 19
19
-
 20
20
-
 21
21
-
 22
22
-
 23
23
-
 24
24
-
 25
25
-
 26
26
-
 27
27
-
 28
28
-
 29
29
-
 30
30
-
 31
31
-
 32
32
-
 33
33
-
 34
34
-
 35
35
-
 36
36
-
 37
37
-
 38
38
-
 39
39
-
 40
40
-
 41
41
-
 42
42
-
 43
43
-
 44
44
-
 45
45
-
 46
46
-
 47
47
-
 48
48
-
 49
49
-
 50
50
-
 51
51
-
 52
52
-
 53
53
-
 54
54
-
 55
55
-
 56
56
-
 57
57
-
 58
58
-
 59
59
-
 60
60
-
 61
61
-
 62
62
-
 63
63
-
 64
64
-
 65
65
-
 66
66
-
 67
67
-
 68
68
-
 69
69
-
 70
70
-
 71
71
-
 72
72


Panasonic CQVX2000U Operating instructions
- Category
- CD players
- Type
- Operating instructions
Ask a question and I''ll find the answer in the document
Finding information in a document is now easier with AI
in other languages
- français: Panasonic CQVX2000U Mode d'emploi
- español: Panasonic CQVX2000U Instrucciones de operación
Related papers
-
Panasonic CQVX2000W Operating instructions
-
-
-
-
-
-
-
-
-
Other documents
-
Satco TP152 Operating instructions
-
Sony HCD-H1600 Operating Instructions Manual
-
Aiwa CT-X409yu User manual
-
-
-
JVC PC-X560BK User manual
-
Sanyo FX-32 User manual
-
Kenwood DPX-5010 User manual
-
-