Moen WS84503 User guide

Category
Sanitary ware
Type
User guide
It is imperative to identify your faucet model to determine the correct replacement
part number(s), as the size and/or number of the replacement part(s) will vary from
faucet model to faucet model. Please see your faucet model’s replacement part list to
determine the correct replacement part number(s). Contact MOEN at 1-800-Buy-MOEN
or 1-800-289-6636 for further assistance.
Leaking………………………………………………………………………………………1
Water Temperature……………………………………………......................................2
Water Pressure…………………………………………………………………………….4
Functionality………………………………….…………………………………………….5
Cartridge…………………………………………………………………………………….7
Other…………………………………………………………………………………………7
** It is imperative to identify your Faucet model to determine the correct replacement part number(s), as the size and/or number of the replacement part(s) will vary from Faucet model to Faucet
model. Please see your Faucet model’s replacement part list to determine the correct replacement part number(s). Contact MOEN at 1-800-Buy-MOEN or 1-800-289-6636 for further assistance.
1
Problem
Specific Issue
Typical Cause(s)
Possible Solutions
Contacting MOEN
Leaking
Non-pullout or non-pulldown
models
A scratched or torn o-ring or
rubber seal not sealing properly
inside the spout can cause a leak.
A. Replace the o-ring(s) inside of the spout. The number of o-rings inside of your spout will vary
depending on the model. It is essential to identify the model of the faucet in order to obtain the proper
MOEN service kit with the correct spout o-rings for your model; and different models utilize different
sizes of o-rings. Remember to clean the inside of the spout and the outside of the valve body when
replacing the o-rings, as well as lubricating the o-ring(s) with silicone-based grease (MOEN part
number 99915, included with o-ring kits). Or, to purchase the silicone-based grease (MOEN part
number 99915), please call MOEN at 1-800-Buy-MOEN or 1-800-289-6636. Do not use plumber's
grade faucet grease, silicon sprays or any lubricant that may contain petroleum. Petroleum based
lubricants may react with the rubber seals and could cause the spout to become difficult to operate.
For Further
Assistance,
MOEN U.S.
1-800-Buy-MOEN
(1-800-289-6636)
Pullout or pulldown models
Vacuum breaker within the spout
receptor may not be sealing
properly.
A. Check the connection between the hose and the wand; there should be a screen washer or o-ring
that provides a seal. If either is missing or compromised, they will need to be replaced.
B. If your model has a vacuum breaker, it may be leaking. Replace the vacuum breaker or install a
vacuum breaker conversion kit inside of the spout receptor.
Fixture leaks from end of the spout
Scratched o-ring or grommet on
the cartridge. On models that use
a handle mechanism, a broken
part could also be the cause.
A. Replace the cartridge (one-handle models) or cartridges (on two-handle models).
B. If the faucet uses a handle mechanism, inspect the parts. If broken, the handle mechanism will need
to be replaced.
Note: Improper installation of the handle mechanism can cause this specific issue to occur.
Side Spray leaks when Faucet is turned
on
The Side Sprayer is not able to
shut off completely.
A. The Side Sprayer would need to be replaced. It is imperative to identify your model because the
side sprays are unique to certain models. To determine your model, please see the replacement part
list. Make sure the correct connection type is obtained for your faucet. Look underneath the sink to
view the connection of the side spray hose to the discharge tube of the faucet. It is possible to have
either a threaded connection (identified by a metal nut at the end of the hose) or our Hydrolock or
Duralock connection (a black piece with a white clip at the end of the hose; or a white piece with a
black clip) on the side sprayer hose.
Often caused by a scratched or
torn o-ring on the cartridge or
spout.
Non-pullout or non-pulldown Models
A. This issue should be resolved by replacing the o-ring(s) inside of the spout, as well as the cartridge.
The number of o-rings inside of your spout will vary depending on the model. It is essential to identify
the model of the faucet in order to obtain the proper MOEN service kit with the correct spout o-rings for
your model; and different models utilize different sizes of o-rings. Remember to clean the inside of the
spout and the outside of the valve body when replacing the o-rings, as well as lubricating the o-rings
with silicone-based grease (MOEN part number 99915, included with o-ring kits). Or, to purchase the
silicone-based grease (MOEN part number 99915), please call MOEN at 1-800-Buy-MOEN or 1-800-
289-6636. Do not use plumber's grade faucet grease, silicon sprays or any lubricant that may contain
petroleum. Petroleum based lubricants may react with the rubber seals and could cause the spout to
become difficult to operate.
B. The correct cartridge will need to be identified and replaced.
Pullout or pulldown Models
A. Replacing the appropriate cartridge for your faucet model should resolve the issue.
** It is imperative to identify your Faucet model to determine the correct replacement part number(s), as the size and/or number of the replacement part(s) will vary from Faucet model to Faucet
model. Please see your Faucet model’s replacement part list to determine the correct replacement part number(s). Contact MOEN at 1-800-Buy-MOEN or 1-800-289-6636 for further assistance.
2
Problem
Specific Issue
Typical Cause(s)
Possible Solutions
Contacting MOEN
Water
Temperature
No COLD (just hot) or no HOT (just cold)
water on tub shower units
Debris or an obstruction in the
balancing spool is causing it not
to move freely within its housing.
In some models, a lack of
pressure feeding the hot and cold
could be the cause. The valve
may also need to be calibrated.
Posi-Temp Models
A. The 1222 cartridge would need to be replaced, and the valve body would need to be flushed and
cleaned.
For Further
Assistance,
MOEN U.S.
1-800-Buy-MOEN
(1-800-289-6636)
Moentrol Models
A. Inspect the 1423 balancing spool. This will appear on the front of the valve body, either to the right or
above the cartridge. It will look similar to a large flat head screw, and it will be brass in color. A large flat-
bladed screwdriver can be used to unscrew the balancing spool from the valve. There will be a spool
inside this piece, and it needs to move freely inside of its shell. If the spool does not move freely, then the
1423 balancing spool will need to be replaced.
¾ ExactTemp Models
Note: for ½” ExactTemp valves refer to original service manual.
A. Verify the shut off valves (check stop kit) are in the open position. This will be a screw in the center of
the check stop kit. These should be unscrewed counter-clockwise.
B. Check to see if the hot and cold lines are reversed. If the supply lines are accessible, feel the
temperature of the pipes. The cold supply must be connected to the cold (right) side of the valve, and the
hot supply must be connected to the hot (left) side of the valve. If this is the case, the valve will need to
be reinstalled.
Note: The cartridge cannot be reversed to correct this issue.
C. The cartridge would need to be calibrated.
Note: When calibrated properly, the ExactTemp valve should provide a range of temperature of 80 to
120 degrees Fahrenheit. Please contact MOEN for the ExactTemp service manual which will walk you
through calibration at 1-800-Buy-MOEN or 1-800-289-6636.
ioDigital Models
A. Verify the shut off valves are in the open position. These will vary depending on your ioDigital model.
B. Remove the valve inlet screens and inspect for any debris. The water supply will need to be shut off,
and then the black nut on the inlets can be unscrewed to remove the inlet screens. Rinse off any debris
that may be on these screens and reinstall.
Standard Valve Models
A. Check to see if there are shut off valves installed with the unit. Verify these valves are opened all the
way.
B. The cartridge (for one-handle faucets) or cartridges (for two-handle faucets) would need to be
removed (or replaced) and the valve body would need to be flushed and cleaned.
No WARM water (no mixture of hot and
cold) on tub shower units
This is most likely due to an error
in installation, an issue with the
cartridge, a lack of hot and cold
water supplied to the valve or a
lack of calibration of temperature.
Posi-Temp Models
A. Make sure the handle is on properly. If it is on upside down, the handle will not rotate the cartridge to
provide a mixture of hot and cold. Simply remove the handle and reinstall.
B. If issue persists, replace the 1222 cartridge and flush the valve body.
Moentrol or Standard Valve Models
A. Replace the 1225 cartridge and flush the valve body.
ExactTemp Models
A. Verify the shut off valves (check stop kit) are in the "open" position. This will be a screw in the center
of the check stop kit. These should be unscrewed counter-clockwise.
B. Check to see if the hot and cold lines are reversed. If the supply lines are accessible, feel the
temperature of the pipes. The cold supply must be connected to the cold (right) side of the valve, and the
hot supply must be connected to the hot (left) side of the valve. If this is the case, the valve will need to
be reinstalled.
Note: The cartridge cannot be reversed to correct this issue.
** It is imperative to identify your Faucet model to determine the correct replacement part number(s), as the size and/or number of the replacement part(s) will vary from Faucet model to Faucet
model. Please see your Faucet model’s replacement part list to determine the correct replacement part number(s). Contact MOEN at 1-800-Buy-MOEN or 1-800-289-6636 for further assistance.
3
Problem
Specific Issue
Typical Cause(s)
Possible Solutions
Contacting MOEN
Water
Temperature
Water temperature is not HOT enough on
tub shower units
Hot water may not be supplied to
the valve, a balancing spool may
be stuck or the temperature may
be calibrated not to allow full hot
water (up to 120 degrees
Fahrenheit).
If external shut off valves are
present, verify they are opened all
of the way. It is extremely
important that the units have both
hot and cold water supplied to the
inlets of the valve body. Also,
verify the hot water system in the
home is on.
Note: If comparing the
temperature of the water to an
adjacent lavatory faucet, you may
notice the temperature may not be
as hot (or as cold) in the
tub/shower valve.
Depending on your climate, the
incoming water (ground water)
temperature may fluctuate during
the year. This can cause the
overall hot temperature to
decrease (or increase) throughout
the year.
Posi-Temp Models
A. If the water pressure decreases when going from cold to hot, the 1222 cartridge would need to be
replaced.
B. Verify the handle rotates all the way counter-clockwise to a 9 o'clock position. If the handle stops
before this position, then the temperature limit stop will need to be re-positioned. Please view the
installation instructions for assistance on how to set this.
C. If the issue is still unresolved, replace the 1222 cartridge and flush the valve body.
For Further
Assistance,
MOEN U.S.
1-800-Buy-MOEN
(1-800-289-6636)
Moentrol Models
A. Inspect the 1423 balancing spool. This will appear on the front of the valve body, either to the right or
above the cartridge. It will look similar to a large flat head screw, and it will be brass in color about the
size of a quarter. A large flat-bladed screwdriver can be used to unscrew the balancing spool from the
valve. There will be a spool inside this piece, and it needs to move freely inside of its shell. If the spool
does not move freely, then the 1423 balancing spool will need replaced.
B. Verify the top of the handle rotates all the way to a 9 o'clock position. If the handle stops before this
position, then the adjustable temperature limit stop will need to be adjusted to allow the handle to rotate
all the way to the hot position. Please view the installation instructions for assistance on how to set this.
C. If the issue is still unresolved, replace the 1225 cartridge and flush the valve body.
¾" ExactTemp models
Note: For ½" ExactTemp valves refer to original service manual.
A. Make sure the temperature override button is being pressed in. If calibrated properly, the handle will
hit a stop at 105 degrees. In order to get warmer temperatures, the temperature override button needs to
be pushed in and then the handle will be able to rotate counter-clockwise to warmer temperatures.
B. Verify the stops are opened. The stops are located on the inlets of the valve, and they look like small
flat head screws. Use a flat head screwdriver to unscrew this counter-clockwise until you reach a stop,
this will ensure it is opened all of the way (screwing clockwise until a stop is reached will turn the water
off).
C. The cartridge may need to be calibrated. Instructions on calibration can be obtained via the
ExactTemp Service Manual. Please contact MOEN for the ExactTemp service manual at 1-800-Buy-
MOEN (1-800-289-6636).
ioDigital models
A. Make sure the temperature knob is being rotated to the hot side. The corresponding LEDs with light
red to illustrate this.
B. Verify that both shut off valves are in the open position. These will vary depending on your ioDigital
model.
C. Verify the hot water supply is attached to the hot water side and the cold water supply is on the cold
side. Feel the temperature of the inlet lines. If the hot is going to the cold side and the cold is going to the
hot side, the lines will need to be reversed.
D. Remove the valve inlet screens and inspect for any debris. The water supply will need to be shut off,
and then the black nut on the inlets can be unscrewed to remove the inlet screens. Rinse off any debris
that may be on these screens and reinstall.
E. The maximum temperature adjustment setting will need to be calibrated. This can be identified as a
blue dial on the valve labeled "Max Temp Adjustment" This can be rotated clockwise to increase the
maximum temperature (counter-clockwise will decrease the temperature).
** It is imperative to identify your Faucet model to determine the correct replacement part number(s), as the size and/or number of the replacement part(s) will vary from Faucet model to Faucet
model. Please see your Faucet model’s replacement part list to determine the correct replacement part number(s). Contact MOEN at 1-800-Buy-MOEN or 1-800-289-6636 for further assistance.
4
Problem
Specific Issue
Typical Cause(s)
Possible Solutions
Contacting MOEN
Water
Pressure
Low water flow from spout-both hot and
cold water on sink faucets
Depending on the model, this
could be caused by debris in the
cartridge, debris in the aerator, a
stuck diverter or a malfunctioning
wand.
It is recommended that the supply
lines from the shut-off valves be
first be checked to ensure the
faucet is receiving full pressure
from both hot and cold supply
lines.
Non-Pullout or Non-Pulldown Models
A. Remove the aerator and rinse off any debris.
B. If this does not resolve the issue, and if the unit also has a side spray, check the pressure from the
side spray. If the side spray has good pressure, then try activating the trigger on the side spray several
times to see if pressure returns to the spout. If it does not, then the diverter would need to be replaced.
Please remember that different models use different diverters.
C. If your model uses a hardware kit (Moen part number 100886) with a diverter, then it is recommended
that the hardware kit be replaced in addition to the diverter. To replace the hardware kit (MOEN part
number 100886), please call MOEN at 1-800-Buy-MOEN or 1-800-289-6636.
D. If this does not resolve the issue (or if your faucet does not have a side sprayer), the cartridge would
need to be replaced and the valve body would need to be flushed and cleaned.
For Further
Assistance,
MOEN U.S.
1-800-Buy-MOEN
(1-800-289-6636)
Pullout or Pulldown Models
A. Remove the hose from the wand and inspect the screen that is in between these items. If there is
debris in the screen, rinse it off with water.
B. Then, hold the end of the hose in the sink and turn on the water. If the pressure is good from the hose,
reinstall the screen and wand. This should resolve the issue.
C. If there is still low pressure after reinstalling the wand, then the wand would need to be replaced. If
there is low water pressure from the hose, the cartridge would need to be replaced and the valve body
would need to be flushed and cleaned.
Bathroom Sink Faucets
A. Remove the aerator and rinse off any debris.
B. If this does not resolve the issue, then the cartridge (for one-handle faucets) or cartridges (for two-
handle faucets) would need to be replaced and the valve body would need to be flushed and cleaned.
Low flow from spout- only hot or cold
water experiencing low water flow from
spout
This is caused by the shut off
valves not being turned on, a lack
of pressure through one of the shut
off valves or an obstruction in one
of the supply lines feeding water to
the faucet.
A. Make sure that both shut-off valves are fully turned on.
B. Check both supply lines from the shut-off valves to the Faucet. These supply lines need to deliver full
pressure to the faucet. If the supply lines do not deliver full pressure, than the faucet will not produce full
pressure. The plumbing of the home would need to be investigated for a resolution.
C. If the issue is still not resolved, then the cartridge (for one-handle Faucets) or cartridges (for two-
handle Faucets) would need to be removed (or replaced) and the valve body would need to be flushed
and cleaned.
Low flow from side spray/water still
comes from spout with side spray
activated.
This is caused by a malfunctioning
diverter or debris within the
valve/spout.
A. Replace the diverter.
B. Make sure that the valve body is cleaned. In some models, the diverter is installed in the valve body;
on other models it is installed around the valve body under the spout. If it is one of these models, make
sure the spout is cleaned as well. If the side spray does not shut off completely, it would also need to be
replaced.
** It is imperative to identify your Faucet model to determine the correct replacement part number(s), as the size and/or number of the replacement part(s) will vary from Faucet model to Faucet
model. Please see your Faucet model’s replacement part list to determine the correct replacement part number(s). Contact MOEN at 1-800-Buy-MOEN or 1-800-289-6636 for further assistance.
5
Problem
Specific Issue
Typical Cause(s)
Possible Solutions
Contacting MOEN
Functionality
Pulldown wand “falls” out of spout
The hose weight is out of position,
the docking collar is broken or the
hose has yet to be calibrated
A. Check the location of the hose weight. Some models will have white or yellow indicator mark on the
hose. It is recommended the weight be installed between the start of the loop curvature and this mark. If
your model does not have a white or yellow mark, then install the weight anywhere between 4" to 8" up
from the start of the loop curvature. For optimal performance, maintain an 8"x8" clear area for the hose
and weight to travel, free of any moveable items (bottles, cleaning supplies, etc.).
Note: The weight might need to be repositioned higher on the hose if non-moveable pipes or other
fixtures are interfering with the hose or weight.
B. Inspect the docking collar. This will typically be a black plastic piece at the end of the spout where the
wand should reside. If this is broken, it will need to be replaced. Different models use different docking
collars, so make sure the model number is determined when replacing.
C. If this is a new installation, the hose will need to be calibrated. This will occur after once the hose is
used and filled with water repeatedly of the course of a few days.
For Further
Assistance,
MOEN U.S.
1-800-Buy-MOEN
(1-800-289-6636)
Pullout or Pulldown wand will not divert
between “stream” and “spray” modes
The diverter within the wand is
malfunctioning
A. Replace the wand.
Spout is difficult to rotate
This is caused by debris and/or an
impaired o-ring inside of the spout
Non-Pullout or Non-Pulldown Models
A. Remove the spout and lubricate the spout o-rings with silicone-based grease (Moen part number
99915, included with o-ring kits). Or, to purchase the silicone-based grease (MOEN part number 99915),
please call MOEN at 1-800-Buy-MOEN or 1-800-289-6636. Do not use plumber's grade faucet grease,
silicon sprays or any lubricant that may contain petroleum. Petroleum-based lubricants may react with the
rubber seals and cause the spout to become even more difficult to operate.
B. Replace the o-ring(s) inside of the spout. The number of o-rings inside of your spout will vary
depending on the model. It is essential to identify the model of the faucet in order to obtain the proper
Moen service kit with the correct spout o-rings for your model; and different models utilize different sizes
of o-rings. Remember to clean the inside of the spout and the outside of the valve body when replacing
the o-rings, as well as lubricating the o-rings with silicone-based grease (MOEN part number 99915,
included with o-ring kits). Or, to purchase the silicone-based grease (MOEN part number 99915), please
call MOEN at 1-800-Buy-MOEN or 1-800-289-6636. Do not use plumber's grade faucet grease, silicon
sprays or any lubricant that may contain petroleum. Petroleum based lubricants may react with the
rubber seals and could cause the spout to become difficult to operate.
C. Inspect the retainer nut on top of the spout (if applicable). Make sure it is not overly tightened.
Note: If the mounting nut underneath the sink is overly tightened to the mounting bracket, this could
cause the spout to be difficult to rotate.
Pullout or Pulldown Models
A. Remove the spout receptor and clean any debris that is impeding the movement.
B. If there is corrosion on the valve body of the interior of the spout receptor, the faucet will need to be
replaced.
Note: If the mounting nut underneath the sink is overly tightened to the mounting bracket, this could
cause the spout receptor to be difficult to rotate.
** It is imperative to identify your Faucet model to determine the correct replacement part number(s), as the size and/or number of the replacement part(s) will vary from Faucet model to Faucet
model. Please see your Faucet model’s replacement part list to determine the correct replacement part number(s). Contact MOEN at 1-800-Buy-MOEN or 1-800-289-6636 for further assistance.
6
Problem
Specific Issue
Typical Cause(s)
Possible Solutions
Contacting MOEN
Functionality
Pop-up Drain Assembly not closing or
opening properly
This is caused by either a broken
pivot rod or an issue with the
adjustment the pivot rod or lift rod.
A. Inspect the pivot rod. This will be a silver rod that should be installed into the rear of the drain.
Depending on the model, there will be a metal or gray plastic pivot rod nut securing the rod in place. This
nut can be unscrewed to view the pivot rod. If this rod is broken, it will need to be replaced.
B. If the pivot rod is not broken, then it will need to be adjusted in conjunction with the lift rod. With the lift
rod (the rod that you pull up on the close the drain) in position, verify it is inserted into the lift rod strap
(this is a metallic piece with a series of holes) and secure it with the lift rod strap screw.
C. Connect the pivot rod to the lift rod strap using the spring clip that should be on the pivot rod.
D. Place the drain plug in the full open position, then loosen the lift rod strap screw and adjust the lift rod
height so that the knob on top of the lift rod clears the faucet. Then tighten the lift rod strap screw.
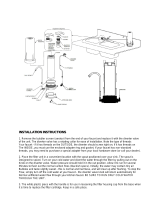
Note: The installation instructions for your faucet will illustrate how to do this.
For Further
Assistance,
MOEN U.S.
1-800-Buy-MOEN
(1-800-289-6636)
ioDigital Valve will not turn on
This can be caused by the
controller not being activated, a
connection issue between the
controller and the valve or a lack of
electrical power
A. The power button on the controller has not been pressed in. The LEDs will light after pressing the
power button.
B. Inspect the data cable. If the cable has been cut, it will need to be replaced. Also inspect the pins of
the data cable. If these are bent, they will need to be straightened or the cable will need to be replaced.
C. Unplug the data cable and plug the data cable back in. Once this is plugged back in, the status light on
the valve body should turn on.
D. The GFCI may have been tripped. Check the reset button on the GFCI outlet and press the reset
button.
E. Verify the power cord from the valve is plugged into the GFCI outlet.
F. There may be no electrical power to the GFCI outlet. Check the breaker box in the home for a tripped
breaker to this GFCI outlet. Reset the breaker if necessary.
No water from tub/shower units
Hot and cold water may not be
supplied to the valve, improper use
or an obstruction in the
spout/showerhead could cause
this to happen.
If external shut off valves are
present, verify they are opened all
of the way. It is extremely
important that the units have both
hot and cold water supplied to the
inlets of the valve body.
Make sure there is nothing
obstructing the spout or
showerhead
Posi-Temp Models
A. Rotate the handle to turn it on. The handle on this model does not pull out.
B. Both hot and cold water MUST be supplied to the valve to get ANY water from the unit.
C. If the valve has stops, both will need to be opened. If your Posi-Temp valve has these, they will be
located on the inlets of the valve. The stops look like small flat head screws. The flat would need to be
horizontal to be opened (if it is vertical, that will shut the water off).
Moentrol Models
A. Verify the handle is being pulled out to turn the water on. If the handle is only being rotated, the water
will not turn on.
B. Both hot and cold water MUST be supplied to the valve to get ANY water from the unit.
C. If the valve has stops, both will need to be opened. If your Moentrol valve has these, they will be
located on the inlets of the valve. The stops look like small flat head screws. Use a flat head screwdriver
to unscrew this counter-clockwise until you reach a stop, this will ensure it is opened all of the way
(screwing clockwise until a stop is reached will turn the water off).
¾ ExactTemp Models
A. These units must be installed with a volume control valve in addition to the thermostatic valve. The
volume control must be rotated counter-clockwise to turn the water on. The temperature (thermostatic)
handle only adjusts the temperature.
B. This model will have stops located on the inlets of the valve. The stops look like small flat head
screws. Use a flat head screwdriver to unscrew this counter-clockwise until you reach a stop, this will
ensure it is opened all of the way (screwing clockwise until a stop is reached will turn the water off).
ioDigital Models
A. Verify the controller will turn on. If it does not turn on, please see the section regarding the "ioDigital
valve will not turn on".
B. Verify the shut-off valves are in the open position. These will vary depending on your IoDigital model.
** It is imperative to identify your Faucet model to determine the correct replacement part number(s), as the size and/or number of the replacement part(s) will vary from Faucet model to Faucet
model. Please see your Faucet model’s replacement part list to determine the correct replacement part number(s). Contact MOEN at 1-800-Buy-MOEN or 1-800-289-6636 for further assistance.
7
Problem
Specific Issue
Typical Cause(s)
Possible Solutions
Contacting MOEN
Cartridge
For one-handle faucets only
Replaced the cartridge in MOEN Kitchen
Faucet and the handle will not stay in the
on position
The combination of the weight of
the handle, excess silicone
lubrication, and loose screws can
cause the faucet to self-close. For
models using a handle connector, a
metal washer may be missing or
the connector could be broken.
Faucet with a 1225 cartridge
A. Make sure all screws that hold the handle to the cartridge are screwed tight. If the model features a
handle connector, make sure that the screw going through the connector is secured tightly.
B. Remove any excess silicone lubrication from the cartridge.
C. If the unit features a handle connector, inspect this item for any cracks or wear. If this is broken, a new
handle connector will be needed. Be aware that not all models use the same handle connector.
D. If the cartridge was replaced, check the old cartridge to see if there was a metal washer on the stem.
This will need to be transferred to the new cartridge to correct this issue.
For Further
Assistance,
MOEN U.S.
1-800-Buy-MOEN
(1-800-289-6636)
Faucet with a 1255 cartridge
A. Replace the cartridge.
Faucet with a 4000 cartridge
A. Tighten the cartridge nut or replace the cartridge.
Other
Water comes out of the showerhead
when the tub spout is being used
This is caused by either a restriction
in the system or an installation
issue.
A. Remove the tub spout and inspect for any obstructions that may restrict the water from the spout. Turn
the water on and see if the water comes out of the showerhead; if it does not, the issue is with the tub
spout. If it cannot be freed of any obstructions, then replace the tub spout.
B. Inspect the type of pipe used for the installation. From the tub port of the valve, only ½" Copper or ½"
Galvanized Iron pipe (IPS) can be used. If PEX or CPVC was used from this connection, it will need to be
replaced with either ½" Copper or ½" Galvanized Iron pipe.
C. Measure the distance between the tub spout and the valve. The tub spout can be no less than six
inches and no greater than eleven inches below the valve. If the measurement does not meet these
criteria, it can cause this to occur.
D. There should only be one elbow from the tub port of the valve to the tub spout. If there are multiple
elbows, they will need to be eliminated.
E. If any transitional fittings that might restrict the water flow were used, they will need to be removed.
F. Inspect the valve body. If it was installed upside down, it will need to be reinstalled in the correct
orientation. Many valves will have the word "up" printed on the valve.
G. If this is a two-handle model, then inspect the flow director (diverter) in the valve. Depending on the
location of the water supplies, it may need to be reversed.
Note: If there is no longer any access into the wall, then a volume control valve (MOEN part number
91888) can be installed between the shower arm and the showerhead. This will allow the user to turn the
showerhead on and off at their discretion, however, this will not provide a positive or complete shut off.
To purchase the volume control valve (MOEN part number 91888), please call MOEN at 1-800-Buy-
MOEN or 1-800-289-6636.
Soap Dispenser is not Dispensing
This is caused by a restriction in the
head or a failure in the pump.
A. Remove the head of the soap dispenser by lift it straight up out of the sink. The pump should come
with it. Using a cup of warm water, place the bottom of the pump in the cup of warm water. Manually
pump the dispenser in order the rum the warm water through the unit. This will prime the pump.
B. Check the dispenser head to make sure there is no debris preventing the soap from coming through
the head. Remove any debris. If this cannot be cleaned, the dispenser head will need to be replaced.
C. Check the pump - does it still pump? If it does not, it will need to be replaced. Be aware different
models use different pumps, and these are not interchangeable.
  • Page 1 1
  • Page 2 2
  • Page 3 3
  • Page 4 4
  • Page 5 5
  • Page 6 6
  • Page 7 7
  • Page 8 8

Moen WS84503 User guide

Category
Sanitary ware
Type
User guide

Ask a question and I''ll find the answer in the document

Finding information in a document is now easier with AI