ACTi XNR-4200 V1.02.13 User manual
- Category
- Digital Video Recorders (DVR)
- Type
- User manual

XNR-4200
Standalone NVR
User’s Manual
Version 1.02.13
2012/02/20

www.acti.com
XNR-4200 User’s Manual 1.02.13
2
Table of Contents
1 Overview 5
Package Contents ........................................................................... 5
Introduction .................................................................................... 5
Physical Description ........................................................................ 7
Turning On / Off or Rebooting the device ..................................... 11
System Requirements .................................................................. 11
2 Installation 12
Connecting to Network ................................................................ 12
Accessing XNR-4200 by IE .......................................................... 12
Accessing XNR-4200 by UPnP .................................................... 13
Disabling UAC in Windows Vista and Windows 7 ........................ 14
Login ............................................................................................. 15
Setup Wizard ................................................................................ 18
Licensing ...................................................................................... 19
How does Activation Work 19
Online Activation 20
Offline Activation 21
Date and Time .............................................................................. 22
User ............................................................................................. 23
RAID ............................................................................................ 24
RAID Introduction 24
RAID Types and Number of Disks 27
Storage Calculation 27
Compatible Hard Disks 27
3 Live 31
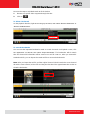
Live View Main Screen .................................................................. 31
Live View Window ........................................................................ 32
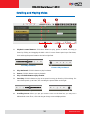
Side Panel .................................................................................... 34
Device List 34
Event List 36

www.acti.com
XNR-4200 User’s Manual 1.02.13
3
Operating Digital PTZ 39
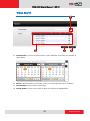
Preset Point Panel 40
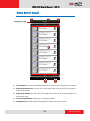
Tool Bar 41
Layout Bar 44
4 Playback 45
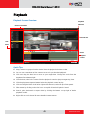
Playback Screen Overview .......................................................... 45
Quick Tips .................................................................................... 45
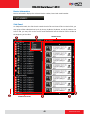
Device Information ....................................................................... 46
Side Panel .................................................................................... 46
Playback Windows ....................................................................... 47
Device Playback Control .............................................................. 48
Layout Bar .................................................................................... 49
Select Device for Playback ........................................................... 49
Bookmarks .................................................................................... 50
Scrolling and Playing Video .......................................................... 52
Video Search ................................................................................. 53
Video Search Result ...................................................................... 54
Export Video ................................................................................. 55
Snapshot ....................................................................................... 58
Print Image ................................................................................... 58
5 Setup 60
System ........................................................................................... 60
Settings-Email .............................................................................. 60
Settings-FTP ................................................................................ 61
Settings-Global Settings............................................................... 61
Information ................................................................................... 62
Date & Time ................................................................................. 63
Network ........................................................................................ 65
Block List ...................................................................................... 66
RAID Management ...................................................................... 67
Disk Status 67
RAID Status 68
How to Manage Disk Error (Changing Disks) 68
Device Pack ................................................................................. 69

www.acti.com
XNR-4200 User’s Manual 1.02.13
4
Firmware Upgrade ....................................................................... 69
Setting Backup / Restore ............................................................. 69
Adding and Removing Device ...................................................... 71
Search Devices 72
Add Device Manually 72
Adding Video Streams from a Multi-channel Device 73
Device Configuration .................................................................... 75
Basic ............................................................................................ 75
Video Quality ................................................................................ 77
Motion Detection .......................................................................... 78
Schedule ....................................................................................... 82
Event Handling ............................................................................. 84
Event Responses ......................................................................... 85
Event Trigger Type Icon 86
Event Response Options 86
Popup 87
Goto Preset 89
Beep 89
Trigger DO 90
Send Email 90
Upload FTP 91
Event Handling List ...................................................................... 92
Event Response Overview ........................................................... 93
Device Group ................................................................................ 94
Device List ................................................................................... 95
Live Layout ................................................................................... 96
User ............................................................................................... 97
Group ........................................................................................... 97
User ............................................................................................. 99
Permission ................................................................................. 101
Playback 103
Setup 103
Joystick ....................................................................................... 104
Language .................................................................................... 106

www.acti.com
XNR-4200 User’s Manual 1.02.13
5
Overview
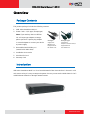
Package Contents
This product package includes the following contents:
1. XNR-4200 Standalone NVR x 1
2. Power Cord x 1 (US type / Europe type)
Note: If your territory does not fall into
US or Europe type adapter coverage,
please purchase a power plug adapter
or a travel adapter to connect your device
to power supply.
3. Removable Hard Disk Bay x 6
(stored inside XNR-4200)
4. Installation Accessories
5. Machine Info Card
6. Warranty Card
Introduction
XNR-4200 Standalone NVR is a Linux based Network Video Recorder that is housed in a 2U
rack mount casing. It is easy to setup and operate. You may connect to the XNR-4200 via Cat 5
cable Ethernet networks or through remote internet.
US Type
Supply End:
NEMA 5-15P
Equipment End:
IEC-60320-C13
Europe Type
Supply End:
European Schuko CEE 7/7
Equipment End:
IEC-60320-C13

www.acti.com
XNR-4200 User’s Manual 1.02.13
6
Main Specification
XNR-4200
General
Full Name
ACTi Standalone Network Video Recorder XNR-4200
Maximum Number of Clients
Unlimited
Maximum Number of Cameras
64
Compression
H.264, MPEG-4, MJPEG
Live View
Display Layout Mode
1, 2, 4, 5, 6, 8, 9, 10, 16, 25, 32, 36, 49, 64
Layout Manager
An interface to define display layouts and the pre-set cameras within layouts; full-screen mode available
Layout Tour
Automatic switch between different display layouts
Digital Zoom
Zoom in/out digitally by PiP (Picture-in-Picture)
Camera Tree
Drag and drop video source from camera tree into display layout
Manual Recording
Instant recording upon mouse click
Event Panel
Display event status upon alarm or upon connection loss or recovery between server and client or when the allocated disk
space is full
Two-way audio
Audio sound from and to all the audio supported devices
PTZ
Control
Pan, tilt and zoom controls; speed control; both buttons and overlay controls
Preset Points and Tours
Create preset points; create auto tours between preset points ; activate NVR preset points or auto tours between preset
points
Number of Preset Points
32
Joystick
USB based joystick supported
Default Protocol
URL command
Recording
Scheduled Recording
Record video with user defined schedule
Event Recording
Record video when the alarm event is triggered, including the pre-event buffered video clip
Bufferless Recording
Event recording without pre-event buffered video clip; no streaming in normal mode; saves bandwidth
Manual Recording
Instant recording upon mouse click
Recording Frame Rate
Max 1920 fps total; Max 30 fps per camera
Maximum Recording Throughput
320 Mbps
Storage
Interface
Serial ATA
HDD Bay
Maximum 6 disks (disks not included)
RAID Level
RAID 0, 1, 5, 10
Search & Playback
Time Based Video Search
Search video recordings by time, channel or bookmark
Event Based Video Search
Search alarm triggered video recordings
Activity and Status Log Search
Search for log of video loss/recovery, network disconnect/reconnect, alarm events, user activity; export of all logs
Playback Control
Forward and backward playback with speeds 1x-500x; pause; stop
Synchronized Playback
4 channels
Manual Snapshot
Create snapshot from playback for export
Digital Zoom
Zoom in/out digitally by PiP (Picture-in-Picture)
Video Cropping
Crop a short video clip from long recording file and save it as an independent file
Video Export
Export video clips in AVI format; text overlay supported
Event Management
Event Trigger
Video motion detection; External device through digital input; Video loss and recovery; Network loss and recovery
Event Response
Record video; Play alert beep; Activate external device through digital output; Upload snapshot to FTP server;
E-mail notification with snapshots; Event logging
Manual Event
Manually activate external devices through digital output via live view monitor
System
Permission Control
Unlimited number of users, multi-level permission, camera group permission for different users
Data Backup
By external DVD drive (optional)
Operating System
Embedded Linux
System Status Monitor
Real time status reports on remote browser
Language
Multi-language support
Remote Access
PC Web Browser
Microsoft Internet Explorer 8.0 or 9.0 with live view, PTZ, playback, setup
Mobile Client Program
Mobile device application (MobileGo!) supporting live view, NVR layouts, PTZ control, event or time based search and
playback, Supported devices: iPhone, iPad, iPod
Hardware
Dimensions (W x H x D)
482.6 mm x 88 mm x 545 mm (19” x 3.46” x 21.4”); Rack-mountable (2U)
Weight
11.2 kg (24.64 lb) without HDD
Operating Temperature
0 ℃~ 40 ℃(32 ℉ ~ 104 ℉)
Operating Humidity
10% ~ 85% RGH
Power Source / Consumption
110V~220V AC 50/60Hz / 350 W
Approvals
CE, FCC (Part 15B Class A), LVD
USB
USB 2.0, 6 ports
Ethernet Port
2, Ethernet (1000 Base-T), RJ-45 connector
System Requirements*
Remote Client PC
1-16 channels: Intel Core 2 Quad 2.66 GHz, 32/64-bit, 4GB RAM;
17-64 channels: Intel Core i7-920 2.67 GHz 64-bit, 6GB RAM
Client PC Operating System
32/64 bit: Windows 7 (all versions), Windows Server 2008 (all versions), Windows Vista (all versions),
Windows Server 2003 (all versions), Windows XP (all versions)
Browser
Microsoft Internet Explorer 8.0 or 9.0
Integration
Unified Solution
Fully compatible with ACTi cameras, encoders and CMS v2.0
Camera Integration
Open platform
ISV CMS Integration
Software Development Kit (SDK) available
* These specifications are based on following camera settings--Scenario 1: 1280x1024, 3Mbps, 18fps, MPEG-4; Scenario 2: 1280x1024, 1.5Mbps, 18fps,
H.264.H.264. In case of high number of channels, you may use "Decode I" mode on live view.
For more details about system requirements, please refer to Project Planner on www.acti.com

www.acti.com
XNR-4200 User’s Manual 1.02.13
7
Physical Description
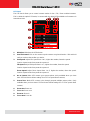
Front View (Panel Closed)
1. Front Panel Nut: The Front Panel contains sponge filters to keep dust away from the
interior of the device. Front Panel is secured to the main body via the Front Panel Nuts.
Rotate them counterclockwise to open, clockwise to lock in place.
2. Rack Mount Ear: XNR-4200 is designed to be used in the control room and mounted on
server racks. The device is attached to standard rack via the Rack Mount Ears.
3. LED Indicators: The LED indicators show the current device status.
-- Power Status LED: The Red light to the left, indicates that the device is powered.
-- HDD Status LED: The central light, indicates HD access status.
-- System Status LED: The yellow light to the right, indicates the system service status. If it
is lit continuously, the system is running and hard drives are operating normally, recording may
proceed. If the disks are not ready for recording, then the yellow light will continue flashing.
Open
Open
Rack Mount
Ear
Front Panel Nut
LED indicators

www.acti.com
XNR-4200 User’s Manual 1.02.13
8
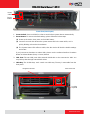
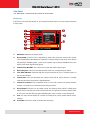
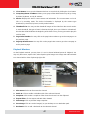
Front View (Panel Open)
1. Power Switch: Press and hold for a few seconds before system reboots automatically
2. Reset Button: To restore to default settings, please follow the below steps:
(1) Power on the device, then press and hold this button.
(2) Count 45 seconds and observe the system status LED in the mean while, as it is
quickly blinking, release the Reset button.
(3) The System Status LED will turn stable, then the device will load the default settings
and restart.
If you just want to shutdown or reboot XNR, please use the software interface Shutdown
Button or Reboot Button (Setup→Power) instead.
3. USB Port: The two USB ports allow external DVD-ROMs to be connected to XNR. You
may backup data through external DVD drives.
4. HDD Bay: The 6 HDD bays each contain one HDD tray. The tray is removable from the
front panel.
Power
Switch
Reset
Button
USB Port
HDD Bays
Slide Lock Tab
Hinged Insert Tab
Locking
Keyhole

www.acti.com
XNR-4200 User’s Manual 1.02.13
9
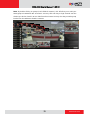
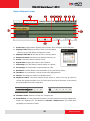
Back View
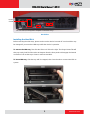
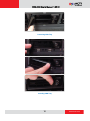
Installing the Hard Disk
Before removing the HDD trays, please make sure the device is turned off. Your hard disks may
be damaged if you move the HDD trays while the device is operation.
To remove the HDD tray, first slide the Slide Lock Tab to the right. The Hinged Insert Tab will
then pop out by itself. Pull the tab to 90 degrees from the front panel to disengage the internal
connection. Pull out the tray to insert or remove Hard Disk.
To insert HDD tray, slide the tray until it is stopped, then close the tab to connect Hard disk to
system.
Power
Socket
Ethernet Port 1
Ethernet Port 2
RS-232 Port (For Diagnostic Adapter Connection Only)


www.acti.com
XNR-4200 User’s Manual 1.02.13
11
Turning On / Off or Rebooting the device
1. To turn on your XNR, press down the Power-On Button on the front side.
2. To turn off or reboot, go to Setup→Power, and click “Shutdown” to turn off your XNR or
“Reboot” to reboot it.
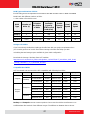
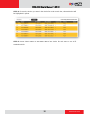
System Requirements
XNR-4200 itself is a self-contained unit. The system requirement here applies only to the
Client PC used to view video and access settings.
PC Specifications
1-16 channels
17-64 channels
CPU
Intel Core 2 Quad 2.66 GHz, 32/64-bit
Intel Core i7-920 2.67 GHz 64-bit
Memory
4GB RAM
6GB RAM
Operating System
32/64 bit: Windows 7 (all versions), Windows Server 2008 (all versions),
Windows Vista (all versions), Windows Server 2003 (all versions), Windows
XP (all versions)
Browser
Microsoft Internet Explorer 8.0 or 9.0
These specifications are based on following camera settings:
Scenario 1: 1280x1024, 3Mbps, 18fps, MPEG-4;
Scenario 2: 1280x1024, 1.5Mbps, 18fps, H.264.
In case of high number of channels, you may use "Decode I" mode on live view. For more
details about system requirements, please refer to Project Planner on www.acti.com

www.acti.com
XNR-4200 User’s Manual 1.02.13
12
Installation
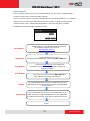
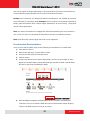
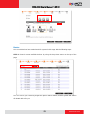
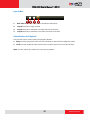
Connecting to Network
Connect XNR-4200 to your network via the two Ethernet Ports as shown in the Physical
Descriptions section.
Standalone NVR will first try to get an IP address assigned by your network router / DHCP
server. If your network does not assign IP address automatically, then Ethernet Port 1 will
assume IP address 192.168.0.10 while Ethernet Port 2 will use IP address 192.168.1.10.
Accessing XNR-4200 by IE
If you know the IP address and port number of the standalone NVR, you may also type in the
IP address and port number directly into Internet Explorer. Sample IP will look like this:
http://192.168.0.10:80/
Input the NVR‟s IP Address and Port Number in IE URL Bar
Ethernet Port 1
Ethernet Port 2
Get IP address from
network router via DHCP
Use IP Address
assigned by
network router
Use Static IP
192.168.0.10
IP Address available
from network router
IP Address
not available
Use Static IP
192.168.1.10

www.acti.com
XNR-4200 User’s Manual 1.02.13
13
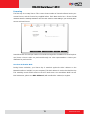
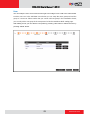
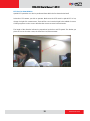
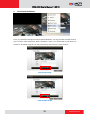
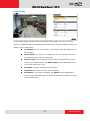
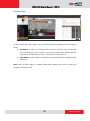
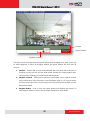
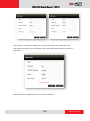
Accessing XNR-4200 by UPnP
XNR-4200 supports UPnP connection. This means that once the device has an IP address,
you will be able to find it in the local network in Windows Explorer → Network. Please note that
your PC must be in the same subnet as the Standalone NVR. A sample screen (in windows 7)
is shown below. Double-click the icon to log into Standalone NVR.
Next to the XNR-4200 title, the MAC address to this Standalone NVR is shown here. You will
need to provide this MAC address to your sales representative if you are registering offline. If
you have internet connection and choose to register online, then you don‟t need to worry about
the MAC address.
XNR-4200 Detected over Local Network by UPnP
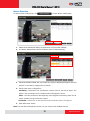
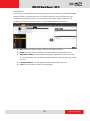
If your default browser is other than IE8.0 or 9.0, right-click on the icon to bring up the context
menu, and select “Properties”, find the IP address and port number next to “Device Webpage”
and input them in your IE browser.
The IP Address and Port Number

www.acti.com
XNR-4200 User’s Manual 1.02.13
14
Disabling UAC in Windows Vista and Windows 7
UAC (User Access Control) is a security setting that restricts access in Microsoft Windows
Vista and Windows 7. You must disable UAC before starting using XNR-4200 in these two
operation systems.
Disabling UAC in Windows Vista
1. Go to Start , then enter Control Panel.
2. In Search box, type “uac”.
3. Click “Turn User Account Control (UAC) on or off”.
4. Uncheck the “Use User Account Control (UAC) to help protect your computer” to
turn off UAC, then click “OK”.
5. Restart your PC to have the change take effect.
Disabling UAC in Windows 7
1. Go to Start , then enter Control Panel.
2. In Search box, type “uac”.
3. Click “Change User Account Control settings”.
4. On the pop-up window, drag the slider to “Never notify” position, and then click “OK”.
5. Restart your PC to have the change take effect.

www.acti.com
XNR-4200 User’s Manual 1.02.13
15
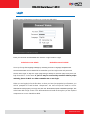
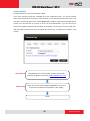
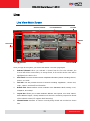
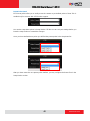
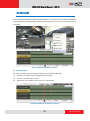
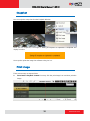
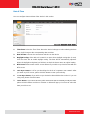
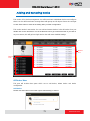
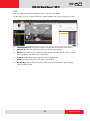
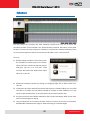
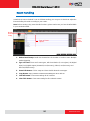
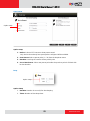
Login
A login screen will welcome you when you connect to XNR-4200.
Enter your Account and Password then click the “Login” button to Login.
Default Account: Admin Default Password: 123456
You may change the language settings by selecting from the “Language” dropdown list.
Check “Remember me” for XNR-4200 to remember your last Login name and password.
Check “Auto Login” to skip the Login page and go directly to the main page every time you
login from this PC in the future. If your PC may be accessed by someone without proper
authority, please do NOT use either remember me or auto login.
When you are logging in for the first time, or when you have just upgraded your firmware, you
will be prompted to install ActiveX components. You must accept the install to access
Standalone NVR properly. You may also click the “Download ActiveX installation package” link
at the lower left of login screen. This will download and install file that gives you the required
components to access Standalone NVR.


www.acti.com
XNR-4200 User’s Manual 1.02.13
18
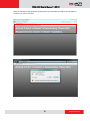
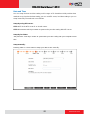
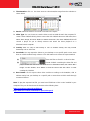
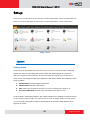
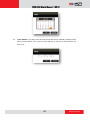
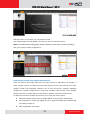
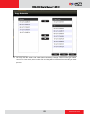
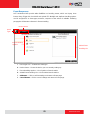
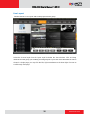
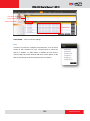
Setup Wizard
Once you connected to Standalone NVR, Setup Wizard will guide you through the initial setup
process. The setup wizard will also show up if you delete all devices from device list in the
future. You may click “Previous” or “Next” button located to the lower right at any time. This will
skip the current step so that you may come back to it later. All the settings in the setup wizard
are available in the Setup tab from Standalone NVR web interface.
If you want to exit this wizard, click the “Done” bubble on upper right corner to directly start
using XNR-4200.

www.acti.com
XNR-4200 User’s Manual 1.02.13
19
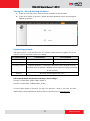
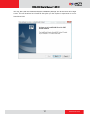
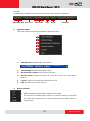
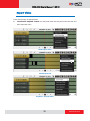
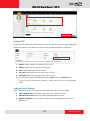
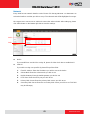
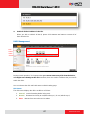
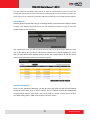
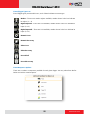
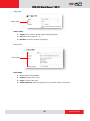
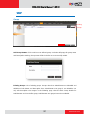
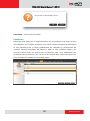
Licensing
The first step is to setup license. This screen shows number of channels allowed under your
current license, and the license keys applied before. Each New device has a license for 16
channels which is already activated. You can click “Next” to next setting if you currently don‟t
want to add new license.
Standalone NVR licensed per number of channels managed. Each additional channel requires
one license. License codes are purchased through our sales representatives. Contact your
distributor for purchase info.
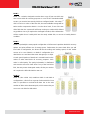
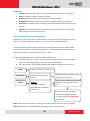
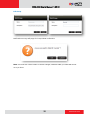
How does Activation Work
During license activation, your license key is matched against the MAC address on the
Network Interface Card (NIC) on your computer. This MAC address is used as the Machine Key.
This matching record will be stored on the ACTi web server. Your standalone NVR has two
MAC Addresses, please use MAC Address 1 (with smaller MAC address) to register.

www.acti.com
XNR-4200 User’s Manual 1.02.13
20
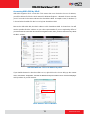
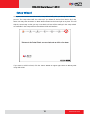
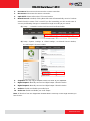
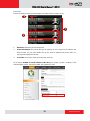
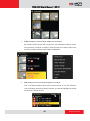
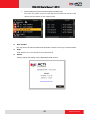
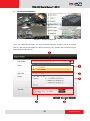
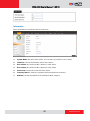
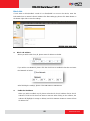
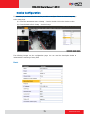
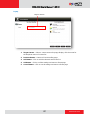
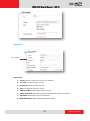
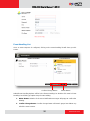
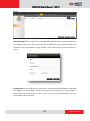
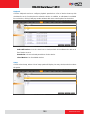
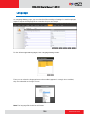
Online Activation
Requires Internet access from standalone NVR.
If you have Internet connection available from your Standalone NVR, you should register
online. After obtaining the license for more channels, log in standalone NVR from local or via
web client, click SetupLicense “Online Registration” button to enter license key directly into
system. You need to have an account on ACTi.com for authentication. If you do not have an
account yet, please click the blue link below and register your account, once you click “OK”,
XNR-4200 will connect to the server to register the license key, and allow more cameras in the
system.
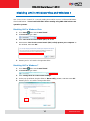
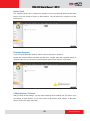
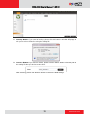
ACTi Website
SNVR Setup
Membership ID in ACTi Member Center is required for
activation. Register one for free at http://member.acti.com/
Setup License. Select “Online Registration”. Enter your
license key, member ID and password, click “Apply”.
Done!
Page is loading ...
Page is loading ...
Page is loading ...
Page is loading ...
Page is loading ...
Page is loading ...
Page is loading ...
Page is loading ...
Page is loading ...
Page is loading ...
Page is loading ...
Page is loading ...
Page is loading ...
Page is loading ...
Page is loading ...
Page is loading ...
Page is loading ...
Page is loading ...
Page is loading ...
Page is loading ...
Page is loading ...
Page is loading ...
Page is loading ...
Page is loading ...
Page is loading ...
Page is loading ...
Page is loading ...
Page is loading ...
Page is loading ...
Page is loading ...
Page is loading ...
Page is loading ...
Page is loading ...
Page is loading ...
Page is loading ...
Page is loading ...
Page is loading ...
Page is loading ...
Page is loading ...
Page is loading ...
Page is loading ...
Page is loading ...
Page is loading ...
Page is loading ...
Page is loading ...
Page is loading ...
Page is loading ...
Page is loading ...
Page is loading ...
Page is loading ...
Page is loading ...
Page is loading ...
Page is loading ...
Page is loading ...
Page is loading ...
Page is loading ...
Page is loading ...
Page is loading ...
Page is loading ...
Page is loading ...
Page is loading ...
Page is loading ...
Page is loading ...
Page is loading ...
Page is loading ...
Page is loading ...
Page is loading ...
Page is loading ...
Page is loading ...
Page is loading ...
Page is loading ...
Page is loading ...
Page is loading ...
Page is loading ...
Page is loading ...
Page is loading ...
Page is loading ...
Page is loading ...
Page is loading ...
Page is loading ...
Page is loading ...
Page is loading ...
Page is loading ...
Page is loading ...
Page is loading ...
Page is loading ...
-
 1
1
-
 2
2
-
 3
3
-
 4
4
-
 5
5
-
 6
6
-
 7
7
-
 8
8
-
 9
9
-
 10
10
-
 11
11
-
 12
12
-
 13
13
-
 14
14
-
 15
15
-
 16
16
-
 17
17
-
 18
18
-
 19
19
-
 20
20
-
 21
21
-
 22
22
-
 23
23
-
 24
24
-
 25
25
-
 26
26
-
 27
27
-
 28
28
-
 29
29
-
 30
30
-
 31
31
-
 32
32
-
 33
33
-
 34
34
-
 35
35
-
 36
36
-
 37
37
-
 38
38
-
 39
39
-
 40
40
-
 41
41
-
 42
42
-
 43
43
-
 44
44
-
 45
45
-
 46
46
-
 47
47
-
 48
48
-
 49
49
-
 50
50
-
 51
51
-
 52
52
-
 53
53
-
 54
54
-
 55
55
-
 56
56
-
 57
57
-
 58
58
-
 59
59
-
 60
60
-
 61
61
-
 62
62
-
 63
63
-
 64
64
-
 65
65
-
 66
66
-
 67
67
-
 68
68
-
 69
69
-
 70
70
-
 71
71
-
 72
72
-
 73
73
-
 74
74
-
 75
75
-
 76
76
-
 77
77
-
 78
78
-
 79
79
-
 80
80
-
 81
81
-
 82
82
-
 83
83
-
 84
84
-
 85
85
-
 86
86
-
 87
87
-
 88
88
-
 89
89
-
 90
90
-
 91
91
-
 92
92
-
 93
93
-
 94
94
-
 95
95
-
 96
96
-
 97
97
-
 98
98
-
 99
99
-
 100
100
-
 101
101
-
 102
102
-
 103
103
-
 104
104
-
 105
105
-
 106
106


ACTi XNR-4200 V1.02.13 User manual
- Category
- Digital Video Recorders (DVR)
- Type
- User manual
Ask a question and I''ll find the answer in the document
Finding information in a document is now easier with AI
Related papers
-
ACTi S1.01.30 Camera Firmware Manual
-
-
-
-
-
ACTi B419-P2 Firmware User manual
-
-
-
-
Other documents
-
Araknis Networks AN-700-AP-O-AC User guide
-
Zavio S5040 User manual
-
 DMP Electronics SecureCom V-4408D User manual
-
Voyager DVR4100 Reference guide
-
EverFocus NVR User manual
-
-
Dlink DNS-726-4 Owner's manual
-
D-Link DNS-722-4 User manual
-
 Digital Watchdog DW-PIVOT HYBRID CMS User manual
-
Control4 LUM-X10-PTZ-IP Owner's manual

