Page is loading ...

Projector
PH1202HL1
User’s Manual
Model No.
NP-PH1202HL1

Ver. 1 12/15
• Apple,Mac,MacOSX,andMacBookaretrademarksofAppleInc.registeredintheU.S.andothercountries.
• Microsoft,Windows,WindowsVista, Internet Explorer,.NETFrameworkandPowerPointareeitheraregistered
trademarkortrademarkofMicrosoftCorporationintheUnitedStatesand/orothercountries.
• MicroSaverisaregisteredtrademarkofKensingtonComputerProductsGroup,adivisionofACCOBrands.
• Adobe,AdobePDF,AdobeReader,andAcrobatareeitherregisteredtrademarksortrademarksofAdobeSystems
IncorporatedintheUnitedStatesand/orothercountries.
• VirtualRemoteToolusesWinI2C/DDClibrary,©NicomsoftLtd.
• HDMI,theHDMILogoandHigh-DenitionMultimediaInterfacearetrademarksorregisteredtrademarksofHDMI
LicensingLLC.
• DisplayPortandDisplayPortComplianceLogoaretrademarksownedbytheVideoElectronicsStandardsAssocia-
tion.
• HDBaseT™isatrademarkofHDBaseTAlliance.
• DLPisatrademarkofTexasInstruments.
• TrademarkPJLinkisatrademarkappliedfortrademarkrightsinJapan,theUnitedStatesofAmericaandother
countriesandareas.
• Blu-rayisatrademarkofBlu-rayDiscAssociation
• CRESTRONandROOMVIEWareregisteredtrademarksofCrestronElectronics,Inc.intheUnitedStatesandother
countries.
• EthernetiseitheraregisteredtrademarkortrademarkofFujiXeroxCo.,Ltd.
• Otherproductsandcompanynamesmentionedinthisuser’smanualmaybethetrademarksorregisteredtrade-
marksoftheirrespectiveholders.
• TOPPERSSoftwareLicenses
TheproductincludessoftwarelicensedunderTOPPERSLicense.
Formoreinformationoneachsoftware,see“readme_English.pdf”insidethe“aboutTOPPERS”folderonthesup-
pliedCD-ROM.
NOTES
(1)Thecontentsofthisuser’smanualmaynotbereprintedinpartorwholewithoutpermission.
(2)Thecontentsofthisuser’smanualaresubjecttochangewithoutnotice.
(3)Greatcarehasbeentakeninthepreparationofthisuser’smanual;however,shouldyounoticeanyquestionable
points,errorsoromissions,pleasecontactus.
(4)Notwithstandingarticle(3),NECwillnotberesponsibleforanyclaimsonlossofprotorothermattersdeemed
toresultfromusingtheProjector.

i
Important Information
Safety Cautions
Precautions
PleasereadthismanualcarefullybeforeusingyourNECprojectorandkeepthemanualhandyforfuturereference.
CAUTION
Toturnoffmainpower,besuretoremovetheplugfrompoweroutlet.
Thepoweroutletsocketshouldbeinstalledasneartotheequipmentaspossible,andshouldbeeasily
accessible.
CAUTION
TOPREVENTSHOCK,DONOTOPENTHECABINET.
THEREAREHIGH-VOLTAGECOMPONENTSINSIDE.
REFERSERVICINGTOQUALIFIEDSERVICEPERSONNEL.
Thissymbolwarnstheuserthatuninsulatedvoltagewithintheunitmaybesufcienttocauseelectrical
shock.Therefore,itisdangeroustomakeanykindofcontactwithanypartinsideoftheunit.
Thissymbolalertstheuserthatimportantinformationconcerningtheoperationandmaintenanceofthis
unithasbeenprovided.
Theinformationshouldbereadcarefullytoavoidproblems.
WARNING:TOPREVENTFIREORSHOCK,DONOTEXPOSETHISUNITTORAINORMOISTURE.
DONOTUSETHISUNIT’SPLUGWITHANEXTENSIONCORDORINANOUTLETUNLESSALLTHEPRONGS
CANBEFULLYINSERTED.
DOC Compliance Notice (for Canada only)
ThisClassAdigitalapparatusmeetsallrequirementsoftheCanadianICES-003Standards.
WARNING
ThisisaClassAproduct.Inadomesticenvironmentthisproductmaycauseradiointerferenceinwhichcasethe
usermayberequiredtotakeadequatemeasures.
CAUTION
• Inordertoreduceanyinterferencewithradioandtelevisionreceptionuseasignalcablewithferritecoreattached.
Useofsignalcableswithoutaferritecoreattachedmaycauseinterferencewithradioandtelevisionreception.
• ThisequipmenthasbeentestedandfoundtocomplywiththelimitsforaClassAdigitaldevice,pursuanttoPart
15oftheFCCRules.Theselimitsaredesignedtoprovidereasonableprotectionagainstharmfulinterference
whentheequipmentisoperatedinacommercialenvironment.Thisequipmentgenerates,uses,andcanradi-
ateradiofrequencyenergyand,ifnotinstalledandusedinaccordancewiththeinstallationmanual,maycause
harmfulinterferencetoradiocommunications.Operationofthisequipmentinaresidentialareaislikelytocause
harmfulinterferenceinwhichcasetheuserwillberequiredtocorrecttheinterferenceathisownexpense

ii
Important Information
WARNING TO CALIFORNIA RESIDENTS:
Handlingthecablessuppliedwiththisproductwillexposeyoutolead,achemicalknowntotheStateofCalifornia
tocausebirthdefectsorotherreproductiveharm.WASHHANDSAFTERHANDLING.
Important Safeguards
Thesesafetyinstructionsaretoensurethelonglifeofyourprojectorandtopreventreandshock.Pleasereadthem
carefullyandheedallwarnings.
Installation
• Consultyourdealerforinformationabouttransportingandinstallingtheprojector.Donotattempttotransportand
installtheprojectoryourself.Theprojectormustbeinstalledbyqualiedtechniciansinordertoensureproperop-
erationandreducetheriskofbodilyinjury.
• Donotplacetheprojectorinthefollowingconditions:
- onanunstablecart,stand,ortable.
- nearwater,baths,ordamprooms.
- indirectsunlight,nearheaters,orheatradiatingappliances.
- inadusty,smokyorsteamyenvironment.
- onasheetofpaperorcloth,rugsorcarpets.
• Donotinstallandstoretheprojectorinthebelowcircumstances.Failuretodosomaycauseofmalfunction.
- Inpowerfulmagneticelds
- Incorrosivegasenvironment
- Outdoors
• Ifyouwishtohavetheprojectorinstalledontheceiling:
- Donotattempttoinstalltheprojectoryourself.
- Theprojectormustbeinstalledbyqualiedtechniciansinordertoensureproperoperationandreducetherisk
ofbodilyinjury.
- Inaddition,theceilingmustbestrongenoughtosupporttheprojectorandtheinstallationmustbeinaccordance
withanylocalbuildingcodes.
- Pleaseconsultyourdealerformoreinformation.

iii
Important Information
WARNING
• Donotcoverthelenswiththelenscaporequivalentwhiletheprojectorison.Doingsocanleadtomeltingof
thecapduetotheheatemittedfromthelightoutput.
• Donotplaceanyobjects,whichareeasilyaffectedbyheat,infrontoftheprojectorlens.Doingsocouldlead
totheobjectmeltingfromtheheatthatisemittedfromthelightoutput.
Donotusetheprojectorwithitleaningtotheleftandright.Thismayresultinamalfunction,however,portraitinstal-
lation*ispossible.Pleasereadthewarningsconcerningportraitorientationbeforesettingtheprojectorinportrait
orientation.(→page140)
Fire and Shock Precautions
• Ensurethatthereissufcientventilationandthatventsareunobstructedtopreventthebuild-upofheatinsideyour
projector.Allowenoughspacebetweenyourprojectorandawall.(→pageix)
• Preventforeignobjectssuchaspaperclipsandbitsofpaperfromfallingintoyourprojector.Donotattempttoretrieve
anyobjectsthatmightfallintoyourprojector.Donotinsertanymetalobjectssuchasawireorscrewdriverintoyour
projector.Ifsomethingshouldfallintoyourprojector,disconnectitimmediatelyandhavetheobjectremovedbya
qualiedservicepersonnel.
• Donotplaceanyobjectsontopoftheprojector.
• Donottouchthepowerplugduringathunderstorm.Doingsocancauseelectricalshockorre.
• Theprojectorisdesignedtooperateonapowersupplyof200-240VAC50/60Hz.Ensurethatyourpowersupply
tsthisrequirementbeforeattemptingtouseyourprojector.
• Donotlookintothelightsourceusingopticalinstruments(suchasmagnifyingglassesandmirrors).Visualimpair-
mentcouldresult.
• Donotusethemalfunctionedprojector.Itmaycauseofnotonlyelectricshockorrebutalsoseriousdamageto
youreyesight.
• Ifdamageormalfunctionoftheprojectorisfound,immediatelystoptouseitandconsultyourdealerforrepair.
• Neverdisassemble,repair,andremodelbyendusers.Iftheseareperformedbyendusers,itmaycauseofserious
problemonusers'safety.
• Consultyourdealerfordisposingtheprojector.Neverdisassembletheprojectorbeforedisposingit.

iv
Important Information
• Handlethepowercordcarefully.Adamagedorfrayedpowercordcancauseelectricshockorre.
- Donotuseanypowercordotherthantheonesuppliedwiththeprojector.
- Donotbendortugthepowercordexcessively.
- Donotplacethepowercordundertheprojector,oranyheavyobject.
- Donotcoverthepowercordwithothersoftmaterialssuchasrugs.
- Donotheatthepowercord.
- Donothandlethepowerplugwithwethands.
• Turnofftheprojector,unplugthepowercordandhavetheprojectorservicedbyaqualiedservicepersonnelunder
thefollowingconditions:
- Whenthepowercordorplugisdamagedorfrayed.
- Ifliquidhasbeenspilledintotheprojector,orifithasbeenexposedtorainorwater.
- Iftheprojectordoesnotoperatenormallywhenyoufollowtheinstructionsdescribedinthisuser’smanual.
- Iftheprojectorhasbeendroppedorthecabinethasbeendamaged.
- Iftheprojectorexhibitsadistinctchangeinperformance,indicatinganeedforservice.
• Disconnectthepowercordandanyothercablesbeforecarryingtheprojector.
• Movingtheprojectorrequiresfourpeopleormore.Besuretormlygripthefrontandbackhandles,thenmovethe
projector.
• Turnofftheprojectorandunplugthepowercordbeforecleaningthecabinet.
• Turnofftheprojectorandunplugthepowercordiftheprojectorisnottobeusedforanextendedperiodoftime.
• WhenusingaLANcable:
Forsafety,donotconnecttotheterminalforperipheraldevicewiringthatmighthaveexcessivevoltage.
CAUTION
• Keephandsawayfromthelensmountingportionwhilethelensshiftisinoperation.Failuretodosocouldresult
inngersbeingpinchedbetweenthecabinetandlenscover.
• Donotusetheleveladjusterforpurposesotherthanoriginallyintended.
• Ifasafetycover(soldseparately)isused,donotcarrytheprojectorbythecover.Thesafetycovercancomeoff
andtheprojectormaybedropped,causingpersonalinjury.
• Donotunplugthepowercordfromthewalloutletorprojectorwhentheprojectorispoweredon.Doingsocan
causedamagetotheACINterminaloftheprojectorand(or)theprongplugofthepowercord.
ToturnofftheACpowersupplywhentheprojectorispoweredon,usetheprojector’smainpowerswitch,apower
stripequippedwithaswitch,orabreaker.
Precautions when installing or replacing the lens unit sold separately (LENS
CALIBRATION)
Afterinstallingorreplacingthelensunit,presseithertheLENSCALIBRATIONbuttononthemainunitortheINFO/L-
CALIB.buttonwhilepressingtheCTLbuttonontheremotecontroltocarryout[LENSCALIBRATION].(→page16,106)
Bycarryingout[LENSCALIBRATION],theadjustmentrangeofthezoomandfocusofthe[LENSMEMORY]iscalibrated.
Contactyourdealertoinstallandreplacethelensunit.
Caution on Handling the Optional Lens
Whenshippingtheprojectorwiththelens,removethelensbeforeshippingtheprojector.Alwaysattachthedustcap
tothelenswheneveritisnotmountedontheprojector.Thelensandthelensshiftmechanismmayencounterdamage
causedbyimproperhandlingduringtransportation.Ifyouneedtoremovethelensunit,contactyourdealer.
v
Important Information
Remote Control Precautions
• Handletheremotecontrolcarefully.
• Iftheremotecontrolgetswet,wipeitdryimmediately.
• Avoidexcessiveheatandhumidity.
• Donotshort,heat,ortakeapartbatteries.
• Donotthrowbatteriesintore.
• Ifyouwillnotbeusingtheremotecontrolforalongtime,removethebatteries.
• Ensurethatyouhavethebatteries’polarity(+/−)alignedcorrectly.
• Donotusenewandoldbatteriestogether,orusedifferenttypesofbatteriestogether.
• Disposeofusedbatteriesaccordingtoyourlocalregulations.
Light Module
1. Alightmodulecontainingmultiplelaserdiodesisequippedintheproductasthelightsource.
2. Theselaserdiodesaresealedinthelightmodule.Nomaintenanceorserviceisrequiredfortheperformanceof
thelightmodule.
3. Enduserisnotallowedtoreplacethelightmodule.
4. Contactqualieddistributorforlightmodulereplacementandfurtherinformation.
Laser Safety Caution
ThisproductsisclassiedasClass3RofIEC60825-1
Secondedition2007-03.Also complieswithFDAperformancestandards21 CFR 1040.10and1040.11 forlaser
productsexceptfordeviationspursuanttoLaserNoticeNo.50,datedJune24,2007.Obeythelawsandregulations
ofyourcountryinrelationtotheinstallationandmanagementofthedevice.
CAUTION
• Useofcontrolsoradjustmentsorperformanceofproceduresotherthanthosespeciedhereinmayresultin
hazardousradiationexposure.
CAUTION – CLASS 3R LASER PRODUCT
LASERLIGHT–AVOIDDIRECTEYEEXPOSURE
• Donotlookintothelenswhiletheprojectorison.Seriousdamagetoyoureyescouldresult.
• Keepanyitemssuchasmagnifyingglassoutofthelightpathoftheprojector.Thelightbeingprojectedfromthe
lensisextensive,thereforeanykindofabnormalobjectsthatcanredirectlightcomingoutofthelens,cancause
unpredictableoutcomesuchasreorinjurytotheeyes.
• Whenturningontheprojector,ensurethatnobodyisfacingtowardsthelensinthepathofthelightemittedfrom
thelaser.

vi
Important Information
Laser aperture and warning labels on the projector
Laser aperture
NonaccessibleInternalLaserParameters
Wavelength 462nm
Laserpowerforclassication <220mW
Totalinternallaserpower <56W
Divergence ±12 - 35°
Modeofoperation CW
Negativemodulation,duetoframerate 23-192Hz

vii
Important Information
About High Altitude mode
• Usingtheprojectorathighlandscanshortenthelifeofopticalcomponentssuchasthelightmodule.
About Copyright of original projected pictures:
Pleasenotethatusingthisprojectorforthepurposeofcommercialgainortheattractionofpublicattentioninavenue
suchasacoffeeshoporhotelandemployingcompressionorexpansionofthescreenimagewiththefollowingfunc-
tionsmayraiseconcernabouttheinfringementofcopyrightswhichareprotectedbycopyrightlaw.
[ASPECTRATIO],[KEYSTONE],Magnifyingfeatureandothersimilarfeatures.
Thisdeviceisnotintendedforuseinthedirecteldofviewatvisualdisplayworkplaces.Toavoidincommodingreec-
tionsatvisualdisplayworkplacesthisdevicemustnotbeplacedinthedirecteldofview.

viii
Important Information
Health precautions to users viewing 3D images
Beforeviewing,besuretoreadhealthcareprecautionsthatmaybefoundintheuser’smanualincludedwithyour3D
eyeglassesoryour3DcompatiblecontentsuchasBlu-rayDiscs,videogames,computer’svideolesandthelike.
Toavoidanyadversesymptoms,heedthefollowing:
• Donotuse3Deyeglassesforviewinganymaterialotherthan3Dimages.
• Allowadistanceof2m/7feetorgreaterbetweenthescreenandauser.Viewing3Dimagesfromtooclosea
distancecanstrainyoureyes.
• Avoidviewing3Dimagesforaprolongedperiodoftime.Takeabreakof15minutesorlongeraftereveryhour
ofviewing.
• Ifyouoranymemberofyourfamilyhasahistoryoflight-sensitiveseizures,consultadoctorbeforeviewing3D
images.
• Whileviewing3Dimages,ifyougetsicksuchasnausea,dizziness,queasiness,headache,eyestrain,blurry
vision,convulsions,andnumbness,stopviewingthem.Ifsymptomsstillpersist,consultadoctor.
• View3Dimagesfromthefrontofthescreen.Viewingfromananglemaycausefatigueoreyestrain.
Power management function
Inordertokeeppowerconsumptionlow,thefollowingpowermanagementfunctions(1)and(2)havebeensetwhen
shippedfromthefactory.Pleasedisplaytheon-screenmenuandchangethesettings(1)and(2)accordingtothe
aimofusingtheprojector.
1. STANDBY MODE (Factory preset: NORMAL)
• When[NORMAL]isselectedfor[STANDBYMODE],thefollowingterminalsandfunctionswillnotwork:
HDMIOUTterminal,Ethernet/HDBaseTPort,USBPort,LANfunctions,MailAlertfunction
(→page122)
2. AUTO POWER OFF (Factory preset: 1 hour)
• When[1:00]isselectedfor[AUTOPOWEROFF],youcanenabletheprojectortoautomaticallyturnoffin1
hourifthereisnosignalreceivedbyanyinputorifnooperationisperformed.
(→page123)
ix
Important Information
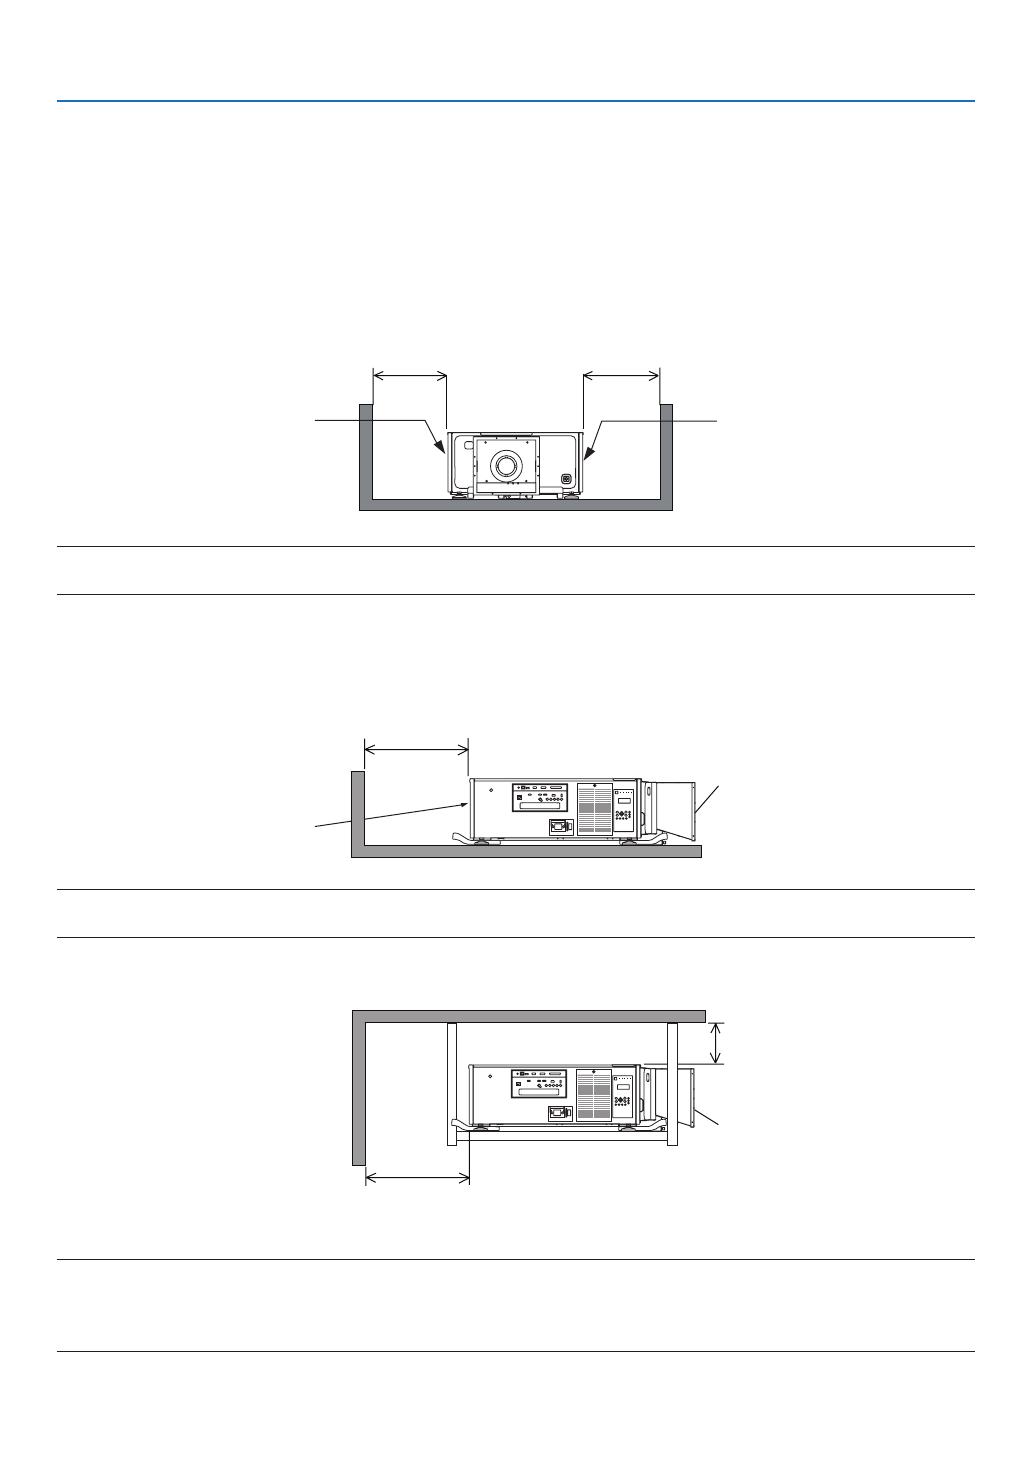
Clearance for Installing the Projector
Allowampleclearancebetweentheprojectoranditssurroundingsasshownbelow.
Thehightemperatureexhaustcomingoutofthedevicemaybesuckedintothedeviceagain.
AvoidinstallingtheprojectorinaplacewhereairmovementfromtheHVACisdirectedattheprojector.
HeatedairfromtheHVACcanbetakeninbytheprojector'sintakevent.Ifthishappens,thetemperatureinsidethe
projectorwillrisetoohighcausingtheover-temperatureprotectortoautomaticallyturnofftheprojectorspower.
• Beforesettingtheprojectorinportraitorientation,pleasereadpage140,Portraitprojection(verticalorientation).
Example 1 – If there are walls on both sides of the projector.
30cm/11.8"orgreater 30cm/11.8"orgreater
IntakeventIntakevent
NOTE:
The drawing shows the proper clearance required for the front, back, and top of the projector.
Example 2 – If there is a wall behind the projector.
(1) For floor installation:
70cm/27.6"orgreater
Lens
Exhaustvent
NOTE:
The drawing shows the proper clearance required for the back, right, left, and top of the projector.
(2) For ceiling mounting:
30cm/12"orgreater
70cm/27.6"orgreater
Lens
NOTE:
1. The drawing shows the proper clearance required for the front, right, left, back, and bottom of the projector.
2. If suspending the projector within the range of 30 cm/12 inches away from the ceiling, allow ample clearance for all four sides
and the under the projector.

x
Table of Contents
Important Information ............................................................................................i
1. Introduction ...........................................................................................................1
❶What’sintheBox? ..........................................................................................................1
❷IntroductiontotheProjector ...........................................................................................2
CongratulationsonYourPurchaseoftheProjector ..................................................2
General .....................................................................................................................2
Lightsource·Brightness ..........................................................................................2
Installation ................................................................................................................. 2
Videos .......................................................................................................................3
Network ..................................................................................................................... 3
Energy-saving ...........................................................................................................3
Aboutthisuser’smanual ........................................................................................... 4
❸PartNamesoftheProjector ...........................................................................................5
Front/Top ...................................................................................................................5
Rear ..........................................................................................................................6
Controls/IndicatorPanel ............................................................................................ 7
TerminalsFeatures ...................................................................................................8
❹PartNamesoftheRemoteControl ................................................................................9
BatteryInstallation ..................................................................................................10
RemoteControlPrecautions ................................................................................... 10
OperatingRangeforWirelessRemoteControl ....................................................... 11
UsingtheRemoteControlinWiredOperation ........................................................ 11
2. Projecting an Image (Basic Operation) ...............................................12
❶FlowofProjectinganImage .........................................................................................12
❷ConnectingYourComputer/ConnectingthePowerCord ..............................................13
UsingthePowerCordFixingMetal ......................................................................... 14
❸TurningontheProjector ...............................................................................................15
PerformingLensCalibration ...................................................................................16
NoteonStartupscreen(MenuLanguageSelectscreen) ....................................... 17
❹SelectingaSource .......................................................................................................18
Selectingthecomputerorvideosource..................................................................18
❺AdjustingthePictureSizeandPosition ........................................................................20
Adjustmentoftheprojector’ssettings(Leveladjusters) .......................................... 21
Adjustingtheverticalpositionofaprojectedimage(Lensshift) .............................22
Focus ......................................................................................................................24
Zoom
....................................................................................................................... 24
❻OptimizingComputerSignalAutomatically ..................................................................25
AdjustingtheImageUsingAutoAdjust ...................................................................25
❼TurningofftheProjector ...............................................................................................26
3. Convenient Features ......................................................................................28
❶Stoppingprojection ....................................................................................................... 28
❷Turningoffthelightsource ...........................................................................................28
❸Lockingtheprojectorsoitcannotbeoperated .............................................................28
❹MutingtheImage(AVMute) ......................................................................................... 29
❺TurningOfftheOn-ScreenMenu(On-ScreenMute) ....................................................29

xi
Table of Contents
❻FreezingaPicture ........................................................................................................29
❼MagnifyingaPicture .....................................................................................................30
❽ChangingLIGHTMODE/CheckingEnergy-SavingEffectUsingLIGHTMODE
[LIGHTMODE]........................................................................................................31
CheckingEnergy-SavingEffect[CARBONMETER] ..............................................33
❾CorrectingHorizontalandVerticalKeystoneDistortion[CORNERSTONE] .................34
❿
PreventingtheUnauthorizedUseoftheProjector[SECURITY] .......................................37
⓫Projecting3Dvideos.....................................................................................................40
Proceduretowatch3Dvideosusingthisprojector .................................................40
Whenvideoscannotbeviewedin3D .....................................................................42
⓬ControllingtheProjectorbyUsinganHTTPBrowser ..................................................43
⓭StoringChangesforLensShift,Zoom,andFocus[LENSMEMORY] .........................49
UsageExample.......................................................................................................49
Tostoreyouradjustedvaluesin[REF.LENSMEMORY]: .......................................49
Tocallupyouradjustedvaluesfrom[REF.LENSMEMORY]: ................................51
4. Multi-Screen Projection ...............................................................................54
❶Thingsthatcanbedoneusingmulti-screenprojection ................................................54
Case1.Usingasingleprojectortoprojecttwotypesofvideos[PIP/PICTURE
BYPICTURE] .........................................................................................................54
Case2.Usingfourprojectors(resolution:FULLHD)toprojectvideoswitha
resolutionof3840×2160pixels[TILING]...............................................................55
Thingstonotewheninstallingprojectors ................................................................ 57
❷DisplayingTwoPicturesattheSameTime ...................................................................58
Projectingtwoscreens ............................................................................................ 59
Switchingthemaindisplaywiththesub-displayandviceversa .............................60
Restrictions .............................................................................................................61
❸DisplayingaPictureUsing[EDGEBLENDING] ...........................................................62
Settingtheoverlapofprojectionscreens ................................................................ 63
BlackLevelAdjustment ...........................................................................................66
5. Using On-Screen Menu .................................................................................68
❶UsingtheMenus ...........................................................................................................68
MenuElements .......................................................................................................69
❷ListofMenuItems ........................................................................................................70
❸MenuDescriptions&Functions[INPUT] ......................................................................76
HDMI ....................................................................................................................... 76
DisplayPort ..............................................................................................................76
BNC ........................................................................................................................76
BNC(CV) .................................................................................................................76
BNC(Y/C) ................................................................................................................76
COMPUTER ...........................................................................................................76
HDBaseT ................................................................................................................76
SLOT ....................................................................................................................... 76
ENTRYLIST ...........................................................................................................76
TESTPATTERN ...................................................................................................... 76
❹MenuDescriptions&Functions[ADJUST] ................................................................... 80
[PICTURE] ..............................................................................................................80
[IMAGEOPTIONS] .................................................................................................84

xii
Table of Contents
[VIDEO] ................................................................................................................... 88
[3DSETTINGS] ......................................................................................................90
UsingtheLensMemoryFunction[LENSMEMORY] ..............................................91
❺MenuDescriptions&Functions[DISPLAY] ..................................................................92
[PIP/PICTUREBYPICTURE] ................................................................................. 92
[GEOMETRICCORRECTION] ...............................................................................94
[EDGEBLENDING] ................................................................................................98
[MULTISCREEN]....................................................................................................99
❻MenuDescriptions&Functions[SETUP] ................................................................... 101
[MENU] .................................................................................................................101
[INSTALLATION] ...................................................................................................103
[CONTROL] ..........................................................................................................107
[NETWORKSETTINGS] ....................................................................................... 115
[SOURCEOPTIONS] ...........................................................................................120
[POWEROPTIONS] .............................................................................................122
ReturningtoFactoryDefault[RESET] ..................................................................124
❼MenuDescriptions&Functions[INFO.] .....................................................................125
[USAGETIME] ......................................................................................................125
[SOURCE(1)] ........................................................................................................125
[SOURCE(2)] ........................................................................................................126
[SOURCE(3)] ........................................................................................................126
[SOURCE(4)] ........................................................................................................126
[WIREDLAN] ........................................................................................................127
[VERSION(1)] .......................................................................................................127
[VERSION(2)] .......................................................................................................127
[OTHERS] .............................................................................................................128
[CONDITIONS] .....................................................................................................128
[HDBaseT] ............................................................................................................128
6. Connecting to Other Equipment ...........................................................129
❶Connectingacomputer ..............................................................................................129
AnalogRGBsignalconnection .............................................................................129
DigitalRGBsignalconnection ..............................................................................130
❷ConnectinganExternalMonitor .................................................................................133
❸ConnectingYourBlu-rayPlayerorOtherAVEquipment ............................................134
ConnectingComponentInput ...............................................................................135
ConnectingHDMIInput.........................................................................................136
❹Connectingadocumentcamera .................................................................................137
❺ConnectingtoaWiredLAN ........................................................................................138
❻ConnectingtoaHDBaseTtransmissiondevice(soldcommercially) .........................139
❼Portraitprojection(verticalorientation) ....................................................................... 140
7. Maintenance .....................................................................................................142
❶CleaningtheFilters.....................................................................................................142
❷CleaningtheProtectionglass ..................................................................................... 146
❸CleaningtheCabinet ..................................................................................................146
8. User Supportware ..........................................................................................147
❶OperatingEnvironmentforUserSupportware ...........................................................147

xiii
Table of Contents
Downloadservice .................................................................................................147
OperatingEnvironment .........................................................................................147
❷InstallingSoftwareProgram .......................................................................................148
InstallationforWindowssoftware .......................................................................... 148
❸OperatingtheProjectorViatheLAN(VirtualRemoteTool) ........................................150
ConnecttheprojectortoaLAN. ............................................................................ 151
❹
ControllingtheProjectoroveraLAN(PCControlUtilityPro4/Pro5) ........................... 153
9. Appendix ..............................................................................................................156
❶Throwdistanceandscreensize .................................................................................156
Lenstypesandthrowdistance .............................................................................156
Tablesofscreensizesanddimensions ................................................................157
Lensshiftingrange ................................................................................................158
❷MountingtheOptionalBoard(soldseparately) ..........................................................159
❸CompatibleInputSignalList .......................................................................................161
❹Specications .............................................................................................................164
❺CabinetDimensions ...................................................................................................167
❻Pinassignmentsandsignalnamesofmainterminals ...............................................169
❼Troubleshooting ..........................................................................................................175
IndicatorMessages ............................................................................................... 175
CommonProblems&Solutions ............................................................................177
Ifthereisnopicture,orthepictureisnotdisplayedcorrectly. ............................... 179
❽PCControlCodesandCableConnection ..................................................................180
❾TroubleshootingCheckList ......................................................................................... 181
1
1. Introduction
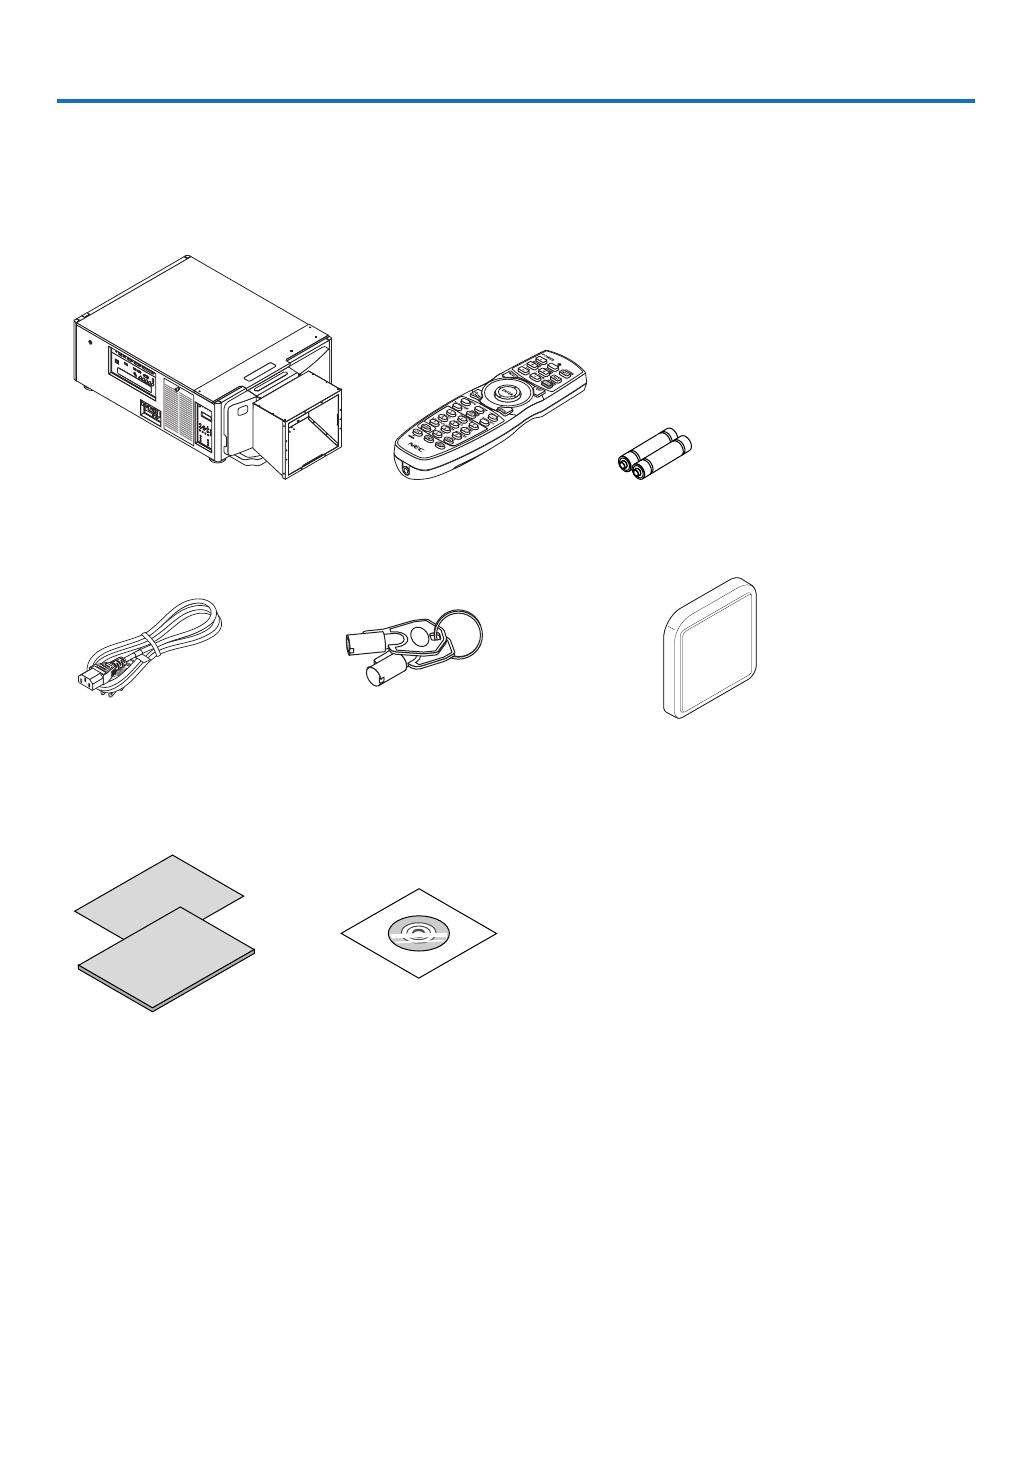
❶ What’s in the Box?
Makesureyourboxcontainseverythinglisted.Ifanypiecesaremissing,contactyourdealer.
Pleasesavetheoriginalboxandpackingmaterialsifyoueverneedtoshipyourprojector.
Projector
* Theprojectorisshippedwithouta
lens.Forthetypesoflensandthrow
distances,seepage156.
Remotecontrol
(7N901041)
AAalkalinebatteries(x2)
Powercord
(US:7N080244)
Servicekeys(2)(24C09081)
WARNING:
Usedbytheservicetechnician.
Donotattempttousebyyourselfasthis
isdangerous.
Glassprotectorcap
• ImportantInfomation
(7N8N6771)
• QuickSetupGuide(ForNorth
America:7N8N6781)
• SecuritySticker
(Usethisstickerwhensecurity
passwordisseton.)
• Limitedwarranty
NECProjectorCD-ROM
User’smanual(PDF)
(7N952401)

2
1. Introduction
❷ Introduction to the Projector
Thissectionintroducesyoutoyournewprojectoranddescribesthefeaturesandcontrols.
Congratulations on Your Purchase of the Projector
Thisprojectorisoneoftheverybestprojectorsavailabletoday.Theprojectorenablesyoutoprojectpreciseimages
upto500inchesacross(measureddiagonally)fromyourPCorMaccomputer(desktopornotebook),VCR,Blu-ray
player,ordocumentcamera.
Youcanusetheprojectoronatabletoporcart,youcanusetheprojectortoprojectimagesfrombehindthescreen,
andtheprojectorcanbepermanentlymountedonaceiling*
1
.Theremotecontrolcanbeusedwirelessly.
*
1
Donotattempttomounttheprojectoronaceilingyourself.
Theprojectormustbeinstalledbyqualiedtechniciansinordertoensureproperoperationandreducetherisk
ofbodilyinjury.
Inaddition,theceilingmustbestrongenoughtosupporttheprojectorandtheinstallationmustbeinaccordance
withanylocalbuildingcodes.Pleaseconsultyourdealerformoreinformation.
General
• Three-chipsDLPprojectorwithhighresolutionandhighbrightness
Realizedtoprojecttheimageintheresolution1920×1080pixels(FullHD),theaspectratioin16:9,andthe
brightnessin12000lm.AbletoprojectFullHDimageinNativeresolution.
• Superiordust-proofstructure
Adaptedthecyclecoolingsystemforcoolingdowntheopticalparts.Bythissystem,airinthelightsourceiscooled
downandcirculated.Astheresult,theopticalpartsarenotexposedtotheopenairandenabletokeepbrightness
withoutcontaminationbydust.
* Cannotpreventcontaminationbydustcompletely.
Light source · Brightness
• Along-lifelaserdiodeisequippedinthelightmodule
Theproductcanbeoperatedatlowcostbecausethelaserlightsourcecanbeusedforalongtimewithoutrequir-
ingreplacementormaintenance.
Moreover,ifthelightmodulelifeoptimizing[LONGLIFE]modeisselected,lightmodulelifecanbeextended.
• Brightnesscanbeadjustedwithinawiderange
Unlikewithordinarylightsources,thebrightnesscanbeadjustedfrom30to100%in1%increments.
• [CONSTANTBRIGHTNESS]mode
Brightnessnormallydecreaseswithuse,butbyselecting[CONSTANTBRIGHTNESS]mode,sensorsinsidethe
projectordetectandautomaticallyadjusttheoutput,therebymaintainingconstantbrightnessthroughoutthelife
ofthelightmodule.
However,ifbrightnessoutputissetatthemaximum,brightnesswilldecreasewithuse.
Installation
• Widerangeofoptionallensesselectableaccordingtotheplaceofinstallation
Thisprojectorsupports4typesofoptionallenses,providingaselectionoflensesadaptedtoavarietyofplaces
ofinstallationandprojectionmethods.Nolensismountedatshippingfromthefactory.Contactyourdealerfor
purchasingandreplacingtheseoptionallensessoldseparately.
• Tilt-free,portraitprojection
Thisprojectorcanbesettoanyanglewithinavertical360°range.
Itcanalsorotatethepicture90°intoportraitorientation,however,itcannotbeinstalledwithrightorleftslant
besidestheportraitprojection.
• Powerlenscontrolforquickandeasyadjustment
Byusingbuttonsontheprojectorortheremotecontrol,zoom,focus,andposition(lensshift)canbeadjusted.

3
1. Introduction
Videos
• Widerangeofinput/outputterminals(HDMI,DisplayPort,HDBaseT,BNC,etc.)
Theprojectorisequippedwithavarietyofinput/outputterminals:HDMI,DisplayPort,HDBaseT,BNC(5-core),
computer(analog),etc.
Theprojector’sHDMIinput/outputterminalsandDisplayPortinputterminalsupportHDCP.
HDBaseT,promotedandadvancedbytheHDBaseTAlliance,isaconnectionstandardforhomeappliances.
• Slotforoptionalboard
Thisprojectorhasaslotforoptionalboards(soldseparately).
• Simultaneousdisplayof2images(PIP/PICTUREBYPICTURE)
Twoimagescanbeprojectedsimultaneouslywithasingleprojector.
Therearetwotypesoflayoutsforthetwoimages:“picture-in-picture”(PIP)inwhichasub-pictureisdisplayed
onthemainpicture,and“picture-by-picture”(PICTUREBYPICTURE)inwhichthemainandsubpicturesare
displayednexttoeachother.
• Multi-screenprojectionusingmultipleprojectors
ThisprojectorisequippedwithmultipleHDMIinput&outputterminalsthatcanconnectmultipleprojectorsina
daisychain.Ahighqualitypictureisachievedbydividingandprojectinghighresolutionvideosamongthevarious
projectors.
Furthermore,theboundariesofthescreensaresmoothedusinganedgeblendingfunction.
• Seamlessswitchfunctionforsmootherscreenchangeswhenswitchingthesignal
Whentheinputconnectorisswitched,theimagedisplayedbeforeswitchingisheldsothatthatthenewimage
canbeswitchedtowithoutabreakduetoabsenceofasignal.
• SupportsHDMI3Dformat
Thisprojectorcanbeusedtowatchvideosin3Dusingcommercially-availableactiveshutter-type3Deyewear
and3DemittersthatsupportXpand3D.
Network
• SupportedbywiredLAN
HDBaseT/EthernetPortVideocanbetransmittedfromacomputerequippedwithaRF-45portthatisconnected
toawiredLANtotheprojector,andtheprojectorcanalsobecontrolledfromthecomputer.
• CRESTRONROOMVIEWcompatible
ThisprojectorsupportsCRESTRONROOMVIEW,allowingmultipledevicesconnectedtothenetworktobeman-
agedfromacomputerorcontroller.
Energy-saving
• “LIGHTMODE”forlowpowerconsumptionand“CarbonMeter”display
Theprojectorisequippedwithan“LIGHTMODE”forreducingpowerconsumptionduringuse.Furthermore,the
power-savingeffectwhentheLIGHTMODEissetisconvertedintotheamountofreductionsofCO
2
emissions
andthisisindicatedontheconrmationmessagedisplayedwhenthepoweristurnedoffandat“Information”on
theon-screenmenu(CARBONMETER).

4
1. Introduction
About this user’s manual
Thefastestwaytogetstartedistotakeyourtimeanddoeverythingrightthersttime.Takeafewminutesnowto
reviewtheuser’smanual.Thismaysaveyoutimelateron.Atthebeginningofeachsectionofthemanualyou’llnd
anoverview.Ifthesectiondoesn’tapply,youcanskipit.
5
1. Introduction
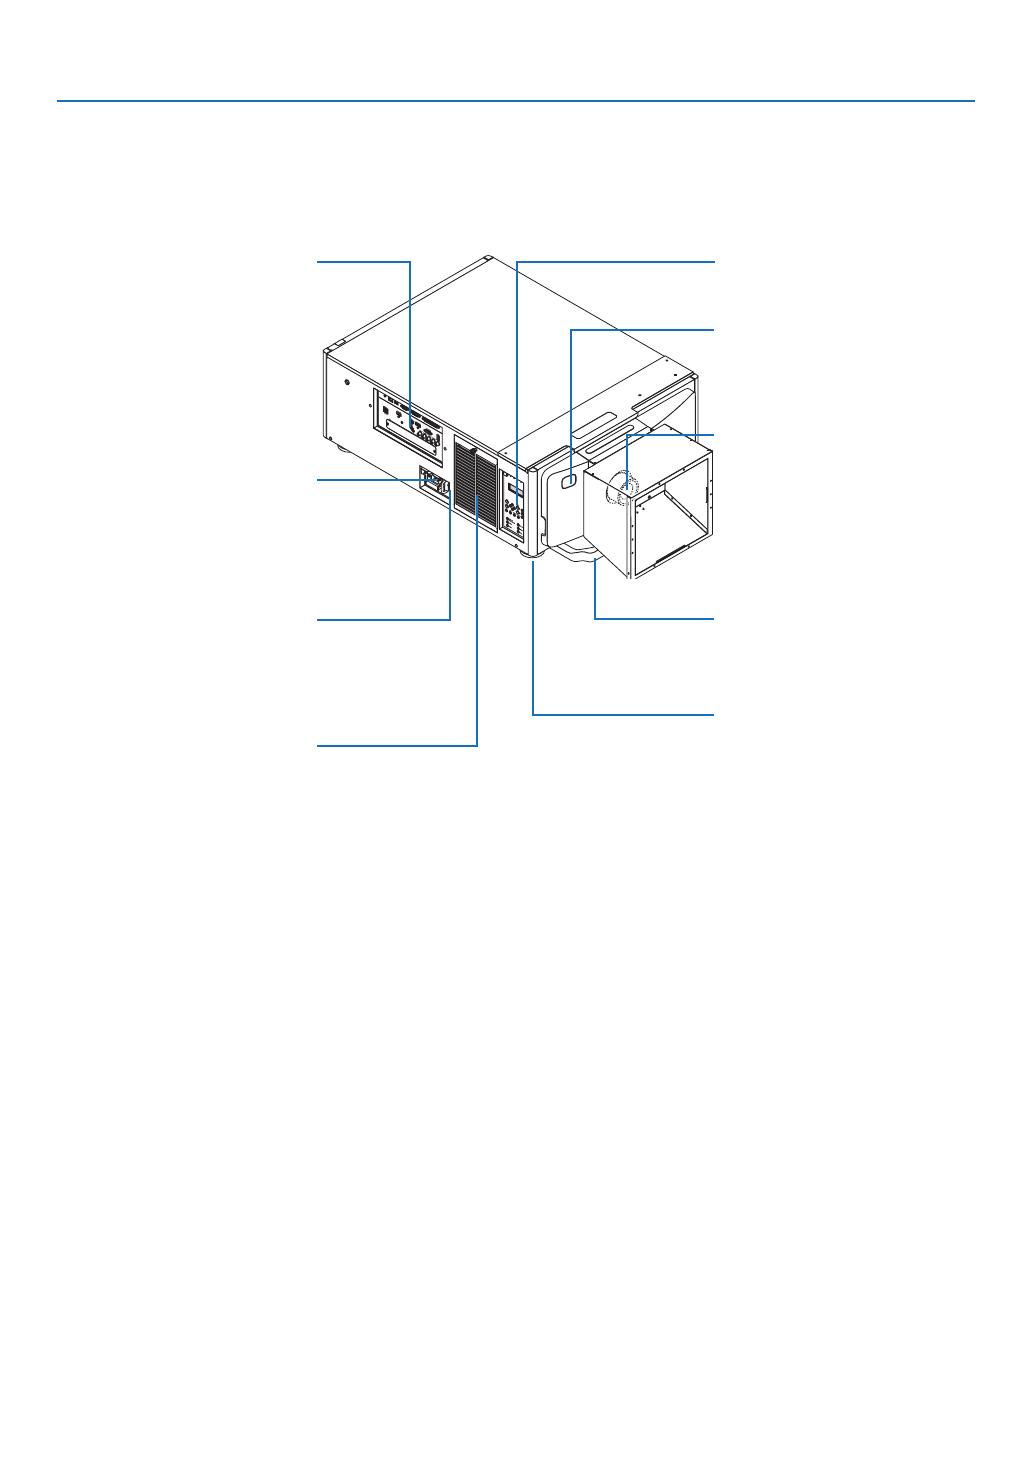
❸ Part Names of the Projector
Front/Top
Thelensissoldseparately.ThedescriptionbelowisforwhentheNP-9LS16ZM1lensismounted.
Lens
Handle
LevelAdjuster
(→page21)
Terminals
(→
page8)
ACINterminal
Connectthesuppliedpowercord’s
three-pinplughere,andplugthe
otherendintoanactivewalloutlet.
(→page13)
Mainpowerswitch
WhileACpowerisbeingsupplied,
setthemainpowerswitchtoON
position(|),thenyourprojectorwill
enterastandbystate.
Intakevent
Takesinoutsideairtocooltheunit.
Thereareairintakeandventilation
holesonthebottom.
(→pageix,57,142)
RemoteSensor(locatedonthe
frontandtherear)
(→page11)
Controls/Indicatorpanel
(→page7)
/