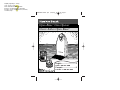
Hamilton Beach 76029 User manual
- Category
- Tin openers
- Type
- User manual

Open Ease
TM
Can Opener
Ouvre-boîtes Open Ease
TM
840097800
English ..............................2
USA: 1-800-851-8900
Français ............................9
Canada : 1-800-267-2826
840097800 ENv01.qxd 2/28/02 10:37 AM Page 1
Digitally signed by A. Creery
cn=A. Creery, c=US
Date: 2002.02.28 13:12:16 -05'00'
Reason: I am approving this document
4.25x5.5"; 16 pg.; English/French; black ink;
no bleed; map.

3
This appliance is intended for household use only.
This appliance is equipped with a polarized plug. This type of plug
has one blade wider than the other. The plug will fit into an electrical
outlet only one way. This is a safety feature intended to help reduce
the risk of electrical shock. If you are unable to insert the plug into
the outlet, try reversing the plug. If the plug should still fail to fit,
contact a qualified electrician to replace the obsolete outlet. Do
not attempt to defeat the safety purpose of the polarized plug by
modifying the plug in any way.
The length of the cord used on this appliance was selected to
reduce the hazards of becoming tangled in, or tripping over a longer
cord. If a longer cord is necessary an approved extension cord may
be used. The electrical rating of the extension cord must be equal to
or greater than the rating of the can opener. Care must be taken to
arrange the extension cord so that it will not drape over the counter-
top or tabletop where it can be pulled on by children or accidentally
tripped over.
WARNING: To reduce the risk of personal injury, keep hair and loose
clothing away from lid opener and other moving parts of the can
opener while using.
CONSUMER SAFETY INFORMATION
2
IMPORTANT SAFEGUARDS
SAVE THESE INSTRUCTIONS
When using electrical appliances, basic safety precautions should
always be followed, including the following:
1. Read all instructions.
2. To protect against risk of electrical shock, do not put can opener
body, cord, or plug in water or other liquid.
3. Close supervision is necessary when any appliance is used by
or near children.
4. Unplug from outlet when not in use, before putting on or taking
off parts, and before cleaning.
5. Avoid contacting moving parts.
6. Do not operate any appliance with a damaged cord or plug, or
after the appliance malfunctions or is dropped or damaged in any
manner. Call our toll-free customer service number for information
on examination, repair, or electrical or mechanical adjustment.
No user-serviceable parts inside.
7. The use of attachments not recommended or sold by Hamilton
Beach/Proctor-Silex, Inc. may cause fire, electric shock, or injury.
8. Do not use outdoors.
9. Do not let cord hang over edge of table or counter, or touch
hot surfaces.
10. Do not place on or near a hot gas or electric burner, or in a
heated oven.
11. Do not open pressurized (aerosol-type) cans.
12. Do not open cans of flammable liquids such as lighter fluid.
13. Do not use appliance for other than intended use.
Can Opener Safety
840097800 ENv01.qxd 2/28/02 10:37 AM Page 2

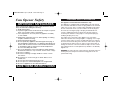
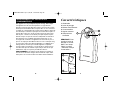
Know Your Can Opener
1. Piercing Lever
2. Can Guide
3. Geared Wheel
4. Bottle Opener
5. Knife Sharpener
6. Cord Storage
5
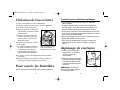
How to Use Your Can Opener
1. Place can opener on level surface.
2. Plug cord into electrical outlet.
3. Raise piercing lever up.
4. Place rim of can firmly under can
guide and against geared wheel.
5. Tilt top of can in, to position the
cutting blade inside the rim of
the can.
6. Press piercing lever all the way
down.
7. The motor will begin turning can
and cutting lid. (It is not necessary
to hold the piercing lever down or
to hold the can during the cutting
action.)
8. The motor will automatically stop
when the can is open.
9. Remove can from can opener and
check can contents to remove any
pieces of label or metal shavings.
4
NOTE: To assemble
the piercing lever onto
the can opener, see
Step 5 in the “How to
Clean” section.
(Use the flip-up magnet to
easily see can position.)
Opening Bottles
Hold the top of the can opener to stabilize the unit.
840097800 ENv01.qxd 2/28/02 10:37 AM Page 4

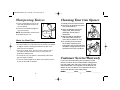
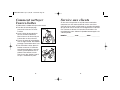
Sharpening Knives
1. Place cutting edge of knife in the
knife slot located on the back of
the can opener.
2. Draw the knife blade through the
slot several times.
NOTE: Serrated blades should never
be inserted into this unit.
7
6
Hints for Best Use
• The can opener will easily open all standard size cans.
• On some models it will be necessary to position can opener
at edge of counter, allowing for clearance to open cans
taller than the can opener.
• If there is a bump, dent, or heavy seam in the rim of the
can, open the other end of the can or start cutter just
beyond the problem area.
• The motor of your can opener is permanently lubricated
and will require no oiling.
• To use the cord storage on the back of the opener, push in
or pull out the cord as needed.
Cleaning Your Can Opener
1. Unplug cord from electrical outlet.
2. To remove the piercing lever, push
lever up and pull out.
3. Wash the piercing lever in hot,
soapy water. Rinse and dry
thoroughly. Do not place in
dishwasher.
4. Wipe the body of can opener
with damp cloth. NEVER im-
merse the can opener in water.
5. To assemble, place the knob
on the back of piercing lever
into keyhole with the lever pointing
toward the ceiling. Rotate the lever
clockwise until it locks into place.
Remove
Assemble
Customer Service/Warranty
If you have a question about your can opener, call our
toll-free customer service number. Before calling, please
note the model, type, and series numbers and fill in that
information below. These numbers can be found on the
bottom of your can opener. This information will help us
answer your question much more quickly.
MODEL:_____________ TYPE:_____________ SERIES: ______________
840097800 ENv01.qxd 2/28/02 10:37 AM Page 6

8
LIMITED WARRANTY
This product is warranted to be free from defects in material and
workmanship for a period of two (2) years for Hamilton Beach
Portfolio products or one (1) year for Hamilton Beach products from
the date of original purchase, except as noted below. During this
period, we will repair or replace this product, at our option, at no
cost. THE FOREGOING WARRANTY IS IN LIEU OF ANY OTHER
WARRANTY, WHETHER EXPRESS OR IMPLIED, WRITTEN OR
ORAL INCLUDING ANY WARRANTY OF MERCHANTABILITY OR
FITNESS FOR A PARTICULAR PURPOSE. ANY LIABILITY IS
EXPRESSLY LIMITED TO AN AMOUNT EQUAL TO THE PURCHASE
PRICE PAID, AND ALL CLAIMS FOR SPECIAL, INCIDENTAL AND
CONSEQUENTIAL DAMAGES ARE HEREBY EXCLUDED. There is
no warranty with respect to the following, which may be supplied
with this product: glass parts, glass containers, cutter/strainer,
blades, and/or agitators. This warranty extends only to the original
consumer purchaser and does not cover a defect resulting from
abuse, misuse, neglect, use for commercial purposes, or any use
not in conformity with the printed directions. This warranty gives you
specific legal rights, and you may also have other legal rights which
vary from state to state, or province to province. Some states or
provinces do not allow limitations on implied warranties or special,
incidental or consequential damages, so the foregoing limitations
may not apply to you.
If you have a claim under this warranty, DO NOT RETURN THE
APPLIANCE TO THE STORE! Please call our CUSTOMER
SERVICE NUMBER. (For faster service please have model, series,
and type numbers ready for operator to assist you.)
CUSTOMER SERVICE NUMBERS
In the U.S. 1-800-851-8900
In Canada 1-800-267-2826
Web site address: www.hamiltonbeach.com
KEEP THESE NUMBERS FOR FUTURE REFERENCE!
840097800 ENv01.qxd 2/28/02 10:37 AM Page 8
Page is loading ...
Page is loading ...
Page is loading ...
Page is loading ...
Page is loading ...
-
 1
1
-
 2
2
-
 3
3
-
 4
4
-
 5
5
-
 6
6
-
 7
7
-
 8
8
-
 9
9
-
 10
10


Hamilton Beach 76029 User manual
- Category
- Tin openers
- Type
- User manual
Ask a question and I''ll find the answer in the document
Finding information in a document is now easier with AI
in other languages
- français: Hamilton Beach 76029 Manuel utilisateur
Related papers
-
Hamilton Beach 840091200 User manual
-
-
-
-
-
-
-
-
-
Hamilton Beach 76382 User manual
Other documents
-
 LavoHome ED780Brkfastmaker User guide
-
Proctor-Silex 75217 User manual
-
Proctor Silex 75217 User guide
-
-
-
Matsui MCO100 User manual
-
Bifinett KH 109 User manual
-
Windmere WCO200C User manual
-
Hamilton Beach Can Opener User manual
-
