Page is loading ...

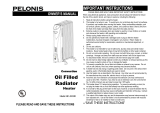
OWNER’S MANUAL
WHOLE ROOM RADIATOR HEATER
Model: HO-0221
PLEASE READ AND SAVE THESE INSTRUCTIONS
1
THERMOSTAT

IMPORTANT INSTRUCTIONS
WARNING!
When using electrical appliances, basic precautions should
always be followed to reduce the risk of fire, electric shock, and injury to persons,
including the following.
INSTRUCTIONS FOR USE AND CARE
1. Read all instructions before using heater.
2. This heater is hot when in use. To avoid burns, do not let bare skin touch hot
surface. If provided, always use handles when moving this heater. Keep
combustible materials such as furniture, pillows, bedding, papers, clothes and
curtains at least 3 feet (0.9m) from the front of the heater and keep them away
from the sides and rear.
3. Extreme caution is necessary when any heater is used by or near children or
invalids and whenever the heater is left operating and unattended.
4. Always unplug the heater when no
t in use.
5. Do not operate the heater with a damaged cord or plug, if the heater malfunctions,
has been dropped or damaged in any manner.
Discard heater or return heater to
authorized service facility for examination, electrical or mechanical adjustment,
or repair.
6. Do not use the heater outdoors.
7. This heater is not intended for use in bathroom, laundry areas and similar moist
indoor locations. Never locate heater where it may fall into a bathtub or other
water container.
8. Do not run cord under carpeting. Do not cover cord with throw rugs, runners, or
similar coverings. Do no
t route cord under furniture or appliances. Arrange cord
away from traffic areas where it can be tripped over.
9. This appliance has a polarized plug (one blade is wider than the
other). To reduce the risk of shock, this plug is intended to fit only one way in
a polarized outlet. If the plug does not fit fully in the outlet, reverse the plug.
If it still does not fit, contact a qualified electrician. DO NOT attempt to
defeat this safety feature. To do so could result in an electric shock hazard.
10. This heater draws 12.5 amps during operation. To prevent overloading a circuit,
do not plug the heater into a circuit that already has other appliances working.
11.
It is
normal for the plug to feel warm to the touch; however, a
loose fit between the AC outlet (receptacle) and plug may cause overheating
and distortion of the plug. Contact a qualified electrician to replace loose or
worn outlet.
12. To disconnect the heater, first turn controls to the OFF position, then remove
plug from outlet. Never pull by the cord.
13. Do not insert or allow foreign objects to enter any ventilation or exhaust opening
2

as this may cause an electric shock or fire, or damage the heater.
14. To prevent a possible fire, do not block air intakes or exhaust in any manner. Do
not use on soft surface, like a bed, where openings may become blocked.
15. A heater has hot and arcing or sparking parts inside. Do not use it in the areas
where gasoline, paint, or flammable liquids are used or stored.
16. Use this heater only as described in this manual. Any other use not recommended
by the manufacturer may cause fire, electric shock, or injury to persons.
17. Always plug heaters directly into a wall outlet/receptacle. Nev
er use
with an extension cord or relocatable power tap (outlet/power strip).
18. The output of this heater may vary and its temperature may become intense
enough to burn exposed skin. Use of this heater is not recommended for persons
with reduced sensitivity to heat or an inability to react to avoid burns.
19.
20.
This heater includes a caution indicator to warn that parts of the heater are getting
excessively hot. If the caution indicator light flashes, immediately turn the heater
off and inspect for any objects on or adjacent to the heater that may cause high
temperatures. DO NOT OPERATE THE HEATER WITH THE CAUTION
INDICATOR LIGH
T FLASHING.
To prevent a possible fire, do not block air intakes or exhaust in any manner.
Do not use on soft surfaces, like a bed, where openings may become blocked.
SAVE THESE IMPORTANT INSTRUCTIONS FOR
EASY REFERENCE.
3

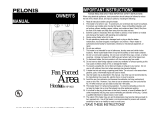
ASSEMBLY
Unpack your heater, take out the foam from the bottom inside the box and find the
wheel base assemblies from this foam. Refer to Fig. below:
1. Make sure the heater is unplugged and
the power switch is in the “OFF”
position.
2. TURN THE HEATER UPSIDE
DOWN.
3. Position the wheel holding plate
between the last two fins as shown.
4. Insert the U-shape screw into the holes
of wheel holding plate.
5. Insert the butterfly nuts and tight them
securely.
6. Attached another wheel holding plate
next
to metal control box.
7. TURN THE HEATER UPRIGHT.
Your heater is now ready to use.
Risk of fire – Do not operate heater without wheel assemblies attached.
Operate heater in upright position only (wheels on bottom, controls on top). Any
other position could create a hazardous situation.
ELECTRICAL RATINGS
This product is rated 12.5 am
TURES
icator Light – It will illuminate when
ol – To set the comfort
itch –
s at
600 Watts of heat output
heater operates at
900 Watts of heat output
e heater operates at
1500 Watts of heat output
ps (1500W) at 120V, 60 Hz.
FEA
B
C
A
A Power Ind
heater is plugged in and the Power Switch is on LOW,
MED or HIGH position.
B Thermostat Contr
temperature.
C Power Sw
1) LOW: The heater operate
operation
.
2) MED:
The
operation
.
3) HIGH:
Th
operation
.
4
THERMOSTAT
Wheel holding
plate
Metal control box
Buerfly nuts

OPERATION
1. Check that neither the appliance nor the power cable has been damaged in any
way during transportation when first using.
2. Place the heater on a firm, level surface free from obstructions, and at least 3 ft.
(0.9m) away from any wall or combustible material.
3. With the Power Switch knob in the OFF position, plug the heater into a grounded
120V outlet. Always operate the heater in the upright position.
4. To turn the heater on, while turning the Power Switch kn
ob clockwise to the
desired position (LOW/MED/HIGH) and turning thermostat to
your desired
setting from MIN to MAX.
5. When the room reaches a comfortable temperature, slowly turn the Thermostat
Control counter-clockwise until you hear one click sounds. This is the point at
which the thermostat setting equals the room temperature. At this setting, the
thermostat will automatically turn the heater on and off to maintain this selected
temperature.
6. Turn the Power Switch knob to OFF
and unplug the heater when you finish
usin
Note: This heater include a safety tip over switch, which will shut the heater off in case
it is tipped over. If at any time, the heater does tip over, please put the heater back in
the upright position (wheels on bottom, controls on top). The heater will resume its
normal operation.
g it.
RESET INSTRUCTIONS
This heater is equipped with an internal High Limit Switch which causes the unit to
stop operating in the event the internal temperature exceeds normal operating
temperatures.
IF THE UNIT SHUTS DOWN
1) TURN THE UNIT OFF
2) UNPLUG UNIT WAIT 10 MINUTES
3) PLUG IN AND TURN ON
IF YOUR HEATER FAILS TO OPERATE:
Be sure it is plugged in and that the electrical outlet is working.
Check for any obstruction. If you find an obstruction turn the heater OFF. Unplug
the heater and wait at least ten minutes for it to cool. Carefully remove the
obstruction. Plug the heater back in and restart it as described under OPERATION.
If you still notice the same defect above mentioned, remove the plug from the
socket and have the appliance serviced by authorized service personnel only.
Check that the thermostat is not set too low. With the power switch set to a heat
5

setting, turn the thermostat up (clockwise) until the heater restarts.
CLEANING AND STORAGE
We recommend that the heater be cleaned at least once a month and before off-season
storage.
Turn the heater OFF and unplug it. Allow it to cool.
Use a dry cloth to clean the external surfaces of the heater.
DO NOT USE WATER, WAX, POLISH OR ANY CHEMICAL SOLUTION.
Clean your heater using the above-mentioned steps, then pack the heater in its
original container and store it in a cool dry place.
The motor is factory lubricated for life, and will require no further lubrication.
SPECIFICATION
Model No.: HO-0221
Voltage: 120V, 60Hz
Current: Maximum 12.5 Amps.
Power: 1500 Watts
Tolerances on all specifications: not exceeded than 105%
6

7
SERVICE & SUPPORT
In the event of a warranty claim or if service is required for this heater, please contact us at the
following:
Toll Free: 1-866-646-4332
Email us at: [email protected]
For questions or comments, please write to:
Midea America Corporation
Customer Care Center
11411 NW 107th Street,
Suite 12
Miami, FL 33178
For your records, staple your sales receipt to this manual and record the following:
DATE OF PURCHASE: ________________________________
PLACE OF PURCHASE: ________________________________
(STAPLE SALES RECEIPT HERE)
NOTE: PROOF OF PURCHASE IS REQUIRED FOR ALL
WARRANTY CLAIMS
PRINTED IN CHINA

8
ONE (1) YEAR LIMITED WARRANTY
• Please read all instructions before attempting to use this product.
• Please return the Warranty Registration card within fifteen (15) days from the date of
purchasing this product.
PELONIS warrants as limited herein to the original purchaser of retail that each new Pelonis
Product, shall be free of defects in material and workmanship for a period of one (1) year from
the date of original purchase. This one (1) year warranty is limited to the heating elements,
motor, and electric control circuit board.
In the event of malfunctions or failure of your Pelonis Product, simply deliver or send the heater,
postage prepaid along with PROOF OF PURCHASE , within the warranty period of one (1) year, to
PELONIS.PELONIS reserves the right to inspect the claimed defective part or parts to determine
if the defect or malfunction complaint is covered by this warranty.PELONIS shall, within sixty
(60) days after receipt of the product, at its option,repair and/or replace the defective part or parts
free of charge. This warranty shall only cover defects arising from normal usage.PELONIS
assumes no responsibility whatsoever if Product should fail during the warranty period by
reason of:
• Misuse, negligence, physical damage or accidents.
• Lack of maintenance (see instructions for proper maintenance
).
• Repair by any unauthorized party during the warranty period.
• Damage caused by connection to an improper input voltage (see specification label on
your heater).
PELONIS makes no further warranties or representations, express or implied except those
contained herein. No representative or dealer is authorized to assume any other liability
regarding the Product. The duration of the implied warranty granted under State law, including
warranties of merchantability and fitness for particular purpose are limited in duration should
the duration of the express warranty grant it hereunder.PELONIS shall in no event be liable for
direct, indirect, special or consequential damages.
Some states do not allow limitations on how long an implied warranty lasts, and/or the above
limitations or exclusion may not apply to you. This warranty gives you specific legal rights and
you may have other rights which vary from state to state.
/