Page is loading ...

Minolta XD-11 Repair Guide
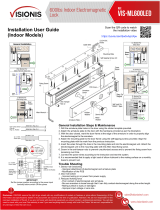
Figure IB
OVERRANGE LED
SHUTTER-SPEED
SCALE
UNDERRANGE LED
DIAPHRAGM WINDOW
Figure 3 Figure 4

SPEED
KNOB
DIAPHRAGM
COUPLING
X-SYNC
FLASHCORD
TERMINAL
LENS
LATCH
DEPTH-OF-FIELD
PREVIEW
Figure 1A
CAMERA CAPSULE
Type: 35mm electronically controlled
SLR with choice between aperture-
preferred or shutter-speed preferred
operation. Electromagnetic release. Full
range of manually calibrated shutter
speeds as well as automatic exposure
control.
Meter: LED readout displays shutter
speed or f/stop which the camera will
automatically program. Silicon photo
diode, full-aperture metering. Film-speed
range — ASA 12 to ASA 3200.
Battery: Two 1.5V silver-oxide batteries
S-76, G-13, MS-76, or RS-76. Negative
ground. Battery compartment at bottom
of camera. Behavior without batteries —
shutter will not release except at
mechanical speeds.
Shutter: Seiko MFC vertically traveling
metal focal-plane shutter. Electronic
shutter-speed control at auto and manual
settings with two mechanically controlled
settings — bulb and 1/100 second. Travel
time — 6.0 to 6.9ms measured across a
20mm distance. Mechanical self-timer.
Lens: Accepts all Minolta MD lenses.
Flange-focal distance 43.7mm (+0.02 —
0) measured from lens-mounting ring to
pressure-plate rails.
Typical current draw with 3V supplied
to battery compartment: Meter — 8.5ma,
Shutter open — 17ma.
Circuit: Components are mounted on a
flexible circuit board. You can replace in
dividual components or the complete
assembly. Three ICs. Memory switch is at
top of camera, metering switch and
release switch are at back of front-plate
assembly (controlled by release button),
power switch is part of mirror-release
combination magnet. Two combination
magnets, one to release mirror and one to
control diaphragm closure. Electro
magnet for shutter-speed control, trigger
switch, and X-sync contacts are shutter
parts.
MINOLTA'S TRENDSETTER
The meteoric rise of the electronic,
super-compact SLRs forced many
camera manufacturers into a game of
catch-up. But Minolta chose to set its
own standards with the XD-11. Among
other innovations, the XD-11 settled the
debate over aperture-preferred vs.
shutter-speed-preferred automation — it
gives you a choice between either mode.
To program the camera for automatic
shutter-speed control, set the mode selec
tor to the "A" (aperture-preferred) position,
Fig. 2. A mechanically controlled shutter-
speed scale now moves into the finder. Fig.
3. When you push the release button part
way, a row of LEDs indicates the shutter
speed which the camera will automatically
select. The appropriate LED lights alongside
the shutter-speed calibration.
Triangle symbols in the LED display
show the range limitations. If the com
bination of light level and diaphragm
opening requires a shutter speed faster
than 1/1000 second, the overrange LED
turns on. The overrange LED indicates
that you're going to get an overexposure
unless you select a smaller diaphragm
opening. If the underrange LED at the
bottom of the display turns on, you're go
ing to get a shutter speed of 1 second or
slower.
When you're using the "A " mode, you
can leave the speed knob at any of the
calibrated shutter speeds — 1 second
through 1/1000 second. The automatic
speed-control circuit disregards the
speed-knob setting. As you select the
f/stop, a tab on the diaphragm-setting
ring rotates the camera's diaphragm-
metering ring. Fig. 1. The diaphragm-
metering ring moves a brush along a
resistance band, thereby programming
the f/stop information.
So far, the XD-11 sounds like most of
the other electronic SLRs. But the XD-11
demonstrates its originality when you
select automatic diaphragm control. Set
ting the mode selector to "S " (shutter-
speed preferred) shifts the diaphragm
scale into the finder, Fig. 4. Now the LED
display indicates the diaphragm opening
which the camera will automatically pro
gram. Also notice in Fig. 4 that the
shutter-speed setting appears in the
finder. At the "A " mode. Fig. 3, a
mechanically controlled mask covers the
shutter-speed display; the speed-knob
setting has no meaning in the aperture-
preferred mode.
For automatic diaphragm control, turn
the diaphragm-setting ring to the smallest
f/stop. A tab on the diaphragm-setting

ring then comes against the minimum-
aperture lever, Fig. 1. As the tab pushes
the minimum-aperture lever from left to
right, it programs the metering system for
the smallest f/stop of the particular lens.
Only the MD series of lenses has the
minimum-aperture tab on the diaphragm-
setting ring. Although the earlier MC
lenses will couple to the diaphragm-
metering ring, they don't have the tab
which positions the minimum-aperture
lever. So, if you install an MC lens on the
XD-11, the LED display won't indicate an
automatically programmed f/stop. You'll
only be able to turn on one LED — the
overrange LED.
You'll also get no diaphragm readout if
you forget to set the smallest f/stop on
the MD lens. The calibration for the
smallest f/stop has a green color code.
Since an optical system reflects the
selected calibration into the finder, you
can quickly set the diaphragm for the "S"
mode. Simply rotate the diaphragm-
setting ring until the green number ap
pears in the finder, Fig. 4.
Now turn the speed knob to select the
shutter speed you want. As long as the
LED display indicates an f/stop in the
usable diaphragm range, the camera
delivers the shutter speed you've
selected. It then limits how far the
diaphragm can close according to your
selected shutter speed and to the light
conditions.
Since the XD-11 already has shutter-
speed control circuitry, it can go an extra
step to make sure you don't get an incor
rect exposure. Perhaps the camera can't
program the right f/stop for the particular
combination of light level and shutter
speed. A glance at the LED readout tells
you to select a different shutter speed.
But, if you fail to make the necessary cor
rection, the camera's "computer" takes
over — it automatically changes the shut
ter speed for you.
The camera lets you know when you're
going to get a shutter speed that's dif
ferent from the one you've selected — it
turns on one of the range-limits LEDS as
you start depressing the release button. If
the overrange LED turns on, you’ll get an
exposure time that's faster than the speed-
knob setting. If the underrange LED turns
on, you'll get an exposure time that's
slower than the speed-knob setting.
To program the diaphragm opening,
the XD-11 controls the movement of the
diaphragm-closing lever, Fig. 5. The
diaphragm-closing lever moves from right
to left before the mirror swings to the tak
ing position. If the diaphragm-closing
lever moves its full distance, it allows the
diaphragm to stop down to the smallest
f/stop. However, by limiting the move
ment of the diaphragm-closing lever, the
XD-11 selects other aperture sizes.
A combination magnet (permanent
magnet plus electromagnet) limits the
movement of the diaphragm-closing
lever. As the diaphragm-closing lever
starts to move, the permanent magnet
holds its armature. Then, when the
diaphragm reaches the proper opening
size, the circuit discharges a capacitor
through the coil that's wound around the
permanent-magnet core. The spurt of
current momentarily disables the perma
nent magnet.
Now the armature of the combination
magnet jumps away from the core. And
the pawl-shaped end of the armature
engages the ratchet teeth of a gear which
rotates as the diaphragm-closing lever
moves. Stopping the rotation of the gear
also stops the movement of the
diaphragm-closing lever.
In turn, the diaphragm-closing lever
stops the spring-loaded diaphragm from
closing any further. At the other settings
of the mode selector, the capacitor never
discharges through the coil of the com
bination magnet. As a result, the
diaphragm-closing lever always moves its
full distance. And the diaphragm stops
down to the f/stop you've selected on the
diaphragm-setting ring.
The third setting of the mode selector
— the "M " setting, Fig. 2 — provides
manually calibrated shutter speeds. With
the mode selector at "M ," the shutter
always delivers the selected shutter
speed. The LED display now serves as a
cross-coupled meter; it tells you what
shutter speed will provide proper ex
posure according to the light conditions
and to the diaphragm setting. Also, as
you turn the mode selector from the "A"
position to the "M " position, the
viewfinder mask uncovers the shutter-
speed calibration in the finder, Fig. 4.
Although the speeds are manually
selected at the "M " mode, they're still
electronically controlled. Consequently,
all three functions depend on battery
power. In fact, even the shutter release
requires battery power. A second com
bination magnet in the XD-11 releases the
mirror when you push the release button
far enough to close the release switch.
The XD-11 uses two S-76 silver-oxide
batteries housed at the bottom of the
camera. What if the batteries die? You'll
then find that the shutter won't release.
But the XD-11 does provide two
mechanical settings — "B " and "0 ," Fig.
2. At the "B" setting, the shutter delivers
a mechanically controlled bulb action. A
mechanical system then releases the mir
ror. At the "0 " setting, the shutter
mechanically delivers the fastest full-
aperture shutter speed — 1/100 second.
So, if the batteries die, you can turn the
speed knob to "0 " and continue using
the camera with electronic flash.
The electronically controlled "X " set
ting also provides the flash speed of
1/100 second. However, the "X " setting
does depend on battery power — both
for the electromagnetic release and for
Figure 5
Figure 6 Front-plate/mirror-cage/shutter assembly

the electronically timed exposure. You
can't use the "X " setting, the "B " set
ting, or the "0 " setting for automatic ex
posure control. To help prevent a possible
operator error, the LED display refuses to
indicate a shutter-speed or diaphragm
calibration at the "X ," "B ," or "0 ” set
tings, Rather, the overrange LED always
turns on.
OTHER FEATURES OF THE XD-11
The XD-11 and its spinoff, the XD-5,
both use the Seiko MFC modular focal-
plane shutter. With a modular focal-plane
shutter, you might expect the XD-11 to
have a modular design. It does. But the
XD-11 is even more modular than most
cameras using similar shutters. You can
remove the front plate, mirror cage, shutter,
and flex circuit as one unit. Reaching the
shutter takes a minimum amount of time.
Practically all of the electronic com
ponents mount to the flex circuit. In many
cameras, the flex circuit causes repair
problems; you must delicately lift aside
portions of the flex circuit to disassemble
the camera. However, the XD-11 elimi
nates such problems. Since the flex cir
cuit comes off with the front assembly,
Fig. 6, there's little chance of damage.
As is typical, the flex circuit covers the
pentaprism. Fortunately, you don't have to
lift aside the flex circuit to clean the focus
ing screen. For that matter, you don't even
have to remove the top cover. To remove
the focusing screen, take out the two
screws that hold the plate at the top of the
mirror cage, Fig. 5. Lift out the cover plate
and the focusing-screen retainer. You can
now drop out the focusing screen from in
side the mirror cage, Fig. 7.
Most of the remaining features are
pretty typical of modern SLRs. Notice
that the film-speed dial allows you to set
intentional overexposures or underex
posures, Fig. 2. When you select the film
speed, the film-speed dial rotates a brush
along the film-speed resistor. Moving the
compensation lever for intentional over-
exposures or underexposures rotates the
entire film-speed resistor without moving
the brush.
The XD-11 also accepts a power winder,
the Auto Winder A, and the Minolta series
of dedicated flash units. The 132X, 200X,
and 320X dedicated flash units automatic
ally program the camera for the flash
speed of 1/100 second. When the flash
unit charges, the overrange LED flashes on
and off in the finder.
CIRCUIT AT THE BOTTOM
OF THE XD-11
The battery-compartment cover screws
into the bottom plate. So, once you
remove the bottom plate, you can't power
the camera with its own batteries.
However, you can connect a 3V DC power
supply to the battery compartment, Fig. 8.
Connect the positive power-supply lead to
the battery-compartment terminal and
connect the negative power-supply lead to
ground (any metal part on the camera). All
the test voltages we'll be giving are
positive with respect to ground.
As you cock and release the shutter,
notice the actions of the two levers at
tached to the transport cam — the mirror-
cocking lever and the shutter-cocking
lever, Fig. 9. The clockwise rotation of
the transport cam drives the mirror-
cocking lever left to right in Fig. 9. The
end of the mirror-cocking lever then
comes against the roller on the mirror-
tensioning lever to charge the mirror. At
the same time, the transport cam draws
the shutter-cocking lever from left to right
to charge the Seiko shutter.
The transport latch, Fig. 9, now drops
into engagement with a notch in the
transport cam. Consequently, you can't
advance the wind lever a second time.
After the exposure, the mirror-tensioning
lever swings from right to left, Fig. 9, and
strikes the transport-release lever. As the
transport-release lever rotates in a
clockwise direction, it disengages the
transport latch from the transport cam.
A spring attached to the transport latch
and the transport-release lever provides
the switching contact for the power
winder. With the shutter released, the
power-winder switching contact moves
into the power-winder locating bushing.
Fig. 9. The locating bushing receives a pin
on the power winder. So, with the power
winder attached to the camera, the
power-winder switching contact touches
the pin.
The power-winder switching contact
now connects the power-winder pin to
ground. As a result, the power winder
goes into action; it advances the film and
cocks the shutter by rotating the power-
winder coupler, Fig. 9. When the shutter
reaches the cocked position, the trans
port latch drops into the notch in the
transport cam. The transport latch now
drives the power-winder switching con
tact away from the power-winder pin.
Since the power-winder pin no longer
connects to ground, the power winder
stops running.
At the other end of the camera, you
can see the circuit board which contains
the mirror-release and diaphragm-control
components. Fig. 8. Locate the two capa
citors — C5 and C6. These are the capa-
IRANSPORT-
RELEASE
LEVER
MIRROR-COCKING
LEVER
LOCATING
BUSHING
LOOSE
DUST
SEAL
SHUTTER COCKING
LEVER
POWER-WINDER
SWITCHING
CONTACT
POWER-WINDER
COUPLER
TRANSPORT
CAM
POSITIVE BATTERY
Figure 8
Figure 9 Shutter Cocked

citors that discharge through the coils of
the combination magnets. C6 discharges
through the coil of the mirror-release
combination magnet M1; C5 discharges
through the coil of the diaphragm-control
combination magnet M2.
As yet, you can't reach the combina
tion magnets. So, if there's a problem in
either the mirror-release circuit or in the
diaphragm-control circuit, you may have
to remove the front-plate assembly.
However, you can troubleshoot both cir
cuits and pinpoint the malfunction with
out further disassembly. And, if you find
that the problem is on the circuit board,
Fig. 8, you can make the repair without
disassembling the camera any further.
The two combination magnets have
very similar circuits. Fig. 10 shows the cir
cuit for the mirror-release magnet M1.
Transistor T6 serves as a switch between
the mirror-release capacitor C6 and the coil
of the mirror-release magnet M1. Turning
on T6 allows the capacitor to discharge
through the coil. The spurt of current
causes the armature of M1 to jump away
from the core and release the mirror.
You can see the M1 armature in Fig. 11.
Also locate the mirror-release lever in the
same illustration. When you push the
release button, you should see the end of
the M1 armature move toward the front of
the camera and strike the mirror-release
lever.
Transistor T6 gets the release signal
from the comparator, Fig. 10. When the
release switch closes, the control circuit
sends a signal to the comparator. The
comparator then switches from a high
state to a low state. The low voltage ap
plied to the base of T6 turns on the tran
sistor. T6 now allows the capacitor to
discharge through the coil of M1.
But notice in Fig. 10 that switch S1
must be closed before the comparator
output connects to the base of T6. S1 sits
at the bottom of the camera, Fig. 11.
When you cock the shutter, S1 closes to
connect the comparator to T6. S1 opens
after the exposure.
You can also see the part that actuates
S1 in Fig. 11 — the nylon lug on the
transport-release lever. As the transport-
release lever swings in a clockwise direc
tion, it allows S1 to close. Then, when
the mirror-tensioning lever drives the
transport-release lever in a counter
clockwise direction, the nylon lug pushes
the long blade of S1 away from the short
blade.
S1 serves as a reset switch for the cir
cuit. But, if S1 fails to close or makes
poor electrical contact, you'll only note
Figure 10
Figure 11
one malfunction in the camera — the
shutter won't release. With S1 open,
transistor T6 never gets the low-voltage
signal from the comparator.
You can check S1 with a voltmeter. At
the long blade of S1, Fig. 12, you should
measure 0V with the shutter in the released
position. You should measure around 2.5V
at the short blade, regardless of whether the
shutter is cocked or released. Since S1
should close when you cock the shutter,
you should also measure around 2.5V at the
long blade. What if you measure 0V at the
long blade with the shutter cocked? Ap
parently, S1 isn't closing.
If you have to reform the blades of SI,
check the timing. Cock the shutter and
hold the wind lever fully advanced. Then,
while measuring the voltage at the long
blade of S1, allow the wind lever to return
slowly to its rest position. S1 should re
main open as the transport latch drops into
the first step in the transport cam, Fig. 9.
But S1 should close when the transport
latch drops into the second transport-cam
notch. So, as soon as the transport latch
drops into engagement with the second
notch, you should measure around 2.5V at
the long blade of S1. If the timing isn't cor
rect, reform the S1 blades.

TROUBLESHOOTING THE
ELECTROMAGNETIC RELEASE
SYSTEM
If the shutter fails to release elec-
tromagnetically, you might first suspect
switch S1. But you can also check the
other possibilities after removing the bot
tom plate. The mirror-release magnet M1
may have an open coil, the mirror-release
capacitor C6 may be open or shorted,
transistor T6 may be open, or T6 may not
be getting the release signal from the
comparator.
It's also possible that the problem is
mechanical rather than electronic. To
check the mechanical release action, cock
the shutter and push the M1 armature.
Fig. 11, toward the front of the camera.
The mirror should release. If it does, you
know the mechanical release is working
properly. And the problem must be with
the circuit.
Fig. 13 shows the approximate voltages
you should measure across the M1 com
ponents. Notice that the mirror-release
capacitor C6 charges to the full battery
voltage. You should measure the +3V at
the positive terminal of C6 regardless of
whether the shutter is cocked or released.
However, before measuring voltages,
you might try a quick shorting test to
simultaneously check both capacitor C6
and the coil of magnet M1. Cock the
shutter. Then bypass transistor T6 by
shorting between its emitter and collec
tor, Fig. 13. The mirror should release.
If your shorting test releases the mirror,
you know that both the combination
magnet M1 and the mirror-release capa
citor C6 are good. You might next try
checking for the release signal at the base
of transistor T6, Fig. 13. Without de
pressing the release button, you should
measure around 2.5V — the output of the
comparator in the "high" state. If you
measure the full 3V signal, T6 apparently
has a base-to-emitter short. Now depress
the release button. The signal should
drop to around 1.3V.
If the circuit fails to supply the release
signal to the base of T6, you'll have to go
further in the disassembly. There may be
a problem with the release switch or with
the release circuit. But if the transistor T6
is at fault, you won't have to go any fur
ther. You can make a final check on T6 by
shorting between the base and the collec
tor, Fig. 13. Your short connects the base
to ground through the coil of M1. If the
transistor is good, the mirror should
release.
Replacing the transistor gives you a
choice in repair procedure. Minolta does
supply the individual components. But
you may prefer to replace the complete
circuit board (circuit base plate B).
Now let's say that the shutter doesn't
release when you short between the emit
ter and collector of T6. Either the com
bination magnet M1 or capacitor C6 could
be at fault. But you might first suspect
the coil of M1. The red wire connected to
the collector of T6 goes to one side of the
coil; the other side of the coil connects to
ground through a black wire, Fig. 13. To
check the coil, measure the resistance
between the red coil wire and ground.
You should measure a very low resistance
— around 15 ohms. If you measure no
continuity, you know that the combina
tion magnet M1 has an open coil. You'll
then have to remove the front-plate
assembly to replace the combination
magnet.
CHECKING THE DIAPHRAGM-
CONTROL CIRCUIT
You can follow practically the same
troubleshooting procedure to check the
circuit for the second combination
magnet — the diaphragm-control magnet
M2. Remember, the diaphragm-control
magnet arrests the diaphragm closure in
the "S " mode. If there's a problem in the
M2 control circuit, the diaphragm always
stops down its full amount.
In Fig. 14, note the similarity between
the diaphragm-control circuit and the
mirror-release circuit. When the dia
phragm reaches the proper f/stop, the
aperture-control comparator switches on
transistor T13. T13 then supplies the base
current which turns on transistor T5.
Turning on T5 allows the diaphragm-
control capacitor C5 to discharge through
the coil of the diaphragm-control magnet
M2. M2 now repels its armature to arrest
the diaphragm-closing lever.
BLACK (GROUND)
RED TO
* BATTERY
Figure 13
Figure 14

WHITE TO S7
BLACK PURPLE
Figure 15
Figure 16
Figure 17
VIOLET
BROWN
TO M2
BLUE
The components for the diaphragm-
control circuit also mount to the circuit
board at the bottom of the camera, Fig. 15.
But you can't as yet see switch S7. Switch
S7 is part of the mirror-release-magnet
assembly M1. As the armature of M1 jumps
away from the core to release the mirror, it
opens S7. Notice in Fig. 14 that S7 must be
open in order for transistor T13 to conduct.
In effect, opening S7 turns on the
diaphragm-control circuit. At the same
time, S7 provides power for the shutter
electromagnet (the electromagnet that
holds open the closing blade for the
length of the exposure). Opening S7 also
switches off the LED display.
A problem with S7, then, could cause
quite a few problems. Although you can't
as yet reach S7, you can check its opera
tion. Locate the white wire attached to
the lower circuit board, Fig. 15. Measure
the voltage between the white wire and
ground; you should measure 0 volt, in
dicating that S7 is closed.
With S7 open, you should measure
around 1.3V at the white wire. But how
can you open S7 to measure the voltage?
One way is to hold open the shutter at the
bulb setting. Then push the M1 armature.
Fig. 16, away from the M1 core (toward
the front of the camera). The M1 ar
mature now opens switch S7. Conse
quently, you should measure around 1,3V
at the white-wire connection, Fig. 15.
The technique for holding open switch
S7 also allows you to conveniently check
the coil of M2 and capacitor C5, Fig. 14.
Consider that the diaphragm-control cir
cuit fails to latch the diaphragm-closing
lever; the diaphragm-closing lever always
moves its full distance in the "S" mode.
You might first check for the charge
across the diaphragm-control capacitor
C5. Measure the voltage between ground
and the positive C5 lead. Fig. 15; you
should measure -t-3V.
If you're getting the full battery voltage
across C5; the problem could be with T5,
T13, or the coil of M2. Another possibility
is that T13 isn't getting the turn-on signal
from the aperture-control comparator.
But you can quickly check the transistors
and the M2 coil with shorting tests.
There are a couple of ways you can
check to see if M2 repels its armature
when C5 discharges. Try setting the mode
selector to the "S" position. Then watch
the diaphragm-closing lever, Fig. 5, as you
release the shutter. If there's a problem in
the diaphragm-control circuit, the
diaphragm-closing lever always travels its
full stroke.
Now short between the emitter and
collector of transistor T5, Fig. 15, as you
release the shutter. The diaphragm-
closing lever should stop after traveling a

short distance. If it doesn't, you know
that the diaphragm-control magnet M2
and the diaphragm-control capacitor C5
are both doing their jobs.
But you may find that it's easier to check
the operation if you can actually see the ar
mature of M2. Just pull aside the battery
compartment by removing its two screws,
Fig. 16. You can now see the M2 assembly
through a clearance cutout in the bottom
of the body casting, Fig. 17.
To check M2, hold open the shutter at
the bulb setting and disengage the M1 ar
mature as previously described. Re
member, pushing the M1 armature away
from its core opens switch S7. S7 must be
open in order for transistor T13, Fig. 14, to
turn on.
Now short between the collector and
the emitter of T5, Fig. 15. You should see
the armature jump toward the front of the
camera. If the armature jumps away from
the core, both M2 and C5 must be good.
You might then suspect transistors T5
and T13, Fig. 14. While still holding open
the shutter on bulb with S7 open, try
shorting between ground and the collec
tor of T13, Fig. 15. Once again you should
see the M2 armature jump away from its
core. But, if the armature fails to move,
transistor T5 must be defective.
If the armature does move, the problem
may be with T13 or with the signal from
the aperture-control comparator. You can
make one more shorting test to check
T13. Again hold open the shutter on bulb
and open S7. Then short between the
base of T13 and ground. If the armature
jumps away from the core, there's no
problem with T13. The problem must be
in the aperture-control circuit. You'll have
to remove the top cover to reach the IC
that provides the turn-on signal.
Let's now consider the other possibility
— the M2 armature does not release
when you short across transistor T5. You
might first suspect an open coil. To check
the coil continuity, measure the resis
tance between the brown wire, Fig. 15,
and ground. You should measure the
resistance of the coil — around 15 ohms.
Also suspect the diaphragm-control
magnet M2 if the diaphragm fails to stop
down. Such a malfunction could indicate
a problem either with the diaphragm-
control magnet or with the circuit. But it's
usually fairly easy to pinpoint the problem
area — just check the operation at the dif
ferent modes. If the diaphragm fails to
stop down at all three modes — A, M,
and S — suspect the diaphragm-control
magnet M2. However, if the problem only
occurs at the S mode, suspect the circuit.
When the diaphragm fails to stop
down, the diaphragm-control magnet
isn’t holding its armature. The armature
then immediately arrests the the
diaphragm-closing lever. If the problem
occurs at all three modes, try cleaning the
contact surfaces of the armature and of
the permanent magnet, Fig. 17. Dirt can
prevent the core from magnetically hold
ing the armature.
If cleaning doesn't do the job, the per
manent magnet may be defective. Try
pushing the armature of M2 away from
the core. Fig. 17; you should be able to
feel the magnetic attraction. A defective
permanent magnet requires that you
replace M2, a job which means pulling the
front-plate/mirror-cage assembly.
Now consider the other possibility — the
problem only occurs at the S mode. The
symptom indicates that the diaphragm-
control circuit gets the release signal as
soon as switch S7 opens. You can spot the
problem by using the technique we describ
ed earlier at the bulb setting. Watch the ar
mature of M2 as you push the M1 armature
toward the front of the camera, Fig. 16. If
the M2 armature now jumps away from the
core, the circuit is sending the release signal
right away.
To verify the malfunction, you might
try operating the camera at the S mode
while you're shorting across the base and
emitter of transistor T13, Fig. 15. Your
short should keep transistor T13 shut off.
And, as a result, the armature of M2
should remain against the core. If the ar
mature still jumps away from its core, the
problem is on the circuit board at the bot
tom of the camera — most likely, a
shorted transistor. But if the armature re
mains against the core, the problem is in
the circuit that sends the signal to T13.
You must then remove the front-plate/
mirror-cage assembly. The problem could
be as simple as the violet wire's shorting
to ground; or a switch or IC may be
defective.
SUMMARY OF TROUBLESHOOTING AT BOTTOM OF CAMERA
As you can see, it's possible to check most of the electromagnetic diaphragm-
closing and release systems from the bottom of the camera. What if the possi
bilities we've discussed don't get you to the problem? You'll then have to go fur
ther. For example, if the mirror won't release electromagnetically, the problem
could be in the release switch. You can check the remaining switches just by
removing the top cover. The following chart summarizes the troubleshooting
covered so far.
SYMPTOM
Shutter won't release, LEDs do not
operate
POSSIBLE CAUSE
No battery power to lower circuit board
— check for 3V at red wire, Fig. 13. No
voltage — check battery compart.
Shutter won't release, LEDs operate
Diaphragm fails to stop down, LEDs
operate
All modes
S mode only
Diaphragm always stops down fully,
"over" LED remains on
Release switch (remove top cover to
check)
Coil M1 open
Capacitor C6
Transistor T6
Switch SI, poor contact
Solder connections to lower circuit
board (red, black, yellow)
No release signal from comparator
Combination magnet M2, armature dirty
or permanent magnet defective
Violet wire shorted to ground
Transistor T13
Comparator always presents release
signal to T13
Solder connections to lower circuit
board (purple, white brown, black)
Film-speed resistor open (remove top
cover to check)

DIAPHRAGM
CONTROL
IC2 - SHUTTER-
RELEASE
LOCK
DRIVER
FOR LEDs
IC1 - DIAPHRAGM
CONTROL
PHOTOCELL
AMPLIFIER
SPEED
CONTROL
OUTPUT
LIGHT LEVEL + FILM SPEED
Figure 18 Actual schematic
Figure 19

ACTUAL CIRCUIT FOR THE
COMBINATION MAGNETS
Fig. 18 shows the actual circuit for the
combination magnets M1 and M2. The
two IC's which drive the switching tran
sistors mount to the flex circuit inside the
camera. Notice in Fig. 18 that a com
parator output of IC1 controls the poten
tial on the emitter of T13; switch S7 con
nects to the T13 base (in the partial
schematics used earlier for explanation,
we showed the comparator controlling
the base of T13).
With S7 closed, the base of T13 con
nects to ground. Opening S7 then con
nects the base of T13 to a positive voltage
— around 1.3V, measured at the white
wire, Fig. 18. T13 now has the voltage it
needs at the base. However, the tran
sistor can't turn on until the emitter
voltage goes less positive than the base
voltage.
The comparator inside IC1, Fig. 18,
decides when it's time to turn on T13. IC1
actually makes its exposure calculation as
the diaphragm stops down. At the "S "
mode, IC1 compares the selected shutter-
speed setting at one input with the light
level and the film-speed setting at the
other input. To stop the diaphragm at the
proper f/stop, the comparator inside IC1
switches low. The emitter of T13 now
goes less positive than the base. As a
result, T13 turns on and allows C5 to
discharge through the coil of M2.
You can see how the comparator
makes its f/stop calculation in Fig. 19.
The shutter-speed setting provides the in
put voltage to one input of the com
parator; the combination of the film-
speed setting and the photocell output
provides the voltage at the other input. If
input #1 in Fig. 19 is less positive than in
put #2, the comparator output remains
high to keep T13 turned off.
However, as the diaphragm stops
down, the output of the photocell
decreases. The voltage at input #2 then
goes less positive. When the two inputs
see the same voltage, the comparator
knows that the diaphragm has reached
the proper f/stop. Now the comparator
switches states — its output switches low
and turns on T13.
Earlier, we mentioned that S7 must
open before T13 can conduct. If S7 re
mains closed, the base of T13 stays at
ground potential. Remember, S7 opens
when the mirror-release combination
magnet M1 repels its armature. Opening
S7 both applies the base bias to T13 and
disconnects IC2 from ground.
IC2 serves as the driver for the LEDs.
So, when S7 breaks the IC2 ground con
nection, the viewfinder LEDs turn off.
Also, IC2 provides the shutter-release
lock for the mirror-release combination
magnet M1, Fig. 18. If the battery voltage
drops too low, the comparator inside IC2
won't switch on transistor T6. As a result,
the mirror-release combination magnet
can't release the mirror.
VARIATIONS IN THE LOWER
CIRCUIT BOARD
As mentioned previously, the lower cir
cuit board. Fig. 20, comes as a complete
unit. Although we described techniques
for checking the individual components,
you can test the complete circuits with
one shot — just short the bases of the
control transistors to ground.

Check the diaphragm-control circuit by
holding open the shutter on bulb. Then
push the armature away from the core of
M1, Fig. 20, to open S7 Now short the base
of T13 (the violet or purple wire, Fig. 201 to
the camera body. You should see the ar
mature of M2 jump away from the core.
If shorting the violet wire to ground
causes M2 to repel its armature, all of the
diaphragm-control circuit on the bottom
of the camera must be working. What if
M2 doesn't repel its armature in normal
operation? Apparently the comparator in
side IC1 isn’t switching low to provide the
emitter bias for T13.
Similarly, you should be able to make
the mirror-release magnet M 1 repel its ar
mature by shorting the yellow wire to
ground (the yellow wire that connects to
the base of T6, Fig. 20). Shorting the
yellow wire to ground should turn on T6.
If M1 repels its armature and releases the
Figure 21 Early style board
mirror, the mirror-release components
must be good.
If you find that there's a problem on the
lower circuit board, however, you may
run into a parts snag — there are two dif
ferent versions of the board, and the two
types won't always interchange. Fig. 21
shows the early version of the board; Fig.
22 shows the modified version.
Whether or not you can install the later
version in an earlier camera depends on
the flex circuit. You must then identify
the flex circuit. Alternately, you may have
to replace the complete flex circuit and
the lower circuit board as a unit. You'll be
able to identify the flex circuit after you
remove the top cover.
REMOVING THE TOP COVER
Unscrew the wind-lever retaining
screw. Then disconnect the end of the
wind-lever return spring, Fig. 23, as you
lift off the wind lever. Also unscrew the
top-cover retaining ring around the wind
shaft. Fig. 24.
Next unscrew the retaining ring that
holds the speed knob. Fig. 24. Although
we used the bulb setting as a reference in
Fig. 24, the actual shutter-speed and film-
speed settings aren't important for
disassembly. Remove the speed knob and
note the loose release pin. The release pin
closes the switches for the metering and
release functions.
You can completely remove the camera
back by depressing the hinge pin. Then
unscrew the rewind knob. Remove the
film-speed dial by unscrewing its retaining
ring and take out the parts indicated in
Fig. 25 — the detent plate, the black
plastic decorator ring, the brass bushing,
and the exposure-compensation lever.
Finally, remove the top-cover screws.
Two of the top-cover screws also hold the
diaphragm-window plate, Fig. 26. If you
wish, you can remove the front decorator
plate. Fig. 26, after you take off the
diaphragm-window plate. However, unless
you know you're going to remove the front-
plate/mirror-cage assembly, you can leave
the front decorator plate installed.
Before lifting off the top cover, push
down the eyepiece-blind lever, Fig. 27.
The eyepiece blind then covers the
eyelens. This precaution prevents the
other end of the eyepiece-blind lever from
catching the flex circuit as you lift off the
top cover.
REPLACING THE TOP COVER
When you replace the top cover, the
mode selector, Fig. 24, must key to the
mode switch, Fig. 28. Fig. 28 shows the
mode switch set for manual shutter
speeds — the "M " position. To set
automatic shutter speeds, move the
mode switch to the center position; move
the mode switch all the way in a
counterclockwise direction to set
automatic diaphragm openings.
Normally, you'll find that the mode
selector keys most easily at the "S" set
ting. Set the mode selector in the top
cover to "S ." Then turn the mode switch.
Fig. 28, all the way in a counterclockwise
direction. After seating the top cover,
check to see that the viewfinder scale
switches from the diaphragm calibrations
to the shutter-speed calibrations when
you move the mode selector to "A .”
Also, with the top cover removed, the
film-advance indicator, Fig. 28, tends to
sneak under the counter dial. Tightening
the retaining ring around the wind shaft.
Fig. 24, then binds both the counter dial
and the film-advance indicator.
The film-advance indicator only moves
when there's film in the camera. As the
BLACK PURPLE OR VIOLET
Figure 22 Modified board

film winds onto the take-up spool, it
pushes forward a lever inside the take-up
chamber. The lever then moves the film-
advance indicator from left to right in Fig.
28. You can see the film-advance in
dicator through the window at the back
of the top cover.
Check the film-advance indicator after
you replace the retaining ring around the
wind shaft. Fig. 24. Reach to the front of
the take-up spool and push forward the
lever that extends into the take-up
chamber; the film-advance indicator
should move into the window. If the film-
advance indicator doesn't move, loosen
the retaining ring. Fig. 24. Then hold for
ward the lever inside the take-up chamber
so that you can see the film-advance in
dicator within its window. Continue
holding the lever as you tighten the re
taining ring.
To replace the wind lever, first hook its
hole to the end of the wind-lever return
spring. Then rotate the wind lever in a
counterclockwise direction as you seat it
over the wind shaft. The upper coil of the
wind lever return spring sometimes
sneaks under the wind lever. If that hap
pens, the wind lever won't return freely
after you replace the cover screw.
The film-speed dial can also be tricky to
install. Replace the exposure-compensation
lever and the detent rack as shown in Fig.
29; notice that the slot in the exposure-
compensation lever fits over the tab on the
film-speed resistor ring. Then replace the
black plastic decorator ring. Fig. 25. The
notch in the decorator ring goes under the
exposure-compensation lever.
SPEED KNOB
RETAINING RING
TOP COVER
RETAINING RING
MODE SELECTOR
Figure 24
mmo
EXPOSURE COMPENSATION
LEVER /
LONG TOP-COVER
SCREWS I
DETENT
PLATE
FRONT-
DECORATOR
PLATE v
UPPER
BRASS
BUSHING
DECORATOR
RING
Figure 26
EYEPIECE-BLIND LEVER
TOP-COVER
SCREW
-----
MODE SWITCH
IN M MODE
A MODE
Figure

Figure 29
TAB ON
RESISTOR RING
SPRING ON
EXPOSURE-COMPENSATION
LEVER
Figure 31
Next seat the upper brass bushing. Fig.
25. Two tabs on the underside of the up
per brass bushing fit into the two slots of
the lower brass bushing. Fig. 29. Also,
the ends of the spring attached to the
exposure-compensation lever, Fig. 29,
must come against the outer circum
ference of the upper brass bushing.
Finally, seat the film-speed dial with its
slot over the tab on the film-speed brush.
Fig. 30. Replace the black plate (the plate
with the compensation calibrations) so
that the film-speed window is over the
film-speed calibrations. Then rotate the
black plate until you feel its tab drop into
one of the slots in the upper brass
bushing.
CHECKING THE FILM-SPEED
RESISTOR
With the top cover removed, you can
see the parts of the film-speed resistor.
Fig. 31. If you know you're going to
remove the front-plate/m irror-cage
assembly, lift out the film-speed lock, the
lower brass bushing, and the film-speed
brush. However, if you're trouble
shooting or adjusting the camera,
reassemble the film-speed dial.
Why? With the film-speed dial remov
ed, the film-speed brush doesn't make
firm contact with the resistor ring, Fig.
31. The camera then exhibits the symp
toms of an open film-speed resistor:
- only the overrange LED turns on
- the diaphragm always stops down
fully in the S mode
-the shutter delivers only the
mechanical speed (1/1000 second) in
either automatic mode.
Even with the film-speed dial reas
sembled, there's a trick to setting the film
speed. With the top cover removed,
neither the film-speed lock nor the
exposure-compensation lever keys to
anything. You must set both parts in their
proper positions before the film-speed
setting is valid.
A detent spring on the bottom of the
resistor ring provides the click stops for
the compensation settings. The detent
spring catches one of five detent slots in
the rewind-shaft support plate. Fig. 31.
First turn the exposure-compensation lever
until the detent spring seats in the center
slot; that's the "normal" position. The two
slots on each side of the "normal" position
provide the intentional overexposure and
underexposure settings.
Next rotate the film-speed lock to align
the "0" compensation calibration with
the index on the compensation lever. As
long as the "0" calibration remains align-

ed, you can believe the film-speed set
ting. Naturally, Minolta has a special top
cover which holds the film-speed dial in
position for tests and adjustments (ASA
100, 0 compensation). But, without the
special top cover, you'll have to make
sure the parts don't shift out of position.
Fig. 32 illustrates the operation of the
film-speed resistor. Setting the film speed
moves the film-speed brush along the
resistance band; changing the compensa
tion setting rotates the resistor ring. In
either case, you're changing the resis
tance between the blue wire and the gray
wire to program the operational amplifier
inside IC1.
If you measure the resistance between
the purple wire and the gray wire, Fig. 32,
you should read the value of the entire
resistance band — around 28K. Between
the blue wire and the gray wire, you
should see the resistance smoothly
decrease as you set slower film speeds;
the resistance should go from around 28K
to around 847 ohms. Here are the re
sistance values measured from a repre
sentative camera for different compensa
tion settings at ASA 100:
+ 1
5.84K
0
9.06K
-1
12.55K
CHECKING THE MODE SWITCH
Before replacing the speed knob, you
might take a look at the speed selector
and the mode switch at the wind-lever
end of the camera. Fig. 33. At the "A ”
setting, the nut on the mode switch
comes against the mask lever. The nut
then pushes the mask lever in a clockwise
direction. In turn, the mask lever pulls the
mask over the window for the shutter-
speed indication. Remember, the shutter-
speed setting has no meaning in the "A "
mode.
The spring-loaded scale to the front of
the pentaprism provides the shutter-
speed indication. Fig. 34. A tungsten wire
couples the shutter-speed scale to the
speed selector. Turning the speed selec
tor in a counterclockwise direction draws
the tungsten wire from left to right in Fig.
34. The tungsten wire then pulls the
shutter-speed scale to the faster-speed
calibrations. Notice that you can rotate
the wire-hooking nut. Fig. 33, to precisely
align the shutter-speed calibrations
through the finder.
Certain malfunctions in the electronic
operation might lead you to suspect a
problem with the mode switch. For exam
ple, suppose that there's poor brush con
tact or dirty contact surfaces. Poor con
tact at the left-hand side of the brush.
Fig. 33, causes the overrange LED to re
main on. Also, the shutter delivers only its
mechanical speed. Poor contact at the
right-hand side causes the shutter to
hang open at all modes.
Later models of the camera have a sup
port arm above the mode switch; the sup
port arm maintains firm brush contact.
Figure 32
Figure 33
But, in earlier models, the mode switch
should be one of your first suspects. You
can pinpoint a problem to the mode
switch by using voltage tests. However,
you might first replace the speed knob
and the wind lever. You’ll then be able to
troubleshoot most of the electronics in
the camera — even though you can't as
yet reach all of the actual components.
Figure 34
PURPLE
FILM-SPEED BRUSH
^V W V W W V A
BLUE
GRAY

OPERATION OF THE METERING
SYSTEM
From the lop of the camera, Fig. 34,
you can see only one of the three IC's —
IC1. The other two IC's mount to the flex
circuit at the side of the mirror cage. IC2,
as mentioned earlier, controls the
viewfinder LEDs. A hybrid IC — H-IC —
contains the transistor switching system
that links together the various camera
functions.
But IC1 does just about everything else
in the camera. For one thing, it contains
the op amp for the single silicon photo
diode (SPD), Fig. 35. Pushing the release
button part way closes the metering
switch to supply power to the circuit; you
should then measure +3V at pin 1 of IC1,
Fig. 34. Also, the circuit forward biases
the silicon photodiode.
Figure 35
Figure 36
Current through the SPD determines
the gate bias of an FET (field-effect tran
sistor), Fig. 36. You can't as yet see the
FET in the camera; it mounts to the
underside of the flex circuit. The FET then
changes the linear current changes
through the SPD to linear voltage
changes at the amplifier input.
The voltage at the output of the op
amp. Fig. 36, now goes more positive as
the light intensity increases. This voltage
output feeds two circuits — the memory
system through IC1 and the LED display
through IC2. Besides seeing the output of
the op amp, IC2 receives an input from
the diaphragm resistor, Fig. 36. Conse
quently, all three exposure variables —
the light level, the film speed, and the
f/stop — contribute to the LED readout.
At the "S " mode, the minimum-aperture
information also goes to IC2.
IC1 uses the op amp output to charge
the memory capacitor, Fig. 35. As the
output of the op amp goes more positive,
the voltage measured across the memory
capacitor increases. So, if you connect a
voltmeter across the memory capacitor,
you should get a higher reading as you in
crease the light level or set a faster film
speed. Just push the release button part
way to charge the memory capacitor.
The charge across the memory capa
citor can continue changing as long as
the memory switch. Fig. 36, remains clos
ed. Fig. 33 points out the memory switch
in the camera. Just before the mirror
starts to rise, the insulated lever shown in
Fig. 33 drives open the memory switch.
Opening the memory switch locks in the
memory-capacitor charge.
However, you'll notice in Fig. 36 that
the memory-capacitor charge doesn't
change with different diaphragm open
ings. The diaphragm resistor affects only
the meter readout; it has nothing to say
about the actual exposure time. Yet the
exposure-control circuit must know the
diaphragm setting in order to program the
proper shutter speed.
Unlike most systems, the XD-11 selects
the automatic shutter speed by reading
the light through a stopped-down aper
ture. With the diaphragm fully open, the
SPD sees the maximum amount of light.
The indication circuit for the LED readout
must know the selected diaphragm open
ing in order to display the proper shutter
speed at the "A " mode.
Then, when you push the release but
ton the rest of the way, the diaphragm
starts closing. As a result, the SPD sees
less and less light. Now the voltage out
put of the op amp decreases (goes less
positive) in proportion to the actual
diaphragm opening.
The voltage across the memory
capacitor also decreases as the dia
phragm stops down. Once the diaphragm
reaches the proper aperture size, the
memory switch opens. Consequently, the
charge remains locked in the memory
capacitor. The m emory-capacitor
voltage, modified by the decreasing out
put of the op amp, reflects all of the ex
posure variables — the light level, the
film-speed setting, and the diaphragm
opening.
After the memory switch opens, the
mirror starts moving to the taking posi
tion. The output of the op amp then
drops even more. But the actual metering
voltage no longer matters — the memory
capacitor has already memorized the
reference voltage.
The unique metering action can help in
troubleshooting. Since the indication cir-
SPEED
COMPARATORS
FOR LEDS
— V ^ A A
DIAPHRAGM
RESISTOR
A AND S
MODES
(0
uj O
t o »
ir uj
= UiW
z a uj
to tone
MEMORY
SWITCH
MEMORY
CAPACITOR

cuit takes its light reading through the
largest aperture — and the exposure-
control circuit takes its light reading
through the stopped-down aperture — the
two systems can disagree. For example,
suppose there’s a problem with the
diaphragm resistor. Although the LED in
dication would then be incorrect, the shut
ter would still provide the proper exposure.
You can get a better idea of the two
separate actions if you operate the
camera on "A " with the lens removed.
Try rotating the diaphragm-metering ring
until the LED display indicates a slow
shutter speed. Then release the shutter.
You'll find that the shutter delivers an ex
posure time that's much faster than the
readout indicates. Why? You tricked the
readout into thinking you'd set a small
aperture. But the exposure-control circuit
knew better.
At the manually calibrated settings, the
meter readout still tells you the proper
shutter speed for the light conditions.
However, the shutter-speed setting —
rather than the op amp — controls the
voltage across the memory capacitor. As
you set faster shutter speeds, the voltage
across the memory capacitor increases.
Earlier, we mentioned the symptom
when there's poor contact at one side of
the mode switch — the shutter hangs
open at all functions. You can see why in
Fig. 36. If the mode switch fails to make
good contact, the memory capacitor
ycan't charge. Then, since the shutter
thinks you're shooting in total darkness, it
hangs open.
A defective memory capacitor or poor
contact in the memory switch, Fig. 36,
results in the same malfunction. In fact,
any condition which prevents a reference
voltage causes the shutter to hang open.
The block diagram of the shutter-speed
control circuit, Fig. 37, may make the
reason apparent.
The memorized voltage across the
memory capacitor provides the base bias
for the current-control transistor, Fig. 37.
Current through the transistor charges
the timing capacitor. With a larger (more
positive) base voltage, the transistor con
ducts harder; it then charges the timing
capacitor more quickly.
However, if there's no voltage across
the memory capacitor, the transistor
won't conduct at all. As a result, the tim
ing capacitor never reaches the voltage
which shuts off the electromagnet cur
rent. And the shutter stays open.
Fig. 37 also shows the electromagnet
current path. Consider that you've just
completed the release-button stroke to
release the shutter. As you've seen,
switch S7 remains closed until the mirror-
release combination magnet M2 repels its
armature. With S7 closed, the switching
transistor. Fig. 37, turns off; the base of
the transistor connects to ground.
With the switching transistor turned
off, OV appears at each lead of the elec
tromagnet. Then, when the mirror re
leases, S7 opens and applies a positive
voltage to the transistor base. The swit
ching transistor now turns on, connec
ting the red electromagnet lead to + 3V.
The holding current flows from the
electromagnet current source, Fig. 37,
through the coil, and through the tran
sistor to the positive side of the supply.
Now the energized electromagnet holds
the closing blade to keep the shutter
open. The current source continues
feeding current to the electromagnet until
the timing capacitor charges.
Figure 37
But the timing capacitor can t start
charging until the trigger switch (timing
switch) opens. Fig. 37. As long as the
trigger switch remains closed, the
current-control transistor won't conduct.
The trigger switch closes when you cock
the shutter. Then, when the opening-
blade assembly starts to move, it opens
the trigger switch.
Now the expansion circuit feeds cur
rent to the emitter of the current-control
transistor. Fig. 37. And the transistor
turns on, conducting the current that
charges the timing capacitor. The higher
the memorized reference voltage, the
more quickly the timing capacitor reaches
the voltage which shuts off the elec
tromagnet current source.
Fig. 38 shows the voltage measured
3V
Figure 38

across the timing capacitor. When you
push the release button far enough to
close the metering switch, a slight voltage
appears across the timing capacitor.
However, the timing capacitor can't
charge any further until the trigger switch
opens. Opening the trigger switch then
allows the timing capacitor to charge as
shown in Fig. 38. When the timing
capacitor reaches around 0.5V, it shuts
off the current through the electromagnet
to end the exposure.
You can't as yet reach most of the
components shown in Fig. 36 and Fig. 37.
But you can often pinpoint the problem
from the top of the camera. So, before
covering the complete electronic opera
tion, let's run through the techniques you
can use to check the switches and the
electromagnet without disassembly.
CHECKING THE ELECTROMAGNET
An open electromagnet coil causes the
shutter to deliver only its mechanical
speed (1/1000 second or faster). Al
though you'll have to remove the Seiko
shutter to replace the electromagnet, you
can check the coil without further dis
assembly. Remove the small section of in
sulating tape at the top of the flex circuit.
You can now see the brown wire and the
red wire coming from the electromagnet.
Check the continuity of the coil by
measuring the resistance between the red
wire and the brown wire. You should
measure around 300 ohms. Alternately,
you can perform a quick shorting test to
determine if the electromagnet is good.
Try shorting between the brown wire and
ground as you release the shutter. If the
coil is good, the shutter will hang open
for as long as you maintain the short.
With most electronic shutters, you can
check coil continuity by measuring the
voltage at each electromagnet lead. If you
measure a voltage at one lead but not at
the other, the coil must be open.
However, you've seen that the transistor
in series with the XD-11 electromagnet re
mains off until you release the shutter.
So, at the red electromagnet lead, you'll
measure 0V — not the full battery voltage
as you would with most other circuits.
You'll also measure 0V at the brown lead.
When you release the shutter, the tran
sistor turns on and connects the red elec
tromagnet lead to positive battery, Fig.
38. So, with the shutter open, you should
measure 3V at the red wire, Fig. 39. But
you should still measure 0V at the brown
wire. The brown wire now connects to
0V, keeping a 3V potential difference
across the electromagnet.
The voltage at the brown wire switches
high to end the exposure. If you leave the
positive voltmeter lead on the brown
wire, you can see the voltage switch high.
You should see a voltage indication at the
end of the exposure. But the voltage only
appears briefly. When the mirror returns,
switch S7, Fig. 38, once again opens to
shut off the transistor. Both elec
tromagnet leads then return to 0V.
A poor ground connection in the circuit
may also cause the shutter to deliver only
its fastest speed. Suspect a poor ground
connection if you measure a voltage at
the red electromagnet lead when you par
tially depress the release button. If you
measure around 2.5V, try retouching the
solder connections to the black ground
wire, Fig. 39. However, you may have to
remove the front-plate/mirror-cage
assembly to correct the ground contact.
A screw on the section of flex circuit that
mounts to the mirror cage makes the
ground connection through the camera
body.
If you measure the full 3V to the red wire
and the brown wire, the switching tran
sistor may be shorted. Fig. 38. A 3V
reading could also indicate a problem with
the electromagnet current source. Both
components are inside H-IC, the hybrid IC
on the side of the mirror cage. You'll have
to remove the front-plate/mirror-cage
assembly to replace the IC.
CHECKING THE METERING SWITCH
AND THE RELEASE SWITCH
Both the metering switch and the
release switch are at the back of the front-
plate assembly. As yet, you can't reach
the switches. But you can reach the
switch connections for troubleshooting.
The metering switch connects to the
green wire, and the release switch con
nects to the orange wire, Fig. 39.
Fig. 40 shows the portion of the
schematic that includes the two switches.
As you start pushing the release button,
the metering switch S5 closes. The
metering switch turns on transistor T1,
applying the positive battery voltage to
pin 1 of IC1 and to pin 2 of IC2.
Pushing the release button the rest of
the way closes the release switch S3. The
release switch now tells the electro
magnetic release circuit to release the
mirror. Also, the power-holding circuit —
transistor T11 in Fig. 40 — turns on. T11
now keeps transistor T1 conducting. So,
even if you allow the release button to
return, the circuit continues to operate.
Transistors T1 and T11 are both inside
H-IC on the side of the mirror cage. Diode
D2, a transistor connected as a diode.
Fig. 40, is also inside the hybrid IC. You
might suspect a problem in this portion of
the circuit if the camera draws power
constantly — even though you haven’t
depressed the release button.
What if the metering switch S5 fails to
make contact? Obviously, the LEDs will
not turn on when you partially depress the
release button. Yet, thanks to the power-
holding circuit, the LEDs will turn on when
you fully depress the release button. With
a defective release switch S3, the shutter
won't release at the electronically con
trolled settings.
To check the metering switch, measure
the voltage at the green wire, Fig. 39. You
should measure around 2.5V. When you
depress the release button part way, you
should measure 0V at the green wire. If
the voltage doesn't drop to 0V (ground),
the metering switch isn't making good
contact.
Alternately, you can check the metering
switch by connecting an ohmmeter be
tween the green wire and ground; you
should measure direct continuity when
you push the release button part way. Or
you can simply short the green wire to
ground. Connecting the green wire directly
Figure 39

to ground should turn on the LEDs.
If the LEDs turn on during your short
ing test, the problem must be in the
metering switch. However, if the LEDs
still won't turn on, the problem is in the
circuit. Suppose, for example, that you
measure OV to pin 1 of IC1 while you're
shorting the green wire to ground.
Suspect a problem with H-IC; transistor
T1, apparently isn't turning on.
Use similar techniques to check the
release switch. But remember — the
release switch only closes at the elec
tronically controlled speeds. Use any
speed-knob setting except bulb or the
mechanical 1/100 second. Then measure
the voltage to the orange-wire connec
tion, Fig. 39. You should measure 2.5V
until you fully depress the release button;
the voltage should drop to 0V with the
release button depressed.
You can also use a shorting test to check
the release switch. Shorting the orange wire
to ground should release the shutter. If your
shorting test doesn't release the shutter, IC2
may be the problem.
CHECKING THE TRIGGER SWITCH
Like the electromagnet, the trigger
switch is a shutter part. The trigger
switch should close when you cock the
shutter. When the shutter releases, the
trigger switch should open to initiate the
exposure.
If the trigger switch remains closed, the
shutter will hang open. If the trigger
switch fails to close or makes poor con
tact, you won't be able to bring in your
shutter-speed adjustments — especially
the fast speeds. Erratic shutter speeds may
also result from poor contact in the trigger
switch.
The trigger switch connects between
the black wire. Fig. 39, and ground. Check
the continuity between the black wire and
ground with the shutter cocked; you
should measure direct continuity, in
dicating that the trigger switch is closed.
Then release the shutter. You should now
measure no continuity — an open — be
tween the black wire and ground.
CHECKING THE MEMORY SWITCH
Poor contact in the memory switch nor
mally causes the shutter to hang open.
With most cameras, you must perform
major surgery to reach the memory switch.
But, in the XD-11, you need only remove
the top cover to clean the memory switch
and check the continuity.
The blade of the memory switch that's
closer to the back of the camera connects
to the memory capacitor and to pin 10 of
IC1, Fig. 34. You can check the memory
switch by measuring the voltage to pin 10
with the release button partially depress
ed; you should measure around 0.5V. If
the memory switch isn't making good
contact, you'll measure 0V at pin 10.
Or you can measure the continuity be
tween the front blade of the memory
switch, Fig. 33, and the memory ca
pacitor, Fig. 35. You should measure
direct continuity. With the shutter held
open on bulb, you should measure no
continuity.
Figure 40

minolia :xe>ii
1- ■ —
-
----
= ■■ === = ^= = = -
SCHEMATIC OF THE XD-11
It may at first appear that the complete schematic. Fig. 41,
shows only two of the three IC's. However, the circled numbers
indicate the connections to the third IC — that’s H-IC, the
hybrid IC on the side of the mirror cage. All the parts enclosed
by the dotted line are inside H-IC.
The schematic shows all the components inside H-IC. It also
gives you a good indication as to the components inside the
other two IC's. Such detailed information can be especially
helpful in troubleshooting. No, you can't take apart an IC to
repair the innards. But you can tell what kinds of signals should
appear at the IC pins.
For example, the large triangle inside IC1 indicates the
amplifier for the silicon photocell (SPC in the schematic). The
connection at pin 19 charges the memory capacitor C2. You
then know at a glance that the voltage at pin 19 should go more
positive as you increase the light striking the SPC.
The center triangle inside IC1 is the comparator for the
diaphragm-control circuit. When the output of the comparator
switches low, it turns on transistor T13. T13 then switches on
T5. Now C5 discharges through the diaphragm-control magnet
M2 to arrest the diaphragm closure.
At pin 16 of IC1, another comparator provides the switch for
the closing-curtain electromagnet M3. When the comparator
output at pin 16 drops low, current flows through M3 to hold
open the shutter. The voltage at pin 16 goes high to shut off the
electromagnet current.
Inside IC2, you can see the large triangle which represents
the individual comparator stages for the LEDs. The cathode of
each LED connects to a comparator output. Notice that the
anodes of the LEDs connect to ■+ 3V when transistor T1 turns
on. Each LED then has the anode bias it needs to conduct. As
soon as the cathode of a particular LED switches low, current
can flow through that LED.
The small comparator inside IC2 — the one connected to pin
3 — provides the release lock. When the release switch S3
closes, the comparator compares the battery voltage with a
reference voltage. Then, providing there's sufficient power for
proper operation, the comparator switches low. The low
voltage at pin 3 forward biases transistor T6 to release the mir
ror. Another triangle inside IC2 represents the analog-to-digital
converter which lights the "60" LED when the flash unit
charges.
As yet, you can only reach one IC for voltage tests — IC1 at
the top of the camera. However, you'll be able to check H-IC
after you remove the front-plate/mirror-cage assembly. So,
before going through the rest of the electronic operation, we'll
describe the procedure for separating the front-plate/mirror-
cage assembly from the body casting.

Figure 41
/