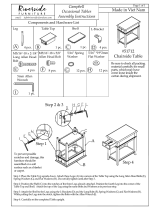
Home Styles 5020-309 Operating instructions

Type
Operating instructions

This manual is also suitable for

Hardware List
E.
Leg
4 pcs.
IMPORTANT NOTE
Carefully remove all the parts from the carton and put
them individually on a soft cloth to prevent scratches
or other damages occuring to the parts.
We have taken great care in the design of this
product and request that you carefully and strictly
follow our assembly instructions to ensure a
completed product as it was designed.
A.
Top
1 pc.
B.
Top
1 pc.
C.
Leaf
1 pc.
F.
Table Slide
2 pcs.
88 5020 31
Tools required for assembly : screwdriverPhillips
Home Styles Consumer Assistance Line 888-680-7460 and 877-831-0319
Key Wrench
1 pc.
Part List
Monarch Dining Table
D.
Apron
2 pcs.
Hex Wrench
1 pc.
Small
Hex Wrench
1 pc.
Bolt
8 pcs. (+1 extra )
Spring Washer
8 pcs. (+1 extra )
Flat Washer
8 pcs. (+1 extra )
Spring Washer (Small)
12 pcs. (+1 extra )
Flat Washer (Small)
12 pcs. (+1 extra )
Head Cap Bolt
12 pcs. (+1 extra)
Wood Screw
16 pcs. (+1 extra )
Wood Screw (short)
6 pcs. (+1 extra )
A
F
B
F
STEP 1
Assembly Instructions 2/3
Attach Top (A) with (B), by aligning dowels with the holes and firmly
pushing together.
Engage the locks by turning their handles clockwise ¼ turn
(see Figure 2).
Attach Table Slides (F) to the unit using Head Cap Bolts,
Spring Washers(Small) and Flat Washers(Small).
Tighten Wood Screws (see Figure 3).
IMPORTANT
* Do not tighten up all the screws until each part is properly assembled.
* You should keep Hex Wrench, Key Wrench in a safe place as you may need to tighten up the Bolts in the future.
Place Top (A) and (B) face side down
on a soft cloth.
Remove Table Slides (F) from their packing position by loosening
and removing Head Cap Bolts, Spring Washers(Small) and
Flat Washers(Small) using Hex Wrench.(see Figure 1)
Note: These 4 Head Cap Bolts, Spring Washers(Small) and Flat Washers(Small)
will be used in Step 2.
DO NOT DISCARD
A
E
B
F
F
STEP 2
Figure 2
Figure 3
Wood Screw
Head Cap Bolt
Spring Washer(Small)
Flat Washer(Small)
Head Cap Bolt
Spring Washer(Small)
Flat Washer(Small)
Hex Wrench
Figure 1
Wood Screw
Head Cap Bolt
Spring Washer(Small)
Flat Washer(Small)
STEP 5
Assembly Instructions 3/3
C
Disengage the locks by turning their handles counter-clockwise ¼
turn (see Figure 3).
Pull out both sides of the table, then place Leaf (C) in the unit as shown,
aligning the dowels with the holes.
Push the table together firmly, then engage the locks by turning their handles clockwise ¼ turn
(see Figure 2).
Adding the Leaf
(Figure 3)
STEP 4
Attach Aprons (D) to Leaf (C)
with Head Cap Bolts,
Spring Washers (Small)
Flat Washers (Small)
and Wood Screws (short).
C
D
D
Head Cap Bolt
Spring Washer (Small)
Flat Washer (Small)
Attach Legs (E) to the unit
with Flat Washers,
Spring Washers and Bolts.
STEP 3
E
E
E
E
Flat Washer
Spring Washer
Bolt
Wood Screw (short)
  • Page 1 1
  • Page 2 2
  • Page 3 3

Home Styles 5020-309 Operating instructions

Type
Operating instructions
This manual is also suitable for

Ask a question and I''ll find the answer in the document

Finding information in a document is now easier with AI