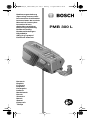
Bosch PMB 300 Owner's manual
- Category
- Laser levels
- Type
- Owner's manual
This manual is also suitable for
Page is loading ...

5
6
7
8
10
11
12
4
14
b
a
3
2
15
9
11
13
2 607 990 031
pmb300l_bu_1609929J04_t.fm Seite 2 Montag, 1. August 2005 4:36 16

A
16
17
C
D
B
18
19
pmb300l_bu_1609929J04_t.fm Seite 3 Montag, 1. August 2005 4:36 16
Page is loading ...
Page is loading ...
Page is loading ...
Page is loading ...
Page is loading ...
Page is loading ...

English–1
1 609 929 J04 • (05.08) T
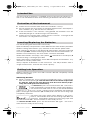
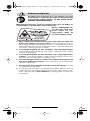
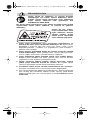
All instructions must be read completely and strictly
followed to ensure safe and secure working with the
measuring instrument. Do not make the warning
signs on the measuring instrument unreadable.
SAVE THESE INSTRUCTIONS IN A SECURE PLACE.
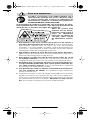
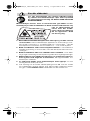
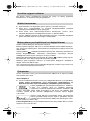
The measuring instrument is delivered with a warning sign (identi-
fied in the illustration of the measuring instrument on the graphic
page with the number 13):
■ Do not direct the laser beam at persons or animals and do not
look directly into the laser beam. This measuring instrument gen-
erates laser radiation of the laser class 2M according to EN 60825-1.
Looking directly into the laser beam – especially with optical light col-
lecting instruments such as binoculars, etc. – can damage the eyes.
■ Do not use the laser viewing glasses as protective glasses. The
laser viewing glasses serve for better recognition of the laser beam,
however, they do not protect against the laser radiation.
■ Do not use the laser viewing glasses as sun glasses or in street
traffic. The laser viewing glasses do not provide complete UV protec-
tion and reduce colour perception.
■ Have the measuring instrument repaired only by qualified spe-
cialist personnel and only with original replacement parts. In
this manner, it is ensured that the safety of the instrument is main-
tained.
■ Do not allow children to use the laser measuring instrument
without supervision. They could unintentionally blind other persons.
■ Be careful when actuating the reel-in button 12. Danger of injury from
the whipping of the measuring tape. Always reel in the measuring tape
in steps. During reeling in, keep hands away from the measuring
tape.
For Your Safety
pmb300l_bu_1609929J04_t.fm Seite 1 Montag, 1. August 2005 4:36 16

English–2
1 609 929 J04 • (05.08) T
Please refer to the article number on the nameplate of your instrument
since the trade designation of individual instruments can vary.
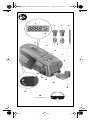
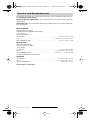
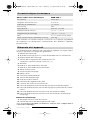
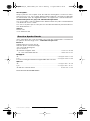
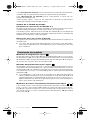
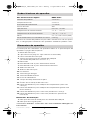
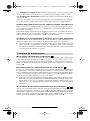
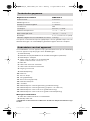
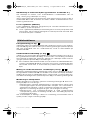
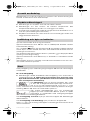
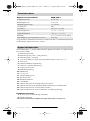
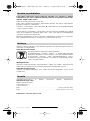
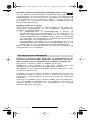
The numbering of the product elements refers to the illustration of the in-
strument on the graphic page.
1 Marking knob
2 Marking pencil (e.g. commercially available lead pencil)*
3 Marking pin/stamp
4 Button for changing the measuring unit
(only Article Number 3 603 K07 0..)
5 Display
6 Bubble level for vertical alignment
7 Bubble level for horizontal alignment
8 Laser beam outlet
9 Marking opening
10 Measuring tape
11 On/off button
12 Reel-in button
13 Warning sign
14 Battery compartment cover
15 Laser viewing glasses*
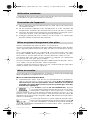
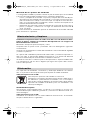
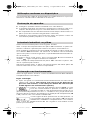
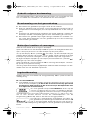
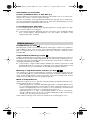
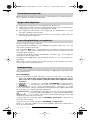
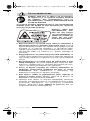
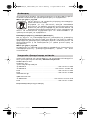
16 Reference point for length measurement (case edge)
17 Reference point for length measurement
(zero point of the measuring tape)
18 Reference point for the laser beam (case notch)
19 Reference point for the laser beam (notch of the marking opening)
Display Elements
a Measured value and measuring unit display
b Battery indicator
* Not all the accessories illustrated or described are included in standard
delivery.
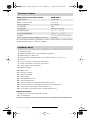
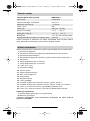
Product Specifications
Digital Laser Tape Measure PMB 300 L
Article number 3 603 K07 ...
Measuring length, max. 3 m/10 ft
Levelling accuracy ±1 mm/m
Laser class 2M
Laser type 650 nm, <3 mW
Operating temperature +5 °C ... +40 °C
Storage temperature –20 °C ... +70 °C
Batteries 2 x 1.5 V DC LR 03 (AAA)
Weight in accordance with
EPTA-Procedure 01/2003 0.26 kg
Product Elements
pmb300l_bu_1609929J04_t.fm Seite 2 Montag, 1. August 2005 4:36 16

English–3
1 609 929 J04 • (05.08) T
The measuring instrument is intended for the measuring of distances as
well as for the determination and checking of horizontal or vertical lines.
■ Protect the instrument from moisture and direct sunrays.
■ Do not expose the instrument to extreme temperatures and tempera-
ture variations (e.g., do not leave in vehicles).
■ If the instrument is not used for a long period, the batteries must be
removed (danger of self-discharge and corrosion).
■ Protect the instrument from strong impacts and falls. Damage to the
instrument can degrade the accuracy.
Use Alkali-Manganese batteries exclusively.
Open the battery compartment cover 14 and insert the batteries provided.
When inserting the batteries, pay attention to the correct polarisation.
If the symbol appears in the display 5, the batteries are exhausted and
must be replaced. When continuing to work with exhausted batteries, er-
roneous measurement by the instrument cannot be excluded.
When the batteries are empty, the symbol then blinks in the display 5
and measuring is no longer possible.
Open the battery compartment cover 14 and replace the batteries. Pay
attention to correct polarisation.
Always replace all batteries at the same time. Use only batteries from a
single manufacturer and with the same capacity.
Before switching on, press the reel-in button 12 and completely rewind
the measuring tape.
Switching On/Off
■ When switched on, the instrument immediately emits a laser beam
from the outlet opening 8. Do not direct the laser beam at persons
or animals and do not look directly into the laser beam (espe-
cially not with optical instruments).
To switch on, press the on/off button 11. The laser is
then in operation and the display shown here appears.
The initial measured value is 0.8 cm (for Article Number
3 603 K07 0.. also 5/16") since a distance exists between the reference
points for length measurement (16 and 17) even with the measuring tape
completely rewound.
The error message shown here appears if the instru-
ment is switched on when the measuring tape 10 is not
rewound. Completely rewind the measuring tape with
the reel-in button 12. The instrument is then ready for use.
To switch off the laser, press the on/off button 11 again. The instru-
ment remains ready for measuring.
Intended Use
Protection of the Instrument
Inserting/Replacing the Batteries
Putting into Operation
pmb300l_bu_1609929J04_t.fm Seite 3 Montag, 1. August 2005 4:36 16

English–4
1 609 929 J04 • (05.08) T
To switch off the instrument, press the on/off button 11 again.
After approx. 5 min without performing a measurement, the instrument
switches off automatically to save the batteries.
Changing the Measuring Unit
(only for Article Number 3 603 K07 0..)
After switching on the measuring instrument, the measured values are
shown in the unit that was selected the last time the measuring instrument
was used.
By repeated pressing of the button for changing the measuring unit 4 with
a pointed object, a change can be made at any time between the meas-
uring units of centimetres and feet/inches.
Laser Viewing Glasses (Accessory)
The laser viewing glasses filter out the ambient light. As a result, the red
light of the laser appears brighter to the eye.
■ The laser viewing glasses (accessory) are not protective glasses
against laser radiation. Do not use them as protective glasses against
strong sun light or in traffic.
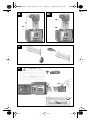
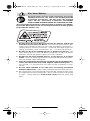
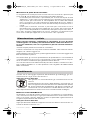
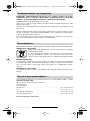
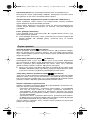
Length Measurements (see Fig. )
The instrument measures the distance d between the lower case edge
(reference point 16) and the outer notch on the marking opening (refer-
ence point 17). The measured value that appears in the display 5 corre-
sponds to the scale value on the measuring tape 10.
Horizontal/Vertical Alignment (see Fig. )
Switch on the laser beam as necessary. For the horizontal alignment of
the laser beam, use the bubble level 7, for the vertical alignment, the bub-
ble level 6. For alignment to existing markings, place the instrument on
the marking with the notch under the laser outlet (reference point 18).
■ The horizontal or the vertical path of the laser beam can be determined
exclusively with the bubble levels 6 or 7. The placing of the case
against horizontal or vertical surfaces does not ensure parallelism of
the laser beam to these reference lines.
Measuring Horizontal/Vertical Distances (see Fig. / )
For exact measuring of horizontal/vertical distances, switch on the laser
beam and pull out the measuring tape 10. Level the laser beam with the
aid of the bubble levels 6 or 7. Then position the measuring tap so that
the laser beam strikes the inner notch (reference point 19) on the marking
opening 9.
Marking the Measured Point
Measured lengths can be marked through the marking opening 9. Avail-
able as marking aids are:
– Marking pin/stamp: The marking pin/stamp 3 can be inserted option-
ally with the point or the stamp downward in the marking knob 1. To
prevent the stamp ink from drying, insert the marking stamp end into
the marking knob 1 after finishing the measurement.
– Making pencil: Remove the marking knob 1 together with the marking
pin/stamp and insert a marking pencil 2 (e.g., a commercially availa-
ble lead pencil) into the marking opening.
After a completed measurement, place a mark on the surface by pressure
on the selected making aid.
Measurement Functions
A
C
B D
pmb300l_bu_1609929J04_t.fm Seite 4 Montag, 1. August 2005 4:36 16

English–5
1 609 929 J04 • (05.08) T
Before each use, check the instrument. For visible damage or
loose parts in the interior of the instrument, reliable functioning is
no longer ensured.
Always keep the instrument clean and dry.
Wipe off dirt with a damp, soft cloth. Do not use aggressive cleaning
agents or solvents.
Clean the laser outlet 8 regularly with a cotton swab and remove lint.
If the instrument should fail despite the care taken in manufacture and
testing, repair should be carried out by an authorised customer services
agent for Bosch power tools.
For all inquiries and replacement parts ordering, always include the 10-
place article number on the nameplate of the instrument.
The measuring instrument, accessories and packaging should be dis-
posed of for recycling in a environmental friendly manner.
Only for EU countries
Do not dispose of measuring instruments in the household
waste!
According to the European Guidelines 2002/96/EG for
waste electric and electronic equipment and its implemen-
tation into national law, measuring instruments that are no
longer usable must be collected separately and recycled in
an environmentally friendly manner.
Batteries
Do not throw batteries into the household waste, fire or water. Batteries
should be collected, recycled or disposed of in an environmentally friendly
manner.
Only for EU countries
According to the Guidelines 91/157/EEC, defective or used batteries
must be recycled.
Batteries/rechargeable batteries that are no longer useable can be sent
directly to:
Great Britain
Robert Bosch Ltd. (B.S.C.)
P.O. Box 98
Broadwater Park
North Orbital Road
Denham-Uxbridge
Middlesex UB 9 5HJ
✆ Service. . . . . . . . . . . . . . . . . . . . . . . . . . . . . .+44 (0) 18 95/83 87 82
✆ Advice line . . . . . . . . . . . . . . . . . . . . . . . . . . .+44 (0) 18 95/83 87 91
Fax . . . . . . . . . . . . . . . . . . . . . . . . . . . . . . . . . . .+44 (0) 18 95/83 87 89
Maintenance and Cleaning
Disposal
pmb300l_bu_1609929J04_t.fm Seite 5 Montag, 1. August 2005 4:36 16

English–6
1 609 929 J04 • (05.08) T
Exploded views and information on spare parts can be found under:
www.bosch-pt.com.
Great Britain
Robert Bosch Ltd. (B.S.C.)
P.O. Box 98
Broadwater Park
North Orbital Road
Denham-Uxbridge
Middlesex UB 9 5HJ
✆ Service. . . . . . . . . . . . . . . . . . . . . . . . . . . . . .+44 (0) 18 95/83 87 82
✆ Advice line . . . . . . . . . . . . . . . . . . . . . . . . . . .+44 (0) 18 95/83 87 91
Fax . . . . . . . . . . . . . . . . . . . . . . . . . . . . . . . . . . .+44 (0) 18 95/83 87 89
Ireland
Beaver Distribution Ltd.
Greenhills Road
Tallaght-Dublin 24
✆ Service. . . . . . . . . . . . . . . . . . . . . . . . . . . . . . . .+ 353 (0)1/414 9400
Fax . . . . . . . . . . . . . . . . . . . . . . . . . . . . . . . . . . . . .+ 353 (0)1/459 8030
Australia and New Zealand
Robert Bosch Australia Pty. Ltd.
RBAU/SBT
1555 Centre Road, P.O. Box 66
3168 Clayton/Victoria
✆ . . . . . . . . . . . . . . . . . . . . . . . . . . . . . . . . . . . .+61 (0)1/3 00 30 70 44
Fax . . . . . . . . . . . . . . . . . . . . . . . . . . . . . . . . . . .+61 (0)1/3 00 30 70 45
www.bosch.com.au
Specifications subject to change without notice
Service and Customer Advice
pmb300l_bu_1609929J04_t.fm Seite 6 Montag, 1. August 2005 4:36 16
Page is loading ...
Page is loading ...
Page is loading ...
Page is loading ...
Page is loading ...
Page is loading ...
Page is loading ...
Page is loading ...
Page is loading ...
Page is loading ...
Page is loading ...
Page is loading ...
Page is loading ...
Page is loading ...
Page is loading ...
Page is loading ...
Page is loading ...
Page is loading ...
Page is loading ...
Page is loading ...
Page is loading ...
Page is loading ...
Page is loading ...
Page is loading ...
Page is loading ...
Page is loading ...
Page is loading ...
Page is loading ...
Page is loading ...
Page is loading ...
Page is loading ...
Page is loading ...
Page is loading ...
Page is loading ...
Page is loading ...
Page is loading ...
Page is loading ...
Page is loading ...
Page is loading ...
Page is loading ...
Page is loading ...
Page is loading ...
Page is loading ...
Page is loading ...
Page is loading ...
Page is loading ...
Page is loading ...
Page is loading ...
Page is loading ...
Page is loading ...
Page is loading ...
Page is loading ...
Page is loading ...
Page is loading ...
Page is loading ...
Page is loading ...
Page is loading ...
Page is loading ...
Page is loading ...
Page is loading ...
Page is loading ...
Page is loading ...
-
 1
1
-
 2
2
-
 3
3
-
 4
4
-
 5
5
-
 6
6
-
 7
7
-
 8
8
-
 9
9
-
 10
10
-
 11
11
-
 12
12
-
 13
13
-
 14
14
-
 15
15
-
 16
16
-
 17
17
-
 18
18
-
 19
19
-
 20
20
-
 21
21
-
 22
22
-
 23
23
-
 24
24
-
 25
25
-
 26
26
-
 27
27
-
 28
28
-
 29
29
-
 30
30
-
 31
31
-
 32
32
-
 33
33
-
 34
34
-
 35
35
-
 36
36
-
 37
37
-
 38
38
-
 39
39
-
 40
40
-
 41
41
-
 42
42
-
 43
43
-
 44
44
-
 45
45
-
 46
46
-
 47
47
-
 48
48
-
 49
49
-
 50
50
-
 51
51
-
 52
52
-
 53
53
-
 54
54
-
 55
55
-
 56
56
-
 57
57
-
 58
58
-
 59
59
-
 60
60
-
 61
61
-
 62
62
-
 63
63
-
 64
64
-
 65
65
-
 66
66
-
 67
67
-
 68
68
-
 69
69
-
 70
70
-
 71
71
-
 72
72
-
 73
73
-
 74
74
-
 75
75
-
 76
76
-
 77
77


Bosch PMB 300 Owner's manual
- Category
- Laser levels
- Type
- Owner's manual
- This manual is also suitable for
Ask a question and I''ll find the answer in the document
Finding information in a document is now easier with AI
in other languages
- italiano: Bosch PMB 300 Manuale del proprietario
- français: Bosch PMB 300 Le manuel du propriétaire
- español: Bosch PMB 300 El manual del propietario
- Deutsch: Bosch PMB 300 Bedienungsanleitung
- Nederlands: Bosch PMB 300 de handleiding
- português: Bosch PMB 300 Manual do proprietário
- dansk: Bosch PMB 300 Brugervejledning
- Türkçe: Bosch PMB 300 El kitabı
- svenska: Bosch PMB 300 Bruksanvisning
- suomi: Bosch PMB 300 Omistajan opas
Related papers
-
Bosch GIM 60L Specification
-
Bosch GMS 120 Owner's manual
-
Bosch PLL 360 Original Instructions Manual
-
Bosch PLT 2 Owner's manual
-
Bosch GLL 3-50 Owner's manual
-
Bosch PLR 25 Owner's manual
-
-
Bosch PLL 5 Owner's manual
-
Bosch PLR 50 Owner's manual
-
Other documents
-
Hilti PS 300 Operating instructions
-
Flex ALC 3/1-G User manual
-
Beta 1693 User manual
-
IKEA FIXA User manual
-
Parkside PLEM 20 A1 Owner's manual
-
-
-
 BAUKER NLCO1 Owner's manual
-
Leitz 6414 Owner's manual
-
 Powerfix Profi HG03064A Operation and Safety Notes

