
ENGLISH
1. Thermomater has 4 digits display for temperature with °C or °F indicator.
2. Termperature : -55°C to 145.8°C
measuring range (67°F to +299.8°F)
Accuracy : +/- 1°C (at 0 to 60°C)
+/- 1.5°C (full range)
Resclution : 0.1°C (from -49°C to 105°C)
0.2°C (from -55°C to -49°C and 105°C to 129°C)
0.3°C (from 129°C to 140°C)
0.4°C (from 140°C to 148.8°C)
3. Selection of Fast or Slow temperature sensing speed. (1 sec. sampling cycle
or 10 sec. sampling cycle.)
4. High limit temperature and low limit temperature setting function.
5. Temperature alarm beep sound when temperature display reaches high limit
or low limit of temperature.
6. Full segment on test by prossing High Alarm, Low Alarm, Advance and
Alarm ON/OFF together.
7. Fast advance alarm setting function. (5°C or 5°F step up)
8. Alarm enable/disable function.
TEMPERATURE MEASUREMENT
1. Normal sampling rate is 10 sec.
2. Slide 1/10 switch for fast sampling setting 1 or 10 sec.
3. Pull out the steelprobe and stick it into the material or liquld of which the
temperature is to be messured. Corresponding temperature will show on
display.
SELECTION OF °C OR °F
1. Slide °C/°F switch to °C position, temperature wil show in °C range on
display.
2. Slide °C/°F switch to °F position, temperature will show in °F range on
display.
SETTING OF HIGH LIMIT TEMPERATURE
1. Slide SET/LOCK switch to SET position.
2. Press HI button, “HI” will show on display, The corresponding indicator
“HI” will flash.
3. Press ADV, Button select dealred high limit temperature. Selection range is
from -55°C to 148°C (-67°F to +299°F). Press and hold ADV. button own
fast advance the setting (for 5°C or 5°F step up).
4. After high limit temperature setting, press HI button once to return current
temperature and “HI” indicator will show on display.
5. After setting, dlide SET/ LOCK switch to LOCK position.
6. When temperature shown on display matches with the high limit
temperature setting, temperature alarm wil sound for 1 minute with flashing
“DISPLAY” indeator. Temperature alarm can be stopped by pressing HI,
LO, ADV., RESET HI/LO button. If you do not want to open slide cover to
stop alarm, simply slide the
switch to position.
SETTING OF LOW LIMIT TEMPERATURE
1. Slide SET/LOCK switch to SET position.
2. press LO button, “LO” will show on display, the corresponding “LO”
indieator will flash.
3. Press adv. button to select dealred low limit temperature. Selecting range is
from -55°C to 148°C (-57°F to +299°F). Press and hold “ADV.” button can
fest advance the setting for 5°C or 5°F stop up.
4. After low limit temperature setting, press LO button to return the current
temperature and the LO indicator will show on display.
5. After setting, slide SET/LOCK switch to LOCK position.
6. When temperature shown on display matches with the low limit
temperature setting, temperature alarm will aound for 1 minute with
flashing “DISPLAY”. Temperature alarm can be stopped by pressing HI,
LO, ADV., RESET HI/LO button. (or simply slide the
switch to
position.)
DISABLE TEMPERATURE ALARM SETTING
1. Enable High or low Alarm Setting; Press the HI or LOW button once to
toggle to the alarm setting mode than press the adv. button for HIGH or
LOW alarm setting, press the HI or LOW button once to return to the
current temperature display.
2. Disable High or Low Alarm Setting; Slide SET/LOCK switch to set position.
Press the HI or LOW button once to toggie to the alarm setting mode, press
RESET HI/LOW switch to reset the HI or LOW alarm setting than press
the HI or LOW button once to return to the current temperature display.
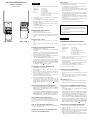
REPLACEMENT OF BATTERY (FIG. 2)
Flip out the bettary cover at back side of unit. Removed exhausted battery and put a new 1.
5V UM-4 (AAA) size battery into battery compertment. Make sure positive (+) and nega-
tive (-) polarftyie matching with the indication inside the battery compartment. Close the
battey cover.
HOW TO SAVE BATTERY POWER (FIG.1)
When not is use, make sure probing time slide switch 1/10 is set on 10 sec. position. This
reduces battery consumption about 10 times.
WARRANTY WILL CEASE TO BE EFFECTIVE IF
CABLE IS CUT OR SHORTENED
PRECAUTION
When handled properly, this unit is engineered to give you years of satisfactory
service. Here are a few product care instructions:
1. Do not immerse the unit in water. If the unit comes in contact with water,
dry it immediately with a soft lint-free cloth.
2. Do not clean the unit with alcohol containing detergent, abrasive or corro-
sive materials. Abrasive cleaning agents may scratch the plastic parts and
corrode the electronic circuit.
3. Do not subject the unit to excessive: force, shock, dust, temperature, or
humidity. Such treatment may result in malfunction, a shorter electronic life
span, damaged batteries, or distorted parts.
4. Do not tamper with the unit's internal components. Doing so will terminate
the unit's warranty and may cause damage. The unit contains no user-ser-
viceable parts.
5. Only use new batteries as specified in this instruction manual. Do not mix
new and old batteries as the old batteries may leak.
6. Read this instruction manual thoroughly before operating the unit.
CAUTION
- The content of this manual is subject to change without further notice.
- Due to printing limitation, the displays shown in this manual may differ
from the actual display.
- The contents of this manual may not be reproduced without the permis-
sion of the manufacturer.
FRENCH
THERMOMETER ANALOGIQUE
1. Ce thermomètre a un affichage à 4 chiffrea pour la température et lindicateur
°C ou °F.
2. Amplitude de mesure : -55°C à 148.8°C
de la température (-67°F à +299.8°F)
Précisior : +/- 1°C (de 0 à 60°C)
+/- 1.5°C pour les autres amplitudes
Flésolution : 0.1°C (de -49°C à 105°C)
0.2°C (de -55°C à 49°C at de 105°C à 129°C)
0.3°C (de 129°C à 140°C)
0.4°C (de 140°C à 148.8°C)
3. Sélection du temps de prise de température (cycle de mesure toutes les
secondes ou toutes les 10 secondes).
4. Fonction de réglage de la température maximale at minimale.
5. La sonnerie d’alarme se déclenche quand la température atteint la limite
pré-réglée maxl ou mini.
6. Tous les segments de l’écran s’allument quand vous appuyez aur High alarm,
Low alarm, Advance et Alarm ON/OFF en möme temps.
7. Fonctior de réglage accétéré de la sonnerie (unités de 5°C ou °F)
8. Fonctior marche/arrét de la sonnerie.
MESURE DE LA TEMPÉRATURE
1. L’intervalie de prise de température est de 10 secondes.
2. Placez le commutateur 1/10 pour unintervalle rapide de 1 seconde ou 10
secondes.
3. Sortez la sonde métallique et mettez-la en contact avoc le matérial ou le
liquide dont vous désirez mesurer la température. La température
correspondante apparait alors sur l’écran.
SÉLECTION °F OU °C
1. Placez le commutateur °C/°F aur la position °C at la température apparait en °C.
2. Placez le commutateur °C/°F aur la position °F at la température apparait en °F.
RÉGLAGE DE LA TEMPÉRATURE MAXIMALE
1. Placez le commutateur SET/LOCK (réglege/verroultlé) aur la position SET
(réglage).
2. Appuyez sur HI, I’ indication “HL..” (haute) apparait sur l’écran. L’Indicateur
“HI” correspondant clignote.
3. Appuyez sur ADV. (avance) pour régler la température désirée, Vous pouvez
choiair un chiffre de -55°C à 148°C (-67°F à + 299°F). Appuyez et mainterez
le bouton d’avance pour un réglage accéléré (par unité de 5°C ou 5°F).
4. Après avoir régié la température maximale, appuyez sur HI à nouveau pour
revenir à la température amoiante et l’indicateur “HI” reste sur l’écran.
5. Après le régiage, placez le commutatour SET/LOCK sur la position LOCK.
6. Quand la température affichée attaint la température pré-réglée, la sonneria
d’alarme sonno pondart 1 minute alors que “DISPLAY” clignote sur l’écran.
Vous pouvez arrétor cette sonnerie en appuyant sur HI, LO, ADV., RESET
HI/LO (ou simplement en glissant l’interruptour
sur la position )
RÉGLAGE DE LA TEMPÉRATURE MINIMALE
1. Placze le bouton du commutateur SET/LOCK sur la position SE.
2. Appuyez sur LO (basse). L’indication “LO...” apparait sur l’écran.
L’Indicateur “LO” clignote.
3. Appuyez sur ADV. pour régler la température minimale désirée. Vous pouvez
choiair un chiffre de -55°C à 148°C (-67°F à + 299°F). Appuyez et maintenez
ADV, pur un réglage accéléré (par unité de 5°C ou °F)
4. Après avoir regié la température minimale, appuyez sur LO pour revenir à
l’affichage de la température ambiante. L’indication LO reste sur l’écran.
DIGITAL THERMOMETER
MODEL: SA880SSWR
USER'S MANUAL
ON/FAST
TEMP
TIMER
QUARTZ
OFF/AUTO OFF
START
STOP
MAX
MIN
HI
HOUR
LO
MIN
…C
…F
Fig. 1 / Abb. 1
Fig. 2 / Abb. 2
Page is loading ...
-
 1
1
-
 2
2


Oregon Scientific SA880SSWR Owner's manual
- Type
- Owner's manual
- This manual is also suitable for
Ask a question and I''ll find the answer in the document
Finding information in a document is now easier with AI
in other languages
Related papers


Other documents
-
Panasonic NV-DX1E Owner's manual
-
Me ADV-F-341 Owner's manual
-
-
-
-
Renkforce W205GU Owner's manual
-
Celestron HomeCast Lite Weather Station User manual
-
Lexibook WB100 User manual
-
BABYMOOV BABYPHONE HIGH CARE Owner's manual
-
Denon ADV-M71 User manual