HP LaserJet P2055 Printer series User manual
- Category
- Print & Scan
- Type
- User manual
This manual is also suitable for

HP LaserJet P2050 Series Printer – Manage and Maintain
© 2008 Copyright Hewlett-Packard
Development Company, L.P.
1
www.hp.com
Fill paper trays
How do I? Steps to perform
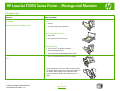
Tray 1
● Face-up
● Top edge leading into the product
Tray 2 and optional Tray 3
● Face down
● Top edge at the front of the tray
Load trays
Paper orientation for loading trays
Envelope printing
● Use only Tray 1 for printing envelopes
● Front of envelope face-up
● Short edge with postage leading into the printer
● Tray 1 is accessed from the front of the printer.
Tray 1
Media guides ensure that the media is correctly fed into
the product and that the print is not skewed (crooked on
the media). When loading media, adjust the media
guides to match the width of the media that you are
using.

HP LaserJet P2050 Series Printer – Manage and Maintain
© 2008 Copyright Hewlett-Packard
Development Company, L.P.
2
www.hp.com
How do I? Steps to perform
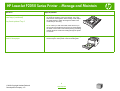
Load trays (continued)
Tray 2 and optional Tray 3
Media guides ensure that the media feeds correctly into
the printer and that the print is not skewed. Tray 2 has
side and rear media guides. When loading media, adjust
the media guides to match the length and width of the
media that you are using.
NOTE: When you add new media, make sure that you
remove all of the media from the input tray and straighten
the stack of new media. This reduces jams by preventing
multiple sheets of media from feeding through the printer
at one time.
Load A6-size paper
When loading A6-size paper, adjust the length by sliding
forward only the center panel of the rear media guide.

HP LaserJet P2050 Series Printer – Manage and Maintain
© 2008 Copyright Hewlett-Packard
Development Company, L.P.
1
www.hp.com
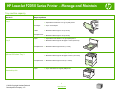
Tray and bin capacity
How do I? Steps to perform
Paper
● Maximum stack height: 5 mm (0.3 inch)
● Equivalent to 50 sheets of 75 g/ m
2 (20 lb) bond
Envelopes
● Up to 10 envelopes
Labels
● Maximum stack height: 5 mm (0.3 inch)
Tray 1
Transparencies
● Maximum stack height: 5 mm (0.3 inch)
Paper
● Equivalent to 250 sheets of 75 g/m2 (20 lb) bond
● Maximum stack height for A6 paper: 15 mm (0.59 inch)
Tray 2
Transparencies
● Maximum stack height: 26 mm (1.0 inch)
Paper
● Equivalent to 500 sheets of 75 g/m2 (20 lb) bond
● Maximum stack height for A6 paper: 40 mm (1.6 inches)
Optional 500-sheet Tray 3
Transparencies
● Maximum stack height: 54 mm (2.1 inches)
Standard top bin
Paper
● Up to 125 sheets of 75 g/m2 (20lb) bond

HP LaserJet P2050 Series Printer – Manage and Maintain
© 2008 Copyright Hewlett-Packard
Development Company, L.P.
1
www.hp.com
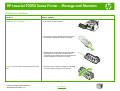
Replace print cartridges
How do I? Steps to perform
Replace print cartridges
1 Push the button to open the print-cartridge door, and
then remove the print cartridge.
2 Remove the new print cartridge from the bag. Place
the used print cartridge in the bag for recycling.
3 Bend the tab on the left side of the cartridge until the
tab breaks loose. Pull the tab until all the tape is
removed from the cartridge. Place the tab and tape in
the print-cartridge box to return for recycling.
CAUTION: Do not touch the shutter or the surface of the
roller.
4 Grasp both sides of the print cartridge and distribute
the toner by gently rocking the print cartridge.

HP LaserJet P2050 Series Printer – Manage and Maintain
© 2008 Copyright Hewlett-Packard
Development Company, L.P.
2
www.hp.com
How do I? Steps to perform
Replace print cartridges (continued)
5 Align the print cartridge with the tracks inside the
product, insert the print cartridge until it is firmly
seated, and then close the print-cartridge door.
6 Installation is complete. Place the used print cartridge
in the box in which the new cartridge arrived. See the
enclosed recycling guide for recycling instructions.

HP LaserJet P2050 Series Printer – Clear Jams
© 2008 Copyright Hewlett-Packard
Development Company, L.P.
1
www.hp.com
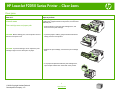
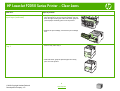
Clear jams
How do I? Steps to perform
Internal areas
Print-cartridge area and paper path
When clearing jams, be careful not to tear jammed paper. If
a small piece of paper remains in the product, it could cause
additional jams.
1 Push the button to open the print-cartridge door, and
then remove the print cartridge.
CAUTION: Before clearing jams, turn the product off and
disconnect the power cord.
2 If jammed paper is visible, grasp it with both hands and
slowly pull it out of the product.
CAUTION: To prevent damage, do not expose the print
cartridge to light. Cover it with a piece of paper.
3 Replace the print-cartridge, and close the print-cartridge
door.
4 If no paper was jammed inside the print-cartridge door,
open the jam-release door at the back of the product.

HP LaserJet P2050 Series Printer – Clear Jams
© 2008 Copyright Hewlett-Packard
Development Company, L.P.
2
www.hp.com
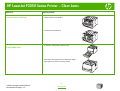
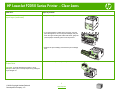
How do I? Steps to perform
Internal areas (continued)
5 If jammed paper is visible, grasp it with both hands and
slowly pull it out of the product.
6 Close the jam-release door.
Duplex paper path
1 At the front of the product, remove Tray 2.
2 Push down on the green lever to release the duplex
paper-path door on the front of the product.

HP LaserJet P2050 Series Printer – Clear Jams
© 2008 Copyright Hewlett-Packard
Development Company, L.P.
3
www.hp.com
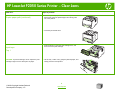
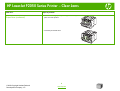
How do I? Steps to perform
Duplex paper path (continued)
3 Check for jammed paper at the front of the product. With
both hands, grasp the jammed paper and slowly pull it
out of the product.
4 Push up on the duplex paper-path door to close it.
5 Replace Tray 2.
6 Open the duplex jam-release door on the back of the
product.

HP LaserJet P2050 Series Printer – Clear Jams
© 2008 Copyright Hewlett-Packard
Development Company, L.P.
4
www.hp.com
How do I? Steps to perform
Duplex paper path (continued)
7 Check for jammed paper at the back of the product. With
both hands, grasp the jammed paper and slowly pull it
out of the product.
8 Close the jam-release door.
Input trays
Tray 1
1 Push the button to open the print-cartridge door, and
then remove the print cartridge.
CAUTION: To prevent damage, do not expose the print
cartridge to light. Cover it with a piece of paper.
2 Lift the Tray 1 roller cover, grasp the jammed paper, and
slowly pull it out of the product.

HP LaserJet P2050 Series Printer – Clear Jams
© 2008 Copyright Hewlett-Packard
Development Company, L.P.
5
www.hp.com
How do I? Steps to perform
Input trays (continued)
3 Replace the print-cartridge, and close the print-cartridge
door.
Tray 2
1 Open the tray.
2 With both hands, grasp the jammed paper and slowly
pull it out of the product.
3 Close the tray.

HP LaserJet P2050 Series Printer – Clear Jams
© 2008 Copyright Hewlett-Packard
Development Company, L.P.
6
www.hp.com
How do I? Steps to perform
Input trays (continued)
4 If no jammed paper is visible in the tray area, open the
print-cartridge door, remove the print cartridge, and pull
down the upper media guide. With both hands, grasp the
jammed paper and slowly pull it out of the product.
5 Replace the print-cartridge, and close the print-cartridge
door.
Tray 3
1 Remove Tray 2 and Tray 3.
2 With both hands, grasp the jammed paper and slowly
pull it out of the product.

HP LaserJet P2050 Series Printer – Clear Jams
© 2008 Copyright Hewlett-Packard
Development Company, L.P.
7
www.hp.com
How do I? Steps to perform
Input trays (continued)
3 Replace the trays.
4 If no jammed paper is visible in the tray area, open the
print-cartridge door, remove the print cartridge, and pull
down the upper media guide. With both hands, grasp the
jammed paper and slowly pull it out of the product.
5 Replace the print-cartridge, and close the print-cartridge
door.
Output bins
CAUTION: To avoid damaging the product, do not
attempt to clear a jam in the top output bin by pulling the
paper straight out.
1 At the back of the product, open the jam-release door.

HP LaserJet P2050 Series Printer – Clear Jams
© 2008 Copyright Hewlett-Packard
Development Company, L.P.
8
www.hp.com
How do I? Steps to perform
Output bins (continued)
2 With both hands, grasp the jammed paper and slowly
pull it out of the product.
3 Close the jam-release door.
-
 1
1
-
 2
2
-
 3
3
-
 4
4
-
 5
5
-
 6
6
-
 7
7
-
 8
8
-
 9
9
-
 10
10
-
 11
11
-
 12
12
-
 13
13


HP LaserJet P2055 Printer series User manual
- Category
- Print & Scan
- Type
- User manual
- This manual is also suitable for
Ask a question and I''ll find the answer in the document
Finding information in a document is now easier with AI