Epson RX620 - Stylus Photo Color Inkjet Owner's manual

Category
Photo printers
Type
Owner's manual

This manual is also suitable for

P R O D U C T I N F O R M A T I O N G U I D E
12/04
EPSON
UPDATE
12/1/04
This package provides a new product section to be added to the Epson Product Information Guide. The table of
contents of this section is listed below.
Epson Stylus
®
Photo RX620
TABLE OF CONTENTS
......................................................................................................................... Epson Stylus Photo RX620 PartsEpson
Stylus Photo RX620 - 1
Accessories........................................................................................................ Epson Stylus Photo RX620 - 1
Specifications.................................................................................................... Epson Stylus Photo RX620 - 2
Loading Paper .................................................................................................. Epson Stylus Photo RX620 - 5
Placing the Original Document........................................................................ Epson Stylus Photo RX620 - 6
Copying Without a Computer ......................................................................... Epson Stylus Photo RX620 - 7
Viewing Photos from a Memory Card..............................................................Epson Stylus Photo RX620 - 9
Printing From a Memory Card......................................................................... Epson Stylus Photo RX620 - 9
Printing From Other Devices ...........................................................................Epson Stylus Photo RX620 - 11
Using EPSON Smart Panel ..............................................................................Epson Stylus Photo RX620 - 11
Scanning to a File With EPSON Scan.............................................................. Epson Stylus Photo RX620 - 12
Scanning From a Program ................................................................................ Epson Stylus Photo RX620 - 12
Scanning With the Scan Button ....................................................................... Epson Stylus Photo RX620 - 12
Placing Film or Slides on the Scanner............................................................... Epson Stylus Photo RX620 - 13
Cleaning the Print Head...................................................................................Epson Stylus Photo RX620 - 14
Replacing Ink Cartridges .................................................................................. Epson Stylus Photo RX620 - 15
Aligning the Print Head ................................................................................... Epson Stylus Photo RX620 - 16
Transporting the RX620 .................................................................................. Epson Stylus Photo RX620 - 17
Related Documentation.................................................................................... Epson Stylus Photo RX620 - 18
Epson Stylus Photo RX620
11/04 Epson Stylus Photo RX620 - 1
Epson Stylus Photo RX620 Parts
Accessories
Ink Cartridges
Media
Paper support
LCD screen
Scanner lid
On (power)
button
Output tray
Document mat
Scanner glass
Memory card
slot cover
Scanner transportation lock
Scanner section
USB cable
Ink
cartridges
Cartridge Part number
Black T048120
Cyan T048220
Light Cyan T048520
Magenta T048320
Light Magenta T048620
Yellow T048420
Paper name Size Part number
Epson Premium Bright
White Paper
Letter (8.5 × 11 inches) S041586
Epson Photo Quality Ink
Jet Paper
Letter (8.5 × 11 inches) S041062
A4 (8.3 × 11.7 inches) S041061
Legal (8.3 × 14 inches) S041067
Epson Photo Quality Ink
Jet Cards
A6 (4.1 × 5.8 inches) S041054
Epson Photo Paper Panoramic (8.3 × 23 inches) S041145
A4 (8.3 × 11.7 inches) S041140
Letter (8.5 × 11 inches) S041272
Epson Glossy Photo
Paper
Borderless 4 × 6 inches S041458/
S041809
Letter (8.5 × 11 inches) S041141/
S041649/
S041272/
S041271
Epson ColorLife
®
Photo
Paper
Letter (8.5 × 11 inches) S041500
Epson Matte Paper
Heavyweight
Borderless 8 × 10 inches S041467
Letter (8.5 × 11 inches) S041257
Epson Double-Sided
Matte Paper
Letter (8.5 × 11 inches) S041568
Control panel
Epson Stylus Photo RX620
2 - Epson Stylus Photo RX620 11/04
Specifications
Printing
Printing method On-demand ink jet
Nozzle configuration
Black 90 nozzles
Color 450 nozzles (90 nozzles per color × 5)
Print direction Bidirectional with logic seeking
Resolution Up to 5760 × 1440 on various papers
using Photo RPM
Ink Cartridges
Caution:
To ensure good results, use genuine Epson cartridges. Other
products may cause damage to your printer not covered by Epson’s
warranty.
Don’t use an ink cartridge if the date on the package has expired.
Do not refill the ink cartridge. An IC chip on the cartridge calculates
the amount of remaining ink based on the initial supply. Adding ink
does not increase the amount available for use.
Paper
Since the quality of any particular brand or type of paper may
be changed by the manufacturer at any time, Epson cannot
attest to the quality of any non-Epson brand of paper. Always
test samples of paper stock before purchasing large quantities
or printing large jobs.
Poor quality paper may reduce print quality and cause paper
jams and other problems. If you encounter problems, switch
to a higher grade of paper. Do not load curled, folded, or
wrinkled paper.
Use paper under normal environmental conditions: 59 to
77 °F (15 to 25 °C) and 40 to 60% RH (relative humidity).
Single sheets
Size Letter (8.5 × 11 inches)
A4 (8.3 × 11.7 inches)
Half-letter (5.5 × 8.5 inches)
A5 (5.8 × 8.3 inches)
A6 (4.1 × 5.8 inches)
Legal (8.5 × 14 inches)
Executive (7.3 × 10.5 inches)
4 × 6 inches (101.6 × 152.4 mm)
5 × 7 inches (127 × 178 mm)
8 × 10 inches (203 × 254 mm)
3.5 × 5 inches (89 × 127 mm)
Paper type Plain bond paper or special media
distributed by Epson
Thickness 0.003 to 0.004 inch (0.08 to
0.11 mm) for plain bond paper
Epson Premium Glossy
Photo Paper
Letter (8.5 × 11 inches) S041286/
S041667
Borderless 4 × 6 inches S041727/
S041808
Borderless 5 × 7 inches S041464
Borderless 8 × 10 inches S041465
Epson Premium
Semigloss Photo Paper
Letter (8.5 × 11 inches) S041331
Epson Premium Luster
Photo Paper
Letter (8.5 × 11 inches) S041405
Epson Photo Quality
Self Adhesive Sheets
A4 (8.3 × 11.7 inches) S041106
Epson Ink Jet
Transparencies
Letter (8.5 × 11 inches) S041064
Epson Iron-On Transfer
Paper
Letter (8.5 × 11 inches) S041153
Epson Glossy Photo
Greeting Card Kit
Letter (8.5 × 11 inches) S041606
Epson Semigloss
Scrapbook Photo Paper
Letter (8.5 × 11 inches) SCR1001
PremierArt
TM
Matte
Scrapbook Photo Paper
Letter (8.5 × 11 inches) SCR1002
Epson Photo Quality Ink
Jet Cards
A6 (4.1 × 5.8 inches) S041054
Epson Photo Stickers
®
A6 (4.1 × 5.8 inches) S041144
Paper name Size Part number
Specification Black ink cartridge Color ink cartridges
Color(s) Black Cyan, Magenta, Yellow,
Light Cyan, Light
Magenta
Storage
temperature
– 4 to 104 °F (– 20 to 40 °C)
1 month at 104 °F (40 °C)
Transit
temperature
– 22 to 122 °F (– 30 to 50 °C)
10 days at 122 °F (50 °C)
Freezing
temperature**
3.2 °F (– 16 °C)
Dimensions 0.5 × 2.9 × 2.2 inches (W × D × H)
12.7 × 73.5 × 55.25 mm (W × D × H)
Epson Stylus Photo RX620
11/04 Epson Stylus Photo RX620 - 3
Weight 17 to 24 lb (64 to 90 g/m
2
) for
plain bond paper
Envelopes
Size No. 10 (4.1 × 9.5 inches)
DL (4.3 × 8.7 inches)
C6 (4.5 × 6.4 inches)
Paper type Plain bond paper or air mail paper
Thickness 0.006 to 0.02 inch (0.16 to
0.52 mm)
Weight 12 to 20 lb (45 to 75 g/m
2
)
Printable Area
Margins
Standard sheets Top (A): 0.12 inch (3.0 mm)
Left (B-L): 0.12 inch (3.0 mm)
Right (B-R): 0.12 inch (3.0 mm)
Bottom (C): 0.12 inch (3.0 mm)
Envelopes Top (A): 0.12 inch (3.0 mm)
Left (B-L): 0.2 inch (5.0 mm)
Right (B-R): 0.2 inch (5.0 mm)
Bottom (C): 0.79 inch (20 mm)
Note:
Depending on the type of paper, the print quality may deteriorate in
the top and bottom areas of the print, or these areas may be
smeared. Before printing large jobs using an extended margin setting,
print a single sheet to confirm print quality.
You can create borderless prints using certain special Epson papers.
Scanning
Scanner type Flatbed color image scanner
Photoelectric device Color CCD line sensor
Effective pixels 20,400 × 28,080 pixels at 2400 dpi,
100%
Document size Letter (8.5 × 11.0 inches) or A4
(8.5 × 11.7 inches); reading area is
selectable with software
Scanning resolution 2400 dpi (main), 4800 dpi (sub)
Output resolution 50 to 6400 dpi (adjustable in one-dpi
increments)
Color separation RGB color filters on CCD
Image data 16 bits per pixel per color input
1 to 16 bits per pixel per color output
Gamma correction User defined 2 level
Light source White cold cathode fluorescent lamp
Interface USB 2.0 High Speed
Reliability 30,000 cycles of carriage movements
(main unit MCBF);
lamp life: 10,000 hours
Integrated TPU Supports transparencies up to six
35 mm film strip images and four
35 mm slides
Mechanical
Paper feed method Friction
Paper path Sheet feeder, rear entry
Sheet feeder
capacity Approx. 100 sheets at 17 lb (64 g/m
2
)
Dimensions 17.6 × 17.3 × 10.1 inches (W × D × H)
456 × 439 × 256 mm (W × D × H)
Weight Approx. 22.0 lb (10.0 kg)
Electrical
Input voltage range 108 to 132 V (check the label on the
back for voltage information)
Rated frequency
range 50 to 60 Hz
Rated current 0.8 A (max. 1.2 A)
Power consumption Approx. 23 W (ISO 10561 Letter
(stand-alone copying) Pattern)
Approx. 4.0 W in sleep mode
Approx. 0.4 W in power-off mode
A
B-L B-R
C
Single sheets or cards
Envelopes
Epson Stylus Photo RX620
4 - Epson Stylus Photo RX620 11/04
Environmental
Temperature
Operation 50 to 95 °F (10 to 35 °C)
Storage* – 4 to 140 °F (– 20 to 60 °C)
1 month at 104 °F (40 °C)
Transit* – 4 to 140 °F (– 20 to 60 °C)
120 hours at 140 °F (60 °C)
Humidity (without condensation)
Operation 20 to 80% RH
Storage* 5 to 85% RH
* Stored in shipping container.
Interface
Standard Based on Universal Serial Bus
Specifications Revision 2.0, Universal
Serial Bus Device Class Definition for
Printing Devices version 1.1; Universal
Serial Bus Mass Storage class Bulk-only
Transport Revision 1.0
Bit rate 480 Mbps (high speed device)
Data encoding NRZI
Connector USB Series B
Recommended
cable length 6.6 feet (2 meters) or less
Safety Approvals
Safety standards UL 60950, CSA C22.2 No. 60950
EMC FCC part 15 subpart B class B
CSA C108.8 class B
Supported Memory Cards
Top slot SmartMedia (maximum 128MB;
standard 2000 compliant)
xD-Picture Card
Middle slot (left) Memory Stick
Memory Stick PRO
Memory Stick Duo*
Memory Stick PRO Duo*
MagicGate Memory Stick
MagicGate Memory Stick Duo*
SD (Secure Digital) Card
MMC (MultiMediaCard)
miniSD Card*
* Requires an adapter
Bottom slot CompactFlash Type I and Type II
IBM Microdrive
Memory Card Image File Requirements
File format JPEG or uncompressed TIF files,
DOS FAT taken with a DCF
version 1.0 compliant digital camera
(supports Exif Print v. 2.1 and 2.2)
Media format DCF (Design rule for Camera File
system) version 1.0 compliant*
Image size Vertical: 120 to 4600 pixels
Horizontal: 120 to 4600 pixels
Number of files Up to 999
* The DCF standard is set by the Japan Electronics and Information Technology
Industries Association (JEITA).
Note:
You can’t print images whose file names contain double-byte
characters, as is the case with some Asian language fonts. Do not
use Asian language fonts to name your files if you will be printing
from the memory card.
SmartMedia
xD
MemoryStick
SD or MMC
CompactFlash or Microdrive
Epson Stylus Photo RX620
11/04 Epson Stylus Photo RX620 - 5
Loading Paper
Single Sheets
1. Open the output tray.
2. Flip the feeder guard forward.
3. Press the sides of the left edge guide together and slide it all
the way to the left.
4. Insert your paper against the right edge of the sheet feeder,
behind the tab.
5. Press the sides of the left edge guide together and slide it
against the paper (but not too tightly).
Note:
Do not place the paper in front of the feeder guard.
6. Flip the feeder guard back over the paper.
Also be sure to:
Load all paper with the printable side up. It’s usually
brighter or whiter.
Always load the short edge first, even when printing on
4 × 6 inch paper.
Do not load paper above the arrow on the left edge guide.
Load letterhead or preprinted paper top edge first.
If you’re using special paper, follow the instructions that
came with the paper.
Loading Special Papers
Follow these capacity guidelines when loading Epson ink jet
papers:
Output tray
Feeder guard
Paper type Loading capacity
Epson Premium Bright White Paper
Epson Photo Quality Ink Jet Paper
80 sheets
Epson Photo Quality Ink Jet Cards 30 cards
Epson Ink Jet Transparencies 30 sheets
Epson Matte Paper Heavyweight
PremierArt Matte Scrapbook Photo Paper
for Epson
Epson All-Purpose Glossy Photo Paper
Epson Glossy Photo Paper
Epson Premium Glossy Photo Paper
Epson Premium Semigloss Photo Paper
Epson Semigloss Scrapbook Photo Paper
20 sheets
Epson Glossy Photo Greeting Cards 10 cards
Epson Iron-On Transfer Paper
Epson Photo Quality Self Adhesive Sheets
Epson Double-Sided Matte Paper
Epson Premium Luster Photo Paper
Epson ColorLife Photo Paper
Epson Photo Stickers
Epson Photo Paper
1 sheet
Feeder guard
Epson Stylus Photo RX620
6 - Epson Stylus Photo RX620 11/04
Envelopes
1. Open the output tray and flip the feeder guard forward (as
shown on page 5).
2. Load up to 10 envelopes at a time, short edge first, flap edge
left, and printable side up, against the right edge of the sheet
feeder, behind the tab.
Note:
Do not place the envelopes in front of the feeder guard. For best
results, press each envelope flat before loading, or load one
envelope at a time. Avoid envelopes that are too thin; they may
curl during printing.
3. Press the sides of the left edge guide together and slide it
against the envelopes (but not too tightly).
Select the following settings when printing on envelopes:
Plain paper as the Type (Windows) or Media Type
(Macintosh) setting
The correct envelope size as the Size (Windows) or
Paper Size (Macintosh) setting
Landscape as the Orientation setting
Selecting the Correct Media Type
Select the paper Type (Windows) or Media Type (Macintosh)
setting according to these guidelines:
Placing the Original Document
Follow these steps to position a photo or document to scan or
copy:
1. Open the scanner lid.
2. Place your photo or document face-down on the glass in the
upper left corner about 1/8 inch from the edges, as shown.
3. Close the scanner lid.
Note:
If you place your photo or document against the edge of the
glass, the edges of your photo or document may not be copied.
To scan or copy a thick document, you can
remove the scanner lid. Turn off the RX620,
and open the scanner lid completely. Then
disconnect the cord from the TPU connector
and pull the lid straight up. Turn on the RX620
and gently press down the original to keep it
flat on the scanner glass as you scan. When
you’re finished, be sure to turn off the RX620
before replacing the scanner lid and plugging
in the connector.
For this paper
Select this Type or
Media Type setting
Plain paper sheets or envelopes
Epson Iron-on Transfer paperEpson
Premium Bright White Paper
Plain paper/ Bright White
Paper
Epson Photo Quality Ink Jet Paper
Epson Photo Quality Ink Jet Cards
Epson Photo Quality Self Adhesive
Sheets
Photo Quality Ink Jet Paper
Epson Matte Paper Heavyweight
Epson Double-Sided Matte Paper
PremierArt Matte Scrapbook Photo
Paper for Epson
Matte Paper - Heavyweight
Epson Photo Paper Photo Paper
Epson Glossy Photo Paper
Epson All-Purpose Glossy Paper
Epson Glossy Photo Greeting Cards
Glossy Photo Paper
Load envelopes
short edge first,
printable side up,
and flap edge left
Epson Premium Glossy Photo Paper
Epson Photo Stickers
Premium Glossy Photo
Paper
Epson Premium Luster Photo Paper Premium Luster Photo
Paper
Epson Premium Semigloss Photo Paper Premium Semigloss Photo
Paper
Epson ColorLife Photo Paper
Epson Semigloss Scrapbook Photo
Paper
ColorLife Photo Paper
Epson Ink Jet Transparencies Ink Jet Transparencies
For this paper
Select this Type or
Media Type setting
Move the photo or
document in about 1/8
inch from the edges
Epson Stylus Photo RX620
11/04 Epson Stylus Photo RX620 - 7
Copying Without a Computer
Follow the steps below to copy a photo or document using
just the RX620. (To copy using Epson Smart Panel, see the
on-screen Reference Guide.)
1. Make sure the RX620 is on, paper is loaded, and the output
tray is open.
2. Place your document face-down on the glass, as described
on page 6.
3. Close the scanner lid.
4. Press the
Copy button to set the RX620 to Copy mode.
5. Make sure you see
Copy with Borders at the top of the
LCD screen. This prints a photo or document with borders.
If you want to select a different setting, such as a photo with
no borders, press the
Copy Options button, then see
“Changing the Copy Layout” on page 8.
6. Use the u and d buttons to choose the copy options listed
below. Use the l and r buttons to change settings.
Copies: Choose the number of copies you want to
make (1 to 99).
Reduce/Enlarge: Choose from these options:
Zoom In/Out: Manually adjust the size of your copies
from 25% to 400%. Select a percentage to reduce or
enlarge your copy.
Paper Type: Select the type of paper you’ve loaded in
the sheet feeder from these settings:
Paper Size: Choose the size of the paper you loaded in
the sheet feeder. (Not all sizes are available for all paper
types.)
Quality: Choose Draft (rough draft copies), Text
(optimum text and line art copies),
Photo (high quality
copies of photos), or
Best Photo (highest quality copies
of photos).
7. Press the x
Color button (for color copies) or the x B&W
button (for black and white copies). Your photo or
document is copied.
Note:
Never open the scanner lid while copying, or your copies may not
look right.
To cancel a copy job in progress, press the y Stop button.
Canceling appears on the LCD screen, and the page is ejected.
Note:
Depending on your copy settings, your copied image size may not be
the exact same size as your original.
Setting Result
Actual Prints the image at its original size. Do
not select this when you want
BorderFree copying.
Auto Fit Page Reduces or enlarges the image, as
needed, to fit the selected paper size.
Always select this for BorderFree
copying.
Letter Æ 4 × 6
4 × 6 Æ Letter
Letter
Æ 5 × 7
5 × 7 Æ Letter
4 × 6 Æ 8 × 10
8 × 10 Æ 5 × 7
Converts the original document size (to
the left of the arrow) to the finished
copy size (to the right of the arrow). Do
not select this when you want
BorderFree copying.
Paper Type
setting Loaded paper
Plain Plain paper
Epson Premium Bright White Paper
Epson Photo Quality Ink Jet Paper
Epson Iron-On Transfer Paper
Epson Photo Quality Self Adhesive Sheets
GlossyPhoto Epson Glossy Photo Paper
Epson Photo Paper
Epson All-Purpose Glossy Paper
Epson Glossy Photo Greeting Cards
SemiGloss Epson Premium Semigloss Photo Paper
Prem.Glossy Epson Premium Glossy Photo Paper
Epson Photo Stickers
Prem.Luster Epson Premium Luster Photo Paper
Matte Epson Matte Paper Heavyweight
Epson Double-Sided Matte Paper
PremierArt Matte Scrapbook Photo Paper for
Epson
Color Life Epson ColorLife Photo Paper
Epson Semigloss Scrapbook Photo Paper
Epson Stylus Photo RX620
8 - Epson Stylus Photo RX620 11/04
Changing the Copy Layout
Follow these steps to select a different copy layout:
1. Press the
Copy Options button to display the Copy
Options
.
2. Choose
Copy Layout with the u and d buttons and use
the l and r buttons to select one of the options in the table
below.
* Borderless is available only on selected Epson photo papers.
** If you notice reduced print quality at the bottom of your copy, try using the
Standard setting.
Lightening or Darkening Copies
1. Press the Copy Options button to display the Copy
Options.
2. Press the d button to choose
Copy Density.
3. Press the l button to lighten or the r button to darken
your copies.
4. Press the
OK button to go back to the additional copy
settings.
Restoring Color as You Copy
You can bring an old 4 × 6-inch photo back to life as you copy
it onto Premium Glossy Photo paper.
1. Press the
Copy button to display the Copy Menu.
2. Press the
Copy Options button to display the Copy
Options.
3. Press the u and d buttons to choose
Copy Layout and use
the l and r buttons to select
Multi Photo.
4. Press the
OK button. You see the MultiPhoto layout screen.
5. Press the
OK button again. You see the MultiPhoto menu.
6. Press the d button to choose
Restoration.
7. Press the l button to choose
On. Your photo paper type
and size are selected automatically.
8. Press the x
Color button and follow the instructions on the
RX620 screen to copy and restore your photo.
Copy Layout setting Result
Copy w/ Borders
Copies your original with a
standard 0.12-inch (3 mm)
margin
Borderless*
Copies your original image to
the edges of 4 x 6-, 5 x 7-,
8 x 10-inch, or letter size
paper, slightly enlarging it as
necessary**
Small Margins
Copies your original with a
0.06-inch (1.5 mm) border
around the edges
Repeat
Prints a photo multiple times
on one sheet; select 4, 9, or
16 photos per sheet, or Auto
to print a photo as many
times as will fit (full-size; best
for photos with small
margins)
2-up
Copies two originals onto one
sheet
4-up
Copies four originals onto one
sheet
Poster
Prints the original image on
separate sheets (4, 9, or 16)
that you can paste together to
make a large poster.
Multi Photo
Copies multiple photos at
once and makes a separate
print for each one. (Follow the
instructions on the LCD
screen.) Also provides color
restoration for 4 x 6-inch
photos. (See the “Restoring
Color as You Copy” below for
more information.
Mirror
Copies a mirror image of your
photo onto transfer paper so
that you can iron it onto a
shirt or other cloth article
Wallet Photo
Prints nine wallet-size copies
of the photo on the page
Copy Layout setting Result
Epson Stylus Photo RX620
11/04 Epson Stylus Photo RX620 - 9
Note:
To restore the color in an old film strip photo or slide and copy or scan
them, see the on-screen Reference Guide.
Canceling Copies
To cancel a job in progress, press the y Stop button.
Canceling appears on the LCD screen and your page is
ejected.
Restoring Default Settings
If you want to reset copy and print settings to their original
default settings, follow these steps:
1. Press the
Setup button.
2. Use the u and d buttons to choose
Restore to Factory
Settings.
3. Press
OK, then press OK again to restore your settings.
4. You see a confirmation message that settings have been
restored. Press
OK.
Viewing Photos from a Memory Card
After you’ve inserted your memory card, you can view your
photos on the RX620 screen.
Note:
You can also print an index sheet containing small thumbnail images
of the pictures on your memory card. See “Printing an Index Sheet”
below for instructions.
1. Press the Memory Card button.
2. Use the u and d buttons to highlight
Custom Print.
3. Use the l and r buttons to choose
Select Print.
4. Press the
OK button. The RX620 screen displays the first
photo on the card.
5. Use the l and r buttons to move through the photos.
To select photos for printing, follow the instructions in the
next section.
Printing From a Memory Card
You can print photos directly from your digital camera’s
memory card, without connecting the RX620 to a computer.
1. Make sure the RX620 is not connected to your computer
(or your computer is turned off) and the RX620 is turned
on.
2. Open the memory card cover, and make sure the memory
card light is off and that no cards are in any of the slots.
Then insert your card into the correct slot (see page 4).
Once the card is inserted, the RX620 reads and displays the
number of printable images on the card. Then you can print
an index sheet of all the photos or choose specific photos to
print.
Printing an Index Sheet
An index sheet lets you see small thumbnail images of the
pictures on your card and select the ones you want to print.
1. Press the
Memory Card button.
2. Use the u and d buttons to highlight
Index Sheet, then
press the
OK button.
3. Use the u and d buttons to highlight
Print Index Sheet.
4. Load several sheets of plain, letter-size paper. (If there are
more than 36 images on the card, you will need multiple
sheets of paper to print the index sheets.)
5. Press the x
Color button to print the index sheet.
Note:
To cancel a print job while printing, press the y Stop button. It
may take a little time to process and print the index sheet,
depending on the number of photos on your card. Also, the
RX620 may print several sheets to include all your photos.
Selecting Photos to Print From the Index
Sheet
Select the photos you want to print by filling in the ovals on
the index sheet, then scan the sheet.
1. Load the type of paper you want to print on. You can
choose from the paper types listed in the table below.
2. Once you have printed the index sheet, fill in the oval
beneath each photo you want to print with a dark pen or
pencil.
OK:
No good:
Epson Stylus Photo RX620
10 - Epson Stylus Photo RX620 11/04
3. Near the bottom of the sheet, select the type and size of
paper you loaded. You can select from these options:
4. Place the index sheet face-down on the scanner glass, so that
the top of the sheet is aligned with the left edge of the glass.
5. Close the scanner lid.
6. Use the u and d buttons to highlight
Scan Index Sheet.
7. Press the x
Color button. The form is scanned and your
photos are automatically printed.
Note:
To cancel a print job while printing, press the y Stop button.
Selecting One or More Photos to Print
Follow these steps to print a single photo or selected photos on
a memory card:
1. Press the
Memory Card button.
2. Use the u and d buttons to highlight
Custom Print.
3. Use the l and r buttons to choose
Select Print, then press
the
OK button.
4. To print one or a few photos, use the l and r buttons to
navigate to the first photo you want to print, then use the u
and d buttons to choose the number of copies you want to
print. Do this for each photo you want to print, then press
the
OK button.
To print all the photos on the card, select
All Photos and
press the
OK button.
5. Continue with “Printing the Selected Photos” on page 10 to
finish laying out your photos and setting up your print job.
Selecting a Range of Photos
You can select a range of photos to print (such as photos 1
through 5) and print them as a group.
1. Press the
Memory Card button.
2. Use the u and d buttons to highlight
Custom Print.
3. Use the l and r buttons to choose
Range Print, then press
the
OK button.
4. Use the l and r buttons to choose the first photo in the
range, then press the
OK button.
5. Use the l and r buttons to choose the last photo in the
range, then press the
OK button.
6. Continue with “Printing the Selected Photos” below to
finish laying out your photos and setting up your print job.
Using DPOF to Select Your Photos
If your camera supports DPOF (Digital Print Order Format),
you can use it to select photos for printing before you insert
the card in your printer. See your camera’s instruction manual
for details.
1. Press the
Memory Card button.
2. Use the u and d buttons to highlight
Basic Print or
Custom Print.
3. Use the l and r buttons to choose
DPOF, then press the
OK button.
4. Continue with the next section to finish laying out your
photos and setting up your print job.
Printing the Selected Photos
1. Press the u and d buttons to highlight Paper Type, then
press the l and r buttons to choose the type of paper that is
loaded in the printer. Refer to the following table.
(These are the settings you should choose when you’re not
using your computer to print.)
Type and size options For these paper types
Prem. Glossy - 4 × 6
Prem. Glossy - 8 × 10
Prem. Glossy - Letter
Epson Premium Glossy Photo Paper
Epson Premium Semigloss Photo
Paper
Glossy Photo - 4 × 6
Glossy Photo - Letter
Epson Photo Paper
Epson Glossy Photo Paper
Matte - Letter Epson Matte Paper Heavyweight
Epson Double-Sided Matte Paper
Left edge
of glass
Top of
sheet
Loaded paper type
Paper Type
setting
Plain paper
Epson Photo Quality Ink Jet Paper
Epson Premium Bright White Paper
Epson Photo Quality Self Adhesive Sheets
Plain
Epson Photo Paper
Epson Glossy Photo Paper
Epson All-Purpose Glossy Paper
Epson Glossy Photo Greeting Cards
GlossyPhoto
Epson Premium Glossy Photo Paper Prem.Glossy
Epson Stylus Photo RX620
11/04 Epson Stylus Photo RX620 - 11
2. Press the u and d buttons to highlight Paper Size, then
use the l and r buttons to select the size of paper you’ve
loaded.
3. Use the u and d buttons to highlight
Layout, then use the
l and r buttons to select the desired layout option (such as
Borderless, 2-up, etc.).
4. Use the u and d buttons to highlight
Quality, then use the
l and r buttons to choose
Photo or Best Photo.
5. If you like, you can make further changes before printing.
Use the u and d buttons to choose one of the options listed
(such as
Brightness, Fit to Frame, etc.). Then use the
l and r buttons to select the desired setting.
6. When you’re done adjusting print settings, press the
OK
button.
7. If you want to print multiple sets of your entire print job,
press the u and d buttons to choose the number of sets to
print (1 to 99).
8. Press the x
Color button or x B&W button to begin
printing.
Note:
To cancel a print job while printing, press the y Stop button.
Printing From Other Devices
The RX620 can also print photos stored on these devices:
PictBridge-enabled digital camera
USB data storage device, such as a CD-ROM or an Iomega
Zip drive
Bluetooth-enabled device (requires an optional Bluetooth
Photo Print adapter)
See the Quick Guide or on-screen Reference Guide for more
information.
Using EPSON Smart Panel
Smart Panel is an easy, step-by-step interface for scanning,
copying, printing, and more. Double-click the
EPSON Smart
Panel
icon on your desktop to open Smart Panel:
Choose from these features:
Epson Premium Semigloss Photo Paper
Epson Semigloss Scrapbook Photo Paper
SemiGloss
Epson Premium Luster Photo Paper Prem.Luster
Epson Matte Paper Heavyweight
PremierArt Matte Scrapbook Photo Paper
Matte
Epson ColorLife Photo Paper ColorLife
Epson Iron-On Transfer Paper Iron On
Loaded paper type
Paper Type
setting
Smart Panel
feature Description
Scan and Save
Scans a photo and saves it to your computer.
Copy Center
Copies documents with all the flexibility of a
conventional photocopier.
Copy to Fax
Scans your image or document to your
computer’s fax utility. (Requires fax software and
a fax modem installed in your PC.)
View and Create
Scans a photo into ArcSoft PhotoImpression,
where you can edit, retouch, enhance, and print it
with templates, frames, and borders.
Scan to
Application
Scans a photo or document and lets you choose
which program it launches for handling the
scanned file.
Epson Stylus Photo RX620
12 - Epson Stylus Photo RX620 11/04
Note:
For details on using all the Smart Panel features, click the
? button in
Smart Panel or see the online Smart Panel User Guide.
Scanning to a File With EPSON Scan
Follow these steps to scan directly to a file on your computer:
1. Place your document face-down on the glass as shown on
page 6, and make sure your computer and RX620 are
turned on.
2. Close the scanner lid.
3. Start Epson Scan.
Windows: Select
Start > All Programs (or Programs) >
EPSON Scan > EPSON Scan.
Macintosh: Double-click
EPSON Scan in the
Applications folder.
4. Click the
Scan button. You see the File Save Settings
window:
5. Type a name for your file in the
Prefix box.
6. Select a file format in the
Type box.
7. Click
OK. EPSON Scan scans your document or photo to
the location you specified.
Note:
Never open the scanner lid while scanning, or your scans may
not look right.
Scanning From a Program
You can scan from any TWAIN-compliant program—such as
Adobe Photoshop or ArcSoft PhotoImpression—using Epson
Scan. Epson Scan provides three scanning modes for progressive
levels of control over your scanned image:
Full Auto Mode makes scanning quick and easy, with
automatic image type and resolution settings.
Home Mode provides a simple screen giving you automatic
image adjustments, previewing and cropping capability, and
preset configurations for various types of scans.
Professional Mode lets you manually configure advanced
image settings.
See the on-screen Reference Guide for more information.
Scanning With the Scan Button
1. Place your document face-down on the glass as shown on
page 6, and make sure your computer and RX620 are on.
2. Close the scanner lid.
3. Press the
Scan button to set the RX620 to Scan mode.
4. Use the u and d buttons to choose
Scan to PC, then press
the
OK button.
Note:
You can also scan to a memory card or to an e-mail; see the
Quick Guide for instructions.
5. For Windows, if you see the screen below on your
computer, select
EPSON Scan and click the Always use
this program for this action
checkbox. Then click OK.
6. Click the
Scan button.
7. When you see the File Save Settings window, type a name
for your file in the
Prefix box, select a file format in the
Type box, and click OK.
Scan to E-mail
Scans a photo or document and attaches it to an
e-mail so that you can send it right away.
(Requires a POP3 compliant e-mail program.)
Epson Photo Site
Scans a photo and uploads it to Epson’s
photo-sharing web site.
Smart Panel
feature Description
Type a name for
your file here
Select a file
format here
Then check this box
Select this option
Epson Stylus Photo RX620
11/04 Epson Stylus Photo RX620 - 13
8. Click OK. Epson Scan scans your document or photo to the
location you specified.
Placing Film or Slides on the Scanner
You can copy, scan, and print from 35 mm film strips and
slides. Follow the instructions below to:
Remove the film holder and document mat
Load 35 mm film strips in the film holder
Place 35 mm slides on the film holder
Removing the Film Holder and Document
Mat
1. Open the scanner lid and slide out the document mat. Set
the mat aside so you can reinstall it for scanning reflective
documents later.
Note:
You can’t scan film or slides unless the white document mat is
removed from the scanner lid.
2. Remove the film holder from its storage place. (Remember
to replace the film holder when you’re done using it.)
3. Continue with one of these sections:
“Loading 35 mm Film Strips in the Film Holder” below
(for film)
“Placing 35 mm Slides on the Film Holder” on page 14
(for slides)
Loading 35 mm Film Strips in the Film
Holder
1. Remove the cover for the film strip holder.
2. Slide your film strip into the holder with the duller
(emulsion) side facing up. The top of the images should be
facing the outside edge of the film holder and the images
should be reversed.
3. Replace the film cover. (It should snap into place.)
4. Position the film holder so that the 35 mm film strip faces
the center of the scanner glass. The positioning posts on the
film holder fit in two small holes near the scanner lid, as
shown.
5. Close the scanner lid.
Now you are ready copy, print, or scan. See the User’s Guide
for instructions.
Flourescent
lamp
Film strip is
in middle
of glass
Epson Stylus Photo RX620
14 - Epson Stylus Photo RX620 11/04
Placing 35 mm Slides on the Film Holder
1. Position the film holder so that the 35 mm slide section
faces the center of the scanner glass. The positioning posts
fit in two small holes near the scanner lid, as shown.
2. Places slides in the film holder as shown, with the duller
(emulsion) side facing up.
Note:
If your slide image is in landscape orientation (wider than it is
long), place it in the same direction as slide images in portrait
orientation (longer than they are wide). This copies the maximum
image area, but your preview will be rotated.
3. Close the scanner lid.
Now you are ready copy, print, or scan. See the User’s Guide
for instructions.
Cleaning the Print Head
If your printouts are unexpectedly light, or dots or lines are
missing, you may need to clean the print head. This unclogs
the nozzles so they can deliver ink properly. Print head
cleaning uses ink, so clean it only if quality declines.
Note:
You can also clean the print head using the printer software. Click the
? or Help button on your printer settings window for instructions on
running the print head cleaning utility.
1. Make sure the RX620 is turned on but not printing.
2. Press the
Setup button to enter setup mode.
3. Press the u and d buttons to select
Head cleaning.
4. Press the
OK button, then press OK to start cleaning the
print head.
Cleaning takes about 30 seconds, during which the message
Head Cleaning appears on the LCD screen.
Caution:
Never turn off the RX620 while the message Head Cleaning
appears on the LCD screen, unless the RX620 hasn’t moved or
made noise for more than 5 minutes.
5. When head cleaning is finished, you return to the Setup
Menu. Use the u and d buttons to select
Nozzle Check.
6. Make sure letter-size paper is loaded. Press the
OK button,
then press
OK to print a nozzle check.
Note:
You can also print a nozzle check using the printer software. Click
the ? or Help button on your printer settings window for
instructions on printing a nozzle check.
7. Examine the nozzle check pattern you printed. Each
staggered line should be solid, with no gaps, as shown.
If your printout looks okay, you’re done. Click
Cancel
to return to the main menu.
If you see any gaps (as shown below) in the dot pattern,
press
OK. Then follow the instructions on the LCD
screen to clean the print head again.
Flourescent
lamp
Film strip is
in middle
of glass
Make sure the top of
images with portrait
orientation face the
front of the RX620
Epson Stylus Photo RX620
11/04 Epson Stylus Photo RX620 - 15
If you don’t see any improvement after cleaning three or four
times, check the troubleshooting solutions in the on-screen
Reference Guide. You can also turn the RX620 off and wait
overnight—this allows any dried ink to soften—and then try
cleaning the print head again.
Caution:
When you don’t turn on your RX620 for a long time, the print quality
can decline. It’s a good idea to turn it on at least once a month to
maintain good print quality.
Replacing Ink Cartridges
When you print with low or empty ink cartridges, you’ll see a
message on your RX620 screen. When your ink starts getting
low, make sure you have replacement cartridges available. You
can’t print if a cartridge is empty.
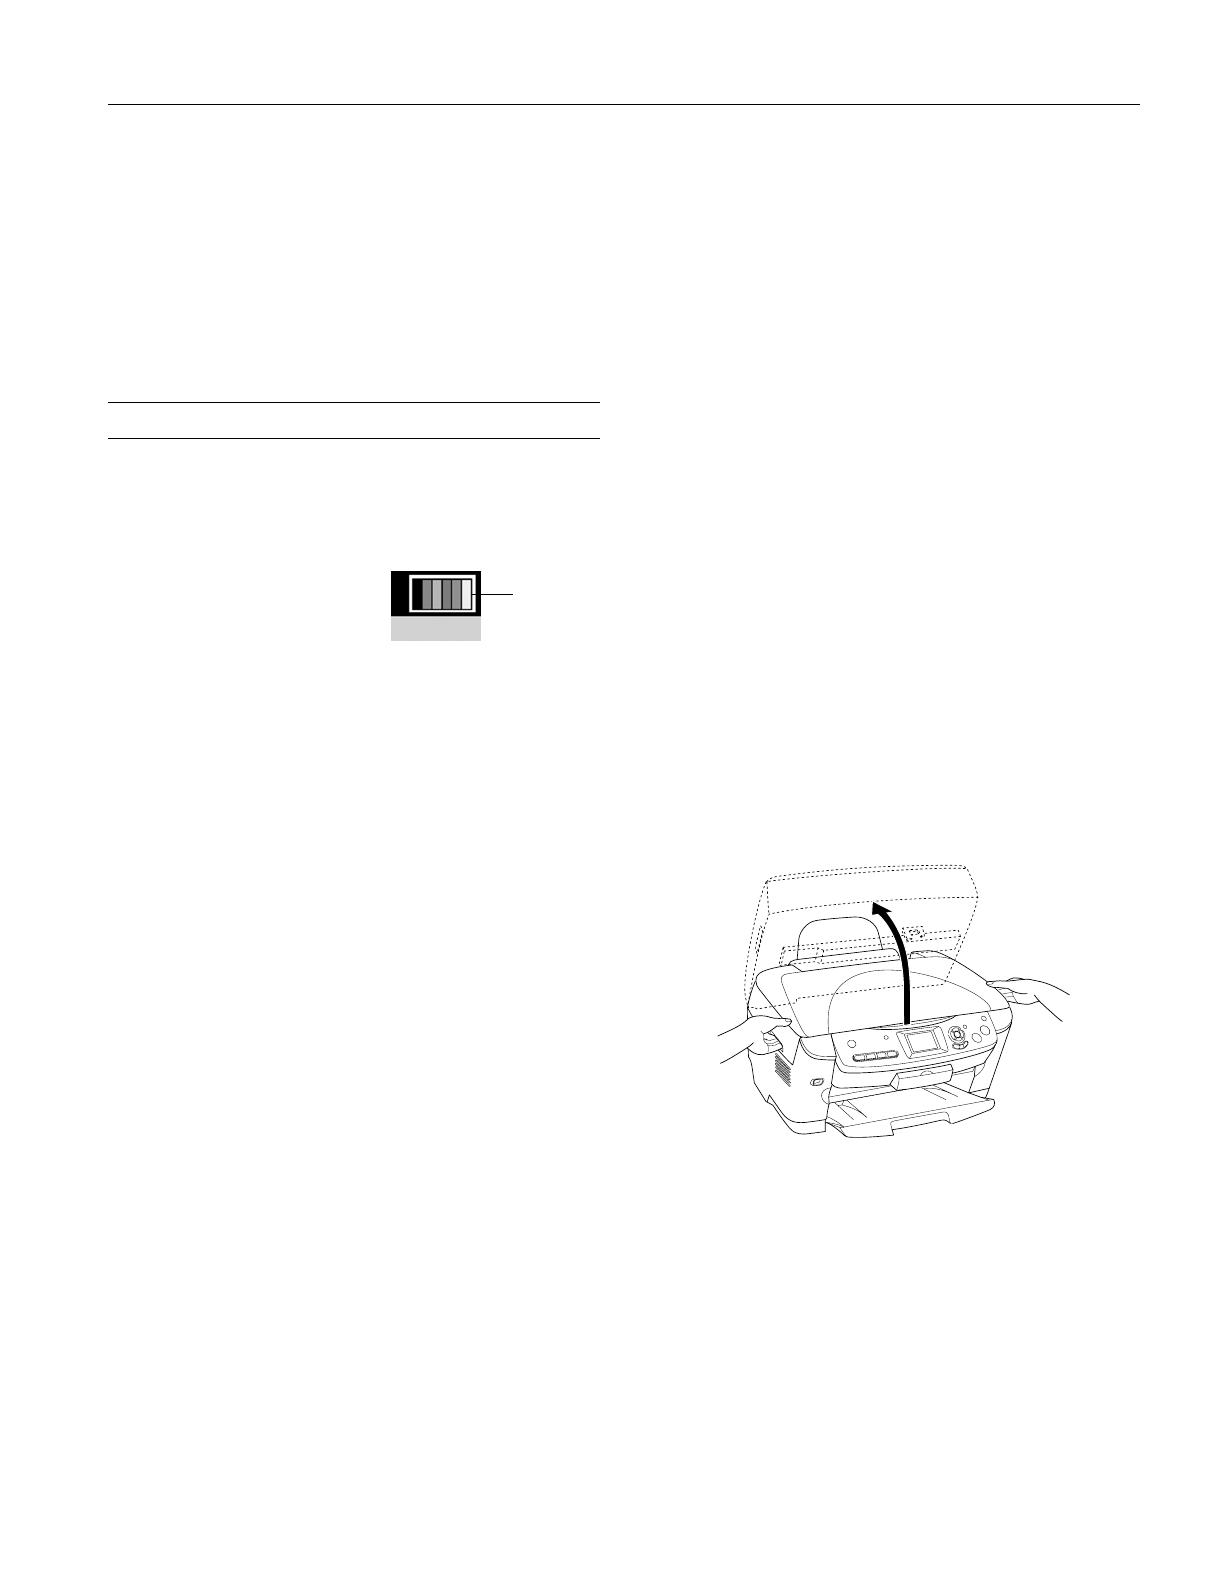
Check the icon in the upper
right corner to see which
cartridge is low or empty:
If you can’t see the icon
clearly enough, press the
Setup button, then press the
d button to select
LCD Contrast Adjustment then press the
OK button. Use the l and r buttons to decrease or increase
the contrast as necessary to see the icon clearly, then press the
OK button.
When a cartridge is more than six months old, you may need
to replace it if printouts don’t look their best. If the quality
doesn’t improve after cleaning and aligning the print head,
you may need to replace the cartridge.
Checking the Ink Supply
To check your ink supply, do the following:
1. Press the
Setup button to enter setup mode.
2. Press the u and d buttons to select
Ink Levels, then press
the
OK button.
You see a graphic with the amount of ink available in each
cartridge:
B (Black) C (Cyan), LC (Light Cyan),
M (Magenta), LM (Light Magenta), and Y (Yellow).
3. When you’re done checking the ink levels, press the
OK
button.
When your ink starts getting low, make sure you have
replacement cartridges available. You can’t print if a cartridge
is empty.
Ink Cartridge Precautions
Warning:
Keep ink cartridges out of the reach of children.
If ink gets on your hands, wash them thoroughly with soap and
water. If ink gets in your eyes, flush them thoroughly with water.
Caution:
To avoid damaging the printer, never move the print head by hand.
You can’t print if an ink cartridge is empty. Leave the empty
cartridge installed in the RX620 until you have obtained a
replacement. Otherwise the ink remaining in the print head nozzles
may dry out.
Removing and Installing Ink Cartridges
Be sure you have a new ink cartridge before you begin. Once
you start replacing a cartridge, you must complete all the steps
in one session.
1. If an ink cartridge is empty:
Look at the icon in the upper right corner of the LCD
screen to see which cartridge is empty, then press the
OK
button.
If an ink cartridge is low:
Press the
Setup button to enter setup mode. Press the u
and d buttons to select
Ink Cartridge, press OK, then press
OK again. Look at the icon in the upper right corner of the
LCD screen or check the ink levels as described in
“Checking the Ink Supply” above.
2. Lift open the scanner section, as shown, making sure to
keep the scanner lid closed on top.
Ink levels
Epson Stylus Photo RX620
16 - Epson Stylus Photo RX620 11/04
3. Open the ink cartridge holder’s cover.
Caution:
Never attempt to open the cartridge holder’s cover while the
print head is moving. Wait until the cartridges have moved to the
replacement position.
4. Remove the cartridge you need to replace. Press in the tab at
the back of the cartridge to release it, then lift the cartridge
straight out. Dispose of it carefully.
Note:
The illustration above shows the black cartridge being removed.
Only remove the cartridge(s) you need to replace.
5. Unwrap the new cartridge.
6. Insert the new cartridge into the holder. Press down firmly
until it clicks into place.
If you need to replace other ink cartridges, repeat steps 4
through 6 before continuing with the next step.
7. Close the ink cartridge holder’s cover, then close the scanner
section.
Caution:
If you find it difficult to close the cover, make sure all the
cartridges are firmly seated. Press down on each newly installed
cartridge until you hear it click into place. Do not attempt to force
the cover closed.
The RX620 begins charging the ink delivery system and the
message
Ink Charging appears on the LCD screen. When
you see the message
Ink cartridge replacement
completed, press OK.
Caution:
Never turn off the RX620 during ink charging, unless the RX620
hasn’t moved or made noise for more than 5 minutes. This may
cause incomplete charging of ink.
Aligning the Print Head
If your printouts look grainy or vertical lines appear jagged,
you may need to align the print head.
1. Make sure the RX620 is turned on and not printing.
2. Load several sheets of plain letter-size paper.
3. Press the
Setup button to enter setup mode, then press the
u and d buttons to select
Head Alignment.
4. Press the
OK button, then press OK again to print an
alignment pattern.
Epson Stylus Photo RX620
11/04 Epson Stylus Photo RX620 - 17
5. On the test page, select the pattern in each row with the two
vertical lines most precisely printed on top of each other.
You may need to use a magnifying glass or loupe.
.
6. Select the number of the best pattern in the first row by
pressing the l and r buttons. Then press
OK.
7. The next row number appears. Select the best pattern for
each remaining row.
8. When you’re finished you see the message
Head alignment
completed on the LCD screen. Press OK to return to the
Setup Menu.
Transporting the RX620
If you move your RX620 some distance, you need to prepare
it for transportation in its original box or one of a similar size.
Caution:
To avoid damage, always leave the ink cartridges installed when
transporting the RX620. Never transport or store the RX620 on its
side or in a tilted or upside-down position.
1. Press the P On button to turn on the RX620. Wait until
the scanner carriage moves to the home position (toward
the left side) and the print head locks in the far right
position. Then turn the RX620 off.
2. Open the scanner lid and slide the transportation lock to
the locked position.
Caution:
Be sure to move the transportation lock back to the unlocked
position after installing the RX620 in its new location.
3. Close the scanner lid.
4. Unplug the power cord from the electrical outlet. Then
disconnect the USB cable from your computer.
5. Unplug the cord from the
TPU connector.
6. Remove any paper from the sheet feeder and output tray,
then remove the paper support.
7. Close the output tray.
8. Lift up the scanner unit.
9. Remove the orange print head lock from its storage area and
install it as shown to prevent the print head from moving
during transport. If you can’t find the orange print head
lock, tape the print head to the case.
Caution:
Be sure to remove the orange print head lock or tape after
installing the RX620 in its new location.
Epson Stylus Photo RX620
18 - Epson Stylus Photo RX620 11/04
10. Close the scanner unit carefully until it clicks back into
place.
11. Repack the RX620 and its attachments in the original box
using the protective materials that came with them.
Caution:
Keep the RX620 level as you transport it.
After transporting the RX620, remove the orange print head
lock or tape securing the print head, unlock the transportation
lock securing the scanner carriage, and print a test copy. If you
notice a decline in quality, clean the print head (see page 14);
if output is misaligned, align the print head (see page 16).
Related Documentation
CPD-15868 Epson Stylus Photo RX620
Start Here sheet
CPD-15867 Epson Stylus Photo RX620
Quick Guide
CPD-15866 Epson Stylus Photo RX620
CD-ROM (includes on-screen
Reference Guide)
  • Page 1 1
  • Page 2 2
  • Page 3 3
  • Page 4 4
  • Page 5 5
  • Page 6 6
  • Page 7 7
  • Page 8 8
  • Page 9 9
  • Page 10 10
  • Page 11 11
  • Page 12 12
  • Page 13 13
  • Page 14 14
  • Page 15 15
  • Page 16 16
  • Page 17 17
  • Page 18 18
  • Page 19 19

Epson RX620 - Stylus Photo Color Inkjet Owner's manual

Category
Photo printers
Type
Owner's manual
This manual is also suitable for

Ask a question and I''ll find the answer in the document

Finding information in a document is now easier with AI