Sunbeam S T 6 5 0 1 E P B User manual
- Category
- Barbecues & grills
- Type
- User manual
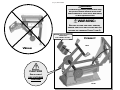
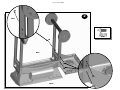
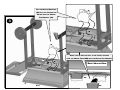
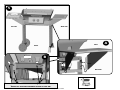
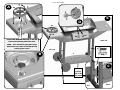
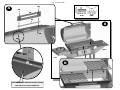
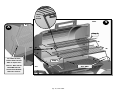
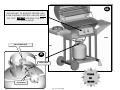
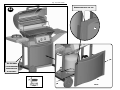
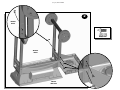
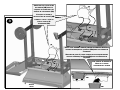
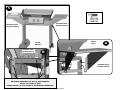
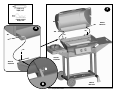
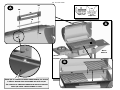
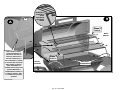
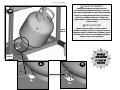
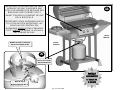
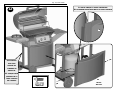
Sunbeam S T 6 5 0 1 E P B is a gas grill with a 650 series model. It has a 10-year warranty on aluminum castings, a 5-year warranty on the burner, and a 1-year warranty on all other parts. The grill has four main burners, one side burner, a warming rack, and a two-tiered cooking grate. It also has a built-in igniter and a temperature gauge. The grill can be used for grilling, roasting, smoking, and baking. It is easy to assemble and comes with detailed instructions. The grill is made of durable materials and is built to last. It is a great choice for anyone who loves to grill.
Sunbeam S T 6 5 0 1 E P B is a gas grill with a 650 series model. It has a 10-year warranty on aluminum castings, a 5-year warranty on the burner, and a 1-year warranty on all other parts. The grill has four main burners, one side burner, a warming rack, and a two-tiered cooking grate. It also has a built-in igniter and a temperature gauge. The grill can be used for grilling, roasting, smoking, and baking. It is easy to assemble and comes with detailed instructions. The grill is made of durable materials and is built to last. It is a great choice for anyone who loves to grill.


-
 1
1
-
 2
2
-
 3
3
-
 4
4
-
 5
5
-
 6
6
-
 7
7
-
 8
8
-
 9
9
-
 10
10
-
 11
11
-
 12
12
-
 13
13
-
 14
14
-
 15
15
-
 16
16
-
 17
17
-
 18
18
-
 19
19
-
 20
20
-
 21
21
-
 22
22
-
 23
23
-
 24
24
-
 25
25
-
 26
26
-
 27
27
-
 28
28
-
 29
29
-
 30
30
-
 31
31
-
 32
32


Sunbeam S T 6 5 0 1 E P B User manual
- Category
- Barbecues & grills
- Type
- User manual
Sunbeam S T 6 5 0 1 E P B is a gas grill with a 650 series model. It has a 10-year warranty on aluminum castings, a 5-year warranty on the burner, and a 1-year warranty on all other parts. The grill has four main burners, one side burner, a warming rack, and a two-tiered cooking grate. It also has a built-in igniter and a temperature gauge. The grill can be used for grilling, roasting, smoking, and baking. It is easy to assemble and comes with detailed instructions. The grill is made of durable materials and is built to last. It is a great choice for anyone who loves to grill.
Ask a question and I''ll find the answer in the document
Finding information in a document is now easier with AI
in other languages
Related papers
Other documents
-
Charmglow CT3402W User manual
-
Coleman LG39611SB Owner's manual
-
-
-
Falcon FN3411 Owner's manual
-
KitchenAid 1900645 Owner's manual
-
-
-
-