
GF0500044A05Re
vA05
© Gr
aham-F
ield Health Pr
oducts 2005
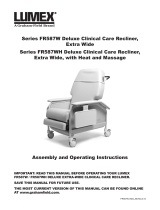
565DG Drop Arm - 565TG Tilt-in-Space
Ortho-Biotic Preferred Care
®
Recliners
Operating Instructions
IMPORTANT: READ THIS MANUAL BEFORE OPERATING
YOUR ORTHO-BIOTIC PREFERRED CARE RECLINER

565DG/565TG Or
tho-Biotic Preferred Care
®
Recliners Operating Instr
uctions
22
Warning: Read entire sheet before assembly
or operation.
Warning: This product should not be used
without proper instruction from a health
care professional.
Warning: The Tilt-in-Space and Drop Arm
Recliners have a 250 lb. maximum user
weight capacity.
Warning: Casters must be locked at all times,
except during transit.
Warning: GF/Lumex assumes no respon-
sibility for damage or injury caused by the
improper installation, assembly or use of
these products.
Note: All dimensions and specifications are
subject to change without notice.
WARNINGS
Every three months:
• Check and clean casters • tighten nuts • check brakes on casters •
• check and clean lock recline mechanism •
Check recliner mechanism for operation in all positions with assistant seated in recliner.
For upholstery maintenance and stain removal, the following hints will be helpful:
CARE & MAINTENANCE
Ordinary Dirt: Wash with warm water and a
mild soap or detergent.
Stubborn Dirt: Using a soft bristle brush, follow
directions above.
Ground-in Dirt: Scrub with powdered cleanser
or similar detergent.
Chewing Gum: Scrape carefully; remove with
kerosene or naphtha.
Nail Polish and Remover: Blot immediately to
prevent damage.
Ball Point Pen: Blot immediately with a white
cloth dampened in water or mineral oil.
Paint, Shoe Polish, Heel Marks: Remove
immediately! Use a white cloth dampened in
kerosene, naphtha or turpentine. Do not use
paint remover or liquid brush cleaners.
Tars, Asphalt, Creosote: Remove to prevent
staining. Clean area with kerosene or naphtha.
Caution: When using kerosene or naphtha, do so
in a well ventilated area and keep away
from fire and flame.
Waxing and Refinishing: Impr
oves wearability.
Use any quality paste wax.
Excrement: Remove immediately! Clean with a
diluted solution of 10% (or less) of bleach
or Clorox.

3565DG/565TG Or
tho-Biotic Preferred Care
®
Recliners Operating Instr
uctions
3
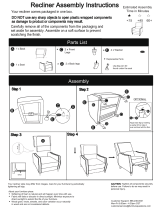
1. Unpack and inspect contents for shipping
damage or missing parts. If parts are
damaged or missing, contact your dealer
immediately. The contents of this package
should be:
• One (1) Recliner frame with upholstered
seat.
• One (1) Upholstered back.
• Two (2) Upholstered side panels.
• Two (2) Pins with wire rings.
2. Do not remove the shipping support which is
attached to the recliner’s upholstered back
until after the recliner’s upholstered back has
been assembled to the chair.
3. Save this booklet in a safe place for future
reference.
UNPACKING INSTRUCTIONS

565DG/565TG Or
tho-Biotic Preferred Care
®
Recliners Operating Instr
uctions
4
Upholstered
Back Cushion
Elastic Band
Shipping
Support
Clevis Pin
Wire Ring
Receiving Tubes
Frame
Key Ring
Strap
Hook
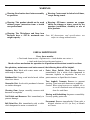
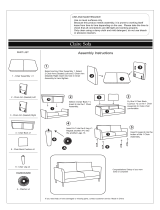
BACK ASSEMBLY
NOTE: Do not remove the shipping support which
is attached to the recliners upholstered back
until after the recliner's upholstered back
has been assembled to chair.
1. Obtain upholstered back assembly. Remove
the upholstered cushion from the metal back
frame (See fig. 1).
2. Remove pins and wire rings from frame
(See fig 1).
3. Slide back tubes onto receiving tubes on
frame and tap down until holes in back line up
with holes in frame (See fig. 1).
4. Replace pins and wire rings. Remove the
shipping support and discard (See fig 1).
5. Slide the lower elastic band on back to cover
pins. Position other straps evenly. The 2" elastic
bands can be adjusted for custom comfort.
6. At the bottom of the cushion you will find two
elastic straps with key rings on the ends (one
on each side). Replace back cushion over
metal frame. Attach each ring to the hook on
the frame next to the seat rings (See fig 2).
Figure 1
Figure 2
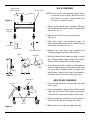
Figure 3
SIDE PANEL ASSEMBLY
1. Face the side panel cut out towards the front
of the chair.
2. Line up the panel’s spring clips with the round
tubes on the frame. Push against the panels
side until the clips are secured to the frame.
3. Slide the panel up or down until the panel is
flush with the top of the frame (See fig 3).
4. Repeat above steps for the opposite side.
Cut-Out
Side Panel
Push
Her
e
Slide

5565DG/565TG Or
tho-Biotic Preferred Care
®
Recliners Operating Instr
uctions
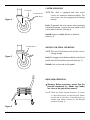
CASTER OPERATION
NOTE: This chair is equipped with four swivel
casters for improved maneuverability. The
rear casters are also equipped with locking
features.
Lock: To prevent the rear casters from swiveling
and wheel turning, step on the rear pedal of the
caster until it latches (See fig 4).
Unlock: Step on middle button to unlatch
(See fig. 4).
DROP ARM OPERATION
Warning: Before operating, insure that the
patients extremities (i.e., hands, legs, limbs)
are clear of the path of the armrest.
NOTE:There are three armrest positions. To lower
or raise the armrest, locate the push button
on the side of the chair. Press the button to
release and adjust armrest to the desired
position (See fig. 6).
Figure 4
Figure 5
Figure 6
To lock swivel
and wheel
To unlock
To lock swivel
SWIVEL LOCK PEDAL OPERATION
NOTE: The swivel lock feature will aid the chair in
rolling straight.
Lock: To engage, push down on black swivel lock
pedal and roll the recliner forward (See fig. 5).
Unlock: Lift on the side of the pedal.

565DG/565TG Or
tho-Biotic Preferred Care
®
Recliners Operating Instr
uctions
6
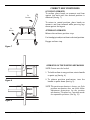
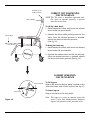
CORRECT SEAT POSITIONING
OCCUPANT OPERATED
To recline, place hands on armrests and lean
against the back until the desired position is
obtained (See fig. 7).
To return to seated position, place hands on
armrests and lean forward while pressing legs
down against the legrest
ATTENDANT OPERATED
Release the recliners position stop.
Use handgrip to adjust recliner to desired position.
Engage recliner stop.
Figure 9
Figure 8
Figure 7
OPERATION OF THE POSITION MECHANISM
NOTE: Casters must be locked.
1. To hold recliner in any position, rotate handle
to point up (See fig. 8).
2. To release position mechanism, turn the
handle to point down (See fig. 9).
NOTE: The position mechanism is factory set. If the
position mechanism does not hold, follow
Adjustment Instructions for the position
mechanism. The plate has 5 position marks
for repeatable positions (See fig. 13).
To
Recline
To
Return

7565DG/565TG Or
tho-Biotic Preferred Care
®
Recliners Operating Instr
uctions
Frame
Key Ring
Strap
Hook
Figure 11
Figure 10
Figure 12
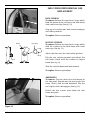
565G UPHOLSTERY REMOVAL AND
REPLACEMENT
BACK CUSHION
To remove: Release the two elastic straps which
hold the button of the cushion to the back frame
with small wire clips (See fig. 10).
Grip top of cushion near back frame handgrips
and slide up and off.
To replace: Reverse procedure.
SEAT-LEG CUSHION
To remove:
Release the two elastic straps which
hold the cushion to the back frame with small
wire rings (See fig. 11).
Adjust the chair into the semi-recline position.
Flip the seat cushion forward and release the
two hooks which hold the cushion to legrest
frame (See fig. 12).
Slide the cushion downward and forward.
To replace: Reverse procedure.
ARM PANELS
To remove: Grip the steel r
od at the bottom of
the side panel, located near the front of the side
frame. Gently slide the rod backward. Flex the
rod slightly until it disengages (See fig. 12).
Detach the four screws from under the side
frame arm plate.
To replace: Reverse procedure.

565DG/565TG Or
tho-Biotic Preferred Care
®
Recliners Operating Instr
uctions
8
Figure 13
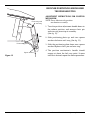
RECLINER POSITIONING MECHANISM
TROUBLE-SHOOTING
ADJUSTMENT INSTRUCTIONS FOR POSITION
MECHANISM
NOTE:Never lubricate the position
mechanism assembly.
1. Turn the position adjustment handle down to
the release position, and remove clevis pin
and wire ring from top of assembly.
(See fig. 13).
2. Slide positioning plate up, and turn square
washer clockwise until snug (See fig. 13).
3. Slide the positioning plate down over square
washer. Replace clevis pin and wire ring.
4. The position mechanism's handle should
engage at about the halt way point. If more
tension is desired, repeat the above procedure.
Clevis ring and
wire ring
Positioning plate
Square washer
Slide

9565DG/565TG Or
tho-Biotic Preferred Care
®
Recliners Operating Instr
uctions
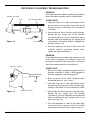
TILT-IN-SPACE GAS SPRING TROUBLESHOOTING
PROBLEM:
If the chair actuates without squeezing the release
lever, the cable assembly needs to be adjusted.
CORRECTION:
1. Lean the chair on its side and remove clevis
pin and wire rue ring that secure the top of
the gas spring to the frame. Do not remove
the cable.
2. Loosen the nut above the gas spring bracket.
Rotate the gas spring out of the bracket
(counterclockwise) 1/2 turn. Retighten nut on
bracket, and reassemble the gas spring back
to the frame. Check that cable is snapped into
bracket (See fig. 14).
3. Test the operation of chair. If the chair still
actuates without squeezing release lever,
repeat the above procedure.
PROBLEM:
If the chair does not actuate with a person in the
chair while squeezing the release lever and
pushing on the back, then the cable is too loose
and the assembly needs to be adjusted.
CORRECTION:
1. Ensure the cable is properly engaged onto the
bracket assembly. If cable is not engaged on
bracket, engage as shown in figure 15.
2. With a person in the chair, recheck cable.
If problem persists, go to step 3.
3. Lean the chair on its side and remove clevis
pin and wire ring that secure the top of the gas
spring to the frame. Do not remove the cable.
4. Loosen the nut above the gas spring bracket.
Rotate the gas spring into the bracket
(clockwise) 1/2 turn. Retighten nut on bracket
and r
eassemble the gas spring back to the
frame (See fig. 14).
5. Test the operation of chair. If the chair does
not actuate with a person in the chair while
squeezing the release lever, repeat steps 3-5.
Gas Spring Cylinder
Bracket Assembly
Cable
Nut
In
Out
Rue Ring
Clevis Pin
Engage as shown
Cable
Bracket Assembly
Figure 14
Figur
e 15

565DG/565TG Or
tho-Biotic Preferred Care
®
Recliners Operating Instr
uctions
10
Figure 16
CORRECT TILT POSITIONING
FOR TILT-IN-SPACE
NOTE:The Tilt chair is attendant operated only.
For chair to operate properly, a person
must be in the chair.
To tilt the chair back:
1. Stand behind the chair, and locate the release
lever under the push handle.
2. Squeeze the lever while pushing down on the
back. Once the desired position is attained,
release the lever to lock into position
(See fig. 16).
To bring the chair up:
1. Stand behind the chair, and locate the release
lever under the push handle.
2. Squeeze the release lever and lift the back up.
Once the desired position is attained, release
the lever to lock into position (See fig. 16).
Release Lever
U
nder Cusion
Push Handle
Up Position
Legrest Down
Legrest Up
LEGREST OPERATION
FOR TILT-IN-SPACE
To lift legrest:
Step on the front of the foot pedal, located on the
side of the chair, until it locks in place (See fig. 16).
To lower legrest:
Step on the back of the foot pedal.
Note: The legrest is easier to operate when the
chair is in its fully tilted position, however
legrest will operate in any position of tilt.

U.S.A., Corporate Headquarters:
Graham-Field Health Products
2935 Northeast Parkway
Atlanta, Georgia 30360
telephone: 800-347-5678, 770-447-1609
fax: 800-726-0601, 678-291-3232
http://www.grahamfield.com
-
 1
1
-
 2
2
-
 3
3
-
 4
4
-
 5
5
-
 6
6
-
 7
7
-
 8
8
-
 9
9
-
 10
10
-
 11
11


Ask a question and I''ll find the answer in the document
Finding information in a document is now easier with AI
Related papers


Other documents
-
Boss Office Products B6106 Operating instructions
-
-
ROOMS TO GO 18505101 Assembly Instructions
-
Graham Field 565WG User manual
-
 HOMESTOCK 49004 User guide
-
Kmart 43171781 User manual
-
 Grand Resort MNY 729-91 Owner's manual
-
-
 ProLounger A162777 Operating instructions
-
 Argos Home BRADLEY User manual


