Philips P725S User manual
- Category
- Remote controls
- Type
- User manual
This manual is also suitable for

PM725S/P725S
FRONT COVER
PM725.manual 5/27/08 9:23 AM Page 1

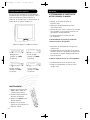
Congratulations on your purchase of Philips
Universal Remote Control. Philips Universal Remotes
let you replace a broken or lost remote or combine
more than one remote into one. In addition, this
remote is equipped with a command learning
feature which lets the remote learn commands from
your original equipment remote control!
This remote control operates the common features
of most but not all models and brands of IR
Infrared Controlled Video Equipment. This remote
may provide functions that are not available on
your equipment. Some functions of your particular
equipment (e.g. menu functions) may not be
controlled by this remote. In such cases, use the
original remote control for your equipment. Please
use this manual to become familiar with your
Philips Universal Remote. After you are familiar
with your remote the first thing you need to do is
to install batteries and setup your remote for your
particular product and brand.
Thank you for buying a Philips remote and we hope
it will give you many years of service.
Introduction
Introduction. . . . . . . . . . . . . . . . . . . . . . . . . . . 3
Setup . . . . . . . . . . . . . . . . . . . . . . . . . . . . . . . 4
Battery Installation. . . . . . . . . . . . . . . . . . . 4
Battery Saver . . . . . . . . . . . . . . . . . . . . . . . 4
Code Saver. . . . . . . . . . . . . . . . . . . . . . . . . 4
Power-On default . . . . . . . . . . . . . . . . . . . . 5
TV Punch Through . . . . . . . . . . . . . . . . . . . . 5
VCR Punch Through . . . . . . . . . . . . . . . . . . . 5
Code Setup . . . . . . . . . . . . . . . . . . . . . . . . 5
Button Functions . . . . . . . . . . . . . . . . . . . . . . . 6
Advanced DVD and SAT Button Functions . . . . . . . 8
TV/VCR Punch-Through . . . . . . . . . . . . . . . . . . . 9
TV/VCR and TV/DVD Combo units. . . . . . . . . . . . . 9
Code Entry . . . . . . . . . . . . . . . . . . . . . . . . . . . 10
Direct Code Entry . . . . . . . . . . . . . . . . . . . 10
Code Search . . . . . . . . . . . . . . . . . . . . . . . 11
Code Identification . . . . . . . . . . . . . . . . . . 12
Sleep Timer . . . . . . . . . . . . . . . . . . . . . . . . . . 13
Code Learning. . . . . . . . . . . . . . . . . . . . . . . . . 13
Tips on Learning . . . . . . . . . . . . . . . . . . . . 14
Learning Commands. . . . . . . . . . . . . . . . . . 14
Clearing Learned commands for a mode . . . . 15
Master Clear . . . . . . . . . . . . . . . . . . . . . . . 15
Product Operation . . . . . . . . . . . . . . . . . . . . . . 16
Troubleshooting . . . . . . . . . . . . . . . . . . . . . . . 17
Code List . . . . . . . . . . . . . . . . . . . . . . . . . . . . 56
Table of Contents
2
3
PM725.manual 5/27/08 9:23 AM Page 2

POWER-ON DEFAULT
The remote powers on in TV mode.
TV VOLUME/MUTE PUNCH-THROUGH
T he TV Vo l u me / M ute punc h - t h r ough feature lets you
c o nt r ol the Vo l u me and Mute func t ion of your TV in
a n y mo de pro g r a m med to be a VCR, DVD, Cable or SAT
de v i c e, without ne e d i ng to change to TV mo d e. This
f e a t u re is also available if AUX mo d e is pro g r a m me d
to cont r ol a second VCR, Cable or SAT de v i c e.
VCR PUNCH-THROUGH
Punch-through to VCR mode is only allowed in TV,
VCR and Cable modes. SAT/DBS and CD/Audio are
dedicated to their modes.
CODE SETUP
T h e Code Search button is used to setup the re mo t e.
You can either setup the re mote using the code fo r
your bra n d of pro duct, from the code tables, or you
can search through the library of codes until you
f i nd a code that works for your pro duc t .
NOTE: You can store any kind of code under any mode
( except TV). I.E. you can store a VCR code under the
CBL ke y, or a DVD code under the VCR ke y, etc. You can
store ANY kind of code under the AUX key. However,
you can only store TV codes under the TV ke y .
5
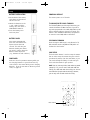
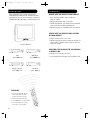
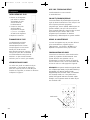
BATTERY INSTALLATION
1. On the back of the remote,
push down on the tab and
lift the cover off.
2. Match the batteries to the
+ and - marks inside the
battery case, then insert 2
AAA Alkaline batteries.
3. Press the battery cover
back into place.
BATTERY SAVER
Your remote automatically
times out if the buttons are
depressed more than 30
seconds. This will save your
batteries should your remote
get stuck in a place where the
buttons remain depressed
(e.g., between the sofa cushions).
CODE SAVER
Codes are stored in permanent memory while you
are changing batteries so you will not lose any
codes stored in the remote while you are changing
batteries. If you do not want to delete any stored
codes, see page 15.
Setup
4
Code Search
PM725.manual 5/27/08 9:23 AM Page 4

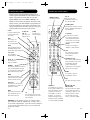
Button Functions, Cont.
7
Some buttons on the remote might have functions
that are referred to by different names on the device
you are controlling. E.G. Prev.Ch. may becalled
RECALL,or ENTER may be called DISPLAY. These
differences depend on the brand and model of your
product. Also, this remote can only operate features
that exist on your product. E.G., your product must
be equipped with Prev. Ch. ability for the Prev. Ch.
button to operate this feature.
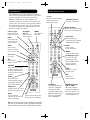
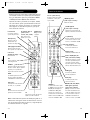
Button Functions
6
MUTE
Turns off the TV
sound while the
picture remains.
TV,VCR,CBL,
AUX, etc.
Selects product
to be operated.
Indicator light
Lights when any
button is pressed.
CHANNEL Up/Down
Changes the channels.
VOLUME Up/Down
Changes the volume level of
the product, normally the TV.
Prev.Ch.
Returns to the previously
selected channel, or
DVD repeat toggle.
CC(Subtitle)
TV Closed Caption
(if your TV has this feature )
or DVD Subtitle toggle.
LEARN
Used to setup
learning functions.
TV/VCR/Input Toggle
For some TVs, press
repeatedly to select
from available viewing
sources (antenna,
cablebox,VCR,etc.).
TOGGLE
Swaps TV PIP screens.
GUIDE
Displays on-screen
program guide.
QUIT
Used to exit
menu functions.
CHAPTER+/-
C o n t rols DVD/ CD tra c k
s e l e c t ion i.e. DVD/CD
Track Skip Up/Down
(in DVD and SAT mo de s ) .
Note: T he VCR Tra n s p o r t
keys also cont r ol DVD
w h en in DVD Mo d e.
RECORD,PLAY, STOP,
REW, FF, PAUSE
VCR control buttons
operate your VCR even
when the remote is set
to operate the TV. Also
operates DVD Scan-/+.
Code Search
For setup.
POWER
Turns product
On or Off.
SLEEP
Turns off the
TV after a period
of 1 to 99 minu t e s.
PIP
TV Picture-in-
Picture control.
NUMBERS
Enter numbers for direct
channel selection. Some
products require Enter to
be pressed after channel
selection.
ENTER
Used after direct
channel number entry to
immediately change to
the selected channel.
INFO/Select
displays/selects on-screen
channel information, etc.
MENU
Access the Menu
functions of the device
you are controlling.
OK
Selects menu items for the
device you are controlling.
N o t e : The REC button must be pressed TWICE to record from
your VCR. For some brands of VCRs, you might need to press
the REC button once, then press it again for three seconds.
PM725.manual 5/27/08 9:23 AM Page 6

TV/VCR PUNCH-THROUGH
VCR Punch-through is automatically available in TV
and Cable Modes only i.e. the 6 VCR keys (Play,
Pause, Stop,Record, FF and Rewind) will punch-
through to the device programmed under VCR when
in either TV or Cable Modes.
The TV/VCR/INPUT button performs the TV/VCR
antenna switch function when in VCR Mode.
The TV/VCR/INPUT button performs the A.B switch
function when in Cable Mode.
The TV/VCR/INPUT button performs the TV/SAT
switch function when in SAT Mode.
The TV/VCR/INPUT button performs the INPUT
source switch function when in TV Mode.
The TV/VCR/INPUT button performs the DVD Setup
function when in DVD Mode.
The TV/VCR/INPUT button performs nonspecific
functions when in CD/Audio Mode.
MISC.
SELECT means same as OKAY - some manufacturers
use OKAY label and others use SELECT label on
their remotes.
CC will activate the Closed Caption feature if your
device has that feature.
PIP (Picture-in-Picture) and TOGGLE buttons
operate your television’s Picture-in-Picture features.
Use PIP to activate the feature and TOGGLE to swap
between the displayed pictures on your TV.
TV/VCR and TV/DVD Combo units
Note that for some TV/VCR and TV/DVD combo units
you might need to set up two different buttons to
control both parts of the combo unit. E.G.,
(referring to the Direct Code Entry section on the
following page) you might need to set up a code
under the TV button to control the TV part of the
combo unit AND a separate code for the VCR or DVD
under any other button you choose.
9
DVD
Scan+ and Scan- buttons control the speed of
Fast Forward and Reverse Playback respectively.
Chapter+ and Chapter- buttons respectively
locate the succeeding or preceding Chapters or
Tracks on a disc.
Subtitle button brings up DVD Subtitle Menu for
Subtitle selection and display.
Repeat button performs DVD players “A-B Repeat”
(or RPT A.B) function for repeat play of current
Chapter or Track.
Info/Select button brings up DVD Display or
C o nt r ol Me n u for Chapter/Track/Title nu m b e r, Time
re ma i n i n g/elapsed ind i c a t ion, system info r m a t ion, etc.
Menu b r i n gs up the DVD disc Me n u screen - use
with the Up, Down, Left & Rig ht na v ig a t ion buttons.
OK button is used for on-screen Menu selection.
Note some DVD players require the Play button to
be used.
Quit button is used to Exit or Clear on-screen
Menu displays.
Play button is used to start Disc playback and
for Menu selection on some DVD players.
Stop button stops Disc playback.
Pause button will pause Disc playback - press Play
to resume.
Note - in DVD Mode the INPUT button activates
the DVD Players SETUP Menu.
SAT
Guide button displays on-screen Satellite
Channel Guide.
Chapter+ and Chapter- buttons perform the
“Page+” and “Page-” function for on-screen Guide
Menus used by some Satellite systems.
Info/Select button brings up Satellite Display
screen for current Channel and system information.
Menu b r i n gs up the Satellite Me nu screen - use with
t he Up, Down, Left & Rig ht na v i g a t ion buttons.
OK button is used for on-screen Menu selection.
Quit button is used to Exit or Clear on-screen
Menu displays.
Input button perfo r m s the Satellite TV/SAT func t i o n .
Advanced Button Functions
8
PM725.manual 5/27/08 9:23 AM Page 8

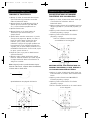
PROGRAMMING WITH CODE SEARCH
1. Manually turn on the device (TV, VCR, etc.)
to be controlled.
2. P ress and hold Code Search button until the re d
i nd i cator stays on. Release the Code Search button.
3. P ress and release the de s i red mo de button (TV,
VCR, etc.). The red ind i cator blinks, then stays lit.
4. Press the Channel Up button repeatedly (up to
300 times) until the device to be controlled
changes channel. The red indicator blinks, then
stays lit. If you accidentally overshoot the code
required, press the Channel Down button to
backtrack through the library until the device
changes channel. Pressing Channel Up changes
direction to forward again. Press and release the
Mute button to install the code.
The above assumes that you want to store VCR
codes under the VCR button, Cable codes under CBL,
etc. If you want to store a VCR code under CBL,
etc., first follow the procedure on page 10 and try
ANY CBL code from the code tables, e.g. press CBL
in step 2, page 10, and then enter ANY VCR code.
Then follow the steps above.
Note: If the device does not have a Channel Up
button,use Play (VCR only) or Power instead. Code
Search starts from the currently stored three digit
number under that mode e.g. if the mode has 100
codes and the currently stored code is 050 then the
Code Search starts from 051 continuing to 100
before looping back to 000 and finishing at 050.
This simplifies the process if you find that several
preprogrammed codes operate your device by
allowing you to bypass codes already tried.
1 1
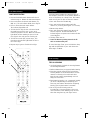
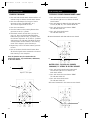
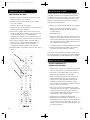
DIRECT CODE ENTRY
1. Press and hold the Code Search button until the re d
i n d icator stays on. Release the Code Search button.
2. P r ess and release the de s i red mo de button (TV,
VCR, etc.). The red ind i cator blinks, then stays lit.
3. Enter the 3 digit code from the code tables. No t e :
after a valid code ent r y, the red ind icator turns
off. For an invalid code, the red ind i cator flashe s.
4. With your device on, press CHANNEL Up. If the
device responds, no further programming is
required. Note: If some buttons do not operate
your equipment, try one of the other codes for
your brand.
Code Entry
1 0
2.
4.
1.
3.
4.
2.
1., 3.
Write your codes down here for easy reference later.
PM725.manual 5/27/08 9:23 AM Page 10

The Sleep feature enables the remote to turn off
the TV after a period of 1 to 99 minutes. Remote is
to be in TV mode to set a Sleep Timer. This feature
works even if your TV does not have this feature.
1. Press and release the TV Mode key.
2. Press and hold the Sleep button until LED
remains on (occurring after approx. 2-3 seconds).
3. Release Sleep button.
4. Press and release the numeric keys (01-99) for
the time required. The LED will blink off to
indicate keypress acceptance and remain off after
second keypress.
5. TV Sleep Timer now set.
6. Leave the Remote pointing towards the TV
with an unobstructed path.
To cancel the Sleep Timer, press and hold the Sleep
key until the LED blinks or press and release the
Power key in TV Mode.
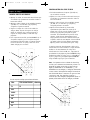
TIPS ON LEARNING
1. Use fresh batteries for both the Learning Remote
and the Original Remote.
2. Pe r f orm a Master clear (see page 15) befo re learning .
3. Place the original remote end-to-end with the
Learning Remote so the IR transmitters on both
remotes are directly in line with each other.
Keep the two remotes approximately one inch
away from each other.
4. Experiment by learning 2 or 3 commands initially
(to ensure compatibility and familiarity) and
then carry out a Master Clear before completely
learning your original remote’s commands.
5. Do not try to learn directly under an
incandescent or low-energy light as these can
cause interference with learning. Keep at least
three feet away from any such light sources.
Code Learning
Sleep Timer
1 3
CODE IDENTIFICATION
1. P r ess and hold Code Search button until the re d
i nd i cator stays on. Release the Code Search button.
2. P r ess and release the de s i red mo de button (TV,
VCR, etc.). The red ind i cator blinks, then stays lit.
3. Press a release the Code Search button.
The indicator light blinks off.
4. To find the first digit for the code stored under
the mode key pressed in step 2, press each
numeric key from 0-9 in turn. When the indicator
light blinks off the number you pressed is the
first digit for the code you are searching for.
5. To find the second digit, repeat step 4, this
time when the indicator light blinks off this is
the second digit.
6. Repeat step 4 again to find the third digit.
Code Indentification
1 2
2.
1.,3.
4.
PM725.manual 5/27/08 9:23 AM Page 12

1 5
1 4
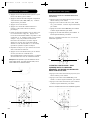
LEARNING COMMANDS
1. P r ess and hold the Code Search button until the re d
i n d icator stays on. Release the Code Search button.
2. Press the mode button for the type of device
you want to learn (TV, VCR, Cable, etc.).
The indicator lights blinks off once.
3. Press the Learn button.
4. Press the button on the Learning Remote that
you want to teach, e.g. Power.
5. Point both remotes at each other (see tips on
page 11). Press and hold the Original Remote
button that you want to learn, e.g. Power, until
the indicator light turns off. If there is a problem
with learning, the indicator light blinks for three
seconds but the remote remains in the Learning
mode. If this happens, repeat from Step 4.
6. Repeat Steps 4 and 5 for other buttons you want
to learn.
7. Press and release the Code Search button when
all desired original remote commands are learned.
Code Learning is now complete.
Note: No functions may be stored under the
Code Search button, any mode button, AUX button,
or the Learn button.
Code Learning, Cont.
TO CLEAR ALL LEARNED COMMANDS UNDER A MODE
1. Press and hold the Code Search button until
the indicator light turns on. Release the Code
Search button.
2. P r ess and release the button for the mo de you want
to clear (TV, VCR, etc.). The ind i cator blinks of f .
3. Press and release the Learn button TWICE.
The indicator blinks off.
4. Press and release Code Search.
The indicator blinks off.
All learned Comma n ds under that mo d e are now cleare d .
MASTER CLEAR - TO CLEAR ALL LEARNED
COMMANDS, I.E. RETURN TO FACTORY DEFAULTS
1. Press and hold the Code Search button until
the indicator light turns on. Release the
Code Search button.
2. Press and release the Learn button TWICE.
The indicator blinks off.
3. Press and release Code Search.
The indicator blinks off.
All Learned comma nds in the re m ote are now cleare d .
Code Learning, Cont.
5.
2.
1.
4.
3.
2.
1,4.
3.
1.,3.
2.
Aprox. 1 inch apart
PM725.manual 5/27/08 9:23 AM Page 14

REMOTE DOES NOT OPERATE YOUR PRODUCT.
• Press the mode button of the product you
want to control.
• Program the remote with a new code.
• I n stall new batterie s. (You mig h t have to re p r o g r a m
your re m ote after ins t a l l i n g new batterie s . )
• R e m ote may not be compatible with your pro duct.
REMOTE DOES NOT OPERATE SOME FEATURES
OF YOUR PRODUCT.
• Program remote with a new code.
• Remote may not be able to operate all features of
your product or button names might be different
than your product.
I N D I C ATOR LIGHT BLINKS AFTER YOU PROGRAM
A PRODUCT CODE.
• Remote did not accept the code.
• Try to pro g r am the code again or try a differe n t code.
Troubleshooting
1 7
1 6
After the batteries are installed and you have
p ro g r a m med the re mote for the codes that opera t e
your pro duc t s , you can use your re m ote to operate a
T V, VCR, Cable Box, CD Player, or Satellite System, etc.
Product Operation
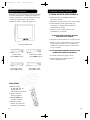
TO OPERATE:
1. Press the TV, VCR, CBL, SAT, etc.
button (depending on which
product you want to operate).
2. Aim the remote at the product.
3. Press POWER to turn on the product.
4. Press other buttons to operate
the features of your product.
TV (Press TV First)
VCR
(Press VCR First)
DVD Player
(Press DVD First)
Satellite System
(Press SAT First)
CD Player
(Press CD First)
PM725.manual 5/27/08 9:23 AM Page 16

1 9
1 8
This product is manufactured to PHILIPS specifications
and is free from defects in material, workmanship and
assembly. This warranty extends only to the original
purchaser and is nontransferable. Should a defect occur
under normal operating conditions from the date of
purchase, PHILIPS will provide a comparable
replacement free of charge within the warranty period,
to the original purchaser. Defective product must be
returned, with the dated proof of purchase, to the place
of purchase for replacement. This warranty does not
extend to the product if it has been damaged or
rendered defective as a result of accident, misuse,
abuse, tampering with or modification. THIS WARRANTY
IS IN LIEU OF ALL OTHER WARRANTIES, EXPRESS OR
IMPLIED, INCLUDING THE IMPLIED WARRANTIES OF
MERCHANTABILITY OR FITNESS FOR A PARTICULAR
PURPOSE. IN NO EVENT SHALL PHILIPS BE LIABLE FOR
SPECIAL, INDIRECT, INCIDENTAL OR CONSEQUENTIAL
DAMAGES, WHETHER IN CONTRACT, TORT OR NEGLIGENCE.
Some States do not allow limitations on how long an
implied warranty lasts, so the above limitation may not
apply to you. Some States do not allow exclusion or
limitation of incidental or consequential damages, so
the above limitation or exclusion may not apply to you.
This warranty gives you specific rights and you may also
have other rights, which vary from State to State.
Made in China, Quality Assured in USA
Ledgewood, NJ 07852
Lifetime Warranty
PM725.manual 5/27/08 9:23 AM Page 18
Page is loading ...
Page is loading ...
Page is loading ...
Page is loading ...
Page is loading ...
Page is loading ...
Page is loading ...
Page is loading ...
Page is loading ...
Page is loading ...
Page is loading ...
Page is loading ...
Page is loading ...
Page is loading ...
Page is loading ...
Page is loading ...
Page is loading ...
Page is loading ...

PM725S/P725S
BACK COVER
PM725.manual 5/27/08 9:23 AM Page 56
-
 1
1
-
 2
2
-
 3
3
-
 4
4
-
 5
5
-
 6
6
-
 7
7
-
 8
8
-
 9
9
-
 10
10
-
 11
11
-
 12
12
-
 13
13
-
 14
14
-
 15
15
-
 16
16
-
 17
17
-
 18
18
-
 19
19
-
 20
20
-
 21
21
-
 22
22
-
 23
23
-
 24
24
-
 25
25
-
 26
26
-
 27
27
-
 28
28
-
 29
29


Philips P725S User manual
- Category
- Remote controls
- Type
- User manual
- This manual is also suitable for
Ask a question and I''ll find the answer in the document
Finding information in a document is now easier with AI
in other languages
- français: Philips P725S Manuel utilisateur
- español: Philips P725S Manual de usuario