Page is loading ...

®
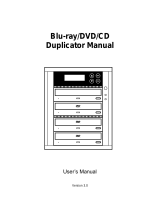
USER GUIDE
Aleratec 1:15 Blu-ray/DVD/CD
Tower Publisher SLS™
Part No. 260203

www.aleratec.com
Copyright/Model Identification
The content of this manual is for informational purposes only and is subject to
change without notice.
This manual is copyright with all rights reserved. Under copyright laws, this manual
and the software described within may not be copied, except in the normal use of the
product(s) described within or to make a backup copy.
Copyright© 2011
Aleratec, Inc.
9851 Owensmouth Avenue
Chatsworth, CA 91311 U.S.A.
Aleratec
®
is a registered trademark, and 1:15 Blu-ray/DVD/CD Tower Publisher
SLS™ is a trademark of Aleratec, Inc
Check out Aleratec Online!
• aleratec.com
• facebook.com/Aleratec
• twitter.com/Aleratec
• youtube.com/Aleratec
Please record the following information to help expedite any warranty claim:
Model No. _________________________ Serial No.________________________
Date Purchased _______________________________________________________
Place of Purchase _____________________________________________________

www.aleratec.com
Radio/TV Interference Statement
The equipment described in this guide emits radio frequency energy. If it is
not installed in accordance with the manufacturer’s instructions, it may cause
interference with radio or television reception.
This equipment has been tested and found to comply with the limits for a Class
B digital device, pursuant to Part 15 of the FCC Rules. These limits are designed
to provide reasonable protection against harmful interference in a residential
installation.
This equipment generates, uses, and can radiate radio frequency energy. If not
installed and used in accordance with the instruction manual, this equipment may
cause harmful interference to radio communications. However, there is no guarantee
that interference will not occur in a particular installation. If this equipment does
cause harmful interference to radio or television reception, which can be veried
by turning the equipment off and on, the user is encouraged to try to correct the
interference by one or more of the following measures:
• Reorient or relocate the receiving antenna.
• Increase the separation between the equipment and the receiver.
• Connect the equipment to an electrical outlet on a circuit that is different from
the circuit to which the receiver is connected.
• Consult your dealer or an experienced radio/TV technician for help.
This equipment has been certied to comply with the limits for a Class B computing
device, pursuant to FCC Rules. In order to maintain compliance with FCC
regulations, shielded cables must be used with this equipment. Operation with non-
approved equipment or unshielded cables is likely to result in interference to radio
and TV reception. The user is cautioned that changes and/or modications made to
this equipment, without the approval of manufacturer, could void the user’s authority
to operate this equipment.

www.aleratec.com
Safety Regulations
WARNING
To prevent re or shock hazard, do not expose the unit
to rain or moisture.
To avoid electrical shock, do not open the cabinet.
Refer servicing to authorized personnel only.
CAUTION
As the laser beam in these 1:15 Blu-ray/DVD/CD
Tower Publisher SLS is harmful to the eyes, do not
attempt to disassemble the cabinet. Refer servicing to
authorized personnel only.
The use of optical instruments with this product will
increase eye hazard.
This BD/DVD/CD Duplicator is classied as a CLASS
1 LASER PRODUCT.
The CLASS 1 LASER PRODUCT label is located on
top of the internal drive enclosure.
CLASS 1
LASER PRODUCT
LASER KLASSE 1
PRODUKT

www.aleratec.com
Table of Contents
Introduction ...................................................................................................1
Product Features ...................................................................................................1
Key Items – 1:15 Blu-ray/DVD/CD Tower Publisher SLS .................................2
1:15 Blu-ray/DVD/CD Tower Publisher SLS: LCD Front Panel ........................3
1:15 Blu-ray/DVD/CD Tower Publisher SLS: Removable Hard Disk Drive ......4
Precautions ...................................................................................................5
Before you start: ...................................................................................................5
Overview ........................................................................................................7
Unpacking the Unit ..............................................................................................7
Connect the Cables and Apply Power ..................................................................7
LightScribe Software Installation ........................................................................8
Using the LightScribe Labeling Software ..........................................................13
Other Label Printing Related Options ................................................................15
Control Functions...............................................................................................16
Stand-Alone Tower Publisher SLS: Tutorials...........................................17
Making Disc-to-Disc Copies ..............................................................................17
Load Source Files onto the Hard Drive .............................................................22
Load Master Disc onto the Hard Drive ..............................................................24
Rename Existing Hard Drive Partition Name ....................................................28
Delete Existing Hard Drive Partition Permanently ............................................30
How to Make Copies from the Hard Drive ........................................................32
Select Burn Speed ..............................................................................................37
Select the Source drive .......................................................................................39
Change the SETUP Settings ..............................................................................41
Audio CD Editing ..............................................................................................42
Introduction to Manage Accounts .....................................................................50
Manage Accounts: Overview .............................................................................51
Introduction to Duplication Mode .....................................................................54
Using AUTOCOPY ............................................................................................57
Menu Overview ...........................................................................................59
Troubleshooting .........................................................................................66
Recommended Media ................................................................................70
Technical Support ......................................................................................71
Service and Support ...................................................................................73
Technical Support FAX Back Form ...........................................................75

www.aleratec.com
®

www.aleratec.com
1
Introduction
Thank you for purchasing the 1:15 Blu-ray/DVD/CD Tower Publisher SLS. Please
read this User Guide thoroughly before using this product.
Product Features
The Aleratec 1:15 Blu-ray/DVD/CD Tower Publisher SLS is a stand alone
LightScribe disc publishing system with the capability of simultaneously producing
up to 15 BD/DVD/CD copies or clearly labeled discs, and no computer is required.
• Removable Hard Disk Drive to store disc images and label les.*
• Aleratec only USB fast key instantly connects Hard Drive to a PC.
• BD/DVD/CD source drive for fast on the y copies.
• Laser burns disc labels.*
• Powerful Aleratec Disc Publishing Suite and LightScribe Labeling Software
included.
*Note: There is currently no LightScribe Blu-ray media available.

www.aleratec.com
2
Introduction
Key Items – 1:15 Blu-ray/DVD/CD Tower Publisher SLS
*Note: There is currently no LightScribe Blu-ray media available.
Control Panel
Removable
Hard Disk Drive
(see page 4)
BD/DVD/CD
Source Drive
BD/DVD/CD RW
LightScribe Drives*

www.aleratec.com
3
Introduction
1:15 Blu-ray/DVD/CD Tower Publisher SLS: LCD Front Panel
(View may vary from picture)
1. Display shows all functions and messages
2. ESC button is used to cancel a selected function
3. ENT button is used to execute a selected function
4. COPYbutton will start the “Autocopy” menu function. (See page 59 for more
information)
5. USB button will take you directly to the USB On/Off mode option. (See page
65 for more information)
6. PRINTbutton will take you directly to the print menu.
7. SOURCE button will allow you to change the Source drive that the duplicator
uses for loading Master Discs. The default for this option is the BD/DVD/CD
source drive. (See page 33 for more information)
8. UP arrow is used to scroll up through functions or menus
9. DOWN arrow is used to scroll down through functions or menus
ESC
Initialize Duplicator
1-3 ver: X.XX
8
1
3
9
2
ENT
COPY USB SOURCEPRINT
4 5 6 7

www.aleratec.com
4
Introduction
1:15 Blu-ray/DVD/CD Tower Publisher SLS: Removable Hard
Disk Drive
Your Tower Publisher SLS is equipped with a removable hard disk drive (HDD) for
storing images of frequently copied discs. Storing an image of a disc you want to copy
on an HDD improves duplication speed, and adds the convenience of not having to
look around for the actual source disc you want to copy.
Your removable HDD provides extra security, in that you can remove the drive
containing the disc images and put it in a safe place where no un-authorized users can
copy or view the data.
The removable HDD includes a keyed lock to protect the data on the drive from being
misused or stolen. The HDD is used in the copy process as described in the following
pages of this user guide.
Note: You can use the duplicator to copy directly from BD, DVDs or CDs with
or without the HDD. Just place your source disc in the BD/DVD/CD source
drive or any of the BD/DVDRW writers.
To remove the HDD:
1. Unlock the HDD by inserting the key and turning it left (counterclockwise) 1/4
turn. The drive is now in the unlocked position.
2. Lift the HDD carriage lever upward and pull out. The HDD carriage will come
out of the tower and a protective drive bay door will close.
To replace the HDD:
1. Align the HDD carriage with the door opening and push the drive carriage
through the protective drive bay door until you feel the drive seat in its connector.
2. Push the HDD carriage lever down, then insert your key and turn it 1/4 turn to
the right (clockwise). The HDD is now in its locked position. You can remove
the key.
Note: The HDD will not work unless it is secured in position with the carriage
lever and locked with the key. Do not unlock the HDD during operation, as you
will destroy any copies you are making.
Removable Hard Disk
Drive
Key in Lock
Carriage Lever

www.aleratec.com
5
Precautions
Before you start:
Before you start using your 1:15 Blu-ray/DVD/CD Tower Publisher SLS, please
read the following to ensure proper operation.
Good care will help assure maximum
product life. Improper operating environment and misuse may void the warranty.
Choose a Good Location:
1. Allow adequate clearance for moving parts.
2. Do not place near heat sources such as radiators or air ducts, or in a place
subject to direct sunlight, mechanical vibration or shock.
3. If the duplicator was stored in a location where the temperature dropped below
32°F (0°C) within the past 24 hours, please leave the duplicator in a warm
room with temperatures at least 65°F (19°C) for 4 hours prior to powering it on
for the rst time. Failure to do so may cause irreparable harm and prevent the
duplicator from functioning.
Input Voltage Selection:
There is a voltage selection switch on the back of the unit, located directly above
where the power cord is connected to. This switch can be set for input power of
115 VAC (the default setting) or 230 VAC. Be sure it is set correctly for the input
voltage you will be using.
Operation:
Do not move the duplicator during operation. This may cause it to malfunction
during writing operation.
Avoid exposing the duplicator to sudden changes in temperature as condensation
may form on the lens inside the duplicator. Should the surrounding temperature
suddenly rise while the duplicator is on, wait at least one hour before turning
off the power. Operating the duplicator immediately after a sudden increase in
temperature may result in a malfunction during playback or writing operation.
Duplicator Limitations:
The duplicator will not copy any BD, DVD or CD disc that have Copy Protection
encoded inside. Typically, the movies you purchase or rent from the store will
contain copy protection. In addition to the copy protection limitation, the duplicator
cannot copy across formats. This means that you cannot copy a DVD master onto
a recordable CD. In addition, you cannot copy the same formats if the discs have
different maximum capacity limitations. This means that you cannot copy a single
layer DVD disc onto a double/dual layer DVD disc or vice versa. The recordable
blanks must be the same format and maximum capacity as the Master Disc you
intend to duplicate.

www.aleratec.com
6
Precautions
Before you start - continued
External Connection Warning:
In order to operate the duplicator solely as a standalone unit (no connection to the
computer), you have to make sure all of the USB connection(s) are off. If by any
chance, the USB connection(s) are on, please refer to “Setup Guide: Setup USB 2.0
device(s)”
Maintenance:
It is very important to operate and keep the duplicator in a dust free, clean
environment since dust is the number 1 killer for BD/DVD/CD recording devices.
Failure to do so may severely damage your duplicator.
Warning: Do not try to use the Air Duster to clean the duplicator while
the Reader/Writer Trays are open. In doing so, you may inadvertently
blow dust into the recording device and damage the recording device.
Warning: The Stand-Alone Tower Publisher SLS must never be cleaned
with a lens cleaning kit!
Proper Shutdown:
To avoid possible system failures, you need to shutdown the duplicator properly. To
shutdown the duplicator, you need to press the down arrow ( ) to “18. Shutdown”
and follow instructions on the screen to shutdown the duplicator properly. Turning
off your duplicator without performing this function will increase the risk of
damaging your duplicator.
Transportation
Please keep the original packing materials for future moving or shipping of the 1:15
Blu-ray/DVD/CD Tower Publisher SLS. Shipping the 1:15 Blu-ray/DVD/CD Tower
Publisher SLS without proper packaging will void the warranty.

www.aleratec.com
7
Overview
Unpacking the Unit
Your system was shipped in one box and contains the 1:15 Blu-ray/DVD/CD Tower
Publisher SLS and cables.
Carefully open the box and remove the top protective foam padding. Remove the
following:
• 1:15 Blu-ray/DVD/CD Tower Publisher SLS
• 2 Power Cords
• 1 USB 2.0 Cable
• 1 Quick Start Guide
• 1 Installation CD
Note: It is important to keep the original shipping container and packaging.
In the event you misplace your packaging and need to ship the 1:15 Blu-ray/
DVD/CD Tower Publisher SLS, you should first contact technical support
to purchase a new shipping container. Shipping the 1:15 Blu-ray/DVD/CD
Tower Publisher SLS without proper packaging will void your warranty.
Connect the Cables and Apply Power
Plug the 2 power cords into the power supply of the 1:15 Blu-ray/DVD/CD Tower
Publisher SLS, also located on the rear side (make sure the red switch is set at 115
VAC for US operation). Plug into a standard 115 VAC outlet.
Plug the USB 2.0 Cable into the USB connector located on the center rear of the
1:15 Blu-ray/DVD/CD Tower Publisher SLS. Connect the other end of the USB
cable into an available USB 2.0 port on your PC.
Note: Use only with a USB 2.0 port. This system cannot be used with USB
1.1, as this will greatly affect system performance. If Windows displays a
message that a fast USB device is detected on a slow USB port, then you
will need to upgrade your computer by adding a USB 2.0 port.

www.aleratec.com
8
Overview
LightScribe Software Installation
Minimum System Requirements: PC running Windows 2000, XP, Vista or 7
1. Install the Aleratec File System Manager. First write down the key code
labeled “Product Key” on the front of the disc and then put the disc into your
PC. If Autorun does not begin, go to “My Computer” and explore the CD and
double-click “Setup” to begin the installer manually. Follow the prompts and
insert the key code that you wrote down where “Serial Number” is displayed
and restart your PC when the installer has nished. This manager allows
Windows to recognize the hard drive on the 1:15 duplicator.
Note: Your 1:15 Tower Publisher SLS should already have the Hard Disk
Drive (HDD) properly formatted. If it is not, while the duplicator is not in
USB mode, go to the Hard Drive Setup menu option 11 and press ENT,
and in the sub-menu choose 7. Format Hard Drive and press ENT. Do
not use Windows to format the hard drive. This will result in the
1:15 Tower Publisher SLS being unable to recognize the HDD.
2. Install the LightScribe Software. Follow the prompts and complete the
installation procedure. There will be two programs that will be installed.
a. LightScribe System Software
b. LightScribe Template Labeler
In order to correctly burn LightScribe labels using your Aleratec Tower
Publisher SLS you rst must correctly congure the LightScribe Template
Labeler Software.
During the LightScribe Template Labeler Setup you will be presented with
a list of Supported LightScribe Drives and a list of Your Selected Drives.

www.aleratec.com
9
Overview
c. Click Install to complete the installation.
3. Connect the 1:15 to your PC with the USB cable.
4. Make sure the 1:15 is in USB mode. Press the “USB” fastkey on the control
panel on the front of the 1:15. If the screensaver is on you may have to press
the button twice.
5. You will see the LCD screen display the “USB Connection” menu. Below this
title you will see an “On” or “Off” listed. This is the current status of the USB
connection. To change the current status, use either the Up or Down arrow keys
to select the mode you want. Then, press the ENT key to conrm the selection.
You will be prompted to restart the system. For this guide make sure that the
USB mode is enabled.
Note: While in USB mode, the duplicator cannot access the hard drive
only the PC can.

www.aleratec.com
10
Overview
6. After the 1:15 Tower Publisher SLS has rebooted, go to “My Computer”
in Windows and look to see if the HDD is there. It will be labeled as
“Duplicator”.
7. If you open the drive location you will see three or four folders.
a. The “dup” folder is where “.iso” les, “.nrg” les and folders of data can
be put in for disc burning.*
b. The “label” folder is where “.lsi” les created by the LightScribe Template
Labeler program will be placed.
* Duplicating from folders on the Duplicator HDD only supports le sizes 4GB
and smaller.

www.aleratec.com
11
Overview
Using the LightScribe Labeling Software
The following procedure demonstrates using the LightScribe Template Labeler to
generate the label les (.lsi) used by the Stand-Alone Tower Publisher SLS.
1. Launch the LightScribe Template Labeler.
▪ Click the shortcut on your desktop, or go to: Start → All Programs→
LightScribe Direct Disc Labeling → LightScribe Template Labeler.
Note: Ignore the “LightScribe Disc Insertion” shown below by
pressing the OK button.
2. Select a Template. You must choose a template before moving to the next step.

www.aleratec.com
12
Overview
3. Insert Text and/or Pictures into the template. Depending on the template
chosen, you may have options to modify text box(es) or picture(s).
▪ To insert pictures, click on the dedicated area to select the picture you’d like
to use.
▪ To insert text, click on the text eld, and type the text you’d like use.
Note: Depending on the template chosen, you may enter
multiple lines of text.
4. When you are satised with your disc design, click “Preview and Print”.
▪ Select the “Best” contrast mode for the darkest print.
▪ Select the label surface color you wish to label onto.
Note: The “LightScribe Duplicator Label Writer” must be selected in
the drive menu.
▪ When you are satised with the preview, click “Print”.

www.aleratec.com
13
Overview
Using the LightScribe Labeling Software - continued
A menu will appear prompting you to save your le. Navigate to the “label”
folder located on the “Duplicator” drive. You may copy multiple les into this
folder.
Note: The 1:15 Tower Publisher SLS will only recognize label files
located in the main LABEL folder. Any file that is placed outside of the
main LABEL folder or in a subfolder will not be recognized as a label.
Create a name for the le and click the “Save” button.
5. The image writing process will begin.
When the image process has completed the le should now be located on the
“Duplicator” drive in the label folder.

www.aleratec.com
14
Overview
6. Press the “USB” button on the duplicator and set the USB mode to “Off”.
Reboot the duplicator by turning it off and then on again. After the device has
completed the start up process, press the “Print” fast key (also menu option 2)
on the main menu of the duplicator and push the ENT key.
7. The “Please Select Label” menu will appear. The newly created label le will
appear below this prompt within the “label” folder. If there are multiple les,
use the UP and DOWN arrow keys to make your selection. Press the ENT key.
8. Next, the “Counter Selection” menu will prompt you to choose the number
of copies you want to make.
You can select “No Counter” if you prefer to copy
continuously,
or you can select “Specify Counter” to specify the number of
copies (1 to 9999).
Note: See page 27 of this User Guide for instructions on using “No
Counter”, and “Specify Counter”.
When you are satised with the number press the ENT key one more time.
This will eject all of the drives.
9. Load the drives with LightScribe discs, label side facing down. Close the drive
trays by pressing the drive tray button or lightly pushing the tray to close itself.
The printing process will begin automatically after all of the drives have been
retracted and the discs have been recognized.
Note: If you would like to manually start printing without waiting for all of
the discs to be recognized, or if you selected “No Counter”, wait until the
device recognizes at least one disc. The display will prompt you to “Go”.
Press the ENT button and the printing process will begin.
10. When the disc printing is complete the drives will automatically eject. If you
are printing additional discs, reload the trays and close them manually to
continue.
/