Page is loading ...

Please read all instructions before use.
KEEP YOUR RECEIPT FOR WARRANTY PURPOSES.
Canister Steam Cleaner
MODEL SF-275
User’s Guide

2
|
ENGLISH
IMPORTANT SAFETY INSTRUCTIONS
READ ALL INSTRUCTIONS BEFORE USE
DANGER
Any appliance is electrically live even when switched off. To reduce risk of electrical shock:
1. Always unplug power cord immediately after using.
2. Do not place or store unit where it can fall or be pulled into a sink or tub.
3. Do not place in, or drop into water or other liquid.
4. If unit falls into water, immediately unplug power cord. Do not reach into the water.
WARNING
To reduce risk of burns, electrocution, re, or injury to persons:
1. Use Canister Steam Cleaner only for its intended purpose as indicated in this manual.
2. If an extension cord is necessary, use a properly rated cord (15 ampere, 14 gauge). Use care
to position extension cord where it is least likely to be damaged or tripped over during use.
3. Before plugging power cord into electrical outlet, be sure that all electrical information on rating
label agrees with your power supply.
4. To reduce likelihood of circuit overload, DO NOT operate another high wattage appliance on
the same circuit as this unit.
5. To protect against risk of electrical shock, do not immerse unit in water or other liquids. Do not
use power cord as handle, let it hang over edges of counters, or be crimped or closed in doors.
6. Never yank power cord to disconnect from outlet; instead, grasp plug and pull to disconnect.
7. Do not operate unit with a damaged power cord or if the unit has been dropped or damaged.
To avoid risk of electrical shock, do not disassemble unit; contact Steamfast Consumer Service
for examination and repair. Incorrect reassembly can cause a risk of electrical shock when unit
is used.
8. Close supervision is required for any appliance being used near children, pets and plants. Do
not leave unit unattended while plugged in.
9. This unit is not intended for use by persons (including children) with reduced physical, sensory
or mental capabilities, or lack of experience and knowledge, unless they have been given
supervision or instruction concerning use of the unit by a person responsible for their safety.
WARNING: To reduce risk of re, electrical shock or injury, the following basic
safety precautions should always be followed when using an electrical
appliance.
WARNING: To reduce the risk of electrical shock, this appliance uses a
grounded (three-pronged) plug. This plug will t in a grounded wall outlet
only one way. If the plug does not correctly t in the outlet, contact a licensed
electrician to install a proper outlet. DO NOT attempt to modify the plug or
defeat this safety feature.

ENGLISH
|
3
SAVE THESE INSTRUCTIONS!
FOR HOUSEHOLD USE ONLY
Questions or comments?
•
www.steamfast.com
•
•
1-800-711-6617
10. Do not use unit where aerosol-based products are being used, or where oxygen is being
administered.
11. Unit is only meant to be used with recommended Canister Steam Cleaner (model SF-275)
accessories. Using other types of attachments may cause damage to unit or injury.
12. If Lighted On/Off Switch does not illuminate when set to “ON” position while power cord is
plugged in, unit is not operating normally. Immediately disconnect cord from power supply,
then refer to troubleshooting guide on Page 13 of this manual for assistance.
13. Always turn unit off and unplug power cord before lling Boiler with water. Do not attempt to
use unit without properly lling Boiler.
14. When lling Boiler, only water should be used in unit – other cleaning agents could damage
unit or cause injury. Distilled or de-mineralized water is highly recommended, in order to
minimize potential build-up of mineral deposits. Do not ll Boiler with more than 48 oz.
(1,420 ml.) of water.
15. To avoid burns from escaping steam when removing Boiler cap to rell unit:
•
Always allow unit to cool for 5-10 minutes.
•
Press and hold Steam Button to release all remaining steam pressure.
16. To reduce risk of contact with hot water emitting from Main Nozzle, check appliance before
each use by positioning it away from body and turning it on. Do not operate unit if Main
Nozzle is blocked.
17. Burns can occur from touching hot metal parts, hot water, or steam. Do not touch Main
Nozzle or attempt to connect accessories while unit is in use. Do not touch bottom of Mop
Head or attempt to attach a Microber Pad by hand while unit is in use. Use caution when
you turn unit upside-down – there may be hot water in Boiler.
18. Use caution when using unit on uneven surfaces, such as stairs.
19. When steaming any surface for the rst time, it is recommended that you consult the
manufacturer’s guidelines for material being steamed. For items in question, test on an
inconspicuous area before proceeding.
20. Steaming unsealed hardwood or unglazed ceramic surfaces is not recommended, and may
result in warping or damage to the surface. Steam may remove the sheen from surfaces
treated with wax.
21. When steam mopping, never leave unit resting in one spot on any surface for any period of
time – prolonged exposure to heat and moisture may damage oor surfaces.
22. Do not allow power cord to touch hot surfaces during use. Bundle cord loosely when storing.
23. Always allow Canister Steam Cleaner to cool (at least 30 minutes for complete cooling) and
empty Boiler before storing. Do not store unit with a damp Microber Pad still attached.

4
|
ENGLISH
Product Information
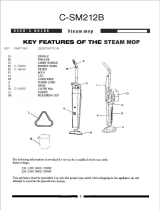
The following features and accessories are included with your Canister Steam Cleaner. Carefully
inspect the packing material for all parts listed below. To obtain possible missing parts, refer to
Product Support on Page 14 of this manual.
UNIT FEATURES
& ACCESSORIES
Lighted On/Off Switch
Steam Ready Light
Storage Compartment
Boiler (internal)
Handle
Steam Lock Switch
Steam Button
Carry Handle
Main Nozzle
Steam Hose
Steam Jet Nozzle
Extension Wands (2)
Mop Head
Microber Pads (2)
Water Funnel
Measuring Cup
Squeegee
Triangle Brush
Nylon Utility Brushes (5)
Brass Utility Brush
Scrub Pad
Screw Driver
1
2
3
4
5
6
7
8
9
10
11
12
13
14
15
16
17
18
19
20
21
22

ENGLISH
|
5
•
The Lighted On/Off Switch (1) activates and deactivates the unit, and illuminates to provide a
clear visual indication of whether the unit is powered on.
•
The Steam Ready Light (2) illuminates while the Boiler is heating, then turns off when the unit is
ready to begin steaming.
•
The Storage Compartment (3) provides a convenient place to store small accessories; it also
houses the Boiler cap.
•
The Boiler (4) is the internal reservoir in which water is stored and heated. It is accessed by
removing the Boiler cap found inside the Storage Compartment. There must be a sufcient
amount of water in the Boiler in order for the unit to properly function.
•
The Handle (5) is designed to stay cool while providing the optimum amount of safety and user
comfort.
•
The Steam Lock Switch (6) is pushed forward to lock the Steam Button down and provide
continuous, hands-free steaming.
•
The Steam Button (7) provides full steam-on-demand control, releasing hot, penetrating steam
from the Main Nozzle when pressed.
•
The Carry Handle (8) functions as a convenient holder for the Main Nozzle, and is designed for
carrying the unit up stairs and over obstacles.
•
The Main Nozzle (9) emits a powerful ow of steam when the Steam Button is pressed.
•
The Steam Hose (10) safely channels the ow of steam from the Boiler to the Main Nozzle.
•
The Steam Jet Nozzle (11) focuses the ow of steam from the Main Nozzle, and serves as the
base to which the Utility Brushes and Scrub Pad connect.
•
The Extension Wands (12) connect to the Main Nozzle, allowing for oor mopping as well as
easier cleaning in high or hard-to-reach places.
•
The Mop Head (13) connects to the Extension Wands, and is designed for steam cleaning a
variety of hard oor surfaces.
•
The Microber Pads (14) attach to the Mop Head, and are designed for removing scuffs and
stains from hard oors. The Pads are reusable and machine washable.
•
The Water Funnel (15) and the Measuring Cup (16) are provided to assist in easily and
consistently lling the Boiler with the optimum amount of water (16 - 48 oz. / 473 - 1,420 ml.).
•
The Squeegee (17) connects to either the Main Nozzle or Extension Wands, and can be used
to clean mirrors, windows and other smooth glass surfaces.
•
The Triangle Brush (18) connects to the Main Nozzle or Extension Wands, and is designed for
cleaning corners and other difcult angles.
•
The assorted Nylon Utility Brushes (19) connect to the Steam Jet Nozzle, providing extra
scrubbing power for removing exceptionally tough dirt and stains.
•
The Brass Utility Brush (20) connects to the Steam Jet Nozzle and is designed for removing
tough stuck-on grease and grime from durable surfaces such as ovens and grills.
NOTE: Use careful judgement when deciding what surface to clean with the Brass Utility
Brush. Some delicate surfaces, such as stainless steel, may be scratched or damaged
by the brass bristles. If you are unsure whether or not a surface will be damaged, it is
recommended that you test a small inconspicuous spot before proceeding.
•
The Scrub Pad (21) connects to the Steam Jet Nozzle and is designed to scrub tough dirt and
scuffs from surfaces.
•
The Screw Driver (22) is included to connect the Carry Handle to the main unit body, using the
screw found inside the Carry Handle.

6
|
ENGLISH
Assembling Your
Canister Steam Cleaner
STEAM MOPPING ACCESSORIES
WARNING: Do not try to connect accessories while unit is emitting steam.
EXTENSION WANDS
1. Select one of the Extension Wands, and align rear end of wand with Main Nozzle.
Rectangular hole in wand should align with gray lock/release button on nozzle.
2. Press down on gray lock/release button. While continuing to hold button down, slide Extension
Wand onto Main Nozzle (FIGURE 1-A). Push wand over button, and continue pushing until
button snaps through hole on wand.
3. Slide second Extension Wand onto end of the one you just connected, this time lining up
rectangular hole of second wand with gray lock/release button of rst wand. Press and hold
button, and rmly push second wand onto end of rst wand until button snaps through hole
(FIGURE 1-B). Both Extension Wands should now be connected to the Main Nozzle.
MOP HEAD
1. Align Mop Head with end of second Extension Wand, so that rectangular hole in Mop Head
neck aligns with gray lock/release button on wand.
2. Press down on gray lock/release button. While continuing to hold button down, slide Mop
Head neck onto Extension Wand (FIGURE 2-A). Press on rmly until button snaps through
hole (FIGURE 2-B).
FIGURE 2
A B
FIGURE 1
A B
MAIN NOZZLE

ENGLISH
|
7
MICROFIBER PADS
1. Lay one Microber Pad on at surface, with two fastener strips facing upward.
2. Align Mop Head above Microber Pad. Make sure Mop Head is oriented with pad as shown,
and centered as best as possible (FIGURE 3-A).
3. Press Mop Head rmly down onto Microber Pad. Fastener strips will adhere to pad grips on
underside of Mop Head. Microber Pad should now be attached and ready for use (FIGURE 3-B).
CAUTION: Use care when handling a recently used Microber Pad, as it may still be hot.
NOTE: Microber Pads are machine washable. To avoid picking up lint, washing
separately from other fabrics is recommended. Only use liquid detergent. Avoid using
any fabric softeners or bleach. Air drying is recommended; machine drying on a low
heat or air dry setting is acceptable as well.
The Mop Head and Microber Pads are perfect for use on these hard oor surfaces:
•
Sealed Hardwood
•
Stained Concrete
•
Sealed Laminate
IMPORTANT: Do not use on unsealed hardwood or unglazed ceramic surfaces. Surfaces
that are not properly sealed may be warped or damaged by exposure to heat and moisture.
Care should also be taken when steaming sealed hardwood oors, as prolonged exposure
to steam in a single spot may cause damage and discoloration. To avoid this, keep the
Mop Head in constant motion on these surfaces.
Steam may remove the sheen from some oors that have been treated with wax.
Extremely rough textured oors may tear or damage Microber Pads.
•
Linoleum
•
Ceramic
•
Granite
•
Marble
•
Vinyl
•
Tile
FIGURE 3
A B

8
|
ENGLISH
Assembling Your
Canister Steam Cleaner
STEAM CLEANING ACCESSORIES
WARNING: Do not try to connect accessories while unit is emitting steam.
STEAM JET NOZZLE / SQUEEGEE / TRIANGLE BRUSH
1. Select one of the three accessories (Steam Jet Nozzle, Squeegee or Triangle Brush – Steam
Jet Nozzle shown as example), and align rear end of accessory with Main Nozzle.
Rectangular hole in accessory should align with gray lock/release button on Main Nozzle.
2. Press down on gray lock/release button (FIGURE 4-A). While continuing to hold button down,
slide accessory onto Main Nozzle (FIGURE 4-B). Push accessory over button, and continue
pushing until button snaps through rectangular hole.
NOTE: The Steam Jet Nozzle, Squeegee and Triangle Brush can be connected to the end
of an Extension Wand for reaching high or difcult spots. Connect the Extension Wand
(or Wands) as outlined on Page 6, then connect your desired accessory to the Wand in
the same way as you would normally connect it to the Main Nozzle.
UTILITY BRUSHES
NOTE: Utility Brushes connect to the Steam Jet Nozzle, not the Main Nozzle.
1. Align guide tab on inside of Utility Brush (FIGURE 5-A) with groove on bottom of Steam Jet
Nozzle tip (FIGURE 5-B).
2. Firmly press Utility Brush onto tip of Steam Jet Nozzle. Press it on as far as possible to
prevent steam leakage (FIGURE 5-C).
3. To remove Utility Brush, simply grip it rmly and pull it off of Steam Jet Nozzle.
FIGURE 5
FIGURE 4
A
B
A B

ENGLISH
|
9
SCRUB PAD
NOTE: Scrub Pad connects to the Steam Jet Nozzle,
not the Main Nozzle.
1. Place Scrub Pad over tip of Steam Jet Nozzle, and rmly
press it on to Steam Jet Nozzle as far as possible (FIGURE 6).
This will help to prevent steam leakage.
2. To remove Scrub Pad, simply grip it rmly and pull it off of
Steam Jet Nozzle.
CARRY HANDLE
1. Insert Carry Handle into hole on top of
unit. Align handle so that grip bracket
faces towards front of unit (FIGURE 7).
2. Use enclosed Screw Driver to tighten
screw found inside Carry Handle, until
secured to main unit.
ORDERING ACCESSORIES & PARTS
Replacement accessories and parts for your Canister Steam Cleaner (model SF-275) may be
ordered through our web site:
www.steamfast.com
You may also contact Consumer Service directly:
[email protected] or 1-800-711-6617
FIGURE 7
FIGURE 6

10
|
ENGLISH
Using Your
Canister Steam Cleaner
FILLING BOILER
1. Place Canister Steam Cleaner on a at, level surface.
2. Make sure Lighted On/Off Switch is set to “OFF” position and grounded power cord is unplugged
from electrical outlet.
3. Flip Storage Compartment lid open, and cautiously unscrew and remove Boiler cap.
4. Drain any water remaining inside Boiler into a sink or tub.
NOTE: Boiler should be emptied after each use – this will help minimize mineral build-up
and prevent over-lling.
5. Fill Measuring Cup to maximum ll line (16 oz. / 473 ml.) with water.
NOTE: In order to signicantly reduce mineral build-up and prolong the life of your
Canister Steam Cleaner, use of distilled or de-mineralized water in the unit is highly
recommended. Refer to Page 12 for more information about mineral build-up.
6. Using Water Funnel, carefully pour water from Measuring Cup into Boiler through ll hole.
CAUTION: Water Funnel should always be used to ll Boiler, to prevent spilled water
from entering unit housing and damaging electrical components.
7. Depending on how long you intend to steam, you may repeat steps 5 & 6 up to two more times,
up to a maximum of 48 oz. (1,420 ml.) of water. See chart for a comparison of the amount of
water vs. approximate steam time.
8. Replace Boiler cap, ensuring that it is screwed on tightly to prevent hot steam from escaping
and causing injury.
9. Close Storage Compartment lid.
REFILLING BOILER
If unit has been in use, always use the following safety precautions before removing
the Boiler cap to add water:
•
Allow unit to cool for 5-10 minutes.
•
Press and hold Steam Button to release all remaining steam. Steam can remain pressurized
inside Boiler for up to an hour after use.
WARNING: Failure to follow these precautions may result in burns from escaping steam
when the Boiler cap is removed.

ENGLISH
|
11
GENERAL OPERATION
NOTE: Be sure that Boiler has been lled and that all desired accessories are connected before
following these steps.
1. For rst time use, remove protective plastic cover from electrical plug. Plug power cord into a
convenient electrical outlet.
2. Switch Lighted On/Off Switch to “ON” position. Steam Ready Light will immediately illuminate,
indicating that unit is heating.
3. Steam Ready Light will turn off in 2-8 minutes (depending on how much water is in Boiler), indicating
that unit is fully heated and ready to begin steaming.
4. Direct nozzle (and any connected accessories) towards surface you desire to steam, and press Steam
Button. To sanitize surfaces, point nozzle, press Button and hold approximately 1/2 inch from surface for
at least 5 seconds. This will insure that you have killed germs and bacteria.
CAUTION: Always be sure that nozzle and any accessories are pointed in a safe direction
(away from yourself, other people, pets, and plants) before pressing Steam Button.
5. Keep Steam Button pressed for a continuous ow of steam. You may also slide the Steam Lock Switch
forward while pressing the Steam Button to lock it down. This will allow a continuous ow of steam
without need of holding the Button down manually.
6. Using a slight back-and-forth motion over the area you are steaming will further enhance the cleaning
process. Wipe steamed areas with a clean cloth to remove loosened dirt and grime. Wiping the area
while it is still wet is recommended, but use caution when wiping surfaces such as metal that may still be hot.
NOTE: During use, the Steam Ready Light may illuminate. This is normal. If you notice a drop
in steam pressure, release Steam Button until Steam Ready Light turns off again.
7. Once steaming tasks are complete, immediately set Lighted On/Off Switch to “OFF” position and
unplug grounded power cord from electrical outlet. Follow steps under Proper Storage procedure
on Page 12 of this manual.
STEAM MOPPING
NOTE: Be sure that Boiler has been lled and that all steam mopping accessories are connected
before following these steps.
It is recommended to sweep or vacuum hard oors before mopping.
1. Follow STEPS 1-3 of General Operation section above.
Refer to Page 7 for a listing of hard oor surfaces that are recommended for cleaning with the
Canister Steam Cleaner.
2. For best results, use a steady back-and-forth motion over oor surface, pushing the Mop Head away
and pulling it back towards you. Work your way backwards over the oor, in order to avoid walking
over freshly mopped areas.
NOTE: To avoid warping or damage caused by heat and moisture, do not use on unsealed
hardwood or unglazed ceramic surfaces. Steam may remove the sheen from some oors that
have been treated with wax.
3. To effectively kill bacteria and microorganisms, repeatedly mop a single small area (approximately
3’ x 3’ for best results) for at least 2 minutes.
4. The Microber Pad will absorb dirt and moisture during mopping. However, when you are nished
you may nd some residual moisture has been left behind. In this case, it is recommended to allow
oor time to air-dry. A fan may be directed towards mopped area to facilitate drying.

12
|
ENGLISH
Storage & Care
PROPER STORAGE
Preparing your Canister Steam Cleaner for storage is quick and simple. When you have nished
your steaming tasks, follow the steps listed below.
1. Set Lighted On/Off Switch to “OFF” position and unplug power cord from electrical outlet.
2. Allow unit to cool (at least 30 minutes for complete cooling).
3. Press and hold Steam Button to release all remaining steam pressure.
4. Remove all accessories from unit.
5. Flip Storage Compartment lid open and remove Boiler cap.
6. Drain any remaining water from Boiler into a sink or tub – this will help to minimize mineral
build-up and prevent over-lling during your next use. Loosely replace Boiler cap.
7. Store accessories safely away, near Canister Steam Cleaner. Utility Brushes can be conveniently
stored in the Storage Compartment.
8. Close Storage Compartment lid and store Canister Steam Cleaner in a cool, dry location.
MINERAL BUILD-UP
A common maintenance need for steam appliances is the removal of build-up caused by high
mineral content in many municipal water supplies. This mineral build-up may limit the
effectiveness and reduce the life of your Canister Steam Cleaner.
The best way to minimize mineral build-up is to use distilled or de-mineralized water when
using your Canister Steam Cleaner. If you are unable to use distilled water, it is recommended
that the following procedure be followed monthly to help remove any mineral build-up:
1. Set Lighted On/Off Switch to “OFF” position and unplug power cord from electrical outlet.
2. Allow unit to cool (at least 30 minutes for complete cooling).
3. Press and hold Steam Button to release all remaining steam pressure.
4. Remove all accessories from unit.
5. Flip up Storage Compartment lid and remove Boiler cap.
6. Drain water from Boiler into a sink or tub.
7. Fill Measuring Cup with 16 oz. (474 ml.) distilled vinegar.
8. Carefully pour vinegar into Boiler. Slowly shake or move unit around to agitate vinegar.
9. Allow to stand for at least 40 minutes, or more if possible.
10. Drain vinegar from Boiler.
11. Rinse Boiler with fresh water, drain and repeat until vinegar odor dissipates.
12. Loosely replace Boiler cap and close Storage Compartment lid.

ENGLISH
|
13
Troubleshooting
Unit fails to heat up. Lighted On/
Off Switch DOES NOT illuminate
when set to “ON” position.
Unit fails to heat up. Lighted On/
Off Switch DOES illuminate when
set to “ON” position.
Steam output is weak or
intermittent.
Excessive amount of water in
steam.
NOTE: Unit produces moist
steam – it is normal for steam
to contain some amount of
water.
Unit is not plugged in.
Mineral build-up in unit.
Mineral build-up in unit.
Household circuit breaker / ground
fault interrupter has tripped or
blown a fuse.
Unit is damaged or otherwise in
need of repair.
Unit is damaged or otherwise in
need of repair.
Water level in Boiler is running
low.
Boiler is empty.
Water condensation in Steam
Hose.
Boiler has been overlled.
Plug power cord into electrical outlet.
Refer to Mineral Build-up section
on Page 12 for cleaning procedure.
Refer to Mineral Build-up section
on Page 12 for cleaning procedure.
Reset circuit breaker / ground
fault interrupter, or replace fuse.
If you need assistance, contact a
licensed electrician.
Immediately cease usage and
unplug. Contact Consumer
Service for further assistance
(see Page 14 for details).
Immediately cease usage and
unplug. Contact Consumer
Service for further assistance
(see Page 14 for details).
Refer to Filling Boiler procedure
on Page 10.
Refer to Filling Boiler procedure
on Page 10.
Point nozzle towards sink, tub or
ground and shake while pressing
Steam Button. Continue until
excess water is released.
Filling Boiler with more than 48
oz. (1,420 ml.) of water interferes
with steam production, resulting in
water condensation in steam.
Drain some water out of Boiler.
Always use included Measuring
Cup to ll Boiler with correct amount
of water (see Page 10 for details).
PROBLEM POSSIBLE CAUSE SOLUTION
Accessories do not stay rmly
connected to Main Nozzle.
Accessories not properly installed.
Unit has not heated to full
operating temperature.
Check to make sure that
accessories are properly connected,
per procedures on Pages 6-9.
Wait until Steam Ready Light
turns off to begin steaming.
Floor surfaces appear cloudy or
streaky after steaming.
Microber Pad is dirty.
Hard water residue on oor.
Replace Microber Pad with a
clean one.
Switch to distilled or
de-mineralized water.

14
|
ENGLISH
Product Support
CONSUMER SERVICES
For problems with your Canister Steam Cleaner, please refer to the troubleshooting guide located
on Page 13 of this manual. Additional inquiries should be directed to our consumer support
services through our web site, www.steamfast.com.
If you do not have Internet access, you may also contact our Consumer Service Department by
telephone, at 1-800-711-6617.
NOTE: In order for our Consumer Service representatives to help you as quickly and
efciently as possible, please have the following information ready before calling:
• Purchase information (where and when you purchased this product)
• Copy of purchase receipt / proof of purchase
• Product serial number (located near electrical specication label on bottom of unit)
• Date code (4-digit number located on electrical specication label)
For information regarding your 1 year limited warranty, refer to Page 15 of this manual.
PRODUCT SPECIFICATIONS
SF-275
120V
1500W
12.5A
48 OZ. (1,420 ML.)
8 MIN. (APPROXIMATE)
45 MIN. (APPROXIMATE)
10.1 LBS. (4.6 KG.)
17.3” (44.0 CM.) x 11.1” (28.2 CM.) x 12.9” (33.0 CM.)
15.4’ (470.0 CM.)
MODEL
VOLTAGE
WATTAGE
AMPERAGE
WATER CAPACITY
HEATING TIME
CONTINUOUS STEAM TIME
UNIT WEIGHT
UNIT DIMENSIONS
POWER CORD LENGTH

ENGLISH
|
15
Warranty Information
1 YEAR LIMITED WARRANTY
Steamfast, a division of Vornado Air LLC, (“Steamfast”) warrants to the original consumer or purchaser
this Steamfast Canister Steam Cleaner model SF-275 (“Product”) is free from defects in material or workmanship
for a period of one (1) year from the date of purchase. If any such defect is discovered within the warranty
period, Vornado, at its discretion, will repair or replace the Product at no cost if the Product is returned
to Steamfast postage-paid. Repairs not covered by the warranty or outside the warranty period will
require a fee to cover the cost of materials, handling and shipping.
This warranty does not apply to defects resulting from abuse of the Product, modication, alteration,
repair or service of the Product by anyone other than Steamfast, mishandling, improper maintenance,
commercial use of the Product, damages which occur in shipment or are attributed to acts of God.
REPAIR OR REPLACEMENT AS PROVIDED UNDER THIS WARRANTY IS THE EXCLUSIVE
REMEDY OF THE CONSUMER. STEAMFAST SHALL NOT BE LIABLE FOR ANY INCIDENTAL OR
CONSEQUENTIAL DAMAGES FOR BREACH OF ANY EXPRESS OR IMPLIED WARRANTY ON THIS
PRODUCT. EXCEPT TO THE EXTENT PROHIBITED BY APPLICABLE LAW, ANY IMPLIED WARRANTY
OF MERCHANTABILITY OR FITNESS FOR A PARTICULAR PURPOSE ON THIS PRODUCT IS
LIMITED IN DURATION TO THE DURATION OF THIS WARRANTY.
Some states do not allow the exclusion or limitation of incidental or consequential damages, or allow
limitations on how long an implied warranty lasts, so the above limitations or exclusions may not apply to you.
This warranty gives you specic legal rights, and you may have other rights that vary from state to state.
For warranty or repair service, call 1-800-711-6617 or email [email protected] to obtain
a Return Authorization (“RA”) form. Please have or include your Product’s model number, date code and
serial number, as well as your name, address, city, state, zip code and phone number when contacting
Steamfast for warranty service. You may be required to provide the original sales receipt. For your
records: Staple or attach your original sales receipt to this Owner’s Guide. Please also write your
Product’s serial number below (located on product specs decal).
Serial No. __________________________________________________________________________
After receiving the RA form, ship your Product to:
Steamfast
Attn: Warranty & Repair
413 East 13th
Andover, KS 67002
To assure proper handling, packages must be clearly marked with the RA number. Packages not
clearly marked with the RA number may be refused at the receiving dock.
Please allow 1-2 weeks for repair and return of your Product after the Product is received.
Product registration available online at www.steamfast.com
© 2011 Vornado Air LLC • Andover, KS 67002
Specications subject to change without notice.
Steamfast® is a trademark owned by Vornado Air LLC.
Manufactured in China.
Steamfast Consumer Service
W: www.steamfast.com | P: 1-800-711-6617 | E: [email protected]

V110512
review this product online
evalúe este producto en línea
évaluer ce produit en ligne
www.steamfast.com/reviews
Steamfast
415 East 13th, Andover, KS 67002
1-800-711-6617 www.steamfast.com consumerservice@steamfast.com
/