
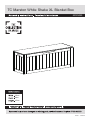
620/9465
Issue 1 - 10/08/16
120cm
40cm
45cm
TC Marston White Shake XL Blanket Box
3


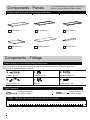
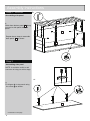
Components - Panels
Please check you have all the panels listed below
2
If you have damaged or missing components,
call the Customer Helpline:03456 400800
1
2
Top panel x 1
Side panel x 2 Bottom panel x 1
5
Bottom rail x 1
6
Front panel x 1
3
Back panel x 1
4
Components - Fittings
Please check you have all the fittings listed below
Note:The quantities below are the correct amount to complete the assembly .In some cases more
fittings may be supplied than are required.
Tools
required
0 5 10 15 20 25 30 35 40 45 50 55 60 65 70 75 80 85 90 95 100
110 115 120 125 130 135 140 145 150 155 160 165 170
105
(medium & large)
Phillips screwdriver
(medium & large)
Straight screwdriver
Ruler - Use this ruler to help correctly identify the screws
Hinge x 3
Locking pin x 10 Locking nut x 10
Wooden dowel x12
12mm Screw x 28
A
B C
D
E F
Spring hinge x 2

3
Assembly Instructions
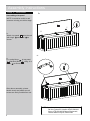
Step 1
Step 2
a:
A
1 2 3
B
Assembling front panel and
back panel
Assembling side panel
Continued on next page
Screw locking pin into front
panel and back panel as
shown
2
3
a:
Insert wooden dowel into front
panel and bottom rail as shown.
Insert locking nut into side panel
and bottom rail as shown and
tighten it with a screwdriver.
Attach side panels and bottom
rail to front panel .
C
C
3
4
4
4
6
2
2
2
A
A
A
A
A
A
B
6
6
B
B

4
a:
b:
Assembly Instructions
Step 2 - continued
Step 3
NOTE: It would be useful to ask
someone to help you at this stage.
b:
Slide down bottom panel along
grooves in side panel and front
panel.
Repeat above steps to assemble
back panel as shown.
a:
Fix hinges to top panel using
6 x screw as shown.
C
1
3
5
3
5
B
E
E
F
F
6
Assembling side panel
Assembling side panel
Continued on next page

Assembly Instructions
5
Step 3 - continued
b:
c:
NOTE:If you have damaged or missing components,
call the Customer Helpline:03456 400800
Argos LTD,489-499 Avebury Boulevard,
Central Milton Keynes, MK9 2NW
After above assembly, please
double check and make sure all
screws are firmly fixed before use.
b:
Attach top panel onto the unit
with hinge and screw as
shown.
F
E
E
1
c:
Fix spring hinge to top panel
and back panel using 16 x
screw as shown.
F
D
31
F
F
1
1
D
NOTE: It would be useful to ask
someone to help you at this stage.
Assembling side panel
-
 1
1
-
 2
2
-
 3
3
-
 4
4
-
 5
5
-
 6
6


Argos Home Ottoman User manual
- Type
- User manual
- This manual is also suitable for
Ask a question and I''ll find the answer in the document
Finding information in a document is now easier with AI
Related papers
-
 Argos Home FCS30222D User manual
-
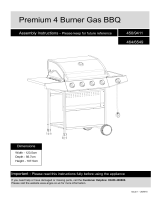
Argos Home PREMIUM 4 BURNER User manual
-
 Argos Home 2 Burner Gas BBQ User manual
-
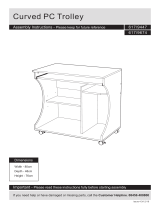 Argos Home 617/9447 User manual
-
 Argos Home SH55B-000 User manual
-
 Argos Home 345/1247 User manual
-
 Argos Home HM OIL DRUM BBQ User manual
-
 Argos Home 6096159 User manual
-
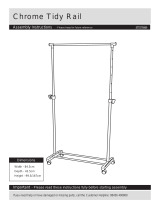 Argos Home AH GV SNGL CLOTHES RAIL BLACK & CHROME User manual
-
 Argos Home TBA User manual


Other documents
-
Heart of House BE00325 Owner's manual
-
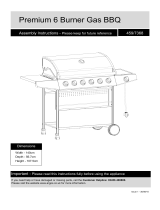 Argos Premium 6 Burner Gas BBQ User manual
-
 Argos 287/6847 Assembly Instructions Manual
-
 Deluxe 6 Burner Gas BBQ User manual
-
 Argos 287/6847 Assembly Instructions Manual
-
 Deluxe 6 Burner Gas BBQ User manual
-
 Argos 345/1247 Assembly Instructions Manual
-
 Argos KS14011 User manual
-
 Argos 343/3980 Assembly Instructions
-
Argos TBC User manual


