Maytag LAT8035AAM User manual
- Category
- Washing machines
- Type
- User manual

III IIIIIIII III II IIII IIIII III
MODELS:
LAT9205 *
LAT8305
LAT8035
TABLE OF CONTENTS
Future Reference ..... Inside Front Cover
Safety Instructions .......................... 1
Using the Washer ........................ 2-3
Operating Instructions
Select Water Level.......... ........... 4
Select Water Temperature ........... 4
Select Wash Cycle ................. 4-5
Select Soak Cycle ..................... 5
Start the Washer ....................... 5
Indicator Light........................... 5
Maintaining the Washer ................ 6
Staring the Washer ......................... 6
Cycle Descriptions ........................... 7
Water Usage ................................... 7
Before You Call for Service ............ 8
Warranty ......................................... 9
Consumer Publications ................... 9
FOR FUTURE REFERENCE
Congratulations on your choice of a Maytag
washer! Your satisfaction is very important to L
The information in this USER'SGUIDE will hell:
you understand how your washer operates.
Additional information is found in the MAYTAC
LAUNDERING GUIDE on proper washing and
drying techniques. By following these instructic
carefully, you will be able to achieve excellent
results with your washer.
Should you have any questions about using yc
Maytag washer, contact us. Please have the
model and serial numbers available.
MAYTAG
CONSUMER EDUCATION
ONE DEPENDABILITYSQUARE
NEWTON, IOWA 50208
(515) 791-8911
(Mon.-Fri., 8am-5pm CST)
NOTE: For service and warranty information
pages 8-9.
Forfuture reference we suggestyou retain this
manual. Record the model number and serial
number of this washer in the spaces provided.
the washer changes ownership, be sure this
manual accompanies the washer.)
This information can be found on the data plal
located on top of the control panel cover.
Model Serial No.
WARNING - Check with installer to mc
sure appliance has been grounded to
avoid possible electrical shock. Be sun
you read the following IMPORTANT
PERSONAL SAFETY INSTRUCTIONS beh
you start to use this washer.
III IIII II

I II
IMPORTANT PERSONAL SAFETY INSTRUCTIONS
WARNING -- Toreducethe riskof fire, electricshock,or injury to personsusingthis
appliance, follow basic precautions,includingthe following:
1. Read all instructions before using the
appliance.
2. To avoid the possibility of fire or explosion:
a. Do not wash items that have been
previously cleaned in, washed in, soaked
in, or spotted with gasoline, dry-cleaning
solvents, other flammable or explosive
substances as they give off vapors that
could ignite or explode.
Any material on which you have used a
cleaning solvent, or which is saturated
with flammable liquids or solids, should
not be placed in the washer, until all
traces of these flammable liquids or solids
and their fumes have been removed.
There are many highly flammable items
used in homes, such as: acetone,
denatured alcohol, gasoline, kerosene,
some liquid household cleaners, some
spot removers, turpentine, waxes and wax
removers.
b. Do not add gasoline, dry-cleaning
solvents, or other flammable or explosive
substances to the wash water. These
substances give off vapors that could
ignite or explode.
c. Under certain conditions, hydrogen gas
may be produced in o hot water system
that has not been used for 2 weeks or
more. HYDROGEN GAS iS EXPLOSIVE.if
the hot water system has not been used
for such a period, before using a washing
machine or combination washer-dryer,
turn on all hot water faucets and let the
water flow from each for several minutes.
This wil_ release any accumulated
hydrogen gas. As the gas is flammable,
do not smoke or use an open flame
during this time.
3. Do not allow children to play on or in the
appliance. Close supervision of children is
necessary when the appliance is used near
children.
4. Before the appliance is removed from serv
or discarded, remove the door to the
washing compartment.
5. Do not reach into the appliance if the
agitator is moving.
6. Do not install or store this appliance wher_
will be exposed to the weather.
.
8.
.
10.
Do not tamper with controls.
Do not repair or replace any part of the
appliance or attempt any servicing unless
specifically recommended in published use
repair instructions that you understand and
have the skills to carry out.
The agitator should not be removed. If the
agitator is removed, it must be replaced by
pushing down completely and the locking
screw tightened before the washer is
operated.
This appliance must be properly grounded.
Never plug the appliance cord into a
receptacle which is not grounded adequat_
and in accordance with local and national
codes. See installation instructions for
grounding this appliance.
Save These Instructions
Appliances with the _ symbol on the data plat_
have been listed with Underwriters' Laboratorie._
Inc. Those with a CSA Monogram on the data
plate have been certified by the CSA Testing
Laboratories as complying with Canadian
Standards Association requirements.
Nevertheless, as with any equipment using
electricity and having moving parts, there are
potential hazards. To use this appliance safely,
the operator should become familiar with the
instructions for operation of the Appliance and
always exercise care when using it.
IIIIIIIIIIIII III I I PAGE

IIIII III
USING THE WASHER
Detergent
Use either liquid or granular laundry detergent.
Add measured amount of detergent to washtub
before loading.
Read the manufacturer's instructions and use the
correct amount. Most instructions are for washing
an "average" load. If the size of the load is extra
large, the degree of soil is heavier than average
and the water is harder than 6 grains per gallon,
more detergent should be used.
Wipe up any spills of liquid laundry detergent on
the washer.
Loading the Washer
Place dry, unfolded clothes loosely in the tub, up
to the top row of holes for a maximum load. Do
not pack or wrap itemsaround the agitator. See
MAYTAG LAUNDERING GUIDE for suggestions
on sorting. Be sure to empty all pockets, mend
any holes or tears and pretreat spots, stains and
heavily soiled areas.
PAGE 2 lit I Itrim I il

I I I I I
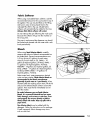
Fabric Softener
When using rinse-added fabric softener, add the
recommended amount to the cup located in top of
the agitator. The cup may be lifted out for filling.
Add warm water to bring liquid level to the
indicated FILLLINE in the cup. Diluted fabric
softener will automatically be added to the rinse.
(Always dilute fabric softener with water.)
Do not interrupt the spin following the wash cycle
because the softener will go into the washtub at
the wrong time.
The area in and around the dispenser cup should
be flushed and cleaned with hot water and a soft
brush periodically.
Bleach
When using liquid chlorine bleach, carefully
measure the amount of bleach recommended on
the bottle label. General recommendations are
1/8 cup for each 2 gallons of wash water.
Amount of wash water in: EX. SMALL - I 0
gallons (8 Imperial gallons; 38 liters); SMALL-
12 gallons (10 Imperial gallons; 45 liters);
MEDIUM- 14 gallons (12 Imperial gallons; 53
liters); LARGE- 17 gallons (14 Imperial gallons;
64 liters); EXTRA LARGE- 19 gallons (16
Imperial gallons; 72 liters).
Select water level, water temperature, desired
cycle and start washer. Dilute chlorine bleach as
recommended by the bleach manufacturer
(generally 4 parts water to 1 part bleach). A few
moments after the washing action starts, lift the lid
and pour the diluted bleach solution around the
agitator. Then close the lid immediately and re-
start the washer.
Be careful whenever you useliquid chlorine
bleach. It isa powerful chemicaland can cause
fabric damage, suchas tearsor color loss,if not
used properly. Do not pour directly on fabrics.
Always dilute with water. Wipe up spillswith a
paper towel.
Non-chlorine bleach may be added with the
detergent. Follow the instructions on the package.
If usedimproperly, fabric damage may occur,
such as color loss.
IIIIIIII!111!II IIII PAGE

IIIIIIIIIIII IIIIIIIIIIIIIII IIIIIIIIIIIIIIIIIII IIIIIIIIIIIIIIIIIIIIIIIII II IIII IIIIII IIIIIIIIIIII IIIIIIIIIIII IIIIIIIIIIIIIIIIIIIIIII
OPERATING INSTRUCTIONS
Select Water Level
Turn the selector knob to the setting that matches
the size of the load.
The pre-setselectorknob (not on all models) can
be set to four or five distinct settings depending
on the model- EX. SMALL, SMALL, MEDIUM,
LARGE, EXTRALARGE.
The infinite selectorknob (not on all models) can
be moved to each water level or any point in
be_een. If more water is needed once the fill is
complete, move the knob to Reset, then to the
desired setting.
For best washing results, clothes must circulate
freely. If too littlewater is used, poor cleaning,
linting and excessive wear may result. Use the
following as a guide to select the proper water
level:
Ex. Small - 1/4 full of clothes.
Small (not on all models) - 1/4 to 1/3 ful_of
clothes.
Medium - 1/3 to 1/2 full of clothes.
Large - 1/2 to 3/4 full of clothes.
Ex. Large - 3/4 to full of clothes.
NOTE: When laundering permanent pressitems
or itemsof delicateconsltuction,
washable woolens or looselyknit items,
never uselessthan the MEDIUM selling.
Thiswill minimize shrinkage, wrinkling
and pulling of seams.
Select Wash/Rinse Water
Temperature
Turn the selector knob to the water temperature
desired.
HOT/COLD - Wash water will be the
temperature of the water coming from the hot
water faucet. Rinse water will be cold. Use this
setting for heavily soiled whites and colorfast
items.
WARM/COLD - Wash water will be a mixture
water coming from the hot and cold water
faucets. Rinse water will be cold. Use this for
items with moderate soil level and colored iterr
COLD/COLD - Wash and rinse water will be
temperature of the water coming from the cold
water faucet. Use this setting to minimize fadin
of brightly colored items and shrinkage of
washable woolens. NOTE: Water below 65°F
too cold to dissolve and activate granular taut
detergents.
Select Cycle and Time
Push in the cycle control knob and turn clockw
to the proper cycle and wash time.
Washing:
The HEAVYcycle is designedto wash very _i
loads, the NORMAL cycle isfor average soilec
loadsand the UGHT cycleshould be selected:
slightlysoiled loads.
PAGE 4 ..............................................

III II IIIIIII I IIIIIIIIIIII IIIIIIIIIIIIIIIIIIIIIIIIIIIIIIIIII II IIIIIII IIII IIIIIIII II IIIIIIIIIII IIIIIIIIIIIIIIIIIII
cording to model.)
For REGULARFABRICloads, turn the control knob
to 12 minutes Fora HEAVY cycle; to 8 minutes For
a NORMAL cycle; and to 5 minutes for a LIGHT
cycle.
For PERMANENTPRESSloads, turnthe control
knob to 10 minutes for a HEAVY/NORMAL
cycle, and to 5 minutes for a LIGHTcycle. Due to
the extra coot down rinse which minimizes
wrinkling, this cycle can also be used for non-
permanent press items when additional rinsing is
needed. NOTE: On some models a separate
NORMAL cycle (7 minutes) can be selected.
Presoaking:
The SOAK ONLY cycle (not on all models) is used
to soak heavily soiled or stained items. The
washer does not advance automatically into a
wash cycle.
To usethe SOAK cycleturn the controlknob to
start. The washer will fill, agitate for
approximately 3 minutes and soak until the
control knob is advanced into a wash cycle or
spin and drain. Generally, soak periods up
to 30 minutes are sufficient for most
loads (overnight soaking is not
necessary or recommended). If Following
the soak with a regular wash, use up to 50%
more than the usual amount of detergent or use a
presoak product such as Biz* in addition to the
regular amount of detergent.
*Brand names are trademarks of the respective manufacturers.
Start the Washer
Pull out the cycle control knob to start the washe
It wi!l fill to the selected water level with the
selected wash water temperature. After filling, it
will agitate for the selected number of minutes.
Thewasher will pause briefly throughouteach
cycle. Thesepauses are normal.
Thiswasher isdesigned so that itwill not agitate
or spin when the lid isopen. It will, however, fill
with the lid open so water isavailable for
pretreating stainsor diluting fabric softener.
Should the lid be opened during a cycle, the
washer will stop; when the lid is closed and the
control knob is pulled out, the washer will resume
itscycle at the point it was interrupted.
NOTE: tf an unbalanced load occurs during the
spin, the washer will automatically stop.
if this happens, push in the control knob,
open the lid, redistribute the load, close
the lid and pull out the control knob.
Indicator Lights
(Not on all models)
The ON light stays lit throughout the entire cycle
indicating the washer is operating. The SOAK
light is on during the soak cycle.
IIIIIIIIIIIIII!, IIIIIIIII1,1!1!!!IIIIIII1_ IIIIIIIIIIIII!1!!!!IIIIIIIIIIII!11111!IIIIIIIIIIIIIIIII1! I III PAGE 5

IIIIIIIIII IIIIII I IIIIIIIIIIIIIIIIIIIIIII IIIIIII IIIIIIIIIIIIIIIIIIIIIIIIIIII II
MAINTAINING THE WASHER
• Turn off the water faucets after finishing the
day's washing. Thiswill shut off the water
supply to the washer and prevent the unlikely
possibility of damage from escaping water.
• Clean the control panel with a soft damp cloth
and glass cleaner. Do not use any abrasive
powders or cleaning pads.
• Clean the cabinet with soap and water
followed with an appliance wax, if desired.
• The SELF-CLEANLLNTFILTERis located under
the agitator on the bottom of the washtub. The
lint filter in this washer cleans itself. During the
wash and rinse portion of the cycle, lint is
collected on the filter. The filter is then flushed
automatically during the spin and drain.
STORING THE WASHER
Washers can be damaged if water is not
removed from hoses and internal components
before storage. Prepare the washer for storage c
follows:
• Select the NORMAL cycle on Regular Fabrics
and add one cup of bleach or white vinegar tc
a full load of warm or hot water without
clothes. Runthe washer through a complete
cycle.
• Turn the water faucets off and disconnect the
inlet hoses.
• Advance the cycle control knob to the final sp:
of Regular Fabrics and lower the drain hose to
drain any water that may be in the drain hose.
• Disconnect the washer from the electrical supp
and leave the washer lid open to let air
circulate inside the tub.
PAGE 6 '111 IIIIIIIIIIIIIIIIIIIIIIIIII II IIIIIIIIIIIIIIIIIIIIIII III I

IIIIIII IIIIIIIIIIII IIIIIIIIIIIII IIIIIIIIIIIIIIIII II/ III IIIII .........
CYCLE DESCRIPTIONS
REGULAR FABRICS*
Fill
WASH
SPIN & DRAIN
SPRAY RINSE
SPiN & DRAIN
Fill
DEEPRINSE & AGITATE
SPtN & DRAIN
SPRAY RINSE
FINAL SPIN
PERMANENT PRESS*
Fill
WASH
SPIN & PARTIALDRAIN
Fill with cold water
AGITATE
SPIN & DRAtN
Fill with cold water
DEEP RINSE& AGITATE
SPIN & DRAIN
SPRAY RINSE
FINAL SPIN
Special Cycle (not on all models)
SOAK ONLY
Fill
AGITATE
SOAK (inFinite)
*The cycle sequenceisthesame for HEAVY,NORMALand LIGHT;however,thetotal cycle timewill vary.
NOTE: Thewasherwillpausebriefly throughouteachcycle.Thesepausesare normal.
TOTAL WATER USAGE
Regular Cycle Permanent Press Cycle
EXTRASMALL ........................................... Approx. 24 gallons .............................................................. Approx. 30 gallon
(20 Imperial gallons; 91 liters) (25 Imperial Gallons; ! 14 liters)
SMALL ..................................................... Approx. 28 gallons .............................................................. Approx. 36 gallons
(23 Imperial gallons; 106 liters) (30 Imperial gallons; 136 liters)
MEDIUM .................................................. Approx. 32 gallons .............................................................. Approx. 42 gallons
(27 Imperial gallons; 121 liters) (35 Imperial gallons; 159 liters)
LARGE ..................................................... Approx, 36 gallons .............................................................. Approx. 48 gallons
(30 lmperiat gallons; 136 liters) (40 Imperial gallons; 182 liters)
EXTRALARGE ........................................... Approx. 40 gallons .............................................................. Approx. 54 gallons
(33 Imperial gallons; 151 litersl (45 Imperial gallons; 204 liters)
gg IIIII II IIIII IIII IIIII IIIIIH IIIIIIIIIIIII IIIIIIIIIIIIII IIIIIIIIIIIIIII III IIIIII PAGE 7

IIIII I IIIIIIIIIIIIIIIIII IIIIIIIIIIIIIII IIIIIIIIIIII IIIIII IIIIIIIIIIIIIIII I
BEFORE YOU CALL FOR SERVICE
Check these points if your
washer...
Won't fill
• Plug cord into live electrical outlet.
• Check fuse or reset circuit breaker.
• Turn the control knob to proper cycle and pull
knob out to start the washer, tf equipped with
buttons, be sure they are fully depressed.
• Turn both faucets on fully.
• Straighten inlet hoses.
• Disconnect hoses and check hose filter screens.
Clean screens, if plugged.
Won't agitate
• Check fuse or reset circuit breaker.
• Turn the control knob to proper cycle and pull
knob out to start the washer. If equipped with
buttons, be sure they are fully depressed.
• Close lid and pull knob out to start the washer.
Foryour safety,washer will notagitate or spin
unlessthe lid is closed.
• The washer is equipped with a lid switch failure
detector. In the event that the lid switch should
malfunction, the detector will stop operations
for your safety. Call for service.
Won't spin or drain
• Check fuse or reset circuit breaker.
• Straighten hoses. Eliminate kinked hoses. If
there is a drain restriction, call for service.
• Close lid and pull knob out to start washer. For
your safety, washer will not agitate or spin
unlessthe lid isclosed.
• Off-balanced load. Redistribute the load evenly,
close lid and pull knob out. Checkfor leveling.
Be sure water level is acceptable for load size.
• Suds lock - caused by too much suds. Rewash
without detergent. Use correct amount of a low-
sudsing detergent.
• The washer is equipped with a lid switch failure
detector. In the event that the lid switch should
malfunction, the detector will stop operations
for your safety. Catl for service.
Stops
• P_ugcord into live electrical outlet.
• Check fuse or reset circuit breaker.
• Turn the control knob to proper cycle and pull
knob out to start the washer, tf equipped with
buttons, be sure they are fully depressed.
• Close lid and pull knob out to start the washer.
Foryour safety,washer will not agitate or spin
unlessthe lid isclosed.
• Off-balanced load. Redistributetheload evenl)
close lid and pull knob out. Checkfor leveling.
Be surewater level isacceptable for toad size.
• Thismay be a pause or soak period in the
cycle. Wait briefly and it may start.
• The washer isequipped with a lid switchfailur
detector.In the eventthat the lid switchshould
malfunction,the detectorwill stopoperations
for your safety. Call for service.
Leaks water
• Make sure hose connections are tight.
• Make sure end of drain hose is correctly
inserted in and secured to drain facility.
Is noisy
• Make surewasher is leveland firm tothe floo
Fills with the wrong temperature
water
• Turn both faucets on futly.
• If equipped with a temperature setector knob,
be sure it is set directly on a temperature settir
and not between settings.
• Make sure temperature selection is correct.
• Make sure hoses are connected to correct
faucets and inletconnections. Be sure water
supply is regulated correctly. Flushwater line
before filfing washer.
• Check the water heater. It should be set to
deliver a minimum 120°F 149°C) hot water a
the tap. Also check water heater capacity ar
recovery rate.
• Hose filter screens plugged. Disconnect hose.
and clean screens.
NOTE: For further assistance contact your
Maytag dealer or call Maytag Custom,
Service:
U.S. 1-800-688-9900
Canada 1-800-688-2002
PAGE 8 I,III IIIIIIIIIIIIIIIIII III

IIII IIIIIIIIIIIIIIIIIIII IIIIIIIIIII IIII IIIIIIIIIIIIIIIIIIIIIIIIIIIIIIIIIIIIII IIIIIIII I IIIIIIIIIIIIIIIIIII IIIIIIIIIIIIIII
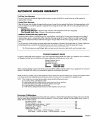
AUTOMATIC WASHER WARRANTY
Full One Year Warranty
For one (1) year from the date of original retail purchase, any part which fails in normal home use will be repaired or
replaced free of charge.
Limited Parts Warranty
After the first year from the date of original retail purchase, through the time periods listed below, the designated parts whick
fail in normal home use will be repaired or replaced free of charge for the part itself, with the owner paying all other costs,
including labor.
Second Year--All parts.
Third through Fifth Year--The drive motor. All parts of the sorid state controls (if so equipped).
Third through Tenth Year--All parts of the transmissionassembly.
Additional Umited Warranty Against Rust
Should an exterior cabinet, including the top, lid, and baseframe, rust during the five year period starting from the date of
retail purchase, repair or replacement wilt be made free of charge during the Firstyear. After the first and through the fifth
year repair or repracement will be made free of charge for the part itself, with the owner paying air other costs, including
labor.
Thisfull warranty and the limited warranties apply when theappliance is locatedin the United Statesor Canada. Appliances
located elsewhereore covered by the limitedwarranties only, which includesparts which fail during thefirst year.
ThisWarranty givesyou specific legalrights,and you mayarsohaveother rights which vary from statetostate.
TO RECEIVEWARRANTY SERVICE
To locate an authorized servicecompany in your area contacttheMaytag dealer from whom your appliance was purchased;c
call Maytag CustomerService.Shouldyou not receive satisfactorywarranty service,call or write:
Maytag CustomerService
240 Edwards St.S.E.
Creveland,TN 37311
US 1-800-688-9900
CANADA 1-800-688-2002
When contactingMaytag CustomerServicebe sureto provide the modeland serial numbersaf your appliance, thename and
addressof thedealer from whom you purchasedthe appliance and the date of purchase.
Shoutdyou stillhavea problem, write to: Major Appliance ConsumerAction Panel,20 North Wacker Drive, Chicago, Illinois60606. MACAP
isan industrysponsoredbut independentgroup of consumerexpertswho receiveand acton complaintsfrom appliance owners.
NOTE: When writing about an unsolvedserviceproblem, please includethe following information:
(at Yourname,address,and telephone number;
(b) ModeJnumberandserial number(foundon contror panelcover}of your appliance;
(c) Name and addressof your dealer and date theappliance was bought;
(d) A cleardescriptionof the problemyou are having;
(e) Water hardness,detergentbrand and amount,water temperatureand cycle used.
Consumer Publications
Formoreinformationonlaunderingandpurchasingothermaior appliances,order thefollowing bookletsfrom Maytag at thepricesindicated.
Sendyourname,address,booklettitle,formnumberand paymentto: ConsumerEducation,Maytog, One DependabilitySquare,Newton, IA
50208. AtJow6-8 weeksfor delivery.
Stain RemovalGuide -- 19YG............................................................................................... 50¢
TheFactsof Laundry-- 181YG .............................................................................................. 50¢
Choosing theRightLaundryAdditives -- 184YG...................................................................... 50¢
Special Baby, SpeciarClean-up-- 191YG.............................................................................. 50¢
EnergySaving Tips-- 392YG ................................................................................................ 50¢
Appliance BuyingGuides ...................................................................................................... 50¢ EACH
Washer -- 211YG; Dryer-- 212YG; Dishwasher-- 213YG;
ElectricRange- 2t4YG; Gas Range-- 2! 5YG; Refrigerator-- 276YG
............... IIIIIIII II IIIIIIIIIIIIIIIIIIIIIIIIIIIIIIIII IIIIIII III PAGE 9
-
 1
1
-
 2
2
-
 3
3
-
 4
4
-
 5
5
-
 6
6
-
 7
7
-
 8
8
-
 9
9
-
 10
10


Maytag LAT8035AAM User manual
- Category
- Washing machines
- Type
- User manual
Ask a question and I''ll find the answer in the document
Finding information in a document is now easier with AI
Related papers
-
Maytag LAT5006 User manual
-
-
-
-
-
-
-
-
-
Other documents
-
Haier HLP21E - Pulsator Wash With Tub User manual
-
ALLIANCE AWS01NW Owner's manual
-
ALLIANCE AWN432SP111TW01 Owner's manual
-
Speed Queen AWNE92 User manual
-
Frigidaire LEVM30FE Owner's manual
-
Speed Queen TR3000WN Owner's manual
-
ALLIANCE AWNE82SP113TW01 Owner's manual
-
Amana AEZ8581 Installation guide
-
Frigidaire FFRE1001PW0 Installation guide
-