Page is loading ...

VR-65XB
2
DIN
6.2'
Monitor
DVD/CD/MP3/MP4 Player
AM/FMRadio
Support Bluetooth
Support
SiriusXM-Ready
0
0
1
AST
MIC
e
(:-
,--
+
...
··-
...
-
~
X
VR-65XB
SeUNDSTREArv1
(C,str}~~~m
,>>0
Bluetooth
[
~
)
J
{(<Si~l~.s:~m>l)
300W
4CH
0
Bluetooth
Owner's Manual
Take the time
to
read
through
this
owner's
manual.
Familiarity
with
installation
and operation procedures
will help
you obtain the best
Performance
from
your
new DVD-receiver.

To promote safety, certain functions are disabled unless the parking brake is on. The Unit is
designed to detect parked status and must be connected to the power supply side
of
the
parking brake switch. Improper connection or use
of
his connection may violate applicable law
and may result
in
serious injury or damage. To avoid the risk
of
damage and injury and the
potential violation
of
applicable laws, this unit
is
not for use with a video screen that is visible to
the driver.
• To avoid the risk
of
accident and the potential violation
of
applicable laws, the front Video
image feature should never be used while the vehicle is being driven. Also, other video
displays should not be
in
a location where it is a visible distraction to the driver.
In
some
countries or states the viewing
of
images on a display inside a vehicle even by persons
other than the driver may be illegal. Where such regulations apply, they must be obeyed
and this unit's DVD features should not be used.
• Please remember to wear your seat belt at all times while operating your vehicle. If you are
ever
in
an accident, your injuries can
be
considerably more severe if your seat belt is not
properly buckled.
• The supplier waves any and all liability when these warnings are not followed.
OPERATION PRECAUTIONS
• Only connect to a 12VDC battery and negative grounding.
• Avoid placing the product
in
direct sunlight,
in
areas with high levels of dust, high
• temperatures (over 40°C) or high humidity (over
90°/o).
In
case
of
high temperatures, cool
• down the car interior by means
of
ventilation or air-conditioning.
• Operate
in
well ventilated areas.
• Do not turn on or off the product
in
short intervals. When turning the unit off, wait for at least
10 seconds prior to turning the unit on again. Do not operate the player with scratched,
bended or broken discs and when a disc
is
not loaded properly, do not force it into the
player.
• Do not watch video playback while driving which will cause serious danger and risks
of
traffic accident. It may violate the laws and regulations.
(There may be exceptional case, i.e., using rear view camera and navigation system)
• Do not install the unit where the operation for safety driving
is
restrained.
• Do not disassembly the unit by yourself, if need repairing, please take the unit to the after
service center.
• Do not open and close the monitor manually, it may damage the monitor tilt system.
• Do not touch the LCD screen by hard objects, it may damage or give scratch to the LCD
screen.
• If the back
of
monitor touches dashboard or air-conditioner inlet etc after open the monitor,
then setup TILT level
in
monitor TILT menu to prevent damage from repeat touching.
• Car parking under direct sunlight may increase the temperature inside the car and the unit
may not be
in
proper operation, please try it again after the temperature returns to normal.
• Do not replace
the fuse on the power cable without professional guidance, using improper
fuse may cause damage to the unit or even cause burn the unit.
• Do not use irregular shaped Disk.
• IR remote control operation may be hindered by monitor when the monitor
is
opened, thus
please use the remote control at the similar level
of
remote control receiver.
• Do not install the unit where the cooling fan
is
blocked.
2

WARNING! ................................................................................................................. 2
OPERATION PRECAUTIONS
.................................................................................... 2
CONTENTS
................................................................................................................ 3
ACCESSORIES
.......................................................................................................... 4
UNIT INSTALLATION
AND REMOVAL
.............................................................
5
WIRING CONNECTIONS ........................................................................................... 6
FRONT PANEL ........................................................................................................... 8
REMOTE
CONTROL .................................................................................................. 9
REMOVE BATTERY .................................................................................................
11
MAIN
MENU ............................................................................................................. 12
+
RADI0
.................................................................................................................. 12
+
DVD PLAYER ...................................................................................................... 13
+ DISC/USB/SDMMC INTERFEACE OPERATION
................................................ 13
+SETTING
CONTROL
............................................................................................ 14
+SOUND
SETTING
................................................................................................. 15
+DISPLAY
SETTING ............................................................................................... 15
+RADIO
SETTING
.................................................................................................. 15
+GENERAL
SETTING FOR
SiriusXM ..................................................................... 15
+DVD
SETTING ....................................................................................................... 16
+STEERING
WHEEL CONTROL ............................................................................ 16
+SYSTEM
............................................................................................................... 16
+SiriusXM SETTING
............................................................................................... 17
+BLUETOOTH SECTION
....................................................................................... 19
+AV-IN
MODE
.........................................................................................................
21
OTHER
FUNCTIONS
...............................................................................................
21
NOTES
ON
DISC
..................................................................................................... 22
TROUBLESHOOTING
.............................................................................................. 23
TROUBLESHOOTING
.............................................................................................. 24
TECHNICAL SPECIFICATIONS
............................................................................... 25
BLUETOOTH CONNECTION ATTENTION INSTRUCTIONS
.................................. 26
VIDEO FILE CONVERSION
..................................................................................... 27
3

p k t . th
f
II
ac
age con
a1ns
e o
ow1ng
accessones
f
.
t
II
f
or
1ns
a a
1on
an
d
operat1on o
f h
t e
un1t.
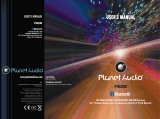
( 1) Washer, Spring
1 each
@
@
Washer, M5 Nut
0
(2)
Metal Mounting Strap
1
p
o o
c:::J
o o
o)
(3) Hex Bolt
1
tJf?
(4) Screw
~
~
Max. 8mm (7/32
X
4
max. 5/16 in)
~
~
(5) Metal
~
Mounting
Sleeve
1
i
~
l> .
·
~
~.-.-
',
} .
(6)
Release
Key
2
;Q
0
(7) Tapping Screw
1
fJJ(((j
(
f,OJ[@
(8) Rubber Cushion
1
C1@
SIORbSTR~'
'
'
--
·-
Remote Control
User
Manual
Warranty card
ISO cable
Plastic
outer trim ring
Note:
Product image may vary from the
actual delivery.
4

Note
Before starting installation
of
the unit, make sure the wiring is connected
properly.
Use
only the parts provided with the unit to ensure proper
installation.
The use
of
unauthorized parts may cause malfunction.
Install
the unit where it does not get
in
the driver's way and
will
not injure the passenger
in
case
there is a sudden stop,
like
an
emergency stop.
+ INSTALLATION
(Figure
1)
+
Insert
the unit into dash-board
hole
and fix it
+
If
necessary,
place
the mount strap at the rear of the unit and fix it with provided washer as
figure
2.
+
Place
Trim Ring over the unit and
installation
is
completed
as figure
1.
Metal
Mounting Sleeve
Removing the Unit
+
Removing the Unit
Insert
the
supplied release
key into the unit and pull the unit out with keeping the
release
key
(As Figure. 4)
Figure 4
5

-
Make sure you have good chassis ground. A good ground connection will eliminate most
electrical noise problems. A good chassis ground requires a tight connection to the vehicle's
metal chassis. The area around the ground connection should be clean, bare metal without rust,
paint, plastic, dust,
or
dirt for a good electrical connection.
Caution: Do not interchange the
connection
of
the wiring!!!
For some car models you may
need to modify wiring
of
the
supplied power cord. Contact your
authorized car dealer before
installing this unit.
Using the ISO Connector
1.
If
your car is equipped with the
ISO connector, then connect the
ISO connectors as illustrated.
2. For connections without the ISO
connectors, check the wiring in the
vehicle carefully before connecting,
incorrect connection
may
cause
serious damage to this unit.
3.
Cut the connector; connect the
colored leads
of
the power cord to
the
car
battery as shown
in
the
color code table below for speaker
and power cable connections
!
OVD/CD,USB/SO,MP3/MP4,
I
SiriusXM,Biuetooth,AM/FM
STEREO
SeUNDSTREAM
A1
SWC
A2
Rear
Camera
[Pmk]
A3
Parking
[Brown]
A4
Battery+
12VOC
[Yellow l
A5
Antenna/
Amp+ 12VOC[81ue]
AS
A7
ACC+12VOC{Rec]
AS
GND[B!ack)
Frequency range:
FM:
87.5-107.9MHz
AM:
530-1710KHz
Front
speaker
83
Right+
84
Right
-
85
Left+
86
Left-
Rear
speaker
81
Right+
82
R1ght
87
Left+
88
Left-
NOTE: Never connect cable to the system while it is connected to the battery power. Whenever
the unit is disconnected from the battery, the preset memory will be erased and the unit will go
back to its factory defaults.
When the brown cable for steering wheel control connected to the steering wheel, we can use
the steering wheel to control some unit
Note: To watch video the parking wire should be connected to break signal.
2 cables is connected to a Hands-Free device (not included).
Parking wire
Note:
The parking wire is connected with brake signal; for safety, the programs can be seen on
the monitor after braking the car.
Parking
Brake
switch
(Activated
by
parking
brake)
Parking
Brake
wire
from
car
DVD
player
(
Brown
#=================~~
Ptrkin9tnu
indkwtnrt
lgH
Car
Battery
To
metal
body
part
or
chassis
ground
of
your
car
6

Connecting the reversing line
to
taillight on the car
To
reversing
line
Totaillight~
To
Car
Battery
Taillight
line
Taillight
After connecting, when you start up the reverse gear, the unit will receive the picture from car
rear view camera.
Note:
Only use groundless loudspeakers.
Use only loudspeakers
of
minimal 40Watt, using fewer watts may result
in
damaging
your loudspeakers at higher volumes.
Use
4-8
0 (Ohm impedance) loudspeakers only; using higher or lesser impedance may
damage the unit.
Do
not use 3-cable loudspeakers and do not connect the loudspeakers minus to the car
body (GND). The unit
is
using a BTL circuit and each loudspeaker must
be
connected
with insulated cables according the diagram.
Loudspeaker cables and/or optional external power amplifiers must always be about
30cm away from the antenna and/or antenna extension parts.
Connect the speakers according the following diagram, incorrect connections will damage the
unit or your loudspeakers
Correct Speaker Connection
7

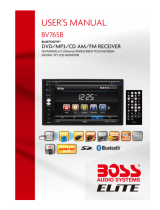
7
8
9
1
2
3
4
5
6
set.JNDSTr<EAM
3oow
4CH
tJ
Bluetooth
1.
IR
Sensor
IR
Remote control signal receiving window. Max distance is 6-8 meters, 45 angels.
2.
EJECT Button
Press to eject a disc.
If
the disc is not removed for about 10
seconds after eject, the disc is
reinserted automatically.
3.
VOL
Increase (
+)
Button
Press
VOL increase button to increase the volume.
4.
Main Menu
Press menu button to go into home page.
5.
VOL
Decrease
(-)
Button
Press
VOL
decrease button to decrease the volume.
6.
POWER/MUTE Button
Press it to turn on the unit. Press and hold
for 2 seconds
to turn the unit off. Press the button
briefly to Mute. Please note that the volume will be muted on
all audio output connector.
7.
MIC
8.
DISC Slot
9.
Info Display
Information Display
LCD
when operation the unit.
8

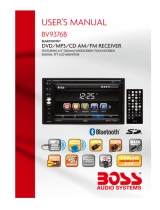
1 Power ON/OFF
2
MODE
5
BAND/ADM
Clear{
Only
for
BTJ
I
UPArrow
8
LeftArrow
10Enter
13
Eject
14
Down
Arrow
17
P.SCAN/APT
t(Only
for
BT)
18ST/MO
PTV(Only
for
ADS)
*I
Only
for
BT)
21
LOUD
TA(Only
for
ADS)
22SEEK·/
...
25STOP/PBC
21080
28
Number
Key
Note;
1
AF
just
for
ADS
model
3 Play/Pause
4
Mute/Biuetooth
7 MENU
8 Sub.c
11
Right
Arrow
12
Setup
15
Angle
..-..(Only
for
BT)
111NT
,.(Only
for
BTJ
19VOL+
20ZOOM/A.S
23SEL
AF(Only
for
ADS)
248EEK+/MJtt
27VOL·
28
AUDIO/GO
TO
2 TA/PTV
for
ABDS/ADS model
3
* 1
..-..
~
Bluet.ooth
1.
POWER
Power it on or off.
2.
MODE button
The••
Function•
for
Bluetooth Model
4
EJECT
Optional
function
Press it to select the mode: Radio, DISC (if there
is
a disc
in
unit), and USB (if there is a USB
device
in
the unit), CARD (if there is a SD/MMC card
in
the unit) and AV
IN.
3.
PLAY/PAUSE button
In
DVD mode, press it to stop playback, press again to resume.
4.
Mute/Biuetooth button
~:Short
press this button to mute the volume output, press it again to resume volume.
5.
BAND/
ROM
{Only
for
Bluetooth)
In
Radio mode, press to change radio band
in
sequence
of
FM1
~
FM2
~
FM3
~
AM1
~
AM2
In
DVD mode, press it to play randomly.
In
Bluetooth mode, press it to clear number.
6.
Cursor 6
buttons
Use the t buttons to select the menu item, the title track or to show next frame.
7.
MENU/ROOT button
Short press it to show main menu.
In
DVD mode, long press it to enter TITLE MENU (Enable only if the DVD disc with title menu)
8.
SUBTITLE button
Press it to select the subtitle language (Available only if the disc with subtitle function).
9

9.
Cursor•
buttons
Use
the•
buttons to select the menu item. The title tracks it or to show next frame.
10. ENTER button
Press it to confirm selection or setting.
11.
Cursor
•buttons
Use the • buttons to select the menu item, the title tracks it
or
to show next frame.
12. SETUP button
In
DVD mode press it to enter the setup menu.
13. EJECT button
Press it to eject the disc.
14.
Cursor
t buttons
Use the t buttons to select the menu item. The title tracks it or to show next frame.
15. ANGLE/ACCEPT button (Only
for
Bluetooth)
In
DVD mode, press it repeatedly to change the viewing angle (Available only with a recorded
DVD file or DVD disc that has this function).
In
BLUETOOTH mode, press to make a call after inputted a phone number
or
accept an
incoming call.
16.
INTI
Hang-Up/Reject button (Only
for
Bluetooth)
Press it to activate the intro function. You can play the beginning
of
every track for 10 seconds
in
sequence.
In
BLUETOOTH mode, press to reject a coming call or hang up while calling.
17. P.SCN/ RPT
In
SD CARD/ USB mode, press to repeat REP 1 => REP DIR => REP ALL
In
DVD mode, press to start repeat REP OFF=>REP Chapter=>REP Title=>REP Off.
In
Radio mode: PS (Preset Scan): Press to scan all preset stations
in
the memory
of
the current
band and stay on each memory stations for about 5 seconds.
AS (Auto Save): Long press to save the stations with good reception automatically.
18. STEREO/MONO (PTY
only
for
RDS/ Bluetooth)
Press STEREO button to select STEREO or MONO.
19. VOL+ button
Press to increase volume level.
20.
A-B/ZOOM button
During playback, press it at the starting point
of
section you want to repeat (A), press this
button again at the ending point
of
the section you want to repeat (B), section A-B repeating
starts. Press it again to cancel the A-B repeat function.
Press it and hold for two seconds
in
DVD mode to zoom the image
in
or out
in
the sequence
of
ZOOM 2-> ZOOM 3-> ZOOM 4-> ZOOM 1/2-> ZOOM 1/3-> ZOOM 1/4.
21. LOUDITA (only
for
RDS)
Press to set LOUD on or OFF.
22
.
..c~
I seek- button
In
DVD mode,
Press~~~
button to skip to the previous track. Press and
hold~~~
button for two
seconds to activate fast reverse (REW) search
in
a track.
In
RADIO mode, press
.,.~
button to start searching automatic, press and hold for two seconds to
start manual searching .
.,.~
Button Frequency down.
23. SEL button (only
for
RDS)
Press it to enter the SOUND SETTING menu, and press Cursor UP/DN buttons to choose
an
item and press cursor left/right buttons to set the item. Press SEL button again to exit the menu.
24 ...
~
I seek + button
In
DVD mode, Press
lli-lli-1
button to skip to the next track. Press it and hold
..
~
button for two
seconds to activate fast forward (FF) search
in
a track.
10

............................
~~
~~.
In
RADIO
mode,
press.,.,,
button to start searching automatic, press and
hold
for two seconds to
start manual
searching
.,.,,
button Frequency up.
25.
STOP/PBC
button
Press
it to Stop
playback
from the current position, press it again to final
stop to the very
beginning.
Press PLAY/PAUSE
button to
play.
Press
and
hold
for two seconds to set
PBC
on/ off in
VCD
mode.
26.
OSD
button
In
DVD mode press it to enter the
OSD menu, press and
hold for 2 seconds to set video setup.
(RED /GREEN /BLUE
/BRIGHT
I
CONTRAST /SHARP /COLOR RESET
/BACK)
27. VOL- button
Press
to decrease
volume level.
28.
AUDIO/GOTO
button
In
DVD mode press it to
select
the audio
language.
In
VCD
mode, press it to
select
the sound track
in
the sequence
of
MONO
L
=>MONO
R
=>STEREO.
Go to:
in
DVD mode, press and
hold
for 2 seconds to show
TIME SEARCH
menu,
select
number and confirm to
go
to certain position
directly.
When
presst
button to enter
TITLELCHAPTER selection
mode,
select
number and confirm to go to certain TITLE
or
CHAPTER
position
directly.
29. Digit
0-9
buttons
In
radio mode,
select
1-6 the desired band;
In
DVD mode,
select
track.
Noted: The RC
is the universal and full-featured. Some options are available
with the
corresponding
model.
REMOVE BATTERY
·Note:
•
The distance may vary according to the
brightness
of
ambient light.
[!
• If
the remote is not used for an extended period
of
time, remove the battery to prevent
possible
damage from battery
leakage
and corrosion.
• Do not
place
any objects between the remote
control
unit and the sensor
on
the unit.
• Do not drop the remote
control
onto the floor;
it
will
damage it beyond repair.
• Do not use the remote
control
unit,
while simultaneously operating the remote control
unit
of
any other equipment; they may interfere
resulting
in improper operation.
•
The battery
normally last for about one year
although depending how often the remote
control
is used.
If the
remote
control
unit isn't working even when it is operated near the
unit,
replace
the battery with a new battery
of
the same make and use only
a
lithium 'cell
battery type:
CR2025
(3V).
• Dispose empty batteries
in
accordance with your local governmental regulations.
•
Do not short-circuit,
disassemble,
heat
or
dispose
of
fire
or
flames the battery.
•
Keep the battery out
of
reach
of
children, should
the battery be
swallowed, immediately
consult
a doctor.
11
I
.
I
\._

The best way to discover the program is to
explore
each screen in
detail,
and to find out how to
move from one to another. Read this chapter for a guided tour.
Unit starts by displaying
the Main menu. This is the root
of
the screen hierarchy, and you can
simply
access all
features by tapping on the touch screen buttons.
T the icons to enter a desired mode.
+RADIO
PLAYER
••
Touch this button can choose
FM1
=>FM2=>FM3=>AM1 =>AM2.
ltD Touch this icon to
select
station forward
manually.
Touch and hold
this icon to
select
station forward
automatically.
li3
Touch this icon to select
station backward
manually.
Touch and
hold
this icon to select
station backward
automatically.
Mute the sound.
IIIJ
Touch it can choose User
=>Flat =>Classic =>Pop =>Rock.
Touch this button can scan the stations from 1-6, Long Touch it to save the stations with
~eception
automatically
and scan each station for
about 5 seconds .
....
Touch this button to search forward stations.
a Touch this button to search backward stations.
Touch this button to switch radio traffic service
on
or off.
Touch this button to select program type.
&IIJ
Touch this icon
select
stereo or mono sound reception.
Note: When a radio signal
is not received, the
default
forST
I
MO
function, once received radio
function
automatically
converted to
ST.
12

+DVD
PLAYER
To
start DVD Player,
tap on DVD icon from main menu screen.
~
In
DVD mode, touch it can choose Repeat chapter =>repeat
title
=>repeat off.
In
VCD mode, touch it can choose Repeat REP 1 => REP
DIR => REP ALL.
m
Touch it to skip to the next track. Touch and
hold
for 2 seconds to activate fast forward
~earch
in a track.
lliill
Touch it to skip to the previous track. Touch and
hold
for 2 seconds to retune to the
~ning
of
the track.
liiiiliiiil
Press this button to fast reverse (REW) search
in
a track, FRx2x4x8x2Q-play
will
be
~-
liiiiiil
Press this button to fast forward (FF) search in a track. FFx2x4x8x2Q-play
will
be
~-
~
STOP
button.
=.::;:
Touch it to
select
the sound channel: Stereo=>MONO
L=>
MONO
R=> .
......... Touch it
repeatedly
to change the viewing
angle
.
•
In
VCD mode touch it can choose PBC
ON or OFF.
1.
DVD
Player will automatically
start playing
when you insert any DVD disc, MEMORY
card
or
USB
device.
2.
Warning
displays
if
the
vehicle is moving for driver's safety.
3.
DVD
Player will
not
only play video, but
also
picture and music
files
as
well.
+DISC/USB/SD/MMC INTERFACE OPERATION
Disc
When a
file disc,
USB
or a memory card is
played,
the screen
will
show
following
interface:
USB
Device
To
play
MP3/
MP4/ WMA
files
from a
USB flash memory, insert a
USB
flash memory into the
USB
port on the right side
of
the unit. The unit will play automatically
MP3/MP4/
WMAIJPEG
files. Or repeatedly press the
MODE
button to
select USB mode.
13

SD/MMC Card
To
play MP3/
MP4/ WMA/JPEG
files
on a
SD/MMC
card, insert the card into the card
slot (you
should
press the Open
button on the
panel
to flip down front
panel
and insert the
SD/MMC
card
into card
slot.)
The unit
will play automatically MP3/MP4/ WMA/JPEG
files.
Or
repeatedly
press
the MODE
button to
select SD mode.
Mute the sound.
a
Touch it to choose
playing
Music,
Video
and Picture
files.
liD
Touch it to
pause/play.
m:J
Touch it to skip to the next track.
m
Press this button to fast reverse (REW) search
in
a
track,
FRx2x4x8x2Q-play will
be
display.
m
Press this button to fast forward (FF) search in a track.
FFx2x4x8x20-play will
be
display.
1m
Touch it to skip to the previous track.
B
Touch it to turn to the track you want to play. Input
track number in the input box.
B Touch it to enter
TITLE
MENU (you can choose music,
e=e
and Video
to
play).
111111
Touch it can choose User
=>Ciassic=>Fiat
=>Pop
=>Rock
And can adjust Bass,
Middle
and
Treble.
Press it to activate the intro
function.
El
Touch it to turn
on
I off random
playback.
- Touch it can choose Repeat REP 1 => REP DIR
=>
REP ALL.
[!!I
A-B segment repeat
+SETTING
CONTROL
"""
Disc
,,
,,.
...
tn
l
;
'
0
·•·
•
~II
I~
·-·
i".
Disc
•f
·i
SEARCH
Q
..
:
/B
r,
.-,
h
,.,
r
lll
x
•
~II
~~~
.,
"
.i'\.
File
Li
st
•I
..
~
_,
.l
\~I;.
I!
;
l
ill
it·1
~
!'ill":
.
L·
~
.:lt.
':It"-
1111
.:.1
f
'
!
~
r
~
1 :
~
•
II
pllr•t
r
61
IIi
f
d •..
-.
:{I
~
n.
7.:
C.':J
'
I IIIII
·•
,
_.
~
~
••I
Q
fJ
~
"=-
.
,
':)
"
•
IIII
I I
r,
•I
u
I<
·~
,
,
~ ~
~I
Q
=
~
r,~
(.
-··
:oo..·
~
t
~
~
To start
SETTING,
tap SETUP icon on main menu. Your device has
default
system settings.
You
can customize the settings to suit your
personal
needs. Once
you change settings, your
new settings
will
remain
until
you change it again.
Page 1 /2 Page 2 /2
14

Sound
BALANCE/FADER: Adjust the
balance and fader to
left
or
right.
BEEP:
Select
keypad sound
on
or off.
LOUD: Select loud
on
or off.
SUBWOOFER: Turn subwoofer
on
or off.
BACKLIGHT:
Adjust the screen
backlight to
LOW-MID-
HIGH
BACKLIGHT
TIME:AUTO-OFF
AFTER 1
OS-OFF
AFTER
20S-OFF
AFTER
30S
AREA:
Europe-USA-South
America-Russia.
PI: Turn to mute
or
sound.
REGION: Turn on or off.
MASX:
DPI
EON
TA: T Select
OX
or
Local.
T
A:
Select T A
on
or off.
Parental
Lock:
Select Parental
Lock to
easily lock
and
unlock channels
with mature content using
Parental
Control.
The
initial
password is "0000".
CLOCK DISPLAY: Select
ON
(clock
is
displayed
on
the screen) or
OFF (clock
is
not
displayed
on
the
screen).
CLOCK SETIING:
Press number buttons to input the
current time, and tap
"OK"
button save
clock
setting.
15

.............................
~~
~
UNLOCK
ALL CHANNELS:
Select
this to
unlock all
channels.
LOCK/UNLOCK CHANNELN SET: Select
this to
lock
or unlock selected channels.
CODE CHANGE: Select
this to change the
parental
lock
code. The
initial
password
is
"0000". Follow the
prompts to change the password.
DEFAULT:
Select
this to
default
the
parental
code
back to the
initial
ssword
of
"0000".
SUBTITLE
LANG:
English-French-Italian-Dutch
-German-s
nish-Portu
uese
AUDIO
LANG:
English-French-Italian-Dutch
-German-s
ish-Portu
uese
MENU
LANG:
English-French-Italian-Dutch
-German-s
ish-Portu
uese
PASSWORD: Set
password.
RATING:
1kid
safe-2G-3PG-4PG13-5PG-R
-6R-7NC-17-8
adult
TV
TYPE:
Set
TV
type
4:3PS-4
:3LB-16
:9
NTSC/PAL: Set NTSC or PAL
DEFAULT: Restore
Setting steering wheel control
function.
The software version is just for
your reference.
16

-
------~~~'··
::::=:
SiriusXM Satellite Radio operation reqiured the connection
of
the SiriusXM-Connect Vehicle
Tuner(sold separately).
Note:The SiriusXM-Connect Vehicle Tuner must have the SiriusXM logo to be compatible with
the VR-65XB.
SiriusXM Vehicle
Tuner Cable
SiriusXM-Ready
Input
Line up the connenctor with the pins on the cable.lt can only be inserted as shown above.
Push the cable into the head unit's connector until it slicks.Attempting to insert the cable
differently from shown above may cause damage to the cable
or
head unit.
SiriusXM SECTION
Before using SiriusXM, the head unit must be connected to the SiriusXM Connect Vehicle
Tuner. After installing your SiriusXM Connect Vehicle Tuner and antenna, power on your head
unit and tap the SXM icon on the main menu to enter SiriusXM mode.
Only
SiriusXM®
brings
you
more
of what
you
love
to listen to,
all
in
one
place.
Get
over
140
channels,
including commercial-free
music
plus
the best sports,
news,
talk,
comedy
and
entertainment.
Welcome
to the world of satellite
radio.
A
SiriusXM
Vehicle
Tuner
and
Subscription
are
required.
For
more
information, visit www.siriusxm.com.
Tuner Activation
To listen to SiriusXM Satellite Radio,a subscription is required.Activate the SiriusXM Vehicle
Tunner using one
of
two methods below:
1.0nline:Go to www.siriusxm.comand choose ACTIVATE RADIO.
2.Phone:Call SiriusXM Listener Care at 1-866-635-2349
Activation typically takes 10-15minutes,but may take up to an hour. It is recommended to leave
your vehicle on until the 'Subscription Updated'message appears.
Radio ID
To view the Radio
10
on the screen,please find channel 0 appears. The 8 character Radio
10
will appear on the screen.The Radio
10
is also printed on the underside
of
the SiriusXM Vehicle
Tunner.
Note:The Radio
10
does not use the letters I,O,S,F
Listening to SiriusXM Satellite Radio
After installation
of
the SiriusXM Vehicle Tuner,press SXM icon on the main mune enter to
SiriusXM modeappears to begin listening to SiriusXM Satellite Radio.
SiriusXM Setup Menu
To access the SiriusXM setup menu options, please touch SETUP icon on the main menu,
press General and then enter to SiriusXM setup.
17

..............................
~~~
~~
Clock Display
Unlock All Channels
i Lock/Unlock Channels
Parental
Lock~
Code Change
Default
Clock Setting
*To enter a 4 Digit code, choose from the two options as below:
• Enter the 4 Digit code using the remote control,
by
press the numbers directly.
The default code is "0000"
if
the code has not been changed with the "CODE CHANGE"
feature. Press ENTER to confirm.
• Touch SETUP icon on the main menu, then press "PARENTAL LOCK" enters to "CODE
CHANGE" directly input 4 digit codes.
Displayed information
)"l-
SiriusXM
•f
l)
2[1
1-:::H
I
S\fl..~!
P2
'?,.,
f..n:-.f"'"tRI~·f'lP~t
?
rill
:.0
k~
Pre·:,p·
.
.-.
3
'
8C!f":i-A--l3-2 l
12
.1
;
c,n·;I_J'='··rn
com
0
5
6
•f
x
< >
~
tom..
Tuner not connected
Connected Tuner
Tap this icon to mute the sound.
B Tap this icon to tune to the next channel.
B Tap this icon to tune to the previous channel.
[I:J
['~
CH
r,...,
CH
CH
CH
CH
m
m Tap this icon to select the bands SXM1, SXM2 and SXM3.
e Tap this icon to direct tuning, it can scan channels.
1
'
1
!
1
1
a.
liD
Tap this icon to adjust tone equalizer between Users =>Ciassic=>Fiat=>Pop=>Rock.
I I Tap this icon to display all channels in a selected category.
Note:The head unit supports direct tuning. When connected tuner,please tap the "CH" button
on the menu, then in
ut
number to scan channels.
"'
SiriusXM
•L
SEAf
~
CH
r:..
·,'['
~
..
'
;.-·
.
~
:,
;;
0
"
.~
II
IJ
•4x
<.
>
~
sa..
H+
0.
Search channel
18

SiriusXM Advisory Messages
Message
Description
•
Ensure the
SiriusXM antenna
cable is connected to the SiriusXM
tuner correctly.
Check
Antenna
•
Check the SiriusXM antenna wire for breaks or sharp bends .
Replace
the antenna
if
necessary.
•
Press
RESET located
on
the top
left
corner
of
the front
panel. If
the
message remains, the antenna may have been damaged.
Check Tuner
•
Check the SiriusXM tuner connection behind the VR-65XB to
ensure that it is
correctly
connected.
•
The
vehicle
must be outside, and the antenna must have a
clear
No Signal
view
of
the southern sky.
•
The magnetic antenna must be mounted on the outside
of
the
vehicle
for the best reception.
Subscription
•
An
updated to your
SiriusXM
subscription has been received by the
Updated
SiriusXM tuner. Touch any keys to continue.
Channel Not
•
This
channel is not a valid SiriusXM channel.
The
channel
number
Available
has been entered
incorrectly,
or the
channel
was removed from the
SiriusXM channel lineup.
Channel
Not
•
This channel
is not
included
in
your
SiriusXM
subscription
plan. Call
Subscribed
866-635-2349 or visit www.siriusxm.com to subscribe.
•
The selected channel
has been
locked
by the
parental control
Channel
Locked
option.
•
A prompt to enter the
unlock
code
will
appear. Enter the
unlock
code as described on page 18.
BULETOOTH
SCETION
Warning: Driving and having a
Telephone
conversation at the same time is dangerous,
please
park your car before having a
telephone
conversation. The
supplier waves any and
all liability
when this warning is not
followed.
To enter
Bluetooth mode, you can tap
Bluetooth icon on Main menu or
long
press
the mute/Biuetooth button
on
the Remote Control or press mode button on remote or on front
panel.
A user can make own choice by tap the buttons.
liHl
Tap Dial
button to enter
call
mode.
f:il
Tap Music button to start
Bluetooth
Music
player.
l.,.q
Tap
In
calling
button to check received calls.
~
Tap
Out calling
button to check
dialed calls.
19

m
Tap Missed
calling
button to check missed
calls.
[a;§)
Tap Phone Book button to use phone book functions.
B
Tap this icon
translate Bluetooth
to
mobile mode.
a
Tap this icon
to
clear
number .
..
Tap this button Hand up and reject
calling .
..
Tap this button Making and accept
calling.
Pairing Mode
At
the 1st time when using
BLUETOOTH,
you need
to
pair the mobile
phone first.
When
a
phone have not been paired with the unit, the
BT
icon and Pairing mark will blink continually on
the
panel.
When
the unit have connect with phone, the BT icon
will
turn on and
the
Mobile
phone name
(if
available) will be display
on the panel.
According to
mobile
pairing device manual,after searching
new
device(SoundStream), select
it,
input password
"0000"
and confirm ok, device paring is finished.
The
text
'Enter
Number'
will
shows on the panel
after the pairing is
completed.
It
means device is connected and ready for
BLUETOOTH
communication.
Auto-connect-
Disconnect
When
power
on the unit, the
last
paired phone
will be connected
to
the device via Bluetooth
automatically,
after searching about one minute,
if
the device cannot find the paired phone, it
will
stop searching. When in standby mode (unconnected),
long
press
Bluetooth
button on
remote control
to active auto-connect function and the device
will
search the
last paired phone.
If
you
want
to disconnect the
Bluetooth
connection, turn
off
the
Bluetooth
on the phone.
1.
Dial
BUTTON
Tap
on
Dial
button to enter
call
mode.
In Call
mode, the unit can be used as your phone. Making and receiving
calls
are
possible
with
BLUETOOTH. Simply
tap phone number and tap button to make a
call, and
tap.
button to hang up.
1.)
Tap
a
button
shortly
to
delete
a wrong digit,
or
press
Reject/INT
button on remote to
delete all
the numbers at once.
2)Tap
button the device automatically
makes a call
to the
latest call
in its
call log.
Voice Transfer
During a
call, you can change a
call
from
Bluetooth
mode to phone by tapping Transfer button.
To
have a
call
in
Bluetooth
mode again, tap Transfer button.
NOTE: the phonebook only supports Western Characters.
Any
difference in character
will
be
shown such as
"+,
*
or
#
"
2. (A2DP) Music Mode
Tap
Music button to
listen
music in
Bluetooth
mode.
You
can
select
the function with the key for previous,
play
or
pause,stop and next.
A2DP
(Advanced Audio Distribution
Profile)
Music Player
A2DP
is a function which can receive the audio frequency
signal
from the
mobile phone,
amplified by the
car
audio
and
played
out
by the car speakers.
Notice:
your
mobile phone need to support A2DP.
1:}
BT
DO
DD
n
(.;
(.;
(:
.
1m
•l
•l
2<J
!
')0
1:
~
I~
~II
~~I
"!:>
Tap
the
buttons on the screen
as
shown,
or
press corresponding buttons (PAUSE/PLAY,
STOP,
PREVIOUS/NEXT) on remote control to
play,
pause,
play
previous,
or
next music
file.
20
/