IbX instruments K10 Rotary Vane Vacuum Pump User manual
- Type
- User manual

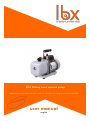
K10 Rotary vane vacuum pump
Please read the User Manual carefully before use, and follow all operating and safety instructions!
user manual
english

2
User Manual
K10 series Rotary vane vacuum pump,
127 l/min, 0,1 torr
Important notice
This instrument is designed for laboratory usage only. Please read this manual carefully before installing or operating this
equipment. The instrument shall not be modified in any way. Any modification will void the warranty and may result in
potential hazard. We are not responsible for any injury or damage caused by any non-intended purposes and modifying
the instrument without authorization.
Service
In order to guarantee this equipment Works safely and efficiently, it must have a regular maintenance. In case of any
faults, do not try to repair it yourself. If help is needed, you can always contact your dealer or Labbox via
www.labbox.com
Please provide the customer care representative with the following information:
• Serial number
• Description of problem
• Your contact information
Warranty
This instrument is warranted to be free from defects in materials and workmanship under normal use and service, for a
period of 24 months from the date of invoice. The warranty is extended only to the original purchaser. It shall not apply to
any product or parts which have been damaged on account of improper installation, improper connections, misuse,
accident or abnormal conditions of operation.
For claim under the warranty please contact your supplier.
Unpacking
In case of damage or lack of any part when unpacking then please contact your local distributor with model and series
number for immediate assistance.
Vacuum Pump x 1
Lubricant (500ml) x 1

3
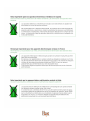
Assembly and disassembly diagram
Installation
1. Ensure to check voltage specified on the nameplate at the bottom of the pump. Make sure if it matches the line
voltage on your location.
2. Install the pump in a clean, dust-less and ventilated area where the ambient under 40℃.
3. Connect (4) air inlet with a high-pressure hose as short as possible and check if all the connections are tightly
sealed and without air leakage.
4. Filling lubricant: remove (2) oil filler cap and fill lubricant slowly by keeping watch on (3) oil level window. Do not
exceed the upper liquid level; otherwise, volume oil mist will spray out in operation. Then fix and tighten (2) oil
filler cap after refilling.
5. Installation of oil mist filter: remove (2) oil filler cap and replace it with oil mist filter.
Warning
1. The pump is NOT in “chemically-resistant” design. Do not use the pump with organic or corrosive gases.
2. Never use the pump with any flammable gas or toxic material.
3. When used with liquid filtration, please always prevent liquid from being drawn into the pump to cause severe
damage to the pump. Which shall not fall in our warranty scope. In case of such condition, please stop the operation
and contact us for assistance immediately.
4. Oil mist filter (optional purchase) is used to absorb oil mist to reduce laboratory pollution. Please ensure to replace it
periodically.
5. If there is no movement after the pump is switched on, please turn off the power first and release the vacuum then
restart it. If still no movement, the power supply or motor may have certain problem, please contact us immediately.
6. The pump is equipped with thermal protection device that will automatically shut down the power whenever the
operation temperature of the pump is too high.
7. The pump may remain at a high temperature while in operation or being stopped just now, please do not touch it.
8. It shall not fall within our warranty scope if any damage caused by using other branded lubricants.
9. Do not draw in any air at too high temperature (above 80℃); otherwise, make sure to install a cooling device in front
of the inlet.

4
Operation
1. Turn on (1) the power switch and run the pump for 1 min. then check through (3) oil level window if the current oil level
is between Max. and Min. line.
• If under Min. line then make sure to add lubricant (VACU-KLB-500).
• Steps for addition of the lubricant: screw off (2) oil filler cap then pour the lubricant into tanker cautiously
and ensure the oil level is not above Max. line. Otherwise, it can spray much oil mist while the pump is in
operation.
2. Check whether the lubricant is clean or not. It should be replaced with new one if it becomes turbid.
• Steps for the replacement of the lubricant: Turn on the pump and run it for 30 min. to reduce oil viscosity
→ Turn off the pump → Open (5) oil drain plug and drain the waste oil → Open (4) air inlet → run the
pump for 1-2 min. to clean up the remaining waste oil in the pump → close (5) oil drain plug → Add new
lubricant up to the proper level → Screw on (2) oil filler cap.
• Ensure to dispose of the drained oil in compliance with local environmental regulations.
3. Ensure that the whole inlet system is well connected and without leakage then press (1) power on/off to start the pump.
4. Press (1) power on/off to turn off the pump after the operation is finished.
• Please make sure to release the pressure before turning off the pump to prevent oil from being sucked
reversely.
Please remove the power plug from the power outlet if not in use promptly to save power.
Basic Troubleshooting
Failure to start:
• Check if the input voltage is within + or (-) 10%. The improper input voltage will cause a failure to start.
Oil leakage:
• Ensure that the leaking oil is not the residues of oil.
• It may need to replace washer or O-ring of the tanker with new ones. If it leaks at (5) oil drain plug then wrap the seal
tape on it.
Insufficient Vacuum:
• Check if the lubricant is clean and replace the new lubricant by following “Steps for the replacement of the lubricant”
mentioned above.
• Check if the current oil level is within the proper level position. Do not keep the current oil level at a higher position;
as the pump starts to run, the operating temperature can inflate the lubricant and make the oil level higher than
Max. line. Whenever checking the current oil level position through (3) oil level window, always make sure to shut (4)
air inlet and start the pump. If the oil is short, please add it immediately.
• Check the whole pipe system to see if all are connected tightly.
Order information
VACU-K10-001 Rotary vane vacuum pump, 127 L/min, 0,1 torr, LBX K10
VACU-KLB-001 Lubricant oil for LBX K pump, 500 ml
VACU-A35-001 Oil mist outlet for LBX K

5

6

www.labbox.com
-
 1
1
-
 2
2
-
 3
3
-
 4
4
-
 5
5
-
 6
6
-
 7
7


IbX instruments K10 Rotary Vane Vacuum Pump User manual
- Type
- User manual
Ask a question and I''ll find the answer in the document
Finding information in a document is now easier with AI