
LED Vapor Tight
User Manual
PLEASE READ THE USER MANUAL CAREFULLY BEFORE USE

KERI® LED Vapor Tights are waterproof, dustproof and anti-corrosion, suitably
used in warehouse, garage, workshop, office, and covered damp locations
such as patio awnings and covered decks. It is IP65 rated, and it is able to
withstand splashed water from any direction (does not include being fully
submersed in water).
Safety Information
Please carefully read and understand following instructions before use.
Failure to do this may result in electrical shock, fire, or injuries to persons:
• Ensure the electricity to the power cord you are working on is shut off
• Do not attempt to install or modify product while plugged in.
• Any changes or modifications not approved by the responsible party
for compliance will void the warranty for the equipment.
• Consult with a qualified electrician to ensure correct circuit conductor.
• When cleaning, please use a dry cloth to clean the lamp. The lighting
fixture can be cleaned with a feather duster or a soft damp cloth. You
should plug in the lighting fixture after it has been completely dried.
• Please make sure the input voltage range is AC100-277V, and connect
the power connection terminal correctly.
Note:
The instructions discussed in this manual cannot cover all possible situations
that may occur. The operator must understand that common sense and
caution are factors which cannot be built into this fixture, but must be
supplied by the operator.
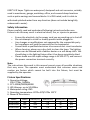
Fixture Specifications:
1. Operating Voltage:
100-277Vac, 50/60Hz
2. CCT: 4000K/5000K/6000K
3. LED Lifespan: up to 50,000hrs
4. Waterproof rating: IP65
5. Operating temperature:-20℃ to 50℃/-4℉ to 122℉
6. Power & Dimensions
MODEL
POWER
LENGTH(mm)
WENGTH(mm)
HEIGHT(mm)
LF(mm)
JS-PRO-2209U
18W
665
128
68
390
JS-PRO-2218U
36W
1268
128
68
858
JS-PRO-2228U
56W
1268
128
68
858

Product Varieties:
• Standard fixture
• Proprietary 3-stages dimming
First stage: 100% full brightness
Second stage: 30% brightness
Third stage: 10% brightness
• 0-10V Wired dimming
• Wireless sensor dimming
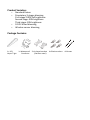
Package Contains:
1× LED 1× Waterproof 2×U-shape brackets 4×Plastic anchors 4×Screws
Vapor Tight Connector (Stainless steel)

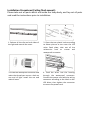
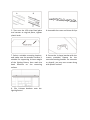
Installation Procedures (Ceiling flush mount):
Please take out all parts which are inside the lamp body, and lay out all parts
and read the instructions prior to installation.
1. Release all the clips on both sides of
the light and remove the cover.
2. Open the two plastic locks according
to above picture to turn over the LED
strips fixed plate, take out all the
accessories such as screws and
waterproof connector.
A B
4. Feed the wires into the housing
through the waterproof connector.
Connect the power cord with the wiring
connector according to the label on the
LED driver, then tighten the connector
to secure the power cord.
3. Screw the waterproof connector and
make the thread part across a hole on
one end of light. Install the nut and
make it loose.
terproof connector

8. Screw the U-shape bracket with the
screws provided. Repeat for the
second mounting bracket. For concrete
or drywall, you may use screws along
with plastic anchors.
7. Select a suitable mounting location,
and make sure the wooden surface is
suitable for supporting 4 times weight
of the lighting fixture, then mark the
hook locations on the mounting
surface.
5. Turn over the LED strips fixed plate
and recover to original place, tighten
plastic locks.
A B
6. Assemble the cover and close all clips.
9. Clip U-shape brackets onto the
lighting fixture.

5 Year Limited Warranty Service
If the product will not work after you have read the troubleshooting guide and practiced the
troubleshooting options, you are advised to return the light system to the retailer you purchased it
from. The dealer will be able to examine the light and test its components. If they are not able to
repair the light, they will return it to us for examination and repair/replacement. Do not attempt to
repair any product on your own, as serious injury or death may result. If the retailer is not able to
help you and the light is still under manufacturer’s warranty, you may contact us for technical
support. In some cases, you will be issued an RMA# (return merchandise authorization number) to
return the unit for factory repair. Complete the warranty form below and return the light with all
original packaging, your receipt of purchase, and a valid RMA# to the address below. Please pack and
ship the light in its original packaging. If it is damaged in shipment we cannot be responsible and the
warranty may be voided. Once we receive RMA package, it will be repaired or replaced and shipped
back to you. Please note if an additional warranty was purchased and include the extended warranty
sales receipt with your return.
RETURN FORM
Include the following if returning:
Proof of purchase
This completed form
RMA# on the outside of the box
Extended warranty receipt
Return Merchandise Authorization Number (Required): ______________________________
Contact Name: _______________________________________________________________
Address: ____________________________________________________________________
____________________________________________________________________________
Phone #: ____________________________________________________________________
Email Address: _______________________________________________________________
Please give a brief description of your technical issue: ________________________________
____________________________________________________________________________
____________________________________________________________________________
SEND TO:
KERI® LED Lighting 20651 Golden Spring Drive Suite 115 Walnut, CA 91789 Tel: 714-516-8176
-
 1
1
-
 2
2
-
 3
3
-
 4
4
-
 5
5
-
 6
6


Ask a question and I''ll find the answer in the document
Finding information in a document is now easier with AI