Page is loading ...

Issue 1 -9/30/14
Assembly & User Instructions- Please keep for future reference
Important
– Please read these instructions fully before assembly or using
Roger Black Gold Treadmill Plus
These Instructions contain important information which will help you get best from your
equipment and ensure safe and correct assembly, use and maintenance.
If you need help or have damaged or missing parts, call the Customer Helpline: 03456040105
www.argoshelpdesk.co.uk
330/4947

Contents
Before you Begin
2
General Safety Information
3
Safety Information
4
Components-Parts
5
Components-Fixings
6
Before Assembly
7
Assembly Instructions
8-11
How to Start
12
Computer Instruction
13
Computer Operation
14-21
Limited Warranty
22
Maintenance
23-27
Exercising Information
28-31
Care and Maintenance
32
Exploded Parts Diagram
33
Exploded Parts List
34-35
1

Congratulations for selecting the 3304947
Treadmill from Roger Black. Whether you are an
accomplished athlete seeking to maintain peak
performance or a beginner realizing the benefits of
exercise for the first time, the 3304947 Treadmill
will help you to achieve your goals.
In the meantime, remember that the benefits of
exercise are many and varied including higher
energy levels, reduced stress, improved
self-esteem, clearer and more radiant skin, greater
cardiovascular efficiency, higher metabolic rate,
and improved body posture – all of which can
result in a longer and more enjoyable life.
While purchasing the 3304947 Treadmill will not
do all of this alone, it is an important step towards
understanding and achieving the benefits of
exercise.
When you open the carton, please DO NOT
hold the handle grip to carry the treadmill from
the carton. Assemble the treadmill and take
out from the carton, failure to do this will
damage the treadmill console.
Do not under any circumstance turn the
machine on its side unless in the fold up
position. Failure to follow this instruction could
lead to serious injury from base frame being
sprung open with considerable force.
Before you Begin
2
Precautions
All Roger Black products are manufactured to the highest specifications and this instruction manual
should enable you to assemble the 3304947 Treadmill and commence your workout program. If, however,
you have any additional questions, please call out UK Customer Service
:
03456040105 or go to
www.argoshelpdesk.co.uk. To help us assist you, please quote the product model number and serial
number when calling. The model number is 3304947. The serial number can be found on a sticker
attached to the rear of main treadmill body (located on the right hand side of the treadmill base next to the
mains power cord inlet).

1. It is the responsibility of the owner to ensure
that all users of this treadmill are adequately
informed of all warnings and precautions.
2. Use the treadmill only as described in this
manual.
3. Place on a level surface, clear safety area of
at least 2000 mm in length and at least as
wide as the treadmill shall be provided behind
the equipment when in use. Do not place the
treadmill on any surface that blocks air
openings. To protect the floor or carpet from
damage, place a mat under the treadmill.
4. When choosing a location for the treadmill
make sure that the location and position
permit access to a plug.
5. Keep the treadmill indoors, away from
moisture and dust. Do not put the treadmill in
a garage, outbuilding, covered patio, or near
water.
6. Do not operate the treadmill where aerosol
products are used or where oxygen is being
administered.
7. Keep children under the age of 12 and pets
away from the treadmill at all times.
8. The treadmill should not be used by persons
weighing more than 120kgs.
9. Never allow more than one person on the
treadmill at a time.
10. Wear appropriate exercise clothing when
using the treadmill. Do not wear loose clothing
that could become caught in the treadmill.
Athletic support clothes are recommended for
both men and women. Always wear athletic
shoes. Never use the treadmill with bare feet,
wearing only stockings, or in sandals.
11. When connecting the power cord, plug the
power cord into a grounded circuit. When
replacing the fuse, an ASTA approved BS
1362 type should be fitted to the fuse carrier,
A13 amp fuse should be used, no other
appliance should be on the same circuit.
12. Keep the power cord away from any heated
surface.
13. Never move the running belt while the power
is turned on. Do not operate the treadmill if the
power cord or plug is damaged, or if the
treadmill is not working properly.
14. Never start the treadmill when you are
standing on the walking belt. Stand on the
side rail, hold the handrails, start with low
speed and then step on the unit. When
comfortable increase the speed to one that
you are comfortable with.
15. The treadmill is capable of high speed. Adjust
the speed in small increments to avoid sudden
jumps in speed.
16. The pulse sensor is not a medical device,
various factors, including the user’s
movement, may affect the accuracy of the
heart rate readings. The pulse sensor is
intended only as exercise aid in determining
heart rate trends in general. WARNING! Heart
rate monitoring systems may be inaccurate.
Over exercising may result in serious injury or
death. If you feel faint stop exercising
immediately.
17. Never leave the treadmill unattended while it
is running. Always remove the safety key
when the treadmill is not in use.
18. Always examine your treadmill before using to
ensure all parts are in working order.
19. Never insert any object or body parts into any
opening.
20. Inspect and tighten all parts of the treadmill
regularly. ( see maintenance page )
21. Always unplug the treadmill before cleaning
and/or servicing. Service to your treadmill
should only be performed by an authorized
service representative, unless authorized
and/or instructed by the manufacturer. Failure
to follow these instructions will void the
treadmill warranty.
22. This appliance is not intended for use by
person (including children) with reduced
physical, sensory or mental capabilities, or
lack of experience and knowledge, unless
they have been given supervision and
instruction concerning use of the appliance by
person responsible for their safety.Keep
unsupervised children away from the
equipment.Injuries to health may result from
incorrect or excessive training.
General Safety Information
3

To reduce the risk of serious injury, read the entire manual before you assemble or operate the Roger Black
Platinum Treadmill, In particular, note the following safety precautions.
Assembly
• Keep children and animals away from the work
area, small parts could cause choke if swallowed.
• Make sure you have enough space to layout the
parts before starting.
• Assemble the item as close to its final position
(in the same room) as possible.
• Position the equipment on a clear, level surface.
• Dispose of all packaging carefully and
responsibly.
Using
• It is the responsibility of the owner to ensure that
all users of this product are properly informed as to
how to use this product safely.
• This product is intended for domestic use only.
Do not use in any commercial, rental, or
institutional setting.
• Before using the equipment to exercise, always
do stretching exercises to properly warm up.
• If the user experiences dizziness, nausea, chest
pain, or other abnormal symptoms stop the
workout and seek immediate medical
attention.
• Only one person at a time should use the
equipment.
• Keep hands away from all moving parts.
• Always wear appropriate workout clothing when
exercising. Do not wear loose or baggy clothing,
since it may get caught in the equipment. Wear
athletic shoes to protect your feet while
exercising.
• Do not place any sharp objects around
the equipment.
• Disabled persons should not use the
equipment without a qualified person or doctor
in attendance.
• This product is suitable for user’s weight of:
120kgs.
•This product conforms to ISO 20957-1 and EN
957-6. Class (H) - Home Use - Class (C)
•This exercise product has been designed and
manufactured to comply with the latest (BS EN
957) British and European Safety Standards.
Important – Please read fully before assembly or using
Safety Information
4

Note: Some of the smaller components may be pre-fitted to larger components. Please check carefully
before contacting Argos regarding any missing components.
Total mass of the product is 53 kg.Foot print of the product is 162 * 76 cm.
The free standing equipment shall be installed on a stable and leveled base.
Components - Parts
If you have damaged or missing parts, please calll
the Customer Helpline: 03456040105
www.argoshelpdesk.co.uk
Please check you have all parts listing below
20. Left Mast Cover
Lubricating Oil
21. Right Mast Cover
57. Mp3 Link
45. Safety Key
5
3. Left Console Mast
4. Right Console Mast
Main Frame
Hardware pack
Console
52. Power cord

Note: Some of the fixings are pre-fitted to the larger components. Please check carefully before contacting
Argos regarding any missing fixings.
Components - Fixings
Please check you have all parts listing below
Please check you have all parts listing below
6
68
20mm Allen Bolt × 4
71
87
66
84
8mm Washer × 10
80mm Allen Bolt × 2
8mm Spring Washer × 10
15mm Phillips Screw × 2
5# Allen Wrench × 1
6# Allen Wrench × 1
Multi Wrench × 1
54
90mm Allen Bolt × 4

Before Assembly
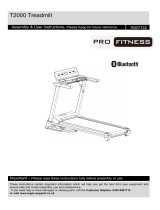
Overview Drawing
7
Overview Drawing
Pulse Sensor
Console Mast
Cover
Mp3 Link
Transport Wheel
Handle Grip
Safety Key
Console Mast
Motor Cover
Side Rail
End Cap
Running Deck

a. Thread the Main wire from the bottom of the Console Mast (4) to the upper opening.
b. Fix each Console Mast (3&4) to the Base Frame (1) using 6 x 85mm Allen Bolts (66), 6 x 8mm Spring
Washers (87) and 6 x 8mm Washers (84).
Assembly Instructions
Step 1
8
3
1
4
66
84
87
54
87
84
84
87
66
54
87
84
Main wire

Assembly Instructions
a. Connect the wires as the diagram showing, insert the wires into the handles holes.;
b. Fix each side of the Console to the two Console Mast (3&4) by using 4 x 15mm Allen Bolts (68), 4 x
8mm Spring Washes (87) and 4 x8mm Washers (84).
9
Console
B
3
4
Step 2
A
A’
B’
68
84
87
84
87
68

Assembly Instructions
Attach the Mast Cover (20&21) to the Console Mast (3&4), using 2 x ST4.8×15mm Dome Head Philips
Screw (71),and then press the Fastener (on the end of the Mast Cover ) into the Groove (on the Base
frame 1 ).
1.
10
20
3
21
4
Fastener
Groove
1
Step 3
71
71

Free area and training area.
The free area shall be not less than 0.6m greater than the training area in the directions from which
the equipment is accessed. The free area must also include the area for emergency dismount.
Where equipment is positioned adjacent to each other the value of the free area may be shared.
Assembly Instructions
0.6m
(Free area)
0.6m
(Free area)
0.6m
(Free area)
0.6m
(Free area)
Training
area
1.7m
11

How to Start
Turning on the treadmill
SAFETY KEY:
The treadmill will only work if the safety key (45) is properly locked in the provided notch of the console.
Insert the safety key (45) and attach the clip onto the waist part of your clothes. If it is necessary to turn
off the motor immediately, just pull the safety key (45) out of the console.
Plug in the mains power and turn on the switch (1).
You will hear a signal tone and the screen of the Computer will light up.
OVER-CURRENT PROTECTOR:
There is an over-current protector (2) located on the right side of the switch (1) (see above picture); in
case of short circuit or over-current, the Button of the over current protector will pop up and the treadmill
will power off; please unplug the power source and push down the button, and then turn on the switch to
restart your workout. If the button pops up again, please contact Argos.
12
45

A Quick Incline Select
B Quick Speed Select
C Start
D Stop
E Incline-
F Speed+
G Incline+
H Speed-
I MODE
J Prog
K Bluetooth
L Heart rate
M Cal
N Speed
O Incline
P Dis
Q Time
R Incline+
S Incline-
T Speed+
U Speed-
Computer Instruction
13
Front view of the Computer

TECHNICAL SPECIFICATION
Time---------------------------------0:00--99:59 Min
Speed-------------------------------1.0--16.0 km/h
Distance----------------------------0.0--99.9 km
Calorie------------------------------0.0--999Kcal
Incline-------------------------------0--15%
Pulse--------------------------------50--200 Times/ Min
START
Press to start exercise at initial speed 1.0km/h
STOP
Press during workout, and the treadmill will stop
by gradually reducing the speed and incline.
Press again all display window will be cleaned
to zero.
QUICK SPEED SELECT
Press to select your desired running speed with 3, 6,
9, 12km/h
QUICK INCLINE SELECT
Press to select your desired running deck incline
with 3%, 6%, 9%, 12%.
SPEED UP/DOWN
Press to increase/decrease exercise speed by
0.1km/km
Press to select training time under program
workout model
Press to choose the desired training target
(Time, Distance, Calorie) under training target
control workout model.
INCLINE UP/DOWN
1. Press to increase/decrease running deck
incline by 1%
2. Press to select training time under program
workout model
3. Press to choose the desired training target
(Time, Distance, Calorie) under training target
control workout model
MODE
Press to select training target workout mode
PROGRAME
Press to select workout program (P01—P10).
CLOCK SET
During standby, pull away the safety key, Press
“Speed + ” and “Speed - “ key on the console
simultaneously for 3 seconds to enter clock setting.
Press “Incline +” or “Incline -” key to adjust clock time.
Press “Mode” key to change “Hour” and “Minute”.
Finish setting, Press “Mode” key to enter time
BLUETOOTH
Turn your mobile phone Bluetooth on,connect with
your treadmill(JX-663SW), then you can:
1.Play your mobile phone music,adjust the volume
by your mobile phone;
2.Press Bluetooth key to answer coming calls, press
it again to end the call.
Computer Operation
Functions and Operations
Functions and Operations
14

IMPORTANT
1. The console will turn off automatically about
ten minutes after the belt has stopped.
2. The pulse function is for reference only, and
not to be used for medical purpose.
SAFETY KEY
1. The safety key must be placed into the
magnetic recess on the console in order to
operate the treadmill. Always place the safety
key on its position and attach the clip to your
clothing at your waist before beginning your
workout.
2. If you should encounter problems and need to
stop the motor immediately, simply pull the
safety key away from the console; to continue
operation, simply turn the power switch to off,
set the speed controller to stop and then
reinsert the safety key into the console.
GENERAL OPERATION
1.Turn on the Power Switch at the front of your
Treadmill. This switch is located next to the
Mains Power Cord inlet.
2.Place the Safety Key into the magnetic recess
on the middle front of the Computer
Console.
The console will give an audible signal and all
console window displays will function with a start
display value of 0.
Note: If the Safety Key is not placed correctly or is
faulty, the “Distance” window will display "E00",
which indicates that the treadmill will not operate.
If the Safety Key falls off during exercise, the
console will give an audible signal and “Distance”
window will display “E00” and the treadmill will
stop.
To stop the treadmill in an emergency, simply pull
the safety key off its mount in the console front or
simply press the red STOP button in the center of
the console. It is important that you connect the
clothing clip to your shirt or other suitable clothing
during exercise to ensure that this safety system
can operate easily.
To get a pre-exercise pulse rate, simply hold both
Hand Pulse Sensors on either side of the
Handlebar Supports for 5 seconds. The Pulse
Range is between 50 ~ 200 Beats per Minute.
Note: The readings displayed by the computer
should not be used for therapeutic purposes as
they can vary due to the sensitivity of the
equipment and the available pulse signal put out
by individuals’ palms. To get the best accurate
readings, keep the hands placed flat and firm on
the PULSE PADS for 10 to 20 seconds, as this will
allow the pulse reading to average and then settle.
Computer Operation
15
Functions and Operations

3. STARTING YOUR TREADMILL
1. Turn on the treadmill, and press “Start” button
on the console.
2. Press “Speed +” or “Speed -” button to adjust
speed or press handle “Speed + or Speed -”
button to adjust speed. Press the key once,
and the speed changes 0.1Km/H.
3. Press “Incline up” or “Incline down” button to
adjust running deck incline or press handle
“Incline + or Incline -” button to adjust running
deck incline. Press the key once, and the
incline changes 1%.
4. Also the user can press the “Quick Speed
Select” and the “Quick Incline Select” button
to select desired running speed and incline.
STOPPING YOUR TREADMILL
23. Press the “Speed -” and “Incline -” button on
the console, adjust or press handle “Speed -”
and handle “Incline -” button to reduce the
speed and deck incline to lower, then press
the “Stop” key on the Console, and the
treadmill will stop; turn off the switch if you
intend to finish workout.
24. Pull away the Safe Key and the treadmill will
stop itself, and then “Distance” window will
display “E00”.
1. TRAINING TIME CONTROL WORKOUT
MODE
1. Turn on the treadmill,press the “Mode” button
one time, and the “Time” window flashes and
displays “15:00”, which is the pre-set training
time of the treadmill. Press “Speed +” / “Speed
-” or press “Incline +”/ “Incline -” button to
select your desired training time, (the range is
5:00—99:00).
2. Press “Start” button to start your workout, the
time data will reduce gradually during your
training and the treadmill will stop
automatically when the “Time” window
displays “0:00”.
TRAINING DISTANCE CONTROL
WORKOUT MODEL
Turn on the treadmill, press the “Mode” key
two times, and the “Dis” (Distance) window
flashes and displays “1.00”, which is the
pre-set training distance of the treadmill.
Press “Speed +” / “Speed -” or press “Incline
+”/ “Incline -” button to select your desired
training distance (the range is 0.5—99.9).
Press “Start” button to start your workout, the
time data will reduce gradually during your
training and the treadmill will stop
automatically when the “Dis” (Distance)
window displays “0.0”.
BURNING CALORIE CONTROL WORKOUT
MODEL
1. Turn on the treadmill
,
press the “Mode” button
three times continuously, the “Cal” (Calorie)
window flashes and displays “50.0”, which is
the pre-set burning calories of the treadmill.
Press “Speed +” / “Speed -” or press “Incline
+”/ “Incline -”button to select target burning
calories (the range is 10.0---999).
2. Press “Start” button to start your workout, the
calories data reduce gradually during your
training, and the treadmill will stop
automatically when the “Cal” (Calorie) window
display “0.0”.
2. SPEED AND INCLINE ADJUSTMENT
In any training target control workout model,
press “Speed +” /“Speed -” button or press the
“Quick Speed Select” button to choose your
desired running speed.
In any training target control workout model,
user can press “Incline +” / “Incline -” button or
press the “Quick Incline Select” button to
choose your desired running Incline.
16
Computer Operation
Functions and Operations
Functions and Operations

3. Program Workout Model (P01—P10)
In this mode, the user has a choice of Program
P01 – Program P10.
1. Press the “Prog. ” button, the “Program” window
will display “P01” and the “Time” window will
display “30:00”, which is the preset time of the
treadmill for each program.
2. Press “Speed +” / “Speed -” or “Incline +”/
“Incline -” button to select your desired workout
time (the range is: 5:00---99:00).
3. Press “Start” button and the treadmill will count
down three and start operation. The start speed
depends on the program you have chosen.
4. For all preset values, please refer to following
table and diagrams.
Any of the training program levels has 10 segments,
and each segment time is 1/10 of total setting time;
during any training segments, press the “Speed +” /
“Speed -” button to adjust training speed or press
“Incline +”/ “Incline -” button to adjust deck incline.
Starting incline and speed for each program
Program
Start Incline
Start Speed
P01
1%
1.5Km/h
P02
1%
3.0Km/h
P03
2%
4.5Km/h
P04
2%
3.0Km/h
P05
3%
3.0Km/h
P06
3%
7.5Km/h
P07
4%
3.0Km/h
P08
4%
1.5Km/h
P09
5%
3.0Km/h
P10
4%
1.5Km/h
Computer Operation
17
Functions and Operations

Computer Operation
18

1. PULSE CONTROL WORKOUT MODE
Turn on the treadmill, press “Prog.” button
until the “Dist.” window display “HP1”. “Time”
window displays “30:00” which is the treadmill
pre set workout time for pulse control workout
mode.
Press “Speed +” or “Speed -” button or press
“Incline +” or “Incline -” button to choose your
desired training time.
Press the “Mode” button, the “Speed” window
is displaying “30” - which is the treadmill pre
set user’s age. Press “Speed +” or “Speed -”
button (or press “Incline +” or “Incline -”
button ) to choose your correct age
Press the “Mode” key again, “Speed” window
is displaying your target heart rate date
according to your age (Please refer next page
to the target heart rate table ), you can press
“Speed +” or “Speed -” button (or press
“Incline +” or “Incline -” button) to choose your
desired target heart rate date.
Press “Mode” key to enter your setting
information when starting your workout, the
treadmill will run with the speed 1.0km/h for
about 1mins warm up, grasp the two handle
pulse sensors with your two hands, then the
treadmill will run automatically according to
user’s heart beat rate, every 10 seconds
increasing by 0.5Km/h. Once the treadmill
speed is on 8Km/h, but the heart rate is lower
than the setting data, then the treadmill will
increase incline by 1% every 10 seconds to
reach your setting heart rate.
When your heart rate is over your setting heart
rate, then the treadmill will decrease incline by
1% every 10 seconds, if user’s heart is still
over your setting heart rate, then the treadmill
will decrease running speed by 0.5Km/h until
our heart rate is lower than your setting heart
beat rate.
The treadmill has three pulse control workout
modes, press “Prog.” button to select “HP1”
“HP2 “ or “HP3”.
Note: HP1 Pulse Control Workout Mode, the
treadmill default Max running speed is
8Km/h, HP2 and HP3 Max running speed is
9/10Km/h. We recommend you to read
target heart rate zone table on page 20
carefully before you starting Pulse Control
Workout.
Computer Operation
19
Functions and Operations
/