www.trojanhealth.co.za
#
1
HOME
FITNESS
SOUTH AFRICA’S
SINCE
1981
0861 876526
0861 TROJAN
WARRANTY
TROJAN
MY SPACE MY TIME
®
CAUTION
READ ALL PRECAUTIONS AND
INSTRUCTIONS IN THIS MANUAL
BEFORE USING THIS EQUIPMENT.
KEEP THIS MANUAL FOR
FUTURE REFERENCE
TREADMILL ASSEMBLY, CARE
AND INSTRUCTION MANUAL
CARDIO COACH 460
TREADMILL

INDEX PAGE
1. SAFETY INSTRUCTIONS 3
2. PRE ASSEMBLY CHECK LIST 5
3. HARDWARE LIST 6
4. ASSEMBLY STEPS 7
5. UNFOLDING/FOLDING/TRANSPORT 9
6. MAINTENANCE 10
7. GROUNDING INSTRUCTIONS 11
8. COMPUTER FUNCTIONS 12
9. FITNESS TIPS & TECHNIQUES 20
10. CONDITIONING GUIDELINES 21
11. WARM -UP AND COOL-DOWN 22
12. FREQUENTLY ASKED QUESTIONS 23
13. PARTS LIST 24
14. EXPLODED DRAWING 26
15. TROJAN 1 YEAR LIMITED WARRANTY 27
16. TROJAN REPAIRS PROCEDURE 28

10204M-3
1. SAFETY INSTRUCTIONS
It is the sole responsibility of the purchaser of TROJAN products to read the owner’s manual, warning labels and instruct all
individuals on proper usage of the equipment. Understanding each and every warning to the fullest is important. If any of these
instructions or warnings are unclear please contact TROJAN Customer Services on 0861 876 526 (0861 Trojan), within the Republic
of South Africa.
The equipment is only intended for HOME USE and is NOT INTENDED FOR COMMERCIAL, INSTITUTIONAL AND/OR
STUDIO FACILITIES USE.
Contact TROJAN with any questions regarding this classification. It is recommended that all users of TROJAN be informed of the
following information prior to use.
HEALTH WARNING
• Beforestartinganyexerciseorconditioningprogramyoushouldconsultwithyourpersonalphysiciantoseeifyourequirea
completephysicalexam.Thisisespeciallyimportantifyouareovertheageof35orhaveneverexercised,arepregnantorsuffer
from any illness.
• Ifatanytimeduringexerciseyoufeelfaint,dizzyorexperiencepain,stopexercisingimmediatelyandconsultyourphysician.
• Toavoidmuscularpainandstrain,begineachworkoutbystretchingandwarmingupandendeachsessionbycoolingdownand
stretching.
ACCESS CONTROL
TROJAN recommends that all fitness equipment be used in a supervised area. It is recommended that the equipment be located in
an access controlled area. Control is the responsibility of the owner. Keep children away from all equipment. Parents or other
supervising adults must provide close supervision of children if the equipment is used in the presence of children.
INSTALLATION
TROJAN recommends that all equipment:
• Besecuredtoorsetuponasolid,levelsurfacetostabiliseandeliminaterockingortippingoverduringtraining.
• Besetupinsideyourhomeawayfrommoistureanddust(theequipmentisnotdesignedforoutdooruse).
• Besetupwithsufcientventilationtoensureproperoperation.
• Besetupwithsufcientspacearoundtheequipmentsothatallexercisescanbecompletedsafely.Itis
recommendedthatthereshouldbeatleast1mofspacearoundtheequipmentwhereaccessisrequiredtoexercise.
Fortreadmillsitisrecommendedthatyouhave2mofspacebehindtherunningdeck.
• Beinstalledbyourteamofinstallers.
PROPER USAGE
• Donotusetheequipmentinanywayotherthanasdesignedorintendedbythemanufacturer.Itisimperativethat
TROJAN equipment is used properly to avoid injury.
• Injuriesmayresultfromexercisingimproperlyorexcessively.
• YourTROJANequipmentshouldonlybeusedbyonepersonatatime.
• Becarefultomaintainyourbalancewhileusing,mounting,dismounting,folding,unfoldingorassemblingyourTROJAN
equipment to avoid injury.
• Servicingotherthantheproceduresinthismanualshouldbeperformedbyanauthorizedservicerepresentativeonly.
• DANGER:Alwaysunplugthepowercordbeforecleaninganyequipmentpoweredbyelectricity.

10204M-4
INSPECTION
• Donotuseorpermituseofanyequipmentthatisdamagedorhaswornorbrokenparts.ForallTROJANequipmentuse
only replacement parts supplied by TROJAN.
• Alwaysmakesurethatallnutsandboltsaretightenedpriortoeachuse.
• Beltsposeanextremedangerifusedwhenfrayed.Alwaysreplaceanybeltatrstsignofwear.
• Maintainlabelsandnameplates–donotremovelabelsforanyreason.Theycontainimportantinformation.
• Equipmentmaintenance–Preventativemaintenanceisthekeytosmoothoperatingequipment.Pleaseensurethatyou
follow our maintenance tips to ensure the continued correct function of your TROJAN equipment.
• Beforeanyuse,examineallaccessoriesapprovedforusewiththeTROJANequipmentfordamageorwear.
• ShouldyourTROJANequipmentappeardamagedorworn,donotattempttouseorrepairtheequipmentyourself.
Please contact our service department on 0861 876526 (0861 Trojan) to arrange a repair.
OPERATING WARNINGS
• Itisthepurchaser’sresponsibilitytoinstructallusersastotheproperoperatingproceduresofallTROJANequipment.
• Keepchildrenawayfromallmovingpartsandawayfromallstrengthequipment.Parentsmustprovideclosesupervisionof
children if the equipment is used in the presence of children.
• Donotwearloosettingclothingorjewellerywhenusingtheequipment.Itisalsorecommendedthatuserstieuplonghair
to avoid contact with moving parts.
• Ensurethatanyonenotusingtheequipmentstaysclearoftheuser,accessoriesandmovingpartswhilethemachineisin
operation.
ELECTRICAL SAFETY
• Keepthepowercordawayfromheatedsurfaces.
• Neverusetheequipmentifthepowercableorplugisfrayedordamaged.
• Neverusetheequipmentifthecord,equipmentorsurroundingoorareaiswetordamp.
• Allelectricalproductsmustbegrounded.Thisproductissupplierwiththenecessarygroundingconnections.
• Donotmodifytheplugprovidedwiththeproduct.Iftheplugwillnottintothepoweroutlet,haveaproperoutletinstalledby
a qualified electrician.
USER WEIGHT LIMITATIONS
• ThisTROJAN CARDIO COACH 460 maynotbeusedbypersonsweighingmorethan130kg.
SAVE THIS INSTRUCTION MANUAL FOR FUTURE USE AND REFERENCE
If any of these instructions or warnings are unclear please contact TROJAN Customer Services on 0861 876526 (0861 Trojan),
within the Republic of South Africa or visit www.trojanhealth.co.za.
1. SAFETY INSTRUCTIONS

10204M-5
Consol
Safety Key
Hand Pulse
Upright
Running Belt
Main Frame
Wheel
2. PRE ASSEMBLY CHECK LIST
Thank you for choosing the TROJAN CARDIO COACH 460 treadmill. We take great pride in producing this quality
product and hope it will provide many hours of quality exercise to make you feel better, look better and enjoy life to its
fullest.
Yes, it is a proven fact that a regular exercise program can improve your physical and mental health. Too often, our
busy lifestyles limit our time and opportunity to exercise. The TROJAN CARDIO COACH 460 treadmill provides a
convenient and simple method to begin your assault on getting your body in shape and achieving a healthier lifestyle.
Before reading further, please familiarise yourself with the parts that are labelled.
Read this manual carefully before using the TROJAN CARDIO COACH 460 treadmill.

10204M-6
3. HARDWARE LIST
Item Description Qty Item Description Qty
85 Computer Consol 1 96 Hex Screw M8 x P1.25 x 100 6
1 Frame 1 94 Truss Hex Screw M8 x P1.25 x 15 6
81 Left Upright 1 120 Truss Philips Screw M6 x P1.0 x 15 2
82 Right Upright 1 97 Hex Wrench 6mm (80mm x 80mm) 1
88 Left Handrail Tube 1 98 Hex Wrench + Screwdriver 5mm 1
105 Upright Fixing Plastic 2 99 Silicon 1
100 Left Handrail Cover 1 93 Safety Key/Clip 1
101 Right Handrail Cover 1 107 Power Cord 1
92 Bottle 1
41 Truss Philips Self Tapping Screw Ø4 x 16 4
89 Right Handrail Tube 1 91
131
MP3 Sound Cable
Spring Washer
Washer
Lug Wrench
1
86 Cup Shelf 2
124 6
6
132 1

10204M-7
4. ASSEMBLY STEPS
Note:
• Two people are required to assemble the treadmill.
• Please follo
w the assembly steps to avoid injury.
STEP 1: Unpacking
even surface.
STEP 2: Upright Assembly
• Attach the Lower Control Wire of Frame (1) to the
Guide Thread attached to the Right Upright (82).
• Place the Left and Right Uprights (81, 82) and Upright
Fixing Plastic onto Fr
ame (1) and secure with three
Hex Screws (96) , three Spring Washer (131) and
three Washer (124) on each side.
Note: While assembling the uprights, one person should
hold the uprights to prevent them falling over.
STEP 3: Handrail Assembly
• Place the Left and Right Handrail Tubes (88, 89)
above the uprights and connect the Control Wires in
Uprights with the corresponding wire in Handrail Tube
(89).
• Secure the Handrail Tubes (88, 89) and the Uprights
with three Hex Screws (94) on each side
.
CAUTION:
Ensure that cables are not damaged
during assembly or when tightening screws.
CAUTION:
Ensure that cables are not damaged
during assembly or when tightening screws.

10204M-8
CAUTION:
Ensure that cables are not damaged
during assembly or when tightening screws.
Recheck
all bolts and nuts are
tightened securely
before using the machine
STEP 4: Consol Assembly
• PlacetheComputerConsol(85)abovetheHandrail
Tubes then connect the Control Wires in the
Handrail to the corresponding wires in the Computer
Consol (85).
• SecuretheComputerConsol(85)ontothe
Handrail Tubes with 1 Truss Philips Screw (120) and 2
Truss Philips Self Tapping Screws (41) on each side.
STEP 5: Cover Assembly
• ClipCovers(100,101)ontotheHandrails.
• PlacetheCupShelves(86)intotheComputer
Consol.
• UntietheLoincloth.

10204M-9
FOLDING
This treadmill can be folded for storage.
• Switchoffthetreadmillandremovetheplugfromthe
power supply.
• Standbehindthetreadmillandlifttherunningdeck
upwardsuntilitlocksintoplace.Besuretohearthedeck
“click”intotheuprightposition.
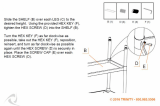
UNFOLDING
• Ifyouwanttousethetreadmill,holdtherunningboard
withbothhandstopreventitfromfallingunexpectedly.
• Steponthexingplate(A)asshowninthedrawing.
• Whentherunningdeckdisengagesfromthelocking
mechanism,pulldowngentlyontherunningdeck.
• Releasetherunningdeck,andthetreadmillwillslowly
fall to the ground automatically.
TRANSPORTING
• Placeyourrightfootontotherightbasefoottube.
• Withtwohandsholdingtheleftandrighthandgriptubes,
pull the treadmill toward you.
• Youcannoweasilymovethetreadmilltothedesired
position by pushing it on its wheels.
5. UNFOLDING / FOLDING / TRANSPORT
CAUTION:
• TheCylindercontainshighpressuregas.
• IftheCylinderishit,itmightbedamagedandaffectthe
smooth operation of the folding and unfolding mechanism.
(A)

10204M-10
HOW TO APPLY LUBRICANT
• Liftonesideoftreadbelt.
• Pouronehalfofthelubricantbottleunderthecentreofthetreadbeltonthetopsurfaceofthetreadboard.
• Walkonthetreadmillataslowspeedfor3to5minutestoevenlydistributelubricant.
NOTE: DO NOT over lubricate treadboard. Any excess lubricant that comes out should be wiped off.
NOTE: ONLY USE HALF THE BOTTLE OF LUBRICANT PER APPLICATION.
• NOTE:Ifyourlubricantisnished,thetreadbeltcanbelubricatedwithDubbin.
LUBRICATION SCHEDULE
• Checkthetreadboardlubricationduringinstallation.Ifit’snecessary,lubricatethetreadboardusingonehalfofthe
lubricantprovided,beforeusingthetreadmillforthersttime.
• Ifthetreadmillisusedonaregularbasis,therunningdeckshouldbelubricatedonceamonth.
• Ifthetreadmillhasnotbeenusedfortwomonthsormore,thetreadboardmustbelubricatedbeforeuse.
6. MAINTENANCE
HOW TO CHECK TREADBELT FOR PROPER
LUBRICATION
•Liftonesideofthetreadbeltandfeelthetopsurfaceofthe
treadboard.
•Ifthesurfaceisslicktothetouch,thennofurtherlubricationis
required.
•Ifthesurfaceisdrytothetouch,applyonepacketoflubricant
or half of the bottle of lubricant.
BELT TRACKING ADJUSTMENT
• Ifduringuseyounoticethattherunningbelteithershiftstotherightortheleftofcentre,switchoffthetreadmill,
remove the “Safety Key” and unplug the equipment from the AC power source.
• Iftherunningbeltshiftsleft,usingHexwrenchprovided,turn
the left rear roller adjustment clockwise no more than 1/4” of a turn
(if the running belt shifts right, adjust the right rear roller).
• RemovetheHexwrench,insertthe“SafetyKey”andinsertthe
AC power cord into the AC outlet. Turn on your treadmill and
observe after running for a few minutes to see if the problem
has been corrected.
• Thismaytakeseveraladjustments,sorepeattheaboveprocedure.
Your treadmill should require little maintenance other than to periodically apply lubricant. Lubricating under the
treadbeltwillensuresuperiorperformanceandextendthetreadmill’slifeexpectancy.

10204M-11
7. GROUNDING INSTRUCTIONS
This product must be grounded. If a malfunction or breakdown occurs, grounding provides a path of least resistance for
electric current to reduce the risk of electric shock. This product is equipped with a cord having an equipment-grounding
conductor and a grounding plug. The plug must be plugged into an appropriate outlet that is properly installed and
grounded in accordance with all local codes and ordinances.
DANGER - improper connection of the equiment-grounding conductor can result in a risk of electric shock. Check with
aqualiedelectricianorservicemanifyouareindoubtastowhethertheproductisproperlygrounded.Donotmodify
theplugprovidedwiththeproduct-ifitwillnotttheoutlet;haveaproperoutletinstalledbyaqualiedelectrician.
This product is for use on a nominal 220-240-volt circuit and has a grounding plug that looks like the plug illustrated in
thegure.Makesurethattheproductisconnectedtoanoutlethavingthesamecongurationastheplug.Noadaptor
should be used with this product.

10204M-12
8. COMPUTER FUNCTIONS
8.1 OPERATION INSTRUCTIONS
1. WEIGHT SETTING MODE
• DisplaysWTforonesecondafterpoweringon,beforeenteringintotheweightsettingmode(Caloriescalculationuse).
• PressSPEED+/-:Setweight:23~130kg;Setage:13-80.
• PressENTER:Conrmweightvalueandenterintoagesettingmode.ConrmagevalueandenterintoSTART/
READYmode.
• PressSTART:Computercountsdownfor3secondsandentersintoManualmode.
Window Display
• WeightSetting:Upperscreendisplays[WT],Lowerdotmatrixdisplays[KG]inMetricUnitand[LBS]in
English Unit.
• AgeSetting:Upperscreendisplays[AGE].
• Window:Weightsettingdisplaysweightvalue:Agesettingdisplaysagevalue.
Start/Ready Mode
• UnderSTART/READYmode,thedisplayalternatesbetweentheProleofProgram1-Program10.
• PressProgramFastKey:SwitchbetweenProgram1-Program10,TimeCountdown,DistanceCountdown,Calories
Countdown,HRC65%-HRC85%,HRCTarget,USER1,USER2,BODYFAT.
• PressSTART:Computercountsdownfor3secondsandentersintoManualmode.
Window Display:
• DisplaysSpeedandInclineProleofProgram1-Program10inturn.
2. MANUAL MODE
General Mode
• PressSTART:Computercountsdownfor3secondsandentersintosportmode(allthevaluescountup).
• PressSTOP:ReturntoSTART/READYmode.
Sport Mode
• PressSPEED+/-:Setspeed.
• PressINCLINE+/-:Setincline.
• PressSTOP/RESET:Stoprunning.
• PressSTART:Countdownfor3secondsandenterintosportmode
• PressFASTKEY:Speedfastkeyadjustment:1-10km/hr,inclinefastkeyadjustment:L0,L2,L4,L6,L8,L10.

10204M-13
8. COMPUTER FUNCTIONS
Window Display
• WindowDisplay:Speed,Incline,Time,Distance,CaloriesandPulse.DotMatrixdisplaysProleofSpeed
and Incline.
3. GOAL MODE
General Mode
• PressProgramFastKey:SwitchbetweenProgram1-Program10,TimeCountdown,DistanceCountdown,Calories
Countdown,HRC65%-HRC85%,HRCTarget,USER1,USER2,BODYFAT.
• PressGOAL:GOALmodeincludesTimeMode,DistanceMode,CaloriesMode.UnderSTART/READYmode,useGOALto
switch between functions.
• PressENTER:Enterintosetting.
• PressSTART:Computercountsdownfor3secondsandentersintosportmode.
• PressSTOP/RESET:ReturntoSTART/READYmode.
• Undereachdifferentmode,thecorrespondingsymbolisblinkinginthedisplaywindowanddisplaysthedefaultvalue.
The other windows will display the related default values.
Time Mode
• Presetvalueis20minutes.
• PressSPEED+/-:Adjusttargettime(5:00-99:00).
• PressSTART:Computercountsdownfor3secondsandentersintosportmode.
• PressSTOP/RESET:ReturntoSTART/READYmode.
Distance Mode
• Presetvalueis5Km.
• PressSPEED+/-:Adjusttargetdistance(1Km-99.0Km).
• PressSTART:Computercountsdownfor3secondsandentersintosportmode(allthevaluescountup).
• PressSTOP/RESET:ReturntoSTART/READYmode.
Calories Mode
• Presetvalueis200Calories.
• PressSPEED+/-:Adjusttargetcalories(40Calories-999Calories).
• PressSTART:Computercountsdownfor3secondsandentersintosportmode(allthevaluescountup).
• PressSTOP/RESET:ReturntoSTART/READYmode.
Sport Mode
• PressSPEED+/-:Setspeed.
• PressINCLINE+/-:Setincline.
• PressSTOP/RESET:Stoprunning.
• PressSTART:Computercountsdownfor3secondsandentersintosportmode.
• PressFASTKEY:Speedfastkeyadjustment:1-10km/hr,inclinefastkeyadjustment:L0,L2,L4,L6,L8,L10.
4. PROGRAM MODE
General Mode
• PressProgramFastKey:SwitchbetweenProgram1–Program10,TimeCountdown,DistanceCountdown,Calories
Countdown,HRC65%-HRC85%,HRCTarget,USER1,USER2,BODYFAT.
• PressP1-P10:UnderSTART/READYmode,usetheFastKeytoswitchbetweenProgram1–10.Aftersetting
P1–P10,thecomputerautomaticallyentersintotimesetting.
• PressSTART:Computercountsdownfor3secondsandentersintosportmode.
• PressSTOP/RESET:ReturntoSTART/READYmode.
• ProgramwindowwilldisplaythecurrentselectedProgramNumber.

10204M-14
8. COMPUTER FUNCTIONS
Setting Mode
• Presetvalueis20minutes.
• PressSPEED+/-:Adjusttargettime(5:00-99:00).
• PressSTART:Computercountsdownfor3secondsandentersintosportmode.
• PressSTOP/RESET:ReturntoSTART/READYmode.
• PressENTER:EnterintoLEVELadjustment.Eachtimeyouadd1LEVELthespeedwillincreaseby1.0km/hrand
inclinewillincreaseby1LEVEL.Thereareamaximumof5LEVELS.
Sport Mode
• PressSPEED+/-:Setspeed.
• PressINCLINE+/-:Setincline.
• PressSTOP/RESET:Stoprunning.
• PressSTART:Computercountsdownfor3secondsandentersintosportmode.
• PressFastKey:Speedfastkeyadjustment:1-10km/hr,inclinefastkeyadjustment:L0,L2,L4,L6,L8,L10.
5. HRC MODE
General Mode
• PressProgramFastKey:SwitchProgram1–Program10,TimeCountdown,DistanceCountdown,Calories
Countdown,HRC65%-HRC85%,HRCTarget,USER1,USER2,BODYFAT.
• PressHRC:HRCmodeincludesheartratetarget(65%,75%or85%).UnderSTART/READYmode,useHRCto
switch to the desired rate.
• PressENTER:Undernon-targetmode,enterintoagesetting.Targetmodeentersintotheagesettingthersttime
you push ENTER and if you push it a second time it will enter into pulse setting.
• PressSTART:Computercountsdownfor3secondsandentersintocountdownmode.
• PressSTOP/RESET:ReturntoSTART/READYmode.
• UnderthedifferentHEARTRATEmodes,theDotMatrixwindowwilldisplaythecorrespondingheartratevalue.
Setting Mode
• PressSPEED+/-:Non-Targetmodecanadjustage(13-80);Targetmodecanadjusttargetpulsevalue.
• PressSTART:Computercountsdownfor3secondsandentersintosportmode(timecountsup).
• PressSTOP/RESET:ReturntoSTART/READYmode.
Sport Mode
• PressSPEED+/-:Setspeed.
• PressINCLINE+/-:Setincline.
• PressSTOP/RESET:Stoprunning.
• PressSTART:Computercountsdownfor3secondsandentersintosportmode.
• PressFastKey:Speedfastkeyadjustment:1-10km/hr,inclinefastkeyadjustment:L0,L2,L4,L6,L8,L10.
• After2minutes,computerbeginstodetectheartbeatchanges.Thecomputerupdatesthereadingonceevery10
seconds. Every time the computer detects a change it will automatically adjust the SPEED and INCLINE (up or down
asrequired).SPEEDisadjustedby0.2km/hrandINCLINEby1level.Ifnoheartbeatisdetectedafter2minutesof
startingthecomputerwilldisplayawarningsymbol.Ifnoheartbeatisdetectedcontinuouslyfor30secondsduring
exercise,thetreadmillwillstopautomatically.

10204M-15
8. COMPUTER FUNCTIONS
6. USER MODE
General Mode
• PressProgramFastKey:SwitchProgram1-Program10,TimeCountdown,DistanceCountdown,Calories
Countdown,HRC65%-HRC85%,HRCTarget,USER1,USER2,BODYFAT.
• PressU1,U2:UnderSTART/READYmode,useU1toswitchtoUSER1,useU2toswitchtoUSER2.Afterselectionthe
computer automatically enters into time setting.
• PressSTART:Computercountsdownfor3secondsandentersintosportmode.
• PressSTOP/RESET:ReturntoSTART/READYmode.
• UserwindowdisplaysthecurrentselectedUsernumber.
Setting Mode
• Presettimeis30minutes.
• PressSPEED+/-:Afterenteringintotimesettingmode,adjusttargettime(20:00-99:00).AfterenteringintoProle
setting mode, set SPEED or INCLINE value.
• PressSTART:Computercountsdownfor3secondsandentersintosportmode.
• PressSTOP/RESET:ReturntoSTART/READYmode.
• PressEnter:SwitchbetweenTIMEsetting,SPEEDsetting,INCLINEsetting.
Sport Mode
• PressSPEED+/-:Setspeed.
• PressINCLINE+/-:Setincline.
• PressSTOP/RESET:Stoprunning.
• PressSTART:Computercountsdownfor3secondsandentersintosportmode.
• PressFastKey:Speedfastkeyadjustment:1-10km/hr,inclinefastkeyadjustment:L0,L2,L4,L6,L8,L10.
7. BODY FAT MODE
General Mode
• PressProgramFastKey:SwitchProgram1–Program10,TimeCountdown,DistanceCountdown,CaloriesCountdown,
HRC65%-HRC85%,HRCTarget,USER1,USER2,BODYFAT.
• PressBodyFat:UseBODYFATtoswitchtoBODYFATmode.
• PressSTOP:ReturntoSTART/READYmode.
• UnderBODYFATmode,DotMatrixdisplaysBODYFAT.

10204M-16
Setting Mode
• PressENTER:Setage,height,sexandweightinturn,afterconrmingweight,thecomputerbeginstotestfat.
• PressSPEED+/-:Adjustpresetvalues.
• DotMatrixwindowdisplaysBODYFAT.
Body fat mode
• PressSTOP/RESET:ReturntoSTART/READYmode.
• Aftersettingweight,thecomputerbeginstodetectheartbeatandBODYFATwindowwilldisplay---.Aftersuccessfullycalculating
BODYFAT,theBODYFATwindowwilldisplaythefatvalue.
• Ifnopulseisdetected,screendisplaysHOLDGRIP.
8. COOL DOWN MODE
General Mode
• PressSTART:Computercountsdownfor3secondsandentersintosportmode.
• PressSTOP/RESET:Returntostart/readymode.
Sport Mode
• PressCOOLDOWN: EnterintoCOOLDOWNmode.
Cool Down Mode
• PressSTOP/RESET:Stoprunning.
• Thecomputercountsdownfor4minutes.ThespeedvaluewillhalvebeforeenteringintoCOOLDOWNmodeandthespeed
willhalveeveryminutethereafteruntilthetimeisup,thenitwillreturntoSTART/READYmode.
9. RECOVERY MODE
General Mode
• PressRECOVERY:Duringworkout,pressSTOPtostoprunning.PressRECOVERYtoenterintoRECOVERYmode.
Recovery Mode
• Ifaheartbeatsignalisdetected,theheart-shapedpicturewillalternateonthescreen(seebelow).
• Ifnoheartbeatsignalisdetected,thescreendisplaysquestionmark.
• Holdthehandgrippulseuntilthe60secondscountdownisover.Theresultwilldisplayinthescreen.
There are 6 Levels, F1 ~ F6, F1 is the best and F6 is the worst.
F1: >24
F2: 20~24
F3: 15~19
F4: 10~14
F5: 05~09
F6: 00~04
8. COMPUTER FUNCTIONS

10204M-17
8.2 OTHER FUNCTIONS INSTRUCTIONS
1. SAFETY KEY FUNCTION
• Duringworkout,inthecaseofanemergency,pulloutthesafetykeytostopthetreadmill.
• Ifyoupulloutthesafetykeyduringworkout,thespeedwillstopandinclinewillstayintheangleitwaspriorto
stopping.Whenyoure-insertthesafetykey,thecomputerwillindicatetheinclinevaluepriortostoppingandallthe
valueswillbezero.
2. METRIC UNIT AND ENGLISH UNIT SWITCH
• UnderSTART/READYmode,pressandholdENTERfor10secondstoenterintoMetricandEnglishunitsettingmode.
• PressINCLINE+/-:Adjustpresetvalue,KMrepresentsMetricunit,MILrepresentsEnglishunit.
• PressENTER:Conrmthesetvalueandrestartthetreadmill.
3. SCALE
Original CountdownSettingOriginalValue Countdown Setting Display range
TIME (Min : Sec) 0:00 20:00 5:00-99:00 0:00-99:59
SPEED (Km/h) 0.8 N/A N/A 0.8-20.0km/hr
DISTANCE (Km) 0.00 N/A 1.0-99.0 0.0-99.9
CALORIES (Calories) 0 N/A 40-999 0-999
PULSE (BPM) HP N/A N/A 40-220
Body Fat (Sex)
30
170
70
1
N/A N/A
0-11
3-80
120-200
23-130
Body Fat (Age)
Body Fat (Height)
Body Fat (Weight)
HRC (Age) 30 N/A N/A 13-80
Original CountdownSettingOriginalValue Countdown Setting Display range
TIME (Min : Sec) 0:00 20:00 5:00-99:00 0:00-99:59
SPEED (Mil/h) 0.5 N/A N/A 0.5-12.5 mil/hr
DISTANCE (Mil) 0.00 N/A 1.0-99.0 0.0-99.9
CALORIES (Calories) 0 N/A 40-999 0-999
PULSE (BPM) HP N/A N/A 40-220
Body Fat (Sex) 1
N/A N/A
0-11
3-80
3’11”-6’7”5
0-286 LBS
Body Fat (Age) 30
Body Fat (Height) 5’7”
Body Fat (Weight) 150 LBS
HRC (Age) 30 N/A N/A 13-80
8. COMPUTER FUNCTIONS

10204M-18
8.3. PROGRAMS
8. COMPUTER FUNCTIONS

10204M-19
8. COMPUTER FUNCTIONS

10204M-20
AEROBIC EXERCISE
Aerobic exercise is any sustained activity that sends oxygen to your muscles via your heart and lungs. Aerobic exercise
improvesthetnessofyourlungsandheart-yourbody’smostimportantmuscle.Aerobicexercisetnessispromoted
by any activity that uses your large muscles (arms, legs, or buttock, for example). Your heart beats quickly and you breathe
deeply. An aerobic exercise should be part of your entire exercise routine.
WEIGHT TRAINING
Along with aerobic exercising which helps get rid of and keep off the excess fat that our bodies can store, weight train-
ing is an essential part of the exercise routine process. Weight training helps tone, build and strengthen muscle. If you
are working above your target zone, you may want to do a lesser amount of reps. And as always consult your physician
before beginning any exercise program.
MUSCLE CHART
TREADMILL
The exercise routine that is performed on the treadmill will develop the lower body muscle group as well as condition
the circulatory system and provide a good aerobic workout . These muscle groups are highlighted on the muscle chart
below.
9. FITNESS TIPS AND TECHNIQUES
Page is loading ...
Page is loading ...
Page is loading ...
Page is loading ...
Page is loading ...
Page is loading ...
Page is loading ...
Page is loading ...
/