Page is loading ...

1
1
3 2
4
5
Step 4
Getting Started
•
•
•
•
5
( / )
( )
•
•
•
•
•
•
•
4
3
1
2
•
•
Rider 530
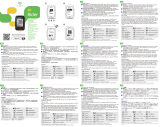
Before first use, please charge your device for at least 4 hours.
To begin 1. Press to turn on the device. 2. Press to select the display language and
press to confirm the selection. 3. Device will search for satellite signals. 4. After GPS
signal is fixed *, ( ) just ride on and enjoy your workout in free cycling mode, and to
record, press to start recording.
*To get GPS acquisition, please take the device to an open sky outdoor environment.
Step 3Step 2Step 1
BACK ( )
LAP/OK
UP ( )
PAGE ( )ON/OFF
Press to return to the previous page or
cancel an operation.
In Menu, press to enter or confirm a
selection.
In Meter view, long press to
enter into Shortcut Menu.
When recording, press to pause
recording. Press it again to stop recording.
When recording, press to mark the lap.
In free cycling, press to start recording.
Press and hold to turn the device off.
In Meter view, press to switch
meter screen page.
In Menu, press to move up to
scroll through menu options.
In Meter view, press to switch
meter screen page.
In Menu, press to move down to
scroll through menu options.
Press to turn the device on.
EN
Language
Français
简中
English
Speed
Speed
Dist. RTime
Speed
Dist. RTime
Altitude
Ride Time
Distance
Press to turn on/off backlight.

EN
1. In the Main Menu, select View History > View to select the desired tracks. 2. Select
Create Track 3. Enter a name of the track and press to save it. 4. Press to be back
to the Main Menu. 5. Select Follow Track > View and select the saved track and press
to start following the track.
1
2
Icon Description
Follow Track
From 3rd Party Websites
From device History
Plan Trip via Bryton App
Notice
1. Download gpx files to your computer. 2. Use USB cable to connect the device to the
computer. 3. Copy the gpx files from your computer and paste to the Extra Files folder of the
device. 4. Remove USB cable. 5. In the Main Menu, select Follow Track > V
iew and press
to start following the track.
1. Download Bryton app. 2. Sign up / log in on Bryton app. 3. Select Plan Trip to set Start
point and Destination. 4. Download the planned trip to the device via Data Sync. 5. In the
Main Menu, select Follow Track > View and select the planned track and press to start
following the track.
With Follow Track feature, you can plan trip via Bryton App, use pervious rides from History
or download gpx tracks online.
Compass accuracy would be influenced by objects having magnetic field, such as magnet,
materials made of iron and electronic devices. Calibrate the compass outdoors and move
away from buildings and power lines. If you find the compass reading is inconsistent, please
calibrate the compass manually.
1. In Main Menu, select Settings > General > Compass Cal. 2. Move the device in a
figure motion till confirmation beep.
Calibrate the Compass
Compass
No Signal (not fixed)
Weak Signal (fixed)
Bike 1
Bike 2
Strong Signal (fixed)
Cadence Sensor Active
Speed Sensor Active
Power Status
Heart Rate Sensor
Active
Dual Sensor Active
Recording is paused
Bluetooth is enabled
Notification
Log Record in Progress
Current speed is faster/
slower than average speed
/
2

3
● Please go to corp.brytonsport.com>Support>Download to download User’s Manual.
Long press all three keys ( / / ) at the same time to reset the device.
1. Connect the device to your computer via USB cable. 2. Select fit files from Bryton folder in the
device. 3. Upload files to popular training sites including STRAVA, Training Peaks, Endomondo,
Map My Ride, Fit track and many more.
With the access to the internet, your Rider computer automatically updates GPS data, uploads
recorded tracks, downloads planned trips from app server and check for available firmware
update.
Note:
Share Your Tracks via USB
Note:
Reset Rider 530
Data Sync
Sync Data to / from Bryton App
● Firmware updates usually take longer to download and install, select NO if you prefer to update
it on your next sync.
● If your device UUID has been added to an Bryton account, QR code will not appear on your
device.
EN
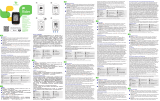
To perform Data Sync, please first go to your device: Settings>Network>Connect to set a
wireless network connection, then go to Data Sync in the main menu and let your Rider
computer smartly guide you through the syncing process.
To add. 1. Scan the QR code labeled on the device securing paperboard inside the box with
your smartphone to download Bryton App. 2. After Bryton App is installed, please sign up for a
new Bryton App account. 3. In the app, tap “Scan Now” to scan the same QR code labeled on
the device securing paperboard to add its UUID to your Bryton App account (or go to Bryton
App: Settings >User Settings>UUID later). 4. If a “successfully added!” message pops up on the
Bryon App, you have successfully added your device to your Bryton account. If not, please tap
“Retry” to scan again or enter the 16 digit device UUID number on the back of your device
manually.
It is required to add your device to your Bryton account before syncing data for the first time.

55
3
1 2
4
Mount Rider 530 to the Bike
Appendix
1
2

56
C
L
O
S
E
O
P
E
N
C
L
O
S
E
O
P
E
N
C
L
O
S
E
O
P
E
N
1
2
3
4
5
C
L
O
S
E
O
P
E
N
Install Heart Rate Belt (Optional)
Electrodes
Strap
Notice:
To prolong the life of your heart rate monitor, detach the sensor and clean the strap after
every use.

57
SP
E
ED
3
mm
SPEED
SPEED
SPEED
S
P
EED
SP
E
E
D
4a
5a
6a
7a
4b
5b
6b
7b
3
mm
CADENCE
6c 7c
Install the Speed/Cadence/Dual Sensor
(Optional)
Speed
Turn Off
Status: active
ID XXXXXXXXX
Rescan
Cadence
Turn Off
Status: active
ID XXXXXXXXX
Rescan
Speed/CAD
Turn Off
Status: active
ID XXXXXXXXX
Rescan
Cadence
Turn Off
Status: active
ID XXXXXXXXX
Rescan
Speed/CAD
Turn Off
Status: active
ID XXXXXXXXX
Rescan
Speed
Turn Off
Status: active
ID XXXXXXXXX
Rescan
x2
2.5
mm
x2
2.5
mm
CADENCE
Speed
1c 2 31b1a
Dual SensorCadence
SPEED
SPEED
Remove battery tab
before use
x2
2.5
mm
x2
3.6
mm
x2
3.6
mm
x2
3.6
mm
x2
3.6
mm
5c4c
/


