
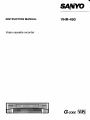
INSTRUCTION MANUAL
VHR”450
Video cassette recorder
G-CODEEiIi51
PAL

Pleaseread
carefullybefore
usingtheVCR.
Makesureto
makethese
settingsbefore
operatingthe
VCR.
1
i
■
✝
■
1
PRECAUTIONS
PARTS
INTRODUCTION
2
PREPARATION
. . . .. . . . . . . . . . . . . . . . . . . . . . . . . . . . . . . . . . . . . . . . . . . . . .
3
AND FUNCTIONS
.............................
5
Remote control batteries insertion ......7
CONNECTIONS
.................................................. 8
Aerial/Reconnection ........................... 8
AVconnection ..................................... 8
MENUS AND BASIC CONTROL ...............................
9
z.$Y,[email protected]
.,:,.,.,:,,,,.,
*.,,,.,X+,,,: ,,+
—.vti/ti/J...:.xsxm.*mJmYmm/m—
VCR PRESETTING ..............................................
11
D
Adjusting the TV receiver to the
video channel .....................................11
Language selection ............................. 11
VCR Tuning control adjustments ........ 11
Clock sefling .......................................l4
Changing the settings ......................... 14
3
BASICOPERATION
CASSETTE LOADING AND UNLOADING ....................15
PLAYBACK ......................................................
15
Normal playback .................................15
Tracking adjustment ...........................l6
Special playback .................................16
Endless play .......................................17
Counter memory ................................ 17
RECORDING TELEVISION BROADCASTS ...................18
Normal recording ............................... 18
Quick Start Recording (QSR) timer ....18

i
ON-SCREEN
OPERATION
G-CODE TIMER RECORDING PROGRAMMING ............ 19
On-screen programming .................... 19
Programming on the VCR display ...... 20
ON-SCREEN TIMER RECORDING PROGRAMMING ....... 22
TAPE SEARCH
Confirmation ...................................... 23
Cancelling .......................................... 23
FUNCTIONS
.................................. 24
Recording search functions ...............24
Blank search function ........................ 25
5
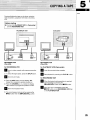
COPYING A TAPE
.............................................. 26
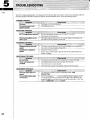
TROUBLESHOOTING .......................................... 27
OTHER
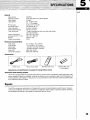
SPECIFICATIONS
.............................................. 28
Repairs .............................................. 28
NOTE
This manual covers the model VHR-430, which is sold in New Zealand and in Australia.
The warranty offered is different according on where the unit is sold, For customers in New Zealand, please
refer to the Warrantv card for New Zealand, For customers in Australia, Dlease refer to the Warrantv card and
to the Extended Marwfacturer’s Warranty Plan for Australia,
.,
Q
‘“2s
---.-..~e
-\.-
‘.
---
“-:+~%j-.
Warranty card for New Zealand Warranty card for Australia Extended Manufacturer’s
Warranty Plan for Australia
This VCR is based on a VHS-PAL signal system, Only video cassette bearing the ~ symbol can
be used.
2

INTRODUCTION
3
The unauthorized recording of television programmed, video tapes, films and other such
material may infringe upon copyright or the rights of third parties.
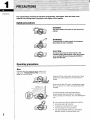
Safety precautions
DANGER:
This VCR contains live parts. Do not remove the
cabinet.
.
--M
Operating precautions
WARNING:
To prevent fire or shock hazard, do not expose
this product to rain or moisture.
CAUTION:
Do not put your hand or other objects in the
cassette loading slot because of the risk of injury
or an accident. Be sure to keep small children
away from the VCR.
Note:
If the unit does not operate properly, switch it off,
refer to the ‘(TROUBLESHOOTING” or consult a
dealer or a service centre.
Place the VCR on a flat, stable, level surface. Never
subject it to violent shaking or any other shock or
impact.
Be sure to use this VCR only in a temperature range
of 5°C to 40°C (41 ‘F to I05”F) and at less than 80%
humidity.
Do not expose the unit to high temperatures.
Excessive heat (heat sources such as heaters,
ovens, closed car on hot days, etc. ) may damage the
unit.
Do not use the unit under the following conditions:
in locations with high humidity
in presence of excessive dirt or dust
in areas subject to strong vibrations
near strong magnetic fields (e.g. transmitting
antennas, motors, fluorescent lights, etc. )

Do not stack anything on top of your VCR, or block
the air vents, to prevent damaging or overheating.
Do not place anything, except VHS video cassette
tapes, in the unit.
Do not allow rain, steam, dew, salt water, sand, oily
smoke, metal objects, etc. entering the unit.
The
POWER button of this VCR is a secondary
“Stand-by” is the condition in which only the time is
circuit, and does not disconnect the unit from
displayed.
the wall outlet, even if the VCR is in stand-by, as
long as the power cord is connected to the VCR
power socket.
Caution concerning condensation
Be careful of condensation
Condensation is the moisture that forms on the
outside of a glass when you fill it with cold water,
Condensation can also form inside a VCR when it is
suddenly moved from a cold place to a warm, humid
one, or when a heater has been turned on to quickly
heat the room.
Particular care must be taken with your VCR because
water particles that form on the video head drum,
which is the main VCR mechanism, can cause the
video tape to stick to the drum, This prevents proper
tape travel and may damage both tape and
mechanism,
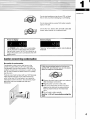
Follow the procedures below the first time you
use the VCR, and whenever you use it in places
which are subject to condensation:
6
;
OConnect the aerial output cable and make all
other necessary connections.
@
Plug the power cord into a wall outlet,
@Turn on the VCR power to warm it up and
speed up the drying of any water particles
that may have formed on the video head
drum,
@Do not insert a video cassette,
Wait for 1-1/2 to 2 hours before using the
VCR.
=S$$S$s
—T#r,w/,-,$m*w.>wf Msg92
INTRODUCTION
4

1~
i
..—
—.
INTRODUCTION
5
—
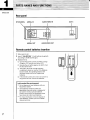
Front panel
POWER
~
EJECT
■ STOP
PLAY b
w
Remote control
TILL
POWER
1...0
MENWTV
DISPLAY
+ REW
■ STOP
● REC
G-CODE
OIAV
+, -
A, Y, +,
➤
OK
PLAY
➤
FF ~
[[ PAUSE/STILL
SLOW
111
’11\
RESET

1
INTRODUCTION
Cassette inserted
Channel selection down/up
15
18
16
1-44 0144
Tracking adjustment during playback
CHANNEL (-, +),
(+, -)
T-:-
Vertical lock adjustment during still
picture
To unload the cassette tape
Fast-forward
16
15
15
16
~EJECT
P (Blinking)
D
Forward search durina riavback
Power on
Playback
Still picture during playback
POWER 4
PLAY b
1lPAUSE/STILL
D15
16
18
DI 1
REC II
Recording pause
Immediate recording
●11
REC
REC--:--
●
QSR--:--
If pressed during normal recording,
easy programmed recording (QSR) is
Dossible
●REC
18
Rewind 15
16
a (Blinking)
4
u
Reverse search during playback
15
Numeric buttons for channel direct
access
On-screen o~eration numbers inrmt
18
1-44
01-44
1...0
14
Up/down/right/left cursor control for
on-screen operation
Auto-trackina adjustment
A,V,b, ●
9
16ATR
T
. . . . .
External input mode (AV mode) select
button
O/AV
26 AV
AV
To turn on/off the on-screen display of
the clock, counter, etc.
To display a blue background for
on-screen menus
0952 SP 000X10M
DISPLAY 9
19
G-Code timer recording set button G-CODE
To display/erase the on-screen
operation main menu
Counter memorv
MENWTV
9
•l
MEMORY 17
9
To confirm entered data
OK
Counter reset RESET 17
0:00:00
D
Slow motion SLOW 16
To select the recording tape speed
This button is not used
SP/LP
TV/VCR
LP
15
6

INTRODUCTION
7
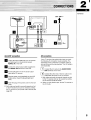
Rear panel
RF CHANNEL AERIALIN
AUDIO~lDEO IN
AC IN -
\
\ 1
~pl ~
1---
rl
—
IN
32-41
N.ID=DEO
AERIAL
.
‘N@@
AUDIO VIDEO
q
@@ fy
OUT
‘“’ 6))(
v
F
—
AERIAL OUT
AUDIO/VIDEO OUT
Remote control batteries insertion
1
2
3
Slide open the lid.
Insert 2 “~ (IEC R6)” 1.5 volt batteries (supplied)
according to the @ and @ signs.
Replace the lid,
❑
❑
❑
•1
Operate the remote control unit within a range
of approx. 30” from the front of the VCR.
Operate the unit within approx. 6m (20 ft.) from
the front of the VCR.
The battery life under normal operating
conditions is about six months. If the batteries
become weak, the operating distance will
decrease; when this occurs, replace the
batteries.
If the remote control unit is not to be used for a
long period of time, remove the batteries.
●
●
●
Do not dispose of used batteries with your
household rubbish.
Used batteries should be taken to a
specialized disposal centre or disposed of
as rubbish needing special treatment.
Certain supermarkets or electronics stores
have boxes to collect used batteries.
For more information on how to dispose of
1111
Dl,p)
‘e
a)~
Qe :..--”-9
..--”
: -----
: -----
:---
0
~
=

f 1
220-240 V -
%?!=
ANT Mm VIDEO
Aerial/RF connection
I
1
❑
Unplug the aerial cable from your TV receiver
and reconnect it to the terminal marked
AERIAL IN on the VCR,
H
Connect the aerial output cable (supplied) to
the AERIAL OUT terminal on the VCR.
H
Connect the other end of this aerial output
cable to the TV receiver,
❑
A
Plug the power cord (supplied) into the VCR
power socket. Insert the plug straight and
firmly,
H
Insert the plug of this power cord into the wall
outlet,
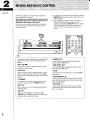
❑ Both video and audio (monaural) signals are fed
to the TV receiver and can be viewed by setting
the TV receiver to your preset video channel (see
page 11).
If your TV receiver has audio/video input terminals,
the following AV connection is also possible. The
advantage of this connection is a higher quality of
picture and sound during playback, The AV cable is
sold separately,
❑
1 Connect the AV cable to the AUDIOMDEO
OUT
terminals on the VCR.
n
z Connect the other end of this AV cable to the
~ audio/video terminals on the TV receiver
●
❑
Both video and audio (monaural) signals are fed
to the TV receiver and can be viewed by setting
the TV receiver to the AV mode.
When you play back a tape, set the”
the AV mode,
V receiver to
PREPARATION

2
PREPARATION
9
The VCR can easily be programmed by using the
❑
menus displayed on-screen.
The menus are controlled from the remote control.
The buttons
that can be used with each menu are
❑
displayed at the bottom of the screen.
If you memorize the basic operations, each setting
can easily be made by following the steps of the
concerned menu.
If a wrong sub-menu has been selected,
press the
MENWTV button twice to return to the main menu,
and start again.
When using an on-screen menu, if the menu is
difficult to read due to the broadcast in the
background, press the DISPLAY button to obtain
a blue background. Press this button again to
return to normal TV broadcasts background
menus
MENWIV
o
P
—
,,.,.,.iJlmEl
ITmm
mmm
,T .........yEg~.[g~.w.m~l@.~l@.
-f”% ‘%1s,E.T,.E.,.,.b
,y
I
‘“””’”””<”””””””’’”””’’’”’’-W-’’’’:’-
,,,,,,,,,,,,:,:,,,
................... ,.,,,,,.,,,,,.,
;?ji
:!;
~
):,:
ZOWER
G-CODE
o
0
obH5
(5(53(5(5
0(5(5(5
MB ~-.
OK
‘E ‘5;?
The buttons for each operation are indicated at the
bottom of the screen, next to the message they
apply to.
“SET:AV<P”
To move the cursor to a different location, press
any of the cursor buttons.
“YES?: OK”
When the cursor is at the desired position, or the
desired setting has been entered, press the OK
button to go on to the following step, or to enter the
setting,
“TV:MENU”
To cancel the on-screen menu and return to the
normal TV screen, press the MENWV button.
“9=T:0.9”
When required, enter the settings by pressing the
numeric buttons.
llDEL:<~!
Always available together with the message
“SET:O-9, as it allows to go back and erase any
wrong number entered by mistake.
“CANCEL: OK”
To cancel the timer recording selected by the
cursor, press the
OK button.
“TIME SHIFT:AY”
For time shifting (Summer/Standard time), press
the cursor (A or 7) button.
6CAV:00Y*
To record from an external source, press the O/AV
button twice.
“E.DAYAIVEEKLY:A”
To select a recording mode (every day or weekly)
other than the standard one time recording, press
the cursor
(A) button.
“OFF TIME:-/+”
To advance or retard the off time of a recording
programmed with the ShowView function, press
the (-or +) button.

MENUITV
o
,.,.
f;:
~,,,.,,,,,;,
.m,,&x ;::,
.:.:,.,.,,,,
x.
v ..:+
.::~:,.,*,,,,,:...
.+:.’...:..
‘+
&
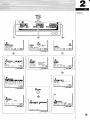
CLOCKSET
SET:AT YES?:~ TV:m
&~
PR: DATE ON “ OFF
:; ;..”- --:-- --:-- SP
SE;:O-9 DEL:4
TV:m
~see
page 22
m
r!bmml
AV 2i:05WKli:30 1;:00 SP
06 27.05 20:00 21:00 SP
10 28.05ED17:O0 17:30 LP
-.. . . ----- .. ... ..
SET:A~ “
TV:H
@see
page 23
P
TIME
1------- --:--
SET:O-9 DEL:4
TV:GIXI!I
~see
page 14
UIlm
pJn
-54321
44
BLANK SEARCH
SET:AT4> YES?:E13
~see
page 24
LANGUAGE
SET:-V YES?:m
r
mm
Tv:cm!l
.:,:.
#
.:*:.,
,x ,.:::~
:.:::,,,,:,,.,,,
...
,:F$::,.
rh!m
NEDERLANDS
FRANCAIS DEUTSCH
ITALIANO PORTUGUtS
YES?:m
&
RJ+p
POS.SETTING
SET:AT YES?:m TV:KIXI!I
~see
page11 ~see page11
,---------------------------------- ---
,“
.-. .
G-CUUE
o
SET:O-9 DEL:4
~see
page 19
,
0
,
------------------------ -------.- ~
P
CHANNEL
81111111--------------------
PRG.POS. --
@see
page 12
44
P
SET:AV4} YES?:m TV:m
~see
page 13
PREPARATION
10

PREPARATION
If you are not
presettingthe
VCRfor the first
time, please refel
to page 14.
11
After all connections have been made, insert the
remote control batteries then proceed to
“Adjusting the TV receiver to the video channel”
- “Language selection” == “Tuning control
adjustments” + “Clock setting” to preset the
VCR.
Before setting
■ Press the POWER button.
■ Turn on the TV.
AJus#g the TV receiver to the video
If the VCR has been connected to the TV using the
“AVconnection”, simply set the TV to the AV mode
and the welcome screen will appear on your screen.
When using the ‘(RF connection”, set your TV
receiver to “VCR” or the position designed for
videorecorder use, (For more details, please refer to
your TV receiver instruction manual.) Select on your
TV the designated video channel and adjust the
tuning on the TV to
UHF channel 36 sothat the
welcome screen is clear.
This is your video
channel.
n
WELCOME TO
USER FRIENDLY
ON-SCREEN
r
m
If in your area, UHF channel 36 is used by a
broadcaster, follow the steps below.
1
2
Tune the TV receiver to an available UHF channel
between channel 32 and 41.
Using a small screwdriver, slowly turn the video
chan~el adjustment screw “RF CHANNEL” on the
back of the VCR, to the right for a higher channel
than 36 and to the left for a lower channel than 36.
Adjust the tuning on the TV, if necessary, so that
the welcome screen is clear
This is your video channel.
To view a tape playback or to watch a TV broadcast
tuned on the VCR tuner, set the TV to the video
channel.
When the welcome screen is clear, press the
OK
button on the remote control.
● LANGUAGE menu is displayed.
I Language selection
P
NED ERLANDS
FRANCAIS
DEUTSCH
ITALIANO
PO RTUGU?S
SET: AV4}
YES? :EIl
The language of the on-screen menus can be
selected between the 6 available languages
(English, Dutch, French, Italian, Portuguese, German).
Using the cursor
(A, 7, + or ➤) button, select the
desired language, then press the OK button.
● TUNING menu is displayed.
VCR Tuning control adjustments
The tuning mode can be selected between “AUTO”
or “MANUAL” from the displayed tuning menu
&
p#Y!
POS. SETTING
SET:AW YES?:m TV:H
This VCR has a built-in tuner capable of memorizing
up to 44 television channels

New Zealand only
Tuning or presetting the VCR channels
For New Zealand conditions, presetting channel
using auto tuning is not advised. This is due to the
order that television stations will be preset in some
New Zealand cities.
Use the manual tuning mode (refer to “Manual
tuning”),
This will ensure the channels are preset in the
correct positions and you will have full control of
tuning.
This is very important for correct G-Code operation,
Ideally for simpler operation, channels should be
preset as follows:
Television station
Programme position
number
TV One
1
TV TWO
2
TV Three
3
For additional channels in your area it is over to
you to select the most logical channel position to
place them,
* Sky Television
4
* Canterbury TV
5
* Action TV
6
* When you use the G-Code function to
programme a recording from a certain channel for
the first time, it will ask you the programme position
number that channel was preset to, That setting will
be memorized and automatically set the next time
the same channel is selected.
Auto tuning
I
The channels available in your area will be
automatically preset in order, starting from
programme position number”1”.
Notes:
● Auto tuning is not possible if the VCR is set to AV
input mode,
● For manual tuning, go directly to step @ under
“Manualtuning”,
~
Using the cursor (7) button, select “AUTO”.
@
Press the OK button.
● The ATM (Auto Tuning Memory) function will
start and proceed in order from programme
position number”1”. When all available
channels have been preset, the function will
stop and the channel preset to programme
position number”1”
willbe tuned on your TV
screen.
❑ The skip function will be set for all position
numbers where no channel has been preset (see
page 13),
Manual tuning
This tuning mode can be used to modify the settings
entered by the
“Autotuning”, or to manually preset
the channels to particular programme position
numbers,
O Press the
MENU~ button,
● Main menu is displayed.
@ Using the cursor (~) button, select
“MODE”,then
press the
OK button,
@With
“TUNING”selected, press the OK button.
Then with
“MANUAL”selected, press the OK
button.
● MANUAL TUNING menu is displayed,
+
11111111. . . . . . . . . . . . . . . . . . . .
PRG POS. --
ExamP/e:
To preset TV One to programme position “01”.
OWith “CHANNEL” selected, press the cursor (<
or
➤) button until the broadcast from the desired
channel (eg. TV One) appears on the TV screen.
(p): The channel with the next higher frequency is
searched and tuned.
(<): The channel with the next lower frequency is
searched and tuned.
Note:
If the search stops on a bad TV screen and the
on-screen display does not appear, press the cursor
(<or
➤) button again.
● The search will continue,
Fine tuning
When the desired channel appears on the TV screen,
if the tuning is not optimum, it can be improved by
manual fine tuning,
Press the (+ or -) button to obtain the best possible
picture and sound,
To be continued *
2
PREPARATION
12

2
PREPARATION
13
Programme position setting
@
Using the cursor (V) button, select “PRG POS.”.
@ Using the numeric buttons, enter the programme
position number (eg “01 “).
+
11111111--------------------
01
SET:AV4~ YES?:E13 TV: GIXI!l
@ Press the OK button,
● TV One has now been preset to programme
position number
“01”.
Skip function
If only programme position numbers 1 to 30 have
been preset, set the skip function for programme
position numbers 31 to 44, so that only the preset
programme position numbers will appear when
pressing the (+ or-) button.
O Press the
MENWTV button.
● Main menu is displayed.
@ Using the cursor (>) button, select
“MODE”,then
press the
OK button.
@With “TUNING” selected, press the
OK button.
@ Using the cursor (V) button, select
“POS.SEITING”, then press the OK button.
@ Using the (+ or -) button, select the programme
Repeat steps 0 to 0 to preset another channel to
position number to skip.
another programme position number.
@ Using the cursor (>) button, select “ON”,
OWhen all channels have been preset, press the
press the OK button.
44
f
SET: AW4) YES?:m TV:m
then
Repeat steps @ and@ for every programme
position number to skip.
@When finished, press the
MENI.YTV button.
● The normal TV broadcast screen will return.

Clock setting
Using the numeric buttons, enter the date (day,
month, year) and time (hours, minutes).
Example:
To set December 10, 1995, 16:15.
❑
Press the MENU~ button.
❑ To
obtain a blue background, press the DISPLAY
button.
9
With “TIMER” selected, press the OK button
❑
Using the cursor (7) button, select “CLOCK
SET”,
then press the OK button.
❑
A
Enter in sequence, 1012951615.
P
TIME
10.12.95 16:15
TIME SHIFT:AT
SET: O-9 DEL:4
YES?:~
❑ If you entered a wrong number, press the cursor
(-~jt)teon to delete it, then enter the correct
Time shift
For time shifting (TIME SHIFT) adjustment
(Summer/Standard time), simply press the cursor
(A
or 7) button.
H
When the date and time have been entered,
press the OK button.
● The normal TV broadcast screen will return.
Notes:
● Seconds will start counting from “00” as the OK
button is pressed.
● Set the clock time accurately.
This controls the start and stop times of both
G-Code and manual programs.
Changing the settings
Follow the steps below to modify or correct a setting.
Language selection
(.)
Press the MENLUTVbutton.
@Using the cursor (~) button, select “MODE”, then
press the OK button.
@
Usingthe cursor (7) button, select
“LANGUAGE, then press the OK button.
OTO set the desired language, refer to
“Language
selection”
on page 11.
Clock setting
Please refer to “Clocksetting”.
Tuning control afiustments
O
Press the MENWTV button.
@ Using the cursor (>) button, select ‘(MODE”, then
press the OK button
@With “TUNING” selected, press the OK button.
@To modify the channels settings, refer to
“Tuning
control adjustments”
on page 11.
+,,—$
r,v,W,:.:tw<.:-wt*.*?m*?t*t~J?r’~mm,:?.+,~.d,Y..,Y.z,JJJ~*m..,
Power interruption
If the power to the VCR has failed or has been
disconnected for more than 1 hour, the digital
display will indicate ”-: - -“.
When using the VCR the welcome screen will
be displayed, the selected language English
and the time, date (and recording programmed)
should be reset.
To enter the settings again, refer to “VCR
PRESEITING” starting on page
11.
Note:
The tuner preset memory will not be erased.
So there is no need to follow the steps under
“Tuningcontrol adjustments”.
PREPARATION
14

3
BASICOPERATION
3
15
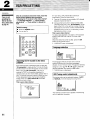
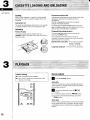
Loading
When a video cassette is inserted, it will be loaded
automatically and the cassette-in (~) indicator will
illuminate.
Auto power on
The power is automatically switched on as a cassette
is inserted while the VCR is in the stand-by mode.
Unloading
Power off eject
The video cassette will be ejected when the
AEJECT button is pressed, even when the VCR is in
stand-by mode.
Erasure-prevention tab
If the erasure-prevention tab on the back of the video
cassette is removed, the cassette cannot be
recorded on.
This tab is designed to prevent the accidental
erasure of recorded material.
To record onto the same cassette again, place two
layers of adhesive tape over the space where the tab
was, so as to cover the space completely.
Playbaclc/Recording duration
The recording tape speed can be selected by
pressing the SP/LP button,
During playback, the tape speed cannot be
changed, the playback speed will always match the
speed selected for recording.
Standard Play mode (SP): Best image and sound
quality. No display
indicates SP mode,
Long Play mode (LP): Twice the SP mode duration
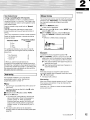
Before starting
■ Insert a recorded video cassette.
■ Turn on the TV then set it to the preset video
channel or AV mode.
J==+Ly
@l-PIAYb-m
““”m ‘F”
o
H STOP
o
O,, PAU,E
SLOW mu
00
C?3 O“E
Normal playback
❑
Press the PLAY ➤ button
Auto play
The VCR will play back a tape automatically when a
video cassette is inserted whose erasure-prevention
tab has been removed.
H
To stop the playback, press the ■STOP
button,
❑ To rewind the tape, press the qREW button
❑ To advance (fast-forward) the tape, press the
FF ~ button.
Auto eject
When a video cassette without an erasure-prevention
tab is played to the end of the tape, the tape will be
automatically rewound and then the cassette will be
ejected,

I
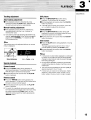
Tracking adjustment
Auto-tracking adjustment
O
If the playback picture is disturbed by noise
interference press the ATR button, adjustment to
the optimum point will occur automatically,
Manual tracking adjustment
@If
the playback picture still shows interference,
manually adjust it with the (+ or -) button, to
minimize the noise.
El If you wish to return the tracking adjustment to its
original “centre position” after having changed it,
press both the CHANNEL (-, +) buttons on the
VCR simultaneously,
Note:
The tracking cannot be adjusted while an on-screen
menu is displayed,
Noiseinterference
Special playback
(-) - Centre- (+)
Forward search
~
Press the FF w button during playback or
fast-forward operation, The picture can be viewed
while the tape is advanced at fast speed,
@ Normal playback will resume when the
PLAY ➤
button is pressed,
Reverse search
~
Press the 4REW button during playback or
rewind operation. The picture can be viewed while
the tape is rewound at fast speed,
@ Normal playback will resume when the
PLAY ➤
button is pressed,
❑ To search for a particular scene you can switch
from fast forward to forward search and vice versa
by simply pressing the
FF ~ button, or from
rewind to reverse search by simply pressing the
WREW button.
Still picture
()
Press the I lPAUSE/STILL button during
playback, A still picture can be viewed,
@ Normal playback will resume when the PLAY
➤
button is pressed,
El If the still picture moves up and down, press the
(+ or -) button to adjust the still picture,
Frame advance
O
Press the 1lPAUSE/STILL button during still
playback to advance the picture frame by frame,
Each press advances one frame,
@ Normal playback will resume when the PLAY
➤
button is pressed,
Slow motion
O
Press the SLOW button during playback or during
still picture,
The tape speed can be set from 1/5 to 1/30 of
normal speed by pressing the
SLOW button,
@ Normal playback will resume when the PLAY
➤
button is pressed,
Notes:
●
●
●
If still picture or slow motion playback is continued
for about five minutes, the VCR will automatically
change to stop mode in order to prevent the tape
from being damaged,
During special playback modes the picture may
contain some noise or vibration. But this is not a
malfunction.
This VCR will not guarantee the picture quality of
special playback in the LP mode,
If noise bars are visible in the still picture, frame
advance or slow motion mode, use the (+ or -)
button while in the slow motion mode to correct.
3
BASICOPERATION
16

3
BASICOPERATION
17
iii
Endless play
Counter memory
This function will play back a tape to the end, rewind
it then replay it again, and again until you stop it.
Notes:
● This function can only be activated using the
buttons on the VCR itself. It cannot be activated
using the remote control.
● During the endless play, the VCR will not perform
special playback functions such as forward
search, reverse search or still picture.
❑
In the stop or playback mode, press the
PIAY
➤ button then while holding it down
press the
+REW button.
● The tape is rewound to the beginning and
then playback will start.
•l If the counter memory function is used in
combination with endless play, the VCR will play
back the tape to the counter reading “~ 0:00:00”
then start again from the beginning.
ExamP/e 1:
Without using the counter memory.
Beginning
Playback
Rewind
Example 2:
Using the counter memory, the “~” indicator on.
Counter”~ 0:00:00” position
-=:$
Rewind
❑
To cancel the endless play function, press the
■STOP button.
This convenient feature for finding the beginning of a
specific recording etc., is made possible by the
“LinearTime Counter” that indicates the tape run
time in hours, minutes and seconds.
●
●
●
Whenever you load a cassette tape, the counter
will be reset to “0:00:00.
When rewinding further back from position
“0:00:00”, the counter shows figures beginning
with “-”,
The ta~e stoDs at the memorized Dosition
“0:00:00 even when using fast forward when the
counter reading begins with “-”.
Press the
RESET then the MEMORY button
before starting recording or playback.
● The zero point of the counter is now
memorized and the memory indicator “~”
will illuminate.
Press the
~REW button at the end of
recording, or playback.
● The tape will be rewound automatically to
the memorized position and then stop.
❑ The counter operates using control signals which
are recorded on the tape, hence if you play back
a tape or portion of tape which has nothing
recorded on it, the counter will not operate.

—
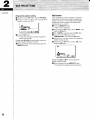
Before starting
■ Insert avideocassette with erasure-prevention
tab.
■ Turn on the TV then set it to the preset video
channel or AV mode.
L
O(55E
(5)(5(56
C5dklo
r
■ STOP
0,,,,,.
@
REC7
Emu
00 0
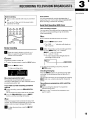
Normal recording
Auto rewind
The VCR automatically rewinds the tape when it
reaches the end, This function does not operate with
timer recording or QSR timer recording.
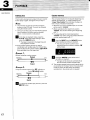
Quick Start Recording (QSR) timer
Timer recording is simple.
You can start a recording and then programme when
the VCR is to stop recording and go to stand-by
mode automatically,
Note:
Be sure that the set date and time are correct.
❑
Press the numeric buttons, or the (+ or -)
button, to select the programme position
number to be recorded,
Examp/e:
Programme position number “2”
❑ To select the tape speed, press the
SP/LP button.
❑
Press the ●REC buttons,
● Video recording starts.
Mis-erasure prevention eject
The cassette will automatically be ejected if
recording is attempted on a video cassette without
an erasure-prevention tab.
If you wish to avoid recording unwanted
material
~ During recording, press the I lPAUSE/STILL
button.
The TV picture and sound will not be recorded.
@ Press the I
lPAUSE/STILL button or .REC
buttons, and the recording will resume.
Note:
If the record pause mode continues for about five
minutes, the VCR will automatically go into the stop
mode in order to prevent damage to the tape.
H
To stop the recording, press the ■STOP
button,
•1
Press the
●REC buttons twice.
● The “QSR --:- -“ indication will display on
the TV screen.
Within 10 seconds, set the recording end time
by using
.REC and (+ or-) buttons.
(.REC) : units of 30 minutes
(+, -) : units of 1 minute
● The timer indicator (~) will light after the
recording end time is set.
r77-
QSR 12:35)
To stop the recording at any time, press the
■STOP button.
Checking/Changing
When the .REC buttons are pressed during QSR
recording, the recording end time will blink for 10
seconds.
The recording end time can be changed by pressing
.REC and (+ or -) buttons during this 10-second
period,
Recording one programme while watching
another
O
Start recording the desired TV programme
selected
on the VCR.
@Select on the TV receiver the programme you
want to watch.
3
BASICOPERATION
18

4
ON-SCREEN
OPERATION
G-Codeisa
trademarkappliedfor
byGemstar
DevelopmentCorp.
G-Codesystemis
manufacturedunder
licensefromGemstar
Development
Corporation.
19
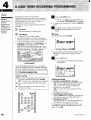
This VCR has a built-in G-Code system.
Programming timer recordings is now as simple as
entering a CODE NUMBER (1 to 9 digits) listed next
to each programme in your local TV guide or
newspaper TV programme listing.
There are two ways of programming G-Code timer
recording.
❑
1 On-screen
Using the television on screen menu.
171
VCFtdisda,
u
. .
Using the VCR front panel display.
●
●
This VCR can hold up to six timer programmed
(these are G-Codes or manual timer programmed).
To list current programmed, corrector cancel
programmed, please refer to “Confirmation” and
“Canceling” on page 23. Use the on-screen
menu system. Then select the timer menu. From
there you can select the required function, (Refer
operation instructions – on-screen – display).
CODE NUMBER
The CODE NUMBER indicated here is a sample only,
please use the appropriate CODE NUMBER indicated in
your Iccal TV guide or newspaper lV programme listing.
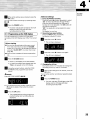
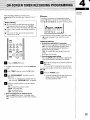
I 1 I I On-screen programming
I
Before starting
Be sure that the set date and time are correct.
If the date and time are not set, the
“CLOCK
SET’
on-screen menu will display (see page 14).
Insert a video cassette with erasure-prevention
tab,
Turn on the TV then set it to the preset video
channel or AV mode.
=WER
G(XUE
o
0
O(5(5E
c5d3&c5
o
DISPL4Y
o
❑
Press the G-CODE button
● If 6 timer recordings have already been set,
the message “PROGRAM FULL” will appear.
El To obtain a blue background, press the DISPLAY
button.
H
Using the numeric buttons, enter the CODE
NUMBER for the programme you want to
record,
ExamP/e:
Enter the CODE NUMBER 489135
-m ~
CODENUMBER 4~9135H:-
SET: O-9 DEL:4
YES? :E13
❑ If you entered a wrong number, press the cursor
~;~gon to delete it, then enter the correct
❑
Press the OK button
● The settings for the programmed recording
are displayed
CODE NUMBER 4;9135-:-
PR. DATE ON
OFF
01 23.12 15:00 16:00 SP
OFF TIME:-/+
E.DAY/WEEKLY:A
SET: O-9 DEL:4
YES?:m
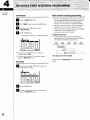
Additional settings
❑
❑
•1
E.DAY(Every day)/WEEKLY recording
Press the cursor (A) button repeatedly to select:
“ED”: for every day (Monday through Friday)
Every day recording starting on Saturday or
Sunday will not be possible.
“WK’: for weekly (the same programme every
week)
No display: for one time
Recording tape speed setting
Press the SP/LP button repeatedly to display the
desired tape speed at the right of the off time.
Changing the off time
Each press of the (+ or -) button will change the
recording off time by units of 10 minutes.
By pressing the cursor (<) button three times, you
can delete the programme settings and then start
again from step H.
To be continued +
Page is loading ...
Page is loading ...
Page is loading ...
Page is loading ...
Page is loading ...
Page is loading ...
Page is loading ...
Page is loading ...
Page is loading ...
Page is loading ...
-
 1
1
-
 2
2
-
 3
3
-
 4
4
-
 5
5
-
 6
6
-
 7
7
-
 8
8
-
 9
9
-
 10
10
-
 11
11
-
 12
12
-
 13
13
-
 14
14
-
 15
15
-
 16
16
-
 17
17
-
 18
18
-
 19
19
-
 20
20
-
 21
21
-
 22
22
-
 23
23
-
 24
24
-
 25
25
-
 26
26
-
 27
27
-
 28
28
-
 29
29
-
 30
30


