Page is loading ...

www.dahon.com
E-Bike

02
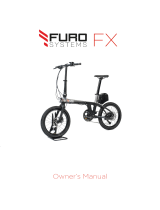
Congratulations on your purchase of a Dahon E-Bike, that will give you
many kilometers of cycling pleasure and comfortable riding.
The Dahon E-Bike offers a perfect synergy between the cyclist’s pedal
input and additional motor support.
Please keep in mind that improper installation and operation of the
TranzX PST can reduce the performance and the overall enjoyment
of this product. So before you start, please read the instruction manual
carefully and follow each step in order to assure proper fit and installation
of your TranzX PST.
Note: Dahon electric bikes are designed for commuting/travel/urban
area riding, and are not suitable for very rough or off-road use.
Once again, we thank you for purchasing your Dahon E-Bike.
Introduction
DAHON POWER SUPPORT TECHNOLOGY
TranzX PST (Power Support Technology)
Driving System for pedal-activated bicycles

03
Specifications
Specifications
Features
Display Instructions
How to Charge the Battery
Maintenance of the Battery
Terms of Warranty
Safety Warnings
----------------------------------------------------------------------03
----------------------------------------------------------------------------04
--------------------------------------------------------------05
----------------------------------------------------09
----------------------------------------------------10
---------------------------------------------------------------11
------------------------------------------------------------------11
Frame:
Tires:
Gear Ratio:
Lighting System:
Rims:
Motor:
Battery Pack:
Charger:
Max Speed
LMA 20” DAlloy Fengding Bike
20" front and rear 20" x 1.75”
SHIMANO (KSG7R50) 7S/3S
6 V Headlight 2.4W Rear Light 0.6W
By battery system
Double walled aluminium
Tranz-X (front hub) 250w 36v
Li-polymer 36V 8.8Ah
DC36V 2.0A (Li-polymer battery)
25km/h
Contents

04
Drive Modes:
• Mode 1: Eco
• Mode 2: Normal
• Mode 3: Boost
• True Pedal Assist Concept.
• Motor support only switches on when you start pedaling and switches
off when you stop pedaling.
• Perfect synergy between cyclist’s pedal input & additional motor support.
• 1:1 direct relation between pedal force and motor support.
• Very smooth riding feeling.
• High torque (rider’s kick) while starting.
• High torque at low speeds.
• Strong power support during cruising speed (in sports mode).
• Gradual power support decrease at 25 km/hr.
• Complies with all European regulations and is still a bicycle, NOT a moped!
• Large LCD display with current speed, trip distance, battery life and
riding program
Power
Adjustment
Button
Display
Battery
Tail Light
Head Light
Motor
Speed Sensor System
Features
Sensor: Adjusts the amount of power from the motor in line with the amount
of pressure by the rider, on the pedals.
Range: 60km (36V)

01. Power Button: Power ON/OFF switch function.
02. Drive Mode Button
• Mode 1: Eco
• Mode 2: Normal
• Mode 3: Boost
03. Battery Capacity Indicator
• Each block ( ) shows the battery capacity.
Five blocks ( ) indicates the battery is fully charged.
• The last block will start blinking when the charge is less than 10%.
When the battery icon is empty ( ), this means the battery
has no power remaining.
Remaining Mileage
Drive Mode Button Back Light Button
Power Button
Turbo Button
Current Speed
Light Sensor
Battery Capacity
Total Distance
05
Display Instructions

06
04. Total distance / Trip distance
• Total distance will show when no speed is detected.
• Trip distance will show when the bicycle is being ridden.
• When the bicycle is attached to an external charger the
trip distance will be reset to 0.
• If the maximum total distance of 19999 km is reached,
the total distance will be reset to zero.
05. Current Speed – Displays current riding speed.
06. Remaining mileage: the display can estimate the remaining
mileage based on the battery capacity and riding condition.
07. Back Light – Displays back light.
08. Light Sensor- when the display is ON, the light sensor will
detect the ambient light and the lamps will be turned on
automatically.
09. Eco Mode – Use for normal and flat road surfaces.
10. Normal Mode – Use for extra support with hills and/or
strong headwinds.
11. Boost Mode – Use for strong support with very steep slopes.
12. Turbo Button S: Use for extra support with the three riding
modes.
13. Sleep Mode
• The display will switch to Sleep Mode automatically when
the bike is not used over 3 minutes.
• The display will then change to Off Mode, and the back
light and battery symbol will disappear.
14. Error Code – The Error Code icon and Service icon will appear
on the LCD when malfunctions are detected. Please refer to the
following error code numbers and descriptions and check with
your dealer for more information.

Code
4
Code
6
Code
1
Code
5
07
Error Code icon
Error Code No. DESCRIPTION
1
Code
Code
2
Code
4
Code
3
Code
5
Code
6
Motor speed sensor is not functional.
The hub motor will vibrate and make noise.
The power-off brake lever is not functional.
RPM sensor in the motor is malfunctioning.
The power is on but the display doesn’t indicate
the current speed.
RPM sensor on the bottom bracket is not functional.
The bike will have power only for 1 - 2 minutes and
then stop.
Not applicable. In the unlikely case that this
error code occurs, see your dealer.
Not applicable. In the unlikely case that this
error code occurs, see your dealer.

08
Note:
1. Fold your Dahon E-bike according to the manual.
2. When folding and unfolding please take care to check that the internal cables are
not caught. Should this occur, simply push the two cables back inside the frame.
After completion of assembly, please perform a final check
and make sure that:
1. Every bolt and screw is tightened properly.
2. Tires are inflated to the recommended tire pressure.
3. Brakes are functioning properly.
Final Check
If you change the display or remove or adjust the rear wheel,
make sure you recalibrate the sensor of the TranzX PST.
Note:
TranzX PST sensor calibration
Once you have finished assembly of the bicycle, please kick up the
kickstand and make sure the two wheels stand in a straight line before
resetting the display. Turn on the power button and press the Back
Light Button for 6 seconds, until the display shows “CAL X” for a few
seconds. This calibrates the TranzX PST sensor. After this step,
you can start to ride your bicycle.

Battery Case Operation
1. Turn the key anti-clockwise and open the plastic casing.
2. Take out the battery for charging.
Charger LCD Indicator
Charging Time
The Li-polymer battery will take approximately 5 hours to fully charge.
09
Only use the battery charger that was supplied with the TranzX PST.
Use of any other battery charger voids your warranty and may result
in severe damage to the battery and electrical system of the bicycle,
and may cause a fire hazard.
Make sure the voltage specification of the changer matches your
local voltage.
Remove the cover of the connector and connect the battery charger.
Fully charge the battery for at least 6 hours at the first time of purchase.
Charger LCD Indication: The Red light indicates that the battery is charging.
The Green light indicates that the battery is fully charged.
How to Charge the Battery

10
Charger & Battery Protection
The battery and charger unit have a built-in heat sensor. If the
heat rises too much, it will automatically shut down the system
before any damage can occur. The charger unit will automatically
cut off the power supply after 6 hours of charging.
Have you recharged your battery pack lately?
If 3 months have passed without recharging, it’s time to do it again.
Charging your battery will help ensure maximum battery life and
performance and will help to avoid battery damage.
Batteries must be charged prior to use. Do not incinerate or mutilate batteries.
They may explode or release toxic material. Do not disassemble the battery.
Return the bike to your authorized service dealer for service or repair.
Store the battery in a cool dry place. Please refer to your dealer regarding
transport of the battery. Cycle (charge and discharge) the battery every
3-6 months to maintain battery performance when being stored for an
extended period of time.
In the case of any irregular noise, variant temperature,
or leakage from the battery, please stop using it immediately.
Always store and cool the battery in a well-ventilated place, out of
direct sunlight.
Battery Maintenance
Storage Recommendations
Turn off power before taking out the battery.
Note:

SAFETY WARNINGS:
THE PURPOSE OF SAFETY SYMBOLS IS TO ATTRACT YOUR ATTENTION TO POSSIBLE
DANGERS. THE SAFETY SYMBOLS, AND THE EXPLANATIONS WITH THEM, DESERVE
YOUR CAREFUL ATTENTION AND UNDERSTANDING. THE SAFETY WARNINGS BY
THEMSELVES DO NOT ELIMINATE ANY DANGER. THE INSTRUCTIONS OR WARNINGS
THEY GIVE ARE NOT SUBSTITUTES FOR PROPER ACCIDENT PREVENTION MEASURES.
WARNING:
Failure to obey a safety warning can result in injury to yourself or others. Always follow
the safety precautions to reduce the risk of fire, electric shock and personal injury.
11
The Dahon E-Bike warranty period is 1Years (12 months)
according to the date of purchase.
Yes. The motor can overheat on very steep hills and under heavy loads,
but the built-in heat sensor will automatically shut down the system before
any damage can occur.
For all electrical parts including charger, display (console),
controller, BB sensor, electrical cables, carrier and motor,
(Note: motor noise is not covered) the warranty period is 2 Years (24 months).
Terms of Warranty
Can the motor be overheated?
Certain fitted parts of the bicycle can wear out at different rates
depending on use, road condition, weather and so on. Typical items
include tires, chains, sprockets, chain wheels, brake pads, grips etc.
Note:

If you experience any problem with your Dahon E-Bike,
please contact your local dealer directly.
IMPORTANT!
01. Read and understand this instruction manual carefully before using
this product. Be thoroughly familiar with the proper use of your
Dahon E-Bike.
02. Thoroughly inspect your PST for loose or damaged parts before
each use. If there are any loose or damaged parts, perform the
needed adjustments or repairs before starting your Dahon E-Bike.
12
PRE-OPERATIONAL SAFETY WARNINGS
The Limited Warranty will be void if the product is used in a
manner other than for recreation or transportation or modified
in any way.
Note:
03. Some countries require that all bicycle riders wear a safety helmet.
It is recommended that this precaution be followed at all times for
maximum safety and protection.
04. The manufacturer is not liable for incidental or consequential loss
nor damage due directly or indirectly from the use of this product.
05. This Dahon E-Bike carrier is not compatible with a rear baby seat.
06. As with all mechanical devices, the bicycle is subjected to wear
and high stresses. Different materials and components may react
to wear or stress fatigue in different ways. If the designated life of
a component has been exceeded, it may suddenly fail, possibly
causing injuries to the rider. Any form of crack, scratches or change
of coloring in highly stressed areas may indicate that the life
expectancy of the component has been reached and it should
be replaced.

www.dahon.com
2012 Dahon North America
Dahon Europe
No.1 P.O. Box 17,
Goliamokonarsko Shosse Str.
Tsaratsovo Village, 4027, Bulgaria
+359 32335 598
Headquarters
Dahon North America INC.
833 Meridian Street
Duarte CA 91010
+1 800 442 3511
Dahon Technologies, Ltd.
#18, Songtang Road, Tongfuyu
Industrial Park, Tangxiayong
Community, Songgang
Sub-district, Baoan, Shenzhen,
518000, China
+86 755 36869788
/