Pelonis HV-1004 Owner's manual
- Category
- Space heaters
- Type
- Owner's manual
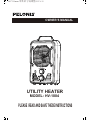
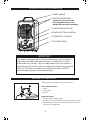
Pelonis HV-1004 is a 1500W utility heater designed for quick heating of small to medium-sized rooms. It features two heat settings, a thermostat, and a fan-only mode, allowing you to customize the heating to your needs. The tip-over switch and overheat protection ensure safety during use, while the carry handle makes it easy to move the heater around. With proper maintenance, the Pelonis HV-1004 can provide reliable and efficient heating for years to come.
Pelonis HV-1004 is a 1500W utility heater designed for quick heating of small to medium-sized rooms. It features two heat settings, a thermostat, and a fan-only mode, allowing you to customize the heating to your needs. The tip-over switch and overheat protection ensure safety during use, while the carry handle makes it easy to move the heater around. With proper maintenance, the Pelonis HV-1004 can provide reliable and efficient heating for years to come.


-
 1
1
-
 2
2
-
 3
3
-
 4
4
-
 5
5
-
 6
6
-
 7
7
-
 8
8


Pelonis HV-1004 Owner's manual
- Category
- Space heaters
- Type
- Owner's manual
Pelonis HV-1004 is a 1500W utility heater designed for quick heating of small to medium-sized rooms. It features two heat settings, a thermostat, and a fan-only mode, allowing you to customize the heating to your needs. The tip-over switch and overheat protection ensure safety during use, while the carry handle makes it easy to move the heater around. With proper maintenance, the Pelonis HV-1004 can provide reliable and efficient heating for years to come.
Ask a question and I''ll find the answer in the document
Finding information in a document is now easier with AI
Related papers


Other documents
-
Holmes HRH8005A Owner's manual
-
Bionaire BH3950 Owner's manual
-
-
-
-
-
-
-
-