EU-Declaration of Conformity
We, SIGMA-ELEKTRO GmbH, Dr.-Julius-Leber-Str. 15, D-67433 Neustadt/Weinstraße declare under our responsibility that the
product BC 14.16 are compliant with the essential requirements of the EMC Directive 2014/30/EU and the RoHS Directive 2011/65/EU.
The declaration of conformity can be found at:
ce.sigmasport.com/bc1416
We, SIGMA-ELEKTRO GmbH, Dr.-Julius-Leber-Str. 15, D-67433 Neustadt/Weinstraße declare under our responsibility that the
product BC 14.16 STS and the transmitters STS-S-3 and STS-C-3 are compliant with the essential requirements and other relevant
requirements of the RED Directive 2014/53/EU and the RoHS Directive 2011/65/EU.
The declaration of conformity can be found at:
ce.sigmasport.com/bc1416sts
Declaration of Conformity/FCC/IC
You can find the Declaration of Conformity at: www.sigmasport.com
FCC statement
This device complies with part 15 of the FCC Rules. Operation is
subject to the following two conditions:
(1) This device may not cause harmful interference, and
(2) this device must accept any interference received,
including interference that may cause undesired operation.
NOTE: This equipment has been tested and found to comply with
the limits for a Class B digital device, pursuant to part 15 of
the FCC Rules. These limits are designed to provide reasonable
protection against harmful interference in a residential installation.
This equipment generates, uses and can radiate radio frequency
energy and, if not installed and used in accordance with the
instructions, may cause harmful interference to radio communi-
cations. However, there is no guarantee that interference will not
occur in a particular installation. If this equipment does cause
harmful interference to radio or television reception, which can
be determined by turning the equipment off and on, the user is
encouraged to try to correct the interference by one or more of
the following measures:
– Reorient or relocate the receiving antenna.
– Increase the separation between the equipment and receiver.
– Connect the equipment into an outlet on a circuit different
from that to which the receiver is connected.
– Consult the dealer or an experienced radio/TV technician for help.
Changes or modifications not expressly approved by the party
responsible for compliance could void the user’s authority to operate
the equipment.
IC
This device complies with Industry Canada licence-exempt RSS standard(s). Operation is subject to the following two conditions:
(1) this device may not cause interference, and
(2) this device must accept any interference, including interference that may cause undesired operation of the device. CAN ICES-3(B)/NMB-3(B)
Le présent appareil est conforme aux CNR d‘Industrie Canada applicables aux appareils radio exempts de licence. L‘exploitation est autorisée
aux deux conditions suivantes:
(1) il ne doit pas produire de brouillage et
(2) l’ utilisateur du dispositif doit étre prêt à accepter tout brouillage radioélectrique reçu, même si ce brouillage est susceptible de
compromettre le fomctionnement du dispositif. CAN ICES-3(B)/NMB-3(B)
The device meets the exemption from the routine evaluation limits in section 2.5 of RSS 102 and compliance with RSS-102 RF exposure,
users can obtain Canadian information on RF exposure and compliance.
Le dispositif rencontre l‘exemption des limites courantes d‘évaluation dans la section 2.5 de RSS 102 et la conformité à l‘exposition de
RSS-102 rf, utilisateurs peut obtenir l‘information canadienne sur l‘exposition et la conformité de rf.
This transmitter must not be co-located or operating in conjunction with any other antenna or transmitter. This equipment should be installed
and operated with a minimum distance of 20 millimeters between the radiator and your body.
Cet émetteur ne doit pas être Co-placé ou ne fonctionnant en même temps qu‘aucune autre antenne ou émetteur. Cet équipement devrait être
installé et actionné avec une distance minimum de 20 milliimètres entre le radiateur et votre corps.
Contents / Inhalt / Contenu / Contenuto / Contenido / Conteúdo / Inhoud / Zawartość / Obsah
BC 14.16
BC 14.16 STS BC 14.16 STS CAD
Press and hold
for 5 sec.
Press and hold
BC 14.16/
/CAD
www.sigmasport.com
081416/4
SP 1
Battery installed / Batterie eingebaut / Pile installée /
Batteria integrata / Batería montada / Pilhas montadas /
Batterij gemonteerd / Używane baterii / Vložená baterie
Batteries installed / Batterien eingebaut / Piles installée / Batterie integrata /
Baterías montada / Pilhas montadas / Batterijen gemonteerd / Używane baterii / Vložená baterie
Start-up / Erste Inbetriebnahme / Mise en service / Messa in funzione / Puesta en servicio /
Primeira colocação em funcionamento / Inbedrijfstelling / Uruchomienie / První uvedení do provozu
Reset / Nullstellen / Réinitialiser / Azzeramento / Colocar en cero /
Posições zero / Op nul instellen / Zerowanie / Vynulování
OPERATING VIDEO
INSTALLATION VIDEO
www.sigma-qr.com
IMPORTANT
WICHTIG
IMPORTANTE
BELANGRIJK
WAŻNE
DŮLEŽITÉ
Functions / Funktionen / Fonctions / Funzioni / Funciones / Funções / Functies / Funkcje / Funkce
BIKE button
Menu structure / Menüstruktur / Structure du menu / Struttura menu / Estructura del menú / Estrutura do menu / Menustructuur / Struktura menu / Struktura menu
ALTI button
EN
Bat teries may not b e disposed of in hous ehold waste (Eur opean Batt ery Law).
Please dispose of properly per local ordinance.
DE
Batterien dürfen nicht im Hausmüll entsorgt werden (Batteriegesetz – BattG)!
Bitte geben Sie die Batterien an einer benannten Übergabestelle zur Entsorgung ab.
FR
Ne pa s jeter les piles au x ordures ména gères (loi rela tive aux piles et a ccumulat eurs).
Veuillez rapp orter vos piles u sagées dans un cen tre de collect e agréé.
IT
Le ba tterie non dev ono essere smal tite nei rifiuti d omestici (legg e europea sulle ba tterie).
Si prega di co nsegnare le bat terie esaurit e presso i punti d i raccolta pre visti per lo smal timento.
ES
Las b aterías no deben s er eliminadas en la ba sura doméstic a (Ley de baterí as).
Por favor e ntregue las ba terías en un lugar d e recogida menci onado para su pos terior eliminac ión.
PT
As pilh as não devem elimin adas em conjunt o com o lixo domésti co (lei relativ a a pilhas).
Entregu e as pilhas num pont o de recolha corr espondente p ara a sua correc ta eliminação.
NL
Bat terijen hore n niet thuis bij het re stafval (Eu ropese richt lijn batterije n).
Geeft u de ba tterijen mee m et de chemokar.
PL
Bat erii nie wolno wy rzucać do śmie ci (ustawa o bat eriach).
Baterie na leży oddać do ut ylizacji w odpo wiednim punkci e zbiórki odpad ów.
CZ
Bater ie se nesmí likvido vat s domovním od padem (zákon o ba teriích).
Odevzdejte prosím baterie na jmenovaném sběrném místě k likvidaci.
LI=Lithium
LI
Start-up:
Your bike computer comes in “deep sleep mode”. When
using it for the first time, please press and hold the
MENU button for 5 seconds. The bike computer will then
switch to active mode.
Wheel size determination:
To measure the speed precisely, the wheel size must be
set according to your tire size. To do this, you can:
A – Select one of the predefined wheel sizes.
B – Calculate the wheel size using the formula provided in
the wheel size chart.
C – Determine the value from the drawings in the
wheel size chart.
D – Take the value that corresponds to your tire size
from the wheel size chart.
PC interface:
The bike computer is PC-compatible. By purchasing the
SIGMA DATA CENTER software and docking station, you
can effortlessly download and analyze your total and
current values on your PC. You can also configure your
bike computer’s settings on the PC.
Troubleshooting:
No Speed, or incorrect speed displayed:
– Computer correctly fastened into the bracket?
– Distance to magnet and sensor checked?
– Magnet correctly positioned in relation to the sensor?
– Wheel circumference correctly set?
For FAQs and trouble shooting solutions,
visit www.sigmasport.com
Technical data:
Computer WIRED:
– Battery type: CR 2032, 3V
– Battery life: 3 to 4 years
(When used for 1 hour per day)
Computer WIRELESS:
– Battery type: CR 2032, 3V
– Battery life: 1 year (When used for 1 hour per day)
Transmitter:
– Battery type: CR 2032, 3V
– Battery life: 1.5 years (When used for 1 hour per day)
Warranty:
SIGMA SPORT provides a 2 year warranty for your com-
puter from the date of purchase. The warranty covers
material and workmanship defects on the computer
itself, the sensor/transmitter and the handlebar bracket.
The warranty does not cover the cable, the batteries
or any assembly materials. The warranty is only valid
if the affected parts have not been opened (exception:
computer’s battery compartment), no force has been
used and there is no intentional damage. Please store
your receipt of purchase in a safe place as
it must be presented in the event of a complaint. If your
complaint is justified, we will provide you with you a
comparable replacement device.
There is no entitlement to a replacement device in the
identical model if the model subject to complaint has
gone out of production due to a model change.
In case of complaints or warranty claims, please contact
the specialist retailer from whom you purchased the
device. Alternatively, send your complaint directly to:
SIGMA-ELEKTRO GmbH
Dr.-Julius-Leber-Strasse 15
D-67433 Neustadt/Weinstraße
Tel.: +49-(0) 63 21-91 20-1 18
Fax.: +49-(0) 63 21-91 20-34
In the event of justified warranty claims, you will receive
wa replacement device.
You will only be entitled to the model available at the time
of replacement. The manufacturer retains the right to
make technical modifications.
You can find a complaints form on our website:
claim.sigmasport.com
EN
Erste Inbetriebnahme:
Im Lieferzustand befindet sich der Fahrrad Computer in
einem Tiefschlaf-Modus. Bei der ersten Inbetriebnahme
bitte die MENÜ-Taste für 5 Sekunden lang gedrückt
halten. Der Fahrrad Computer geht dann in den aktiven
Modus.
Radgrößenbestimmung:
Um die Genauigkeit der Geschwindigkeitsmessung zu
erreichen, muss die Radgröße entsprechend Ihrer
Reifengröße eingestellt werden. Dafür können Sie:
A – aus vordefinierten Radgrößen auswählen.
B – Die Radgröße anhand der aus der Tabelle
„Wheel Size Chart“ angegebenen Formel berechnen.
C – Den Wert gemäß den Zeichnungen aus
„Wheel Size Chart“ ermitteln.
D – Aus der Tabelle „Wheel Size Chart“ den Ihrer
Reifengöße entsprechenden Wert übernehmen.
PC Interface:
Der Fahrrad Computer ist PC-fähig. Nach Kauf der
SIGMA DATA CENTER Software und der Docking Station
können Sie die Gesamt- und aktuellen Werte einfach und
mühelos auf Ihrem PC protokollieren. Darüber hinaus
können Sie die Einstellungen des Fahrradcomputers am
PC vornehmen.
Problemlösung:
Keine oder falsche Geschwindigkeitsanzeige:
– Computer richtig in der Halterung eingerastet?
– Abstand zu Magnet und Sensor überprüft?
– Magnet zum Sensor richtig positioniert?
– Radumfang richtig eingestellt?
Weitere Problemlösungen erhalten Sie aus unseren Fragen
und Antworten unter www.sigmasport.com
Technische Daten:
Computer KABELGEBUNDEN:
– Batterietyp: CR 2032, 3V
– Batterielebensdauer: 3 bis 4 Jahre
(Bei einer Benutzung von 1 Stunde pro Tag)
Computer KABELLOS:
– Batterietyp: CR 2032, 3V
– Batterielebensdauer: 1 Jahr
(Bei einer Benutzung von 1 Stunde pro Tag)
Sender:
– Batterietyp: CR 2032, 3V
– Batterielebensdauer: 1,5 Jahre
(Bei einer Benutzung von 1 Stunde pro Tag)
Garantiebestimmungen:
SIGMA SPORT gewährt für Ihren Computer eine Garantie
von 2 Jahren ab Kaufdatum. Die Garantie erstreckt sich
auf Material- und Verarbeitungsfehler am Computer
selbst, am Sensor/Sender und an der Lenkerhalterung.
Kabel und Batterien sowie Montagematerialien sind von
der Garantie ausgeschlossen. Die Garantie ist nur dann
gültig, wenn die betroffenen Teile nicht geöffnet wurden
(Ausnahme: Batteriefach des Computers), keine Gewalt
angewendet wurde und keine mutwillige Beschädigung
vorliegt. Bitte bewahren Sie den Kaufbeleg sorgfältig auf,
da er im Reklamationsfall vorgelegt werden muss. Bei
einer berechtigten Reklamation erhalten Sie von uns ein
vergleichbares Austauschgerät.
Anspruch auf Ersatz des identischen Modells besteht
nicht, wenn durch Modellwechsel die Produktion des
reklamierten Modells eingestellt wurde. Bitte wenden Sie
sich mit allen Reklamationen und Garantieansprüchen an
Ihren Fachhändler, bei dem Sie das Gerät gekauft haben.
Oder senden Sie Ihre Reklamation direkt an:
SIGMA-ELEKTRO GmbH
Dr.-Julius-Leber-Strasse 15
D-67433 Neustadt/Weinstraße
Tel.: +49-(0) 63 21-91 20-1 18
Fax.: +49-(0) 63 21-91 20-34
Bei berechtigten Ansprüchen auf Gewährleistung erhalten
Sie ein Austauschgerät.
Es besteht nur Anspruch auf das zu diesem Zeitpunkt
aktuelle Modell. Der Hersteller behält sich technische
Änderungen vor.
Sie finden ein Reklamations-Formular auf unserer
Website claim.sigmasport.com
DE
Mise en service :
A la livraison, le compteur cycle se trouve dans un état
de veille profonde. Lors de la première mise en service,
maintenir la touche MENU enfoncée pendant 5 secondes.
Le compteur cycle est ensuite actif.
Détermination de la taille des roues :
Pour obtenir une mesure précise de la vitesse, la taille
des roues doit être réglée en fonction de la taille de vos
pneumatiques. A cette fin, vous pouvez :
A – Sélectionner parmi une liste de grandeurs des roues
prédéfinies.
B – Calculer la grandeur des roues au moyen de la
formule du tableau “Wheel Size Chart”.
C – Déterminer la valeur conformément aux schémas du
“Wheel Size Chart”.
D – Reprendre la valeur adéquate pour la grandeur de vos
roues dans le tableau “Wheel Size Chart”.
PC Interface :
Le compteur cycle est compatible PC. Après avoir
acheté le logiciel SIGMA DATA CENTER et la station de
connexion, vous pouvez enregistrer les valeurs totales
et actuelles aisément et sans effort sur votre PC.
Vous pouvez également procéder aux réglages de votre
compteur cycle sur votre PC.
Résolution des problèmes :
Pas d‘affichage de la vitesse ou affichage erroné :
– Compteur correctement enclenché dans son support ?
– Distance entre l‘aimant et le capteur correcte ?
– Aimant correctement positionné par rapport au
capteur ?
– Circonférence de la roue correctement réglée ?
Vous trouverez la résolution d‘autres problèmes dans nos
FAQ, à l‘adresse www.sigmasport.com
Caractéristiques techniques :
Compteur AVEC FIL:
– Type de pile : CR 2032, 3V
– Autonomie : 3 à 4 ans (1 heure d‘utilisation par jour)
Compteur SANS FIL:
– Type de pile : CR 2032, 3V
– Autonomie : 1 an (1 heure d‘utilisation par jour)
Emetteur :
– Type de pile : CR 2032, 3V
– Autonomie : 1,5 an (1 heure d‘utilisation par jour)
Garantie :
SIGMA SPORT octroie une garantie de 2 ans à compter
de la date d‘achat sur tous ses compteurs. Cette
garantie couvre les défauts matériels et de fabrication
sur le compteur lui-même, le capteur / l‘émetteur et
le support pour guidon. Les câbles, piles et matériel
de fixation sont exclus de la garantie. La garantie n‘est
valable que lorsque les pièces concernées n‘ont pas été
ouvertes (exception: compartiment à pile du compteur),
il n‘a pas été fait usage de la force et aucun dommage
volontaire n‘existe. Veuillez conserver soigneusement la
preuve d‘achat car celle-ci devra être présentée en cas
de réclamation. En cas de réclamation justifiée, nous
vous enverrons un appareil de rechange comparable.
Il n‘existe aucun droit au remplacement du modèle à
l‘identique lorsque la production du modèle faisant l‘objet
d‘une réclamation a été arrêtée pour des raisons liées
à des changements de modèle. Veuillez adresser toutes
vos réclamations et demandes en garantie au revendeur
auprès duquel vous avez acheté l‘appareil. Ou envoyer
votre réclamation directement à :
SIGMA-ELEKTRO GmbH
Dr.-Julius-Leber-Strasse 15
D-67433 Neustadt/Weinstraße
Tél.: +49-(0) 63 21-91 20-1 18
Fax: +49-(0) 63 21-91 20-34
Un appareil de remplacement vous sera envoyé si votre
requête est justifiée.
Les demandes en garantie ne peuvent concerner que
les modèles actuels. Sous réserve de modifications
techniques par le fabricant.
Vous trouverez un formulaire de réclamation sur notre
site Web, à l‘adresse : claim.sigmasport.com
FR
Messa in funzione:
Al momento della consegna, il ciclocomputer è in modalità
deep-sleep. Dalla prima messa in servizio, tenere premuti
il tasto MENÜ per 5 secondi. Il ciclocomputer va in
modalità attiva.
Determinazione della misura ruote:
Per avere risultati precisi nella misurazione della velocità,
è necessario impostare le dimensioni delle ruote
conformemente alle dimensioni delle gomme.
A questo scopo è possibile:
A – Scegliere fra misure delle ruote predefinite.
B – Calcolare le dimensioni delle ruote in base alla
formula indicata nella tabella “Wheel Size Chart”.
C – Determinare il valore secondo i disegni nel documento
“Wheel Size Chart”.
D – Acquisire dalla tabella “Wheel Size Chart” il valore
corrispondente alle dimensioni delle gomme
PC Interface:
Il ciclocomputer è compatibile con PC. Dopo l’acquisto del
software SIGMA DATA CENTER e della docking station,
potrete archiviare sul PC, con semplicità e praticità,
i valori totali e i valori attuali. Inoltre, potrete eseguire
le impostazioni del ciclo computer dal PC.
Risoluzione dei problemi:
Nessuna indicazione di velocità o indicazione di velocità
errata:
– Il computer è scattato correttamente in posizione nel
supporto?
– La distanza fra magnete e sensore è stata verificata?
– Il magnete è stato posizionato correttamente rispetto
al sensore?
– La circonferenza ruota è stata correttamente
impostata?
Ulteriori soluzioni ai problemi possono essere acquisite
tramite le FAQ all’indirizzo www.sigmasport.com
Dati tecnici:
Computer DOTATO DI CAVI:
– Tipo di batteria: CR 2032, 3V
– Durata della batteria: da 3 e 4 anni
(a fronte di un utilizzo di 1 ora al giorno)
Computer SENZA CAVI:
– Tipo di batteria: CR 2032, 3V
– Durata della batteria: 1 anno
(a fronte di un utilizzo di 1 ora al giorno)
Sensore:
– Tipo di batteria: CR 2032, 3V
– Durata della batteria: 1 anno e mezzo
(a fronte di un utilizzo di 1 ora al giorno)
Garanzia:
Per il vostro computer SIGMA SPORT offre una garanzia
di 2 anni dalla data d’acquisto. La garanzia si estende ai
difetti di materiali e di fabbricazione del computer, del
sensore e del supporto per manubrio. I cavi e le batterie,
nonché il materiale per il montaggio, sono esclusi dalla
garanzia. La garanzia è valida soltanto quando le parti
interessate non sono state aperte (eccezione: vano
batteria del computer), non è stata esercitata forza e non
è presente alcun danno intenzionale. Conservare con cura
la ricevuta d‘acquisto, in quanto è necessario esibirla in
caso di reclamo. Se il reclamo viene accettato, riceverete
un dispositivo simile in sostituzione.
Non è possibile rivendicare la sostituzione con un
modello identico, se la produzione del modello oggetto
del reclamo è stata interrotta per un cambio del modello.
Per qualsiasi reclamo o richiesta di intervento in garanzia
rivolgersi al rivenditore specializzato presso il quale è
stato effettuato l‘acquisto. In alternativa inviare il proprio
reclamo direttamente a:
SIGMA-ELEKTRO GmbH
Dr.-Julius-Leber-Strasse 15
D-67433 Neustadt/Weinstraße
Tel.: +49-(0) 63 21-91 20-1 18
Fax.: +49-(0) 63 21-91 20-34
In caso di legittimo diritto alla garanzia, potrete ottenere
un apparecchio sostitutivo.
Sussiste solo il diritto al modello corrente, al momento
corrente. Il produttore si riserva il diritto di apportare
modifiche tecniche.
È possibile trovare un modulo di reclamo sul nostro
sito web: claim.sigmasport.com
Puesta en servicio:
En el estado de suministro, el ciclocomputador se
encuentra en el modo llamado “de sueño profundo”.
En la primera puesta en marcha, mantener presionada
la tecla MENÚ durante 5 segundos. El ciclo computador
pasará al modo activo.
Determinación del tamaño de rueda:
Para lograr precisión en la medición de la velocidad se
debe ajustar el tamaño de la rueda de acuerdo al tamaño
de su neumático. Para ello, puede:
A – Seleccionar entre tamaños de rueda predefinidos.
B – Calcular el tamaño de rueda con ayuda de la fórmula
citada en la tabla “Wheel Size Chart”.
C – Determinar el valor conforme a los dibujos de la tabla
“Wheel Size Chart”.
D – Tomar el valor correspondiente al tamaño de su
neumático de la tabla “Wheel Size Chart”.
Interfaz del ordenador:
El ciclocomputador es compatible con los ordenadores.
Luego de adquirir el software SIGMA DATA CENTER y la
estación de conexión, podrá registrar los valores totales
y actuales sin problema y rápidamente en su ordenador.
Además, podrá realizar los ajustes del ciclocomputador
en el ordenador.
Solución de problemas:
Ninguna indicación de velocidad o indicación incorrecta:
– ¿El ordenador está correctamente encastrado en el
soporte?
– ¿Se ha verificado la distancia entre el imán y el sensor?
– ¿El imán está correctamente posicionado en relación
con el sensor?
– ¿El tamaño de la rueda está bien ajustado?
Podrá obtener más soluciones de problemas en nuestra
sección de preguntas frecuentes en www.sigmasport.com
Datos Técnicos:
Ordenador CON CABLE:
– Tipo de batería: CR 2032, 3V
– Duración de la batería: 3 a 4 años
(Con un uso de 1 hora diaria)
Ordenador INALÁMBRICO:
– Tipo de batería: CR 2032, 3V
– Duración de la batería: 1 año
(Con un uso de 1 hora diaria)
Transmisor:
– Tipo de batería: CR 2032, 3V
– Duración de la batería: 1,5 año
(Con un uso de 1 hora diaria)
Garantía:
SIGMA SPORT le brinda garantía sobre su ordenador
por 2 años a partir de la fecha de compra. La garantía
comprende defectos del material y de fabricación del
ordenador en sí, del sensor/transmisor y del soporte del
manillar. Los cables y baterías, así como los materiales de
montaje no están incluidos en la garantía. La garantía solo
será válida siempre que no se hayan abierto las piezas
afectadas (excepción: compartimento de la pila del
ordenador), no se haya empleado la fuerza y no exista
daño intencionado. Conserve el comprobante de compra
para presentarlo en caso de reclamo. En caso de un
reclamo fundado, recibirá de nuestra parte un equipo
equiparable para su recambio.
No podrá reclamarse el reemplazo del mismo modelo
si la producción del modelo reclamado se ha suspendido
por haber cambiado el modelo. Por cualquier reclamo
o derecho de garantía, póngase en contacto con el
comercio especializado en el que compró el aparato
o bien envíe su reclamo directamente a:
SIGMA-ELEKTRO GmbH
Dr.-Julius-Leber-Strasse 15
D-67433 Neustadt/Weinstraße
Tel.: +49-(0) 63 21-91 20-1 18
Fax.: +49-(0) 63 21-91 20-34
Si su reclamo de garantía está justificado, recibirá un
aparato nuevo de recambio.
Solo puede reclamarse el modelo actual de ese momento.
El fabricante se reserva el derecho a realizar
modificaciones técnicas.
En nuestra página web claim.sigmasport.com encontrará
un formulario para reclamos.
IT
ES
Colocação em funcionamento:
Nas condições de expedição o computador de bicicleta
encontra-se no chamado modo de hibernar.
Na primeira colocação em funcionamento manter
premida a tecla MENU durante 5 segundos.
O computador de ciclismo entra no modo ativo.
Determinação da dimensão da roda:
Para alcançar a medição de velocidade com exactidão, a
dimensão da roda deve ser ajustada à dimensão do pneu.
Para isso pode:
A – Escolher a partir das dimensões de roda
predefinidas.
B – Calcular a dimensão da roda com base na fórmula
indicada na tabela “Wheel Size Chart”.
C – Determinar o valor de acordo com os desenhos do
“Wheel Size Chart”.
D – Assumir o valor correspondente à dimensão do seu
pneu a partir da tabela “Wheel Size Chart”.
Interface PC:
O computador de bicicleta é compatível com o PC.
Após a compra do software SIGMA DATA CENTER
e da estação de ancoragem pode protocolar os valores
totais e actuais de forma simples e sem esforço no
seu PC. Para além disso pode efectuar os ajustes do
computador de bicicleta no PC.
Solução do problema:
Sem indicação de velocidade ou indicação de velocidade
incorrecta:
– O computador está bem encaixado no suporte?
– Verificou a distância para o íman e sensor?
– O íman está corretamente posicionado relativamente
ao sensor?
– O perímetro da roda está ajustado corretamente?
Pode consultar outras soluções para problemas nas
nossas FAQ em www.sigmasport.com
Dados técnicos:
Computador COM FIOS:
– Tipo de pilha: CR 2032, 3V
– Vida útil da pilha: entre 3 e 4 anos
(numa utilização de 1 hora por dia)
Computador SEM FIOS:
– Tipo de pilha: CR 2032, 3V
– Vida útil da pilha: 1 ano
(numa utilização de 1 hora por dia)
Transmissor:
– Tipo de pilha: CR 2032, 3V
– Vida útil da pilha: 1,5 anos
(numa utilização de 1 hora por dia)
Garantia:
A SIGMA SPORT concede-lhe uma garantia de 2 anos
para o computador a partir da data de compra.
A garantia abrange erros de material e de produção
no próprio computador, no emissor/transmissor e no
suporte do guiador. O cabo e as pilhas, bem como os
materiais de montagem, não são abrangidos pela garantia.
A garantia só é válida se as peças afetadas não tiverem
sido abertas (exceção: compartimento das pilhas no
computador), se não tiver sido aplicada força nem existir
qualquer dano deliberado. Guarde bem o comprovativo
de compra, pois este terá de ser apresentado numa
situação de reclamação. Em caso de reclamação
legítima, receberá da nossa parte um aparelho de
substituição equivalente.
A substituição por um modelo idêntico não é um direito
garantido, caso a produção do modelo reclamado tenha
sido suspensa devido à mudança de modelo. Em caso
de reclamações e reivindicações de garantia, contacte
o seu revendedor especializado, junto do qual adquiriu
o aparelho. Ou envie a sua reclamação diretamente para:
SIGMA-ELEKTRO GmbH
Dr.-Julius-Leber-Strasse 15
D-67433 Neustadt/Weinstraße
Tel.: +49-(0) 63 21-91 20-1 18
Fax.: +49-(0) 63 21-91 20-34
No caso de reivindicações legítimas de garantia,
receberá um aparelho de substituição.
O direito de garantia apenas se aplica ao modelo actual
nesse momento. O fabricante reserva-se o direito
a alterações técnicas.
Pode obter um formulário de reclamação no nosso
website claim.sigmasport.com
PT
BC 14.16 STS optional
BC 14.16 STS CAD inclusive
EN
Grey border:
Read-only information,
not set-able
Red border: Read and set-able information
DE
Grauer Rand: nicht einstellbar
Roter Rand: einstellbar
FR
Bord gris : aucun réglage possible
Bord rouge : réglage possible
IT
Contorno grigio: non impostabile
Contorno rosso: impostabile
ES
Borde gris: no se puede ajustar
Borde rojo: se puede ajustar
PT
Margem cinzenta: não ajustável
Margem vermelha: ajustável
NL
Grijze rand: niet instelbaar
Rode rand: instelbaar
PL
Szara krawędź: bez możliwości regulacji
Czerwona krawędź: regulowana
CZ
Šedý okraj: nelze nastavit
Červený okraj: lze nastavit
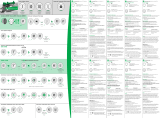
Max. values / Max. Werte / Valeurs max. / Valori max / Valores máx. / Valores máx. / Max. waarde / Maks. wartości / Max. hodnoty
EN
Trip Distance:
9999.99 KM/Mi
Ride Time:
99:59:59
HH:MM:SS
Average Speed:
199.8 kmh/
124.2 mph
Maximum Speed:
199.8 kmh/
124.2 mph
Time:
12 h AM/PM or 24 h
Temperature:
-20 to +70°C or
-4 to +158°F
Section Time:
99:59:59
HH:MM:SS
Section Distance:
9999.99 KM/Mi
Current Cadence:
180 rpm
Average Cadence:
180 rpm
Altitude Profile:
for the last 3-5 km /
2-3 miles
Current Altitude:
-999 to +4999 m or
-999 ft to +16999 ft
Actual Gradient:
0 % to 99 %
Altitude Uphill:
99999 m/ft
Maximum Altitude:
+4999 m or
+16999 ft
Total Distance:
99,999 KM/Mi
Total Time:
9999:59 HHHH:MM
Total Altitude:
99999m/ft
DE
Tagesstrecke:
9999,99 KM/Mi
Fahrzeit:
99:59:59
HH:MM:SS
Durchschnitts-
Geschwindigkeit:
199,8 kmh/
124,2 mph
Maximale
Geschwindigkeit:
199,8 kmh/
124,2 mph
Uhrzeit:
12 h AM/PM
oder 24 h
Temperatur:
-20 bis +70 °C oder
-4 bis +158 °F
Teil-Zeit:
99:59:59
HH:MM:SS
Teil-Strecke:
9999,99 KM/Mi
Akt Trittfrequenz:
180 rpm
Durchschnitts-
Trittfrequenz:
180 rpm
Höhenprofil:
für die letzten
3-5 km / 2-3 Miles
Aktuelle Höhe:
-999 bis +4999 m
oder
-999 ft bis +16999 ft
Steigung-Gefälle:
-99 % bis +99 %
Höhenmeter
Bergauf:
99999 m/ft
Maximale Höhe:
+4999 m oder
+16999 ft
Gesamtstrecke:
99.999 KM/Mi
Gesamtzeit:
9999:59 HHHH:MM
Gesamt-Höhen-
meter:
99999m/ft
FR
Distance quotidi-
enne:
9999,99 km/mi
Temps de parcours :
99:59:59
HH:MM:SS
Vitesse moyenne :
199,8 kmh /
124,2 mph
Vitesse maximale:
199,8 kmh /
124,2 mph
Heure :
12 h AM/PM ou
24 h
Température:
-20 à +70 °C ou
-4 à +158 °F
Temps partiel :
99:59:59
HH:MM:SS
Distance partielle :
9999,99 km/mi
Cadence act. :
180 rpm
Cadence moyenne:
180 rpm
Profil d‘altitude :
pour les 3-5
derniers km / 2-3
derniers miles
Altitude actuelle :
-999 à +4999 m ou
-999 ft à +16999 ft
Montée / Descente:
-99 % à +99 %
Dénivelé en montée:
99999 m/ft
Altitude maximale:
+4999 m ou
+16999 ft
Distance totale:
99999 km/mi
Temps total:
9999:59 HHHH:MM
Dénivelé total :
99999m/ft
IT
Distanza giornaliera:
9999,99 km/mi
Tempo di corsa:
99:59:59
HH:MM:SS
Velocità media:
199,8 kmh/
124,2 mph
Velocità massima:
199,8 kmh/
124,2 mph
Orario:
12 h AM/PM o 24 h
Temperatura:
da -20 a +70 °C o
da -4 a +158 °F
Tempo parziale:
99:59:59
HH:MM:SS
Distanza parziale:
9999,99 KM/Mi
Cadenza pedalata
attuale:
180 giri/m
Cadenza pedalata
media:
180 giri/m
Profilo altimetrico:
per gli ultimi tratti
da 3-5 km /
2-3 miglia
Altitudine attuale:
da -999 a +4999 m
oppure da -999 ft
a +16999 ft
Pendenza:
da -99 % a +99 %
Dislivello in salita:
99999 m/ft
Altitudine massima:
+4999 m o
+16999 ft
Percorso totale:
99.999 km/mi
Tempo totale:
9999:59 HHHH:MM
Dislivello totale:
99999 m/ft
ES
Distancia diaria:
9999,99 Km/Mi
Tiempo de recorrido:
99:59:59
HH:MM:SS
Velocidad promedio:
199,8 kmh/
124,2 mph
Velocidad máxima:
199,8 kmh/
124,2 mph
Hora:
12 h AM/PM o 24 h
Temperatura:
-20 a +70 °C o
-4 a +158 °F
Tiempo parcial:
99:59:59
HH:MM:SS
Distancia parcial:
9999,99 Km/Mi
Frecuencia de
pedaleo act.:
180 rpm
Frecuencia de
pedaleo promedio:
180 rpm
Perfil de altitud:
para los últimos
3-5 km / 2-3 Miles
Altitud actual:
-999 a +4999 m o
-999 ft a +16999 ft
Pendiente-Desnivel:
-99 % a +99 %
Altímetro en
ascenso:
99999 m/ft
Altitud máxima:
+4999 m o
+16999 ft
Distancia total:
99.999 Km/Mi
Tiempo total:
9999:59 HHHH:MM
Altímetro total:
99999m/ft
PT
Percurso diário:
9999,99 KM/Mi
Tempo de percurso:
99:59:59
HH:MM:SS
Velocidade média:
199,8 kmh/
124,2 mph
Velocidade máxima:
199,8 kmh/
124,2 mph
Hora:
12 h AM/PM ou
24 h
Temperatura:
-20 a +70 °C ou
-4 a +158 °F
Tempo parcial:
99:59:59
HH:MM:SS
Percurso parcial:
9999,99 KM/Mi
Frequência de peda-
lada atual:
180 rpm
Frequência de peda-
lada média:
180 rpm
Perfil de elevação:
para os últimos
3-5 km / 2-3 milhas
Elevação atual:
-999 a +4999 m ou
-999 pés
a +16999 pés
Declive:
-99 % a +99 %
Altitude Subida:
99999 m/pés
Elevação máxima:
+4999 m ou
+16 999 pés
Percurso total:
99 999 KM/Mi
Tempo total:
9999:59 HHHH:MM
Altitude total:
99999m/pés
NL
Dagafstand:
9999,99 KM/Mi
Rijtijd:
99:59:59
HH:MM:SS
Gemiddelde snelheid:
199,8 kmh/
124,2 mph
Maximale snelheid:
199,8 kmh/
124,2 mph
Kloktijd:
12 h AM/PM of 24 h
Temperatuur:
-20 tot +70 °C of
-4 tot +158 °F
Deeltijd:
99:59:59
HH:MM:SS
Deelafstand:
9999,99 KM/Mi
Act trapfrequentie:
180 rpm
Gemiddelde trapfre-
quentie:
180 rpm
Hoogteprofiel:
voor de laatste
3-5 km / 2-3 Miles
Actuele hoogte:
-999 tot +4999 m
of
-999 ft tot +16999 ft
Helling:
-99 % tot +99 %
Hoogtemeter
bergop:
99999 m/ft
Maximale hoogte:
+4999 m of
+16999 ft
Totaalafstand:
99,999 KM/Mi
Totaaltijd:
9999:59 HHHH:MM
Totaalhoogtemeter:
99999m/ft
PL
Trasa dzienna:
9999,99 km/mile
Czas jazdy:
99:59:59
HH:MM:SS
Prędkość średnia:
199,8 kmh/
124,2 mph
Prędkość
maksymalna:
199,8 kmh/
124,2 mph
Godzina:
12 h AM/PM lub
24 h
Temperatura:
-20 do +70°C lub
-4 do +158°F
Czas częściowy:
99:59:59
HH:MM:SS
Dystans częściowy:
9999,99 km/mile
Akt. kadencja:
180 rpm
Średnia kadencja:
180 rpm
Profil wysokości:
dla ostatnich
3-5 km / 2-3 mili
Aktualna wysokość:
-999 do +4999 m
lub
-999 ft do +16 999 ft
Wzniesienie /
spadek:
-99% do +99%
Przewyższenie w
górę:
99 999 m/ft
Wysokość
maksymalna:
+4999 m lub
+16 999 ft
Cała trasa:
99,999 km/mile
Czas całkowity:
9999:59 HHHH:MM
Łączne
przewyższenie:
99 999 m/ft
CZ
Denní trasa:
9999,99 km/mi
Doba jízdy:
99:59:59 hh:mm:ss
Průměrná rychlost:
199,8 km/h /
124,2 mi/h
Maximální rychlost:
199,8 km/h /
124,2 mi/h
Čas:
12h AM/PM nebo
24h
Teplota:
-20 až +70 °C nebo
-4 až +158 °F
Dílčí čas:
99:59:59 hh:mm:ss
Dílčí trasa:
9999,99 km/mi
Akt. frekvence
šlapání:
180 ot/min
Prům. frekvence
šlapání:
180 ot/min
Výškový profil:
pro posledních
3–5 km / 2–3 mi
Aktuální výška:
-999 až +4999 m
nebo
-999 až +16999
stop
Stoupání/klesání:
-99 % až +99 %
Výškové metry
nahoru:
99999 m/stopy
Maximální výška:
+4999 m nebo
+16999 stop
Celková trasa:
99 999 km/mi
Celková doba:
9999:59 hhhh:mm
Celkové výškové
metry:
99999 m/stopy
EN
Operation of backlight:
Light mode ON: Press ALTI button + MENU button
Light mode OFF: Press ALTI button + MENU button
In light mode ON:
Press a button to put the lights on.
With the next button press the desired function
is called up on the display.
Trip section counter start/stop:
Press BIKE button + MENU button
RESET the trip section counter:
In the trip section counter:
Press and hold BIKE button.
Quick selection of the start altitude:
Press and hold the ALTI button.
Selection of the start elevation: the BIKE or ALTI button.
Confirm selection: using the MENU button.
Setting the current altitude: Opening the settings using
the MENU button.
Changing the values with the BIKE or ALTI button.
Confirm the setting with the MENU button.
Select bike 1 / bike 2 (BC 14:16):
Press and hold BIKE button + MENU button and
select bike and confirm with MENU button
Setting the cadence:
– Open the menu
– Open Setting/Device
– Scroll to the cadence setting
– Set the cadence to ON
Once activated in the settings menu,
the cadence is available.
DE
Bedienung der Beleuchtung:
Licht Modus AN: ALTI-Taste + MENÜ-Taste drücken
Licht Modus AUS: ALTI-Taste + MENÜ-Taste drücken
Im Licht Modus AN:
Durch einen Tastendruck wird die Beleuchtung aktiviert.
Mit nächstem Tastendruck wird die gewünschte Funktion ins
Display geholt.
Teilstrecken-Zähler Starten/Stoppen:
BIKE-Taste + MENÜ-Taste drücken
RESET des Teilstrecken-Zählers:
Im Teilstrecken-Zähler:
BIKE-Taste gedrückt halten
Schnell-Auswahl der Start-Höhe:
ALTI-Taste gedrückt halten.
Auswahl der Start-Höhe: mit der BIKE-oder ALTI-Taste.
Bestätigen der Auswahl: mit der MENÜ-Taste.
Einstellen der aktuellen Höhe: Öffnen der Einstellung
mit der MENÜ-Taste.
Ändern der Werte mit der BIKE-oder ALTI-Taste.
Bestätigen der Einstellung mit der MENÜ-Taste.
Auswahl Rad 1 / Rad 2 (BC 14.16):
BIKE-Taste + MENÜ-Taste gedrückt halten
Rad auswählen und mit MENÜ-Taste bestätigen
Einstellen der Trittfrequenz:
– Menü öffnen
– Einstellung/Gerät öffnen
– Zu Trittfrequenz-Einstellung blättern
– Trittfrequenz auf AN stellen
Nach Aktivierung im Einstell-Menü ist die Funktion
Trittfrequenz verfügbar.
FR
Utilisation de l‘éclairage :
Mode d‘éclairage ON : enfoncer les touches ALTI + MENU
Mode d‘éclairage OFF : enfoncer les touches ALTI + MENU
En mode d‘éclairage ON:
enfoncer une touche permet d‘allumer l‘éclairage.
La pression suivante sur la touche permet d‘appeler
la fonction souhaitée à l‘écran
Démarrer / Arrêter le compteur de
distances partielles :
Enfoncer les touches BIKE + MENU
REINITIALISATION du compteur de
distances partielles :
Dans le compteur de
distances partielles :
maintenir la touche BIKE enfoncée
Sélection rapide de l‘altitude de départ :
Maintenir la touche ALTI enfoncée.
Sélection de l‘altitude de départ : avec la touche BIKE ou ALTI.
Confirmation de la sélection : avec la touche MENU.
Réglage de l‘altitude actuelle : ouverture du réglage avec
la touche MENU.
Modification des valeurs avec la touche BIKE ou ALTI.
Confirmation du réglage avec la touche MENU.
Sélection Vélo 1 / Vélo 2 (BC 14.16):
Maintenir les touches BIKE et MENU enfoncée,
sélectionner le vélo et confirmer avec MENU
Réglage de la cadence :
– Ouvrir le menu
– Ouvrir Réglages / Appareil
– Accéder au réglage de la cadence
– Définir la cadence sur MARCHE
La cadence est disponible après activation dans le
menu Réglages.
IT
Funzionamento delle luci:
Modalità luce ON: premere pulsante ALTI + pulsante MENU
Modalità luce OFF: premere pulsante ALTI + pulsante MENU
Modalità luce ON:
premendo un pulsante si accende la luce.
Alla successiva pressione del pulsante,
la funzione desiderata viene visualizzata sul display.
Avviare/arrestare contatore
percorsi parziali:
premere pulsante BIKE +
pulsante MENU
RESETTARE il contatore percorsi parziali:
Nel contatore percorsi parziali:
tenere premuto il pulsante BIKE
Selezione libera dell‘altitudine di partenza:
Tenere premuto il pulsante ALTI.
Selezione dell‘altitudine di partenza: con il pulsante BIKE o ALTI.
Conferma della selezione: con il pulsante MENU.
Impostazione dell‘altitudine attuale: accedere all‘impostazione
con il pulsante MENU.
Modifica dei valori con il pulsante BIKE o ALTI.
Conferma dell‘impostazione con il pulsante MENU.
Selezione ruota 1 / ruota 2 (BC 14.16):
Tenere premuti i pulsanti BIKE + MENU,
selezionare la ruota e confermare con il pulsante MENU
Impostazione della cadenza pedalata:
– Aprire il menu
– Aprire le impostazioni del dispositivo
– Passare all’impostazione Cadenza della pedalata
– Impostare l’opzione su ON
Dopo l’attivazione nel menu delle impostazioni,
la cadenza della pedalata diventa disponibile.
ES
Manejo de la iluminación:
Modo luz ON: presionar tecla ALTI + tecla MENÚ
Modo luz OFF: presionar tecla ALTI + tecla MENÚ
En modo luz ON:
presionando una tecla se enciende la luz.
Presionando nuevamente, la función deseada se muestra
en la pantalla.
Iniciar/detener contador
de distancia parcial:
presionar la tecla BIKE + la tecla MENÚ
RESET el contador de distancia parcial:
En el contador de distancia parcial:
mantener presionada la tecla BIKE
Selección rápida de la altitud inicial:
Mantener presionada la tecla ALTI.
Selección de la altitud inicial: con las teclas BIKE o ALTI.
Confirmar la selección: con la tecla MENÚ.
Ajustar la altitud actual: abrir los ajustes con la tecla MENÚ.
Modificar los valores con las teclas BIKE o ALTI.
Confirmar el ajuste con la tecla MENÚ.
Selección bici 1 / bici 2 (BC 14.16):
Mantener presionadas las teclas BIKE + MENÚ,
seleccionar la bici y confirmar con la tecla MENÚ
Ajustar la frecuencia de pedaleo:
– abrir el menú
– abrir los ajustes / el aparato
– ir hasta el ajuste de frecuencia de pedaleo
– colocar la frecuencia de pedaleo en ON
Después de activarla en el menú de ajustes
la frecuencia de pedaleo estará disponible.
PT
Utilização da iluminação:
Luz Modo ON: premir o botão ALTI + botão MENU
Luz Modo OFF: premir o botão ALTI + botão MENU
No modo de luz ON:
ao premir um botão acende-se a iluminação.
Premindo novamente um botão é exibida no visor
a função pretendida.
Iniciar/parar o contador
de percurso parcial:
Premir o botão BIKE + MENU
REPOSIÇÃO do contador
de percurso parcial:
No contador de percurso parcial:
manter premido o botão BIKE
Seleção rápida da altitude inicial:
Manter premido o botão ALTI.
Seleção da altitude inicial: com o botão BIKE ou ALTI.
Confirmação da seleção: com o botão MENU.
Ajuste da altitude atual: abrir as configurações com
o botão MENU.
Alteração dos valores com o botão BIKE ou ALTI.
Confirmação das configurações com o botão MENU.
Seleção Roda 1/Roda 2 (BC 14.16):
Manter premido o botão BIKE + MENU,
selecionar a roda e confirmar com o botão MENU
Ajuste da frequência de pedalada:
– Abrir o menu
– Ajuste/Abrir o aparelho
– Navegar para ajuste de frequência de pedaladas
– Colocar frequência de pedalada em LIG.
Após ativação no menu de ajuste encontra-se disponível
a frequência de pedaladas.
NL
Bediening van de verlichting:
Lichtmodus AAN: ALTI-toets + MENU-toets indrukken
Lichtmodus UIT: ALTI-toets + MENU-toets indrukken
In de lichtmodus AAN:
Een toets indrukken schakelt de verlichting in.
Door indrukken van een volgende toets wordt de gewenste
functie in het display getoond.
Deelafstandteller starten/stoppen:
BIKE-toets + MENU-toets indrukken
RESET van de deelafstandteller:
In de deelafstandteller:
BIKE-toets ingedrukt houden
Snelkeuze van de starthoogte:
ALTI-toets ingedrukt houden.
Keuze van de starthoogte: met de BIKE- of ALTI-toets.
Bevestigen van de keuze: met de MENU-toets.
Instellen van de actuele hoogte: openen van de instelling
met de MENU-toets.
Wijzigen van de waarde met de BIKE- of ALTI-toets.
Bevestigen van de instelling met de MENU-toets.
Selectie Fiets 1 / Fiets 2 (BC 14.16):
BIKE-toets + MENU-toets ingedrukt houden,
fiets selecteren en met MENU-toets bevestigen
Instellen van de trapfrequentie:
– Menu openen
– Instelling/apparaat openen
– Naar trapfrequentie-instelling bladeren
– Trapfrequentie op AAN zetten
Na activering in het instelmenu is de trapfrequentie
beschikbaar.
PL
Obsługa podświetlenia:
Tryb podświetlenia ON: Nacisnąć przycisk ALTI + MENU
Tryb podświetlenia OFF: Nacisnąć przycisk ALTI + MENU
W trybie podświetlenia ON:
Naciśnięcie przycisku powoduje włączenie podświetlenia.
Po kolejnym naciśnięciu przycisku żądana funkcja pojawia się
na wyświetlaczu.
Włączenie / zatrzymanie licznika
dystansów częściowych:
Nacisnąć przycisk BIKE + MENU
RESET licznika dystansów częściowych:
W liczniku dystansów częściowych:
przytrzymać wciśnięty przycisk BIKE
Szybki wybór wysokości początkowej:
Przytrzymać wciśnięty przycisk ALTI.
Wybór wysokości początkowej: przyciskiem BIKE lub ALTI.
Zatwierdzenie wyboru: przyciskiem MENU.
Ustawianie aktualnej wysokości: Otwarcie ustawień
przyciskiem MENU.
Zmiana wartości przyciskiem BIKE lub ALTI.
Zatwierdzenie ustawień przyciskiem MENU.
Wybór roweru 1 / roweru 2 (BC 14.16):
Wciśniętym przyciskiem BIKE + MENU wybrać rower
i zatwierdzić przyciskiem MENU
Ustawianie kadencji:
– otwórz Menu;
– wybierz opcję Ustawienia/Urządzenie;
– przewiń ekran do ustawienia kadencji;
– ustaw kadencję na WŁ.
Po aktywowaniu w menu Ustawienia funkcja kadencji
będzie dostępna.
CZ
Ovládání osvětlení:
Režim světla ZAP: stisknout tlačítko ALTI + tlačítko MENU
Režim světla VYP: stisknout tlačítko ALTI + tlačítko MENU
Vrežimu světla ZAP:
Stisknutím tlačítka se zapne osvětlení.
Dalším stisknutím tlačítka se na displeji vyvolá
požadovaná funkce.
Počitadlo dílčí trasy spustit/zastavit:
stisknout tlačítko BIKE + tlačítko MENU
RESET počitadla dílčí trasy:
V počitadle dílčí trasy:
přidržet stisknuté tlačítko BIKE
Rychlý výběr počáteční výšky:
Přidržet stisknuté tlačítko ALTI.
Výběr počáteční výšky: tlačítkem BIKE nebo ALTI.
Potvrzení výběru: tlačítkem MENU.
Nastavení aktuální výšky: otevření nastavení tlačítkem MENU.
Změna hodnot tlačítkem BIKE nebo ALTI.
Potvrzení nastavení tlačítkem MENU.
Výběr kolo1 / kolo2 (BC 14.16):
Přidržet stisknuté tlačítko BIKE + tlačítko MENU,
vybrat kolo apotvrdit tlačítkem MENU
Nastavení frekvence šlapání:
– otevření menu
– otevření nastavení přístroje
– přejití k nastavení frekvence šlapání
– nastavení frekvence šlapání na ZAP
Po aktivaci v menu nastavení je frekvence šlapání k dispozici.
= ALTI BIKE
= ALTI BIKE
= ALTI BIKE
BIKE
= ALTI BIKE
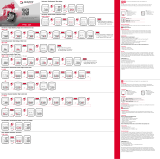
Example of a setting (setting the wheel size):
– Open menu: Press and hold down MENU button until the menu opens
– Scroll from statistics to setting: With the BIKE or the ALTI button
– Open the settings menu: With the MENU button
– Scroll in the settings menu up to the desired BIKE setting: With the BIKE or
the ALTI button
– Open setting: With the MENU button
– Scrolling to WHEEL CIRCUM setting: With the BIKE or the ALTI button
– Opening the WHEEL CIRCUM setting: With the MENU button
– Change data: With the BIKE or the ALTI button (short press,
long press for quick change)
– Confirm setting: With the MENU button
– Close settings menu/one level back: Go BACK with the BIKE or the ALTI button,
confirm with the MENU button or go one level up in the menu: Press and
hold BIKE button.
– Close settings menu / back to the function menu: Press and hold
the MENU button.
Exemple de réglage (réglage de la taille des roues) :
– Ouverture du menu : maintenir la touche MENU enfoncée jusqu‘à ce que
le menu s‘ouvre
– Passage des statistiques aux réglages : avec les touches BIKE ou ALTI
– Ouverture du menu de réglage : avec la touche MENU
– Défilement jusqu‘au réglage VELO souhaité dans le menu de réglage avec
les touches BIKE ou ALTI
– Ouverture du réglage : avec la touche MENU
– Défilement jusqu‘au réglage CIRCONFERENCE DE LA ROUE :
avec les touches BIKE ou ALTI
– Ouverture du réglage CIRCONFERENCE DE LA ROUE : avec la touche MENU
– Modification des données : avec les touches BIKE ou ALTI (pression courte,
pression longue pour une modification rapide)
– Confirmation du réglage : avec la touche MENU
– Fermeture du menu de réglage / Retour d‘un niveau de menu en arrière :
avec les touches BIKE ou ALTI pour revenir en arrière, confirmer avec
la touche MENU ou revenir au niveau supérieur dans le menu : maintenir
la touche BIKE enfoncée
– Fermeture du menu de réglage / Retour au menu “Fonctions”:
maintenir la touche MENU enfoncée
Beispiel einer Einstellung (Radgrösse einstellen):
– Menü öffnen: MENÜ-Taste gedrückt halten, bis sich das Menü öffnet
– Blättern von Statistik zu Einstellung: Mit der BIKE- oder der ALTI-Taste
– Einstell-Menü öffnen: Mit der MENÜ-Taste
– Blättern im Einstell-Menü bis zur gewünschten Einstellung RAD: Mit der
BIKE- oder der ALTI-Taste
– Einstellung öffnen: Mit der MENÜ-Taste
– Blättern zur Einstellung RADUMFG: Mit der BIKE- oder der ALTI-Taste
– Öffnen der Einstellung RADUMFG: Mit der MENÜ-Taste
– Daten verändern: Mit der BIKE- oder der ALTI-Taste (kurz drücken,
lang drücken für schnelle Veränderung)
– Einstellung bestätigen: Mit der MENÜ-Taste
– Einstell-Menü schließen/eine Ebene zurück: Mit der BIKE- oder der ALTI-Taste
zu ZURÜCK, mit der MENÜ-Taste bestätigen oder im Menü eine Ebene nach
oben: BIKE-Taste gedrückt halten
– Einstell-Menü schließen/zurück zum Funktions-Menu: MENÜ-Taste
gedrückt halten
Esempio di un‘impostazione (impostare dimensioni ruote):
– Aprire il menu: tenere premuto il pulsante MENU fino a quando si apre il menu
– Scorrere da statistiche a impostazioni: con il pulsante BIKE o ALTI
– Aprire il menu di impostazione: con il pulsante MENU
– Scorrere nel menu di impostazione fino all‘impostazione desiderata per RUOTA:
con il pulsante BIKE o ALTI
– Aprire le impostazioni: con il pulsante MENU
– Scorrere all‘impostazione CIRC.RUOTA: con il pulsante BIKE o ALTI
– Accedere all‘impostazione CIRC.RUOTA: con il pulsante MENU
– Modificare i dati: con il pulsanta BIKE o ALTI (premere brevemente,
premere a lungo per una rapida modifica)
– Confermare l‘impostazione: con il pulsante MENU
– Chiudere il menu di impostazione/tornare indietro di un livello:
tornare a INDIETRO con il pulsante BIKE o ALTI, confermare con il
pulsante MENU oppure tenere premuto il pulsante BIKE per passare
a un livello più in alto nel menu
– Chiudere il menu di impostazione/tornare al menu di funzionamento:
tenere premuto il pulsante MENU
Setting / reading with NFC:
BC 14.16 has NFC technology. With NFC, you can make all settings easily with
your smartphone. After a trip you can transfer the trip data to your smartphone
with NFC.
– In device setting NFC must be set to “ON”.
ATTENTION: If NFC is set to “ON”, any of your data can be read out using
a smartphone and the SIGMA Link app. If you do not want that, then switch
NFC back to “OFF” after setting/reading.
– The SIGMA Link app must be installed on the smartphone.
– Open SIGMA Link app on the smartphone.
– Place smartphone with the NFC sensor to the BC.
– Wait for read/write confirmation of the app.
– Adjust settings in the app.
– Place smartphone again on the BC.
– Wait for read/write confirmation of the app.
Réglage / Consultation via NFC :
Le BC 14.16 est doté de la technologie NFC. La technologie NFC vous permet
de procéder à tous les réglages confortablement depuis votre Smartphone.
Les données d‘un tour peuvent également être transmises à votre Smartphone
après une sortie grâce à la technologie NFC.
– L‘option NFC doit être activée dans les réglages de l‘appareil.
ATTENTION ! Lorsque la fonction NFC a été activée, toutes vos données
peuvent être consultées avec un Smartphone et l‘application SIGMA Link.
Si vous ne le souhaitez pas, désactivez la fonction NFC après le réglage /
la consultation des données.
– L‘application SIGMA Link doit être installée sur le Smartphone.
– L‘application SIGMA Link doit être lancée sur le Smartphone.
– Placer le Smartphone avec le capteur NFC sur le BC.
– Attendre la confirmation de lecteur/écriture de l‘application.
– Adapter les réglages dans l‘application.
– Placer à nouveau le Smartphone sur le BC.
– Attendre la confirmation de lecteur/écriture de l‘application.
Setting/Auslesen mit NFC:
BC 14.16 verfügt über NFC Technik. Mit NFC können Sie bequem alle
Einstellungen mit Ihrem Smartphone machen. Nach einer Fahrt können Sie
die Tourdaten mit NFC auf Ihr Smartphone übertragen.
– NFC in Geräte-Einstellung muss auf „AN“ stehen.
ACHTUNG: Wenn NFC auf „AN“ gesetzt wurde, kann jeder Ihre Daten mit
einem Smartphone und der SIGMA Link App auslesen. Wenn Sie das nicht
wollen, dann setzen Sie NFC nach dem Einstellen/Auslesen wieder auf „AUS“.
– SIGMA Link App muss auf dem Smartphone installiert sein.
– SIGMA Link App am Smartphone öffnen.
– Smartphone mit dem NFC Sensor auf den BC legen.
– Lese/Schreib-Bestätigung der App abwarten.
– Einstellungen in der App anpassen.
– Smartphone erneut auf den BC legen.
– Lese/Schreib-Bestätigung der App abwarten.
Impostazione/analisi con NFC:
BC 14.16 è dotato di tecnologia NFC. Con la tecnologia NFC, è possibile
effettuare le impostazioni in tutta tranquillità con il proprio smartphone.
Quindi, dopo la corsa, è possibile trasmettere i dati del percorso con NFC sullo
smartphone.
– Nelle impostazioni del dispositivo, l‘opzione NFC deve essere posizionata
su “ON”.
ATTENZIONE: se l‘opzione NFC è impostata su “ON”, ciascuno può analizzare
i propri dati con uno smartphone e con l‘app SIGMA Link. Se non si desidera
procedere in questo modo, è possibile impostare l‘opzione NFC di
impostazione/analisi su “OFF”.
– L‘app SIGMA Link deve essere installata sullo smartphone.
– Aprire l‘app SIGMA Link sullo smartphone.
– Appoggiare lo smartphone con il sensore NFC sul ciclocomputer.
– Attendere la conferma di lettura/scrittura dell‘app.
– Regolare le impostazioni nell‘app.
– Appoggiare nuovamente lo smartphone al ciclocomputer.
– Attendere la conferma di lettura/scrittura dell‘app.
Operating concept:
– Opening the MENU: with the MENU button (long press)
– Scroll in the MENU: with the BIKE or the ALTI button (BIKE = forward / ALTI = backward)
– Opening the MENU: with the MENU button (short press)
– Selection of setting / changing the setting: with the BIKE or the ALTI button (BIKE = forward / ALTI = backward)
– Confirm the setting: with the menu button (short press)
– Exit menu: scroll to BACK, confirm with the MENU button (short press) or with the BIKE button go up one menu level
(long press BIKE button)
Concept d‘utilisation:
– Ouverture du MENU : avec la touche MENU (pression longue)
– Défilement du menu : avec les touches BIKE ou ALTI (BIKE = vers l‘avant / ALTI = vers l‘arrière)
– Ouverture du MENU : avec la touche MENU (pression courte)
– Sélection / Modification d‘un réglage : avec les touches BIKE ou ALTI (BIKE = vers l‘avant / ALTI = vers l‘arrière)
– Confirmation du réglage : avec la touche MENU (pression courte)
– Quitter le menu : faire défiler jusqu‘à RETOUR, confirmer avec la touche MENU (pression courte) ou revenir d‘un niveau de menu
vers le haut avec la touche BIKE (pression longue)
Bedienkonzept:
– MENÜ Öffnen: mit der MENÜ-Taste (lang drücken)
– Blättern im MENÜ: mit der BIKE- oder der ALTI-Taste (BIKE = vorwärts / ALTI = rückwärts)
– Einstellung Öffnen: mit der MENÜ-Taste (kurz drücken)
– Auswahl der Einstellung / Ändern der Einstellung mit der BIKE-oder der ALTI-Taste (BIKE = vorwärts / ALTI = rückwärts)
– Einstellung Bestätigen: Mit der MENÜ-Taste (kurz drücken)
– Menü verlassen: blättern mit der BIKE- oder ALTI-Taste bis ZURÜCK, mit der Menü-Taste bestätigen (kurz dücken) oder
mit der BIKE-Taste eine Menü-Ebene nach oben (BIKE-Taste lang drücken)
Sistema di utilizzo:
– Apertura del MENU: con il pulsante MENU (premere in modo prolungato)
– Scorrere il MENU: con il pulsante BIKE o ALTI (BIKE = in avanti / ALTI = indietro)
– Apertura del MENU: con il pulsante MENU (premere brevemente)
– Selezione dell‘impostazione / Modifica dell‘impostazione: con il pulsante BIKE o ALTI (BIKE = in avanti / ALTI = indietro)
– Conferma dell‘impostazione: con il pulsante MENU (premere brevemente)
– Uscire dal menu: tornare a INDIETRO, confermare con il pulsante Menu (premere brevemente) oppure passare a un livello
più in alto nel menu con il pulsante BIKE (premere in modo prolungato il pulsante BIKE)
= MENU button
= Touche MENU
= MENU-Taste
MENU
= Tasto MENU
EN
FR
DE
IT
IMPORTANT
IMPORTANT
WICHTIG
IMPORTANTE
Note: Detailed operating instructions can be found at www.sigmasport.com
Remarque : Vous trouverez des instructions d‘utilisation détaillées sur le site www.sigmasport.com
Hinweis: Eine ausführliche Bedienungsanleitung finden Sie auf www.sigmasport.com
Nota: istruzioni per l‘uso dettagliate sono disponibili all‘indirizzo www.sigmasport.com
SIGMA-ELEKTRO GmbH
Dr.-Julius -Leber- Straße 15
D-67433 Neustadt /Weinstraße
SIGMA-ELEKTRO (Hong Kong) Ltd
Room 2010, 20/F, No.1 Hung To Road,
Kwun Tong, Kowloon, Hong Kong
SIGMA SPORT USA
1860B Dean St.
St. Charles, IL 60174, U.S.A.
EN
HOLD MENU button: Open the Menu Press BIKE button or ALTI button short: Select Menu Press MENU button short: Open the Menu Press MENU button short: Back to upper Menu Level Hold BIKE button 3 sec.: Back to upper Menu Level
DE
MENU-Taste gedrückt halten: Menü öffnen BIKE oder ALTI-Taste kurz drücken: Menu auswählen MENU-Taste kurz drücken: Menü öffnen MENU-Taste kurz drücken: Eine Ebene zurück BIKE-Taste 3 Sek. gedrückt halten: Eine Ebene zurück
FR
Maintenir la touche MENU enfoncée: ouverture du menu Appuyer brièvement sur la touche BIKE ou ALTI : sélection d‘un menu Appuyer brièvement sur la touche MENU : ouverture du menu Appuyer brièvement sur la touche MENU : retour en arrière d‘un niveau Maintenir la touche BIKE enfoncée 3 sec. : retour en arrière d‘un niveau
IT
Tenere premuto il pulsante MENU: aprire il menu Premere brevemente il pulsante BIKE o ALTI: selezionare il menu Premere brevemente il pulsante MENU: aprire il menu Premere brevemente il pulsante MENU: tornare indietro di un livello Tenere premuto il pulsante BIKE per 3 sec.: tornare indietro di un livello
ES
Mantener presionada la tecla MENÚ: abrir el menú Presionar brevemente las teclas BIKE o ALTI: seleccionar el menú Presionar brevemente la tecla MENÚ: abrir el menú Presionar brevemente la tecla MENÚ: volver un nivel Mantener presionada la tecla BIKE durante 3 s: volver un nivel
PT
Manter a tecla MENU premida: abrir o menu Premir brevemente a tecla BIKE ou ALTI: selecionar menu Premir brevemente a tecla MENU: abrir o menu Premir brevemente a tecla MENU: retroceder um nível Manter a tecla BIKE premida durante 3 seg.: retroceder um nível
NL
MENU-toets ingedrukt houden: Menu openen BIKE of ALTI-toets kort indrukken: menu selecteren MENU-toets kort indrukken: menu openen MENU-toets kort indrukken: een niveau omhoog BIKE-toets 3 s ingedrukt houden: een niveau omhoog
PL
Naciśnij i przytrzymaj przycisk MENU: otwarcie Menu Naciśnij przycisk BIKE lub ALTI: wybranie Menu Naciśnij przycisk MENU: otwarcie Menu Naciśnij przycisk MENU: przejście w Menu o poziom wyżej
Naciśnij i przytrzymaj przycisk BIKE przez 3 s:
przejście w Menu o poziom wyżej
CZ
Přidržte stisknuté tlačítko MENU: otevření menu Krátce stiskněte tlačítko BIKE nebo ALTI: výběr menu Krátce stiskněte tlačítko MENU: otevření menu Krátce stiskněte tlačítko MENU: oúroveň zpět Přidržte po3sekundystisknuté tlačítko BIKE: oúroveň zpět
BC 14.16 STS
only
STS-S-3
FCC ID: M5LSPD3STS
STS-C-3
FCC ID: M5LCAD3STS
Emisssion frequency: 112 kHz
Max power is < 11.37 dBm
Emisssion frequency: 112 kHz
Max power is < 11.37 dBm