Whirlpool AKR 443 GY Owner's manual
- Category
- Cooker hoods
- Type
- Owner's manual
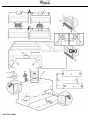
Whirlpool AKR 443 GY: Enhance your kitchen experience with this versatile range hood. Featuring 3 speed settings, it effectively removes cooking odors and fumes, leaving your kitchen fresh and clean. Aluminum grease filters capture grease and oil particles, while the optional carbon filter (sold separately) eliminates odors. Easy-to-use controls and a sleek design make this range hood a stylish and functional addition to your kitchen.
Whirlpool AKR 443 GY: Enhance your kitchen experience with this versatile range hood. Featuring 3 speed settings, it effectively removes cooking odors and fumes, leaving your kitchen fresh and clean. Aluminum grease filters capture grease and oil particles, while the optional carbon filter (sold separately) eliminates odors. Easy-to-use controls and a sleek design make this range hood a stylish and functional addition to your kitchen.


-
 1
1
-
 2
2
-
 3
3
-
 4
4
-
 5
5
-
 6
6
-
 7
7


Whirlpool AKR 443 GY Owner's manual
- Category
- Cooker hoods
- Type
- Owner's manual
Whirlpool AKR 443 GY: Enhance your kitchen experience with this versatile range hood. Featuring 3 speed settings, it effectively removes cooking odors and fumes, leaving your kitchen fresh and clean. Aluminum grease filters capture grease and oil particles, while the optional carbon filter (sold separately) eliminates odors. Easy-to-use controls and a sleek design make this range hood a stylish and functional addition to your kitchen.
Ask a question and I''ll find the answer in the document
Finding information in a document is now easier with AI
Related papers
-
Whirlpool AKR 643 GY User guide
-
Whirlpool AKR 958 IX WP Owner's manual
-
Whirlpool AKR 630 WH-1 User guide
-
Whirlpool Ddw 5790 IN User guide
-
Whirlpool DS 2355 WS User guide
-
-
-
Whirlpool DDLI 5710 User guide
-
Whirlpool AKR 813 IX WP User guide
-
Other documents
-
 Futuro Futuro WL36LUXOREQUO Luxor Wall Installation
-
Bauknecht DTR 5890/IN/01 Program Chart
-
IKEA . User guide
-
Maytag MET 8090 VAS Program Chart
-
-
Bauknecht DLHI 5370 IN Program Chart
-
-
IKEA HDN P610 S Program Chart
-
-
Bauknecht DKEL 3860 IN Program Chart
