Chicco Lullaby® Primo User manual
- Category
- Baby furniture
- Type
- User manual
This manual is also suitable for
Chicco Lullaby® Primo
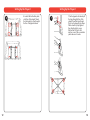
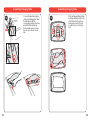
The Chicco Lullaby® Primo is a versatile 3-in-1 product that can be used as a bassinet, playard, and changing table. It's designed to provide a safe and comfortable space for your baby to sleep, play, and get changed.
As a bassinet, the Lullaby® Primo has a soft, padded mattress and a mesh canopy to keep your baby cool and comfortable. It also has a built-in nightlight and sound machine to help your baby drift off to sleep.
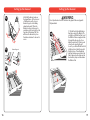
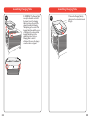
As a playard, the Lullaby® Primo has a large, open space for your baby to play and explore. It also has a removable toy bar with several interactive toys to keep your baby entertained.
Chicco Lullaby® Primo
The Chicco Lullaby® Primo is a versatile 3-in-1 product that can be used as a bassinet, playard, and changing table. It's designed to provide a safe and comfortable space for your baby to sleep, play, and get changed.
As a bassinet, the Lullaby® Primo has a soft, padded mattress and a mesh canopy to keep your baby cool and comfortable. It also has a built-in nightlight and sound machine to help your baby drift off to sleep.
As a playard, the Lullaby® Primo has a large, open space for your baby to play and explore. It also has a removable toy bar with several interactive toys to keep your baby entertained.


-
 1
1
-
 2
2
-
 3
3
-
 4
4
-
 5
5
-
 6
6
-
 7
7
-
 8
8
-
 9
9
-
 10
10
-
 11
11
-
 12
12
-
 13
13
-
 14
14
-
 15
15
-
 16
16
-
 17
17
-
 18
18
-
 19
19
-
 20
20
-
 21
21
-
 22
22
-
 23
23
-
 24
24


Chicco Lullaby® Primo User manual
- Category
- Baby furniture
- Type
- User manual
- This manual is also suitable for
Chicco Lullaby® Primo
The Chicco Lullaby® Primo is a versatile 3-in-1 product that can be used as a bassinet, playard, and changing table. It's designed to provide a safe and comfortable space for your baby to sleep, play, and get changed.
As a bassinet, the Lullaby® Primo has a soft, padded mattress and a mesh canopy to keep your baby cool and comfortable. It also has a built-in nightlight and sound machine to help your baby drift off to sleep.
As a playard, the Lullaby® Primo has a large, open space for your baby to play and explore. It also has a removable toy bar with several interactive toys to keep your baby entertained.
Ask a question and I''ll find the answer in the document
Finding information in a document is now easier with AI
Related papers
-
Chicco Lullaby® Zip Playard User manual
-
-
-
-
-
-
-
-
-
Other documents
-
Qaba 330-158V00PK Assembly Instructions
-
 Beautyrest 700753694-1030 User guide
-
PyleHome PCVGNL8 Owner's manual
-
 Delta Children Deluxe Play Yard Assembly Instructions
-
Baby Trend Nursery center PY86091 User manual
-
BABYTREND py81060 Owner's manual
-
-
BABYTREND Nursery Center Owner's manual
-
BABYTREND Nursery Center Mini Playard User manual
-
BABYTREND py88950 Owner's manual

