Curtis GEMXSIFT63A1000 User guide
- Category
- Coffee making accessories
- Type
- User guide
This manual is also suitable for

USER GUIDE
READ AND SAVE THESE INSTRUCTIONS
NOTICE TO INSTALLER: Please leave this booklet with the machine.
øøøøø #
'$(&.94*'5(&.95*'5'30/5$07&3 'SFW"
G3 GEMX
™
IntelliFresh
®
Coffee Brewing
System with FreshTrac
®
Satellite
4UZMFWBSJFT.PEFM(&.94*'5TIPXO.

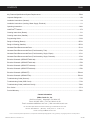
CONTENTS CL68
.H\)HDWXUHV6SHFLÀFDWLRQV6\VWHP5HTXLUHPHQWV..............................................................................................FS68
,PSRUWDQW6DIHJXDUGV ...............................................................................................................................................IS2
,QVWDOODWLRQ,QVWUXFWLRQV*HQHUDO ...............................................................................................................................II2
,QVWDOODWLRQ,QVWUXFWLRQV/HYHOLQJ:DWHU6XSSO\(OHFWULFDO ......................................................................................II1
2SHUDWLQJ,QVWUXFWLRQV ............................................................................................................................................OI50
,QWHOOL)UHVK
®
Features ............................................................................................................................................... IF2
&OHDQLQJ,QVWUXFWLRQV%UHZHU .................................................................................................................................CI1
&OHDQLQJ,QVWUXFWLRQV6DWHOOLWH .............................................................................................................................. CI29
3URJUDPPLQJ*XLGH ............................................................................................................................................... 3*
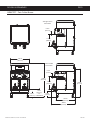
5RXJK,Q'UDZLQJ%UHZHU .................................................................................................................................. 5'
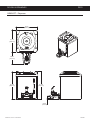
5RXJK,Q'UDZLQJ6DWHOOLWH ................................................................................................................................ 5'
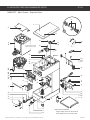
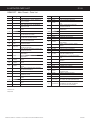
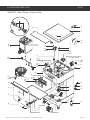
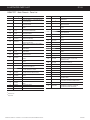
,OOXVWUDWHG3DUWV5HFRPPHQGHG3DUWV .................................................................................................................. IP119
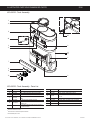
,OOXVWUDWHG3DUWV5HFRPPHQGHG3DUWV7DQN$VVHPEO\7ZLQ .............................................................................. IP26
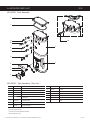
,OOXVWUDWHG3DUWV5HFRPPHQGHG3DUWV7DQN$VVHPEO\6LQJOH([SRUW ............................................................... IP31
,OOXVWUDWHG3DUWV5HFRPPHQGHG3DUWV7DQN$VVHPEO\6LQJOH'RPHVWLF ........................................................... IP32
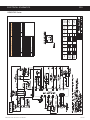
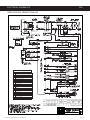
(OHFWULFDO6FKHPDWLF*(0;6,)7$ ............................................................................................................ES3
(OHFWULFDO6FKHPDWLF*(0;6,)7$ ............................................................................................................ES4
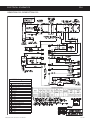
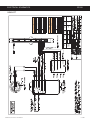
(OHFWULFDO6FKHPDWLF*(0;7,)7$ ............................................................................................................ES5
(OHFWULFDO6FKHPDWLF*(0;7,)7$ ............................................................................................................ES6
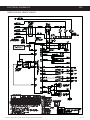
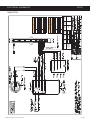
(OHFWULFDO6FKHPDWLF*(0;,)7 ....................................................................................................................... ES108
(OHFWULFDO6FKHPDWLF*(0;,)7 ................................................................................................................... ES133
7URXEOHVKRRWLQJ*XLGH*HQHUDO ............................................................................................................................7*
7URXEOHVKRRWLQJ*XLGH665&LUFXLW ......................................................................................................................7*
7URXEOHVKRRWLQJ*XLGH,QWHOOLIUHVK&LUFXLW ..........................................................................................................7*
(UURU&RGHV .............................................................................................................................................................EC4
3URGXFW:DUUDQW\....................................................................................................................................................3:
Contact Information
Wilbur Curtis Co., Inc.
6913 Acco Street | Montebello, CA 90640 US
Phone: 323-837-2300 | Toll Free: 800-421-6150
Email: [email protected] | Web: www.wilburcurtis.com
'PSUIFMBUFTUTQFDJmDBUJPOTBOEJOGPSNBUJPOHPUPXXXXJMCVSDVSUJTDPN
5PMM'SFF].POEBZ'SJEBZ
A.M. - 4:00 P.M. PT
Email: [email protected]
%VFUPDPOUJOVFEQSPEVDUJNQSPWFNFOUUIFQSPEVDUTJMMVTUSBUFEQIPUPHSBQIFEJOUIJTHVJEFNBZWBSZTMJHIUMZGSPNUIFBDUVBMQSPEVDU
(&.94*'5(&.95*'5$0/5&/54-*45øø #

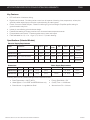
KEY FEATURES/SPECIFICATIONS/SYSTEM REQUIREMENTS FS68
Key Features
• -&%OPUJmDBUJPOPGGSFTIOFTTUJNJOH
• %JHJUBMDPOUSPMNPEVMF1SPWJEFTQSFDJTFDPOUSPMPWFSBMMBTQFDUTPGCSFXJOHUJNFUFNQFSBUVSFWPMVNFQMVT
TQFDJBMUZDPGGFFOFFETGSPNQSFJOGVTJPOUPQVMTFCSFXJOHUPXBUFSCZQBTT
• 1SFTFUPOFUPVDI(MPCBM3FDJQFTo#BTFEPODPGGFFUZQFHSJOEBOEXFJHIU4JNQMJmFTQSPmMFTFUUJOHGPS
HPVSNFUSFTVMUTFWFSZUJNF
• *OEVTUSZTNPTUFGGFDUJWFNJOFSBMUPMFSBOUEFTJHO
• 1BUFOUFEGBTUXFUUJOH"'4TQSBZIFBEBOEOPOJNNFSTFEXBUFSUFNQFSBUVSFTFOTPS
• &ODBQTVMBUFEDPOUSPMCPBSEo1SPUFDUTBHBJOTUTUFBNXBUFSBOEJNQBDU
• 'JFMETFMFDUBCMFGPSPSHBMPS-CBUDICSFXJOH
6SHFLÀFDWLRQV6HOHFWHG0RGHOV
(OHFWULFDO6XSSO\5HTXLUHPHQWV
02'(/ '(6&5,37,21 3+$6( 92/76 $036
+($7,1*
&21),*
:,5( :$776 +(57= &$3$&,7<
*(0;6,)7$ Single, 1.5 Gallon with IntelliFresh
®
1 PH 230 V 18.5 A 2 X 2000 W 2W + G 4050 W 50/60 Hz
12.0 gal./hr.
[45.4 L/hr.]
*(0;6,)7$
Single, 1.5 Gallon w/IntelliFresh, Dual
Voltage
1 PH 120/220 V 13.5/13.5 A 2 X 1600 W 2W/3W + G 1650/2800 W 50/60 Hz
4.5/10.0 gal./hr.
[17.0/37.9 L/hr.]
*(0;7,)7$ Twin, 1.5 Gallon with IntelliFresh 1 PH 220 V 23.0/34.0 A 3 X 2500 W 3W + G 5100/7500 W 50/60 Hz
15.0/21.0 gal./hr.
[56.8/79.5 L/hr.]
*(0;7,)7$ Twin, 1.5 Gallon with IntelliFresh 1 PH 230 V 24.2 A 2 X 2500 W 2W + G 5574 W 50/60 Hz
15.0/21.0 gal./hr.
[56.8/79.5 L/hr.]
'LPHQVLRQV :DWHU6XSSO\5HTXLUHPHQWV
02'(/ +(,*+7 :,'7+ '(37+ 6+,3:(,*+7 6+,3&8%( :$7(5&211(&725 :$7(535(6685( 0,1)/2:5$7(
*(0;6,)7$
*(0;6,)7$
31.87”
[81.0 cm]
10.50”
[26.7 cm]
22.68”
[57.6 cm]
51.0 lb.
[23.1 kg]
7.00 cu. ft.
[0.20 m
3
]
µÁDUH
20 - 90 psi
[138 - 620 kPa]
1.0 gpm
[3.8 Lpm]
*(0;7,)7$
*(0;7,)7$
31.87”
[81.0 cm]
18.17”
[46.1 cm]
22.68”
[57.6 cm]
85.0 lb.
[38.6 kg]
10.90 cu. ft.
[0.31 m
3
]
µÁDUH
20 - 90 psi
[138 - 620 kPa]
2.0 gpm
[7.6 Lpm]
(&.94*'5(&.95*'5,&:'&"563&441&$44:45&.3&26*3&.&/54 D
'PMMPXJOHBSFUIFGBDUPSZEFGBVMUTFUUJOHTGPSUIF*OUFMMJ'SFTICSFXFS
• &OFSHZ4BWF.PEF0GG
• 2VBMJUZ5JNFS.JOVUFT
• 8BSNFS"VUP0GG)PVST
• #SFX5FNQFSBUVSF¡'¡$
• 8BUFS#ZQBTT0O-"3(&BOE.&%*6.CSFXPOMZ
• #SFX7PMVNF-BSHF.FEJVN4NBMM

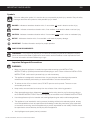
IMPORTANT SAFEGUARDS IS2
Symbols
This is the safety alert symbol. It is used to alert you to potential physical injury hazards. Obey all safety
messages that follow this symbol to avoid possible injury or death.
DANGER - Indicates a hazardous situation which, if not avoided, will result in death or serious injury.
WARNING - Indicates a hazardous situation which, if not avoided, could result in death or serious injury.
CAUTION - Indicates a hazardous situation which, if not avoided, could result in minor or moderate injury.
NOTICE - Indicates a situation which, if not avoided, could result in property damage.
IMPORTANT - Provides information and tips for proper operation.
SANITATION REQUIREMENTS
Important Safeguards/Conventions
WARNING:
• Make sure that this appliance is installed and grounded according to the INSTALLATION
*/4536$5*0/4CZRVBMJmFEQFSTPOOFMCFGPSFBUUFNQUJOHUPVTFJU'BJMVSFUPGPMMPXUIF*/45"--"5*0/
INSTRUCTIONS could result in personal injury or void the warranty.
• This appliance is designed for commercial use. Any service other than cleaning and preventive
maintenance should be performed by an authorized Wilbur Curtis service technician.
• 5PSFEVDFUIFSJTLPGmSFPSFMFDUSJDTIPDL%0/05PQFOUIFTFSWJDFQBOFMT5IFSFBSFOPVTFS
serviceable parts inside.
• Keep hands, arms and other items away from hot surfaces of the unit during operation.
• Clean the appliance and any dispensers completelyCFGPSFVTJOHUIFNGPSUIFmSTUUJNFBDDPSEJOHUP
the CLEANING INSTRUCTIONS. Clean them regularly as instructed in the CLEANING INSTRUCTIONS.
• Use this appliance only for its intended use, brewing/dispensing hot and/or cold beverages/water.
• This appliance is not intended for use by persons (including children) with reduced physical, sensory
or mental capabilities or lack of experience and knowledge, unless they have been given supervision
or instruction concerning use of the appliance by a person responsible for their safety. Children should
be supervised to ensure that they do not play with the appliance.
• Avoid spillage onto the power (mains) connector.
$0''&&5&"#3&8&34*.1035"/54"'&(6"3%44:.#0-4 )
WARNING - 5IJTQSPEVDUDBOFYQPTFZPVUPDIFNJDBMTJODMVEJOH"DSZMBNJEFBOE#JTQIFOPM"#1"
which are known to the State of California to cause cancer and birth defects or other reproductive harm.
'PSNPSFJOGPSNBUJPOWJTJUXXX18BSOJOHTDBHPW

IMPORTANT SAFEGUARDS IS2
$0''&&5&"#3&8&34*.1035"/54"'&(6"3%44:.#0-4 )
CE Requirements
• This appliance must be installed in locations where it can be overseen by trained personnel.
• 'PSQSPQFSPQFSBUJPOUIJTBQQMJBODFNVTUCFJOTUBMMFEXIFSFUIFUFNQFSBUVSFJTCFUXFFO¡$UP¡$
• This appliance is not suitable for outdoor use.
• 5IJTBQQMJBODFTIBMMOPUCFUJMUFENPSFUIBO¡GPSTBGFPQFSBUJPO
• "OFMFDUSJDJBONVTUQSPWJEFFMFDUSJDBMTFSWJDFBTTQFDJmFEJODPOGPSNBODFXJUIBMMMPDBMBOEOBUJPOBMDPEFT
'PSTBGFVTFBOBMMQPMFEJTDPOOFDUJPONVTUCFJODPSQPSBUFEJOUPUIFmYFEXJSJOHJOBDDPSEBODFXJUIUIF
XJSJOHSVMFTPVUMJOFEJODMBVTFPG*&$GPSNFFUJOHUIFNJOJNVNFMFDUSJDBMTBGFUZPGUIJTTUBOEBSE
• This appliance must not be cleaned by water jet.
• 5IJTBQQMJBODFDBOCFVTFECZQFSTPOTBHFEGSPNZFBSTBOEBCPWFJGUIFZIBWFCFFOHJWFOTVQFSWJTJPOPS
instruction concerning use of the appliance in a safe way and if they understand the hazards involved.
• ,FFQUIFBQQMJBODFBOEJUTDPSEPVUPGSFBDIPGDIJMESFOBHFEMFTTUIBOZFBST
• "QQMJBODFTDBOCFVTFECZQFSTPOTZFBSTBOEBCPWFXJUISFEVDFEQIZTJDBMTFOTPSZPSNFOUBMDBQBCJMJUJFT
or lack of experience and knowledge if they have been given supervision or instruction concerning use of the
appliance in a safe way and understand the hazards involved.
• $IJMESFOVOEFSUIFBHFPGZFBSTTIPVMECFTVQFSWJTFEUPFOTVSFUIFZEPOPUQMBZXJUIUIFBQQMJBODF
• If the power cord is ever damaged, it must be replaced by the manufacturer or authorized service personnel
with a special cord available from the manufacturer or its authorized service personnel in order to avoid a
hazard.
• Machine must not be immersed for cleaning.
• $MFBOJOHBOEVTFSNBJOUFOBODFTIBMMOPUCFNBEFCZDIJMESFOVOMFTTUIFZBSFPMEFSUIBOZFBSTBOE
supervised.
• This appliance is intended to be used in household and similar applications such as:
oTUBGGLJUDIFOBSFBTJOTIPQTPGmDFTBOEPUIFSXPSLJOHFOWJSPONFOUT
oCZDMJFOUTJOIPUFMTNPUFMTBOEPUIFSSFTJEFOUJBMUZQFFOWJSPONFOUT
– bed and breakfast type environments.
• This appliance not intended to be used in applications such as:
– farm houses
• Access to the service areas permitted by Authorized Service personnel only.
• 5IF"8FJHIUFETPVOEQSFTTVSFMFWFMJTCFMPXE#"

INSTALLATION INSTRUCTIONS II2
Installation Instructions
Installation Requirements
• A secure surface capable of supporting the weight of the appliance.
• For units without an attached cord set attached or dual voltage units set up for use with 220 - 240 Volts:
"QQSPQSJBUFMZTJ[FE6-MJTUFEHSPVOEJOHUZQFQPXFSDBCMFUPNFFUUIFFMFDUSJDBMTQFDJmDBUJPOTGPSUIF
BQQMJBODF*GZPVIBWFRVFTUJPOTBCPVUUIFDPSSFDUDBCMFTJ[FBOEMFOHUIDPOTVMUBRVBMJmFEJOTUBMMFS*GUIF
appliance will be hard wired to a junction box, the power cable must be long enough so that the unit can be
moved for cleaning underneath.
• "HSPVOEFEFMFDUSJDBMDPOOFDUJPOUPBOFMFDUSJDBMDJSDVJUUIBUNFFUTUIFFMFDUSJDBMTQFDJmDBUJPOTPGUIF
appliance (see SPECIFICATIONS). The circuit must be protected by the appropriate sized circuit breaker. If
you are not certain that the existing circuit meets the requirements for your unit, consult a licensed electrician.
• "XBUFSmMUSBUJPOTZTUFNJTSFRVJSFEUPNBJOUBJOUSPVCMFGSFFPQFSBUJPO8JMCVS$VSUJT$P*ODSFDPNNFOETB
8JMCVS$VSUJTBQQSPWFEXBUFSmMUFS4FFUIF$VSUJT&RVJQNFOU$BUBMPHGPSBGVMMMJOFPG8JMCVS$VSUJTBQQSPWFE
XBUFSmMUFST
• 1PUBCMFXBUFSTVQQMZMJOFDPOOFDUJPOGSPNUIFXBUFSmMUFSDBQBCMFPGTVQQMZJOHUIFNJOJNVNnPXSBUFSFRVJSFE
CZUIFTQFDJmDBUJPOT5IFXBUFSTVQQMZMJOFNVTUCFBCMFUPDPOOFDUUPUIFnBSFmUUJOHPOUIFCBDLPGUIF
VOJU4FFUIFSPECIFICATIONS section for the correct size. The water line should also be capable of being
controlled by a shut off valve. Do not connect the water line to a saddle valve or needle valve.
*&$SFRVJSFTUIFGPMMPXJOHXBUFSDPOOFDUJPO
1 A quick disconnect or additional coiled tubing (at least two times the depth of the appliance) is required
so that it can be moved for cleaning underneath.
2 5IJTFRVJQNFOUJTUPCFJOTUBMMFEXJUIBEFRVBUFCBDLnPXQSPUFDUJPOUPDPNQMZXJUIBQQMJDBCMF
federal, state and local codes.
8BUFSQJQFDPOOFDUJPOTBOEmYUVSFTEJSFDUMZDPOOFDUFEUPBQPUBCMFXBUFSTVQQMZTIBMMCFTJ[FE
installed and maintained in accordance with federal, state and local codes.
WARNING:*OTUBMMBUJPOJTUPCFQFSGPSNFEPOMZCZBRVBMJmFEJOTUBMMFS
WARNING: Improper electrical connection may result in an electric shock hazard or damage the unit. This
appliance must be properly grounded.
NOTICE: DO NOT connect this appliance to a hot water supply. The water inlet valve is not rated for hot
water. Do not exceed the maximum water pressure stated in the SPECIFICATIONS section.
IMPORTANT: Observe all governing codes and ordinances.
#3&8&34=41&$*"-5:%*41&/4&34(&/&3*$*/45"--"5*0/*/4536$5*0/4 F
5IF*OUFSOBUJPOBM1MVNCJOH$PEFPGUIF*OUFSOBUJPOBM$PEF$PVODJMBOEUIF'PPEBOE%SVH"ENJOJTUSBUJPO
'%"'PPE$PEFNBOVBMEJSFDUUIBUUIJTFRVJQNFOUNVTUCFJOTUBMMFEXJUIBEFRVBUFCBDLnPX
QSFWFOUJPOJODPNQMJBODFXJUIGFEFSBMTUBUFBOEMPDBMDPEFT'PSVOJUTJOTUBMMFEPVUTJEFPGUIF64"
make sure that the installation is in compliance with the applicable plumbing/sanitation code for your area.

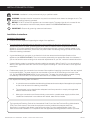
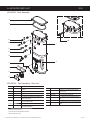
INSTALLATION INSTRUCTIONS II1
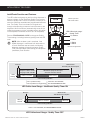
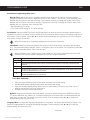
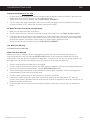
Brew
deck
Front
panel
&RQ¿JXUDWLRQYDULHV
ZLWKPRGHO
:LULQJ
label
7HUPLQDO
block
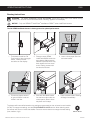
Installation
Leveling
1 Position the brewer on the counter top. Level it left to
right and front to back by turning the bottom of the
legs.
Connect the Water Supply
2 Flush the water supply line prior to installation to
QVSHFBJSBOEEFCSJTGSPNUIFXBUFSmMUFSBOEUVCJOH
3 $POOFDUUIFXBUFSTVQQMZMJOFUPUIFnBSFmUUJOHPO
the back of the brewer. Leave the water supply valve
closed until the power is connected.
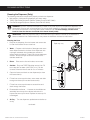
Connect the Brewer Wiring
Brewers Without A Cord Set Attached and Dual
Voltage Brewers to be Operated 220 Volts
4 Remove the screws that hold the front panel in place
and remove it.
5 Loosen the strain relief on the back of the brewer.
6 On dual voltage units being operated at 220 Volts
(nominal) disconnect the existing power cable from
the terminal block and remove.
7 Feed the 220 Volt power cable into the brewer.
8 On dual voltage units being operated at 220 Volts,
disconnect and cap the jumper wire between the “C”
and “N” terminals on the terminal block.
9 Connect the wires on the power cable to the terminal
block inside the brewer.
10 Tighten the strain relief and replace the front panel.
11 Connect the power cable wires to the terminals in the
junction box. See the ELECTRICAL SCHEMATIC for
the power supply requirements.
WARNING: Use the leveling legs to level the
brewer only. Do not use them to adjust brewer
height. Do not extend them higher than
necessary.
WARNING: Turn off power to the junction box at
the circuit breaker panel before connecting the
power cable to the brewer. Lock out and tag the
circuit breaker.
((&.*/45"--"5*0/*/4536$5*0/4ø D

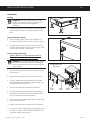
INSTALLATION INSTRUCTIONS II1
Brewers With A Cord Set Attached -
12 Connect the power cord to the appropriate type of
electrical outlet.
Power Up the Brewer
13 Turn on the water supply valve.
14 Make sure that the circuit breaker supplying power to
the unit is on.
15 Turn the toggle switch on the back of the brewer to the
0/QPTJUJPO5IFXBUFSUBOLXJMMTUBSUUPmMM8IJMFUIF
UBOLJTmMMJOHJOTQFDUUIFXBUFSTVQQMZMJOFGPSMFBLT
16 Determine if the brewer will be setup for one, two or
three batch mode. Find the appropriate label, included
with the brewer. The three batch label has LARGE,
.&%BOE4."--#3&8POJUUIFUXPCBUDIMBCFMIBT
-"3(&BOE4."--#3&8POJUBOEUIFPOFCBUDIIBT
POMZ#3&8POJU
17 Peel the protective backing off of the desired label
BOEBGmYJUUPUIFGSPOUPGUIFVOJWFSTBMDPOUSPMNPEVMF
(UCM).
18 Go to the PROGRAMMING GUIDE section and
program the brewer for the correct model and batch
number.
Connect the Brewer Wiring (cont.)
WARNING: Connect the power cord to the
appropriate type and size electrical outlet. If the
electrical outlet is not compatible with the power
cord, have it upgraded by a licensed electrician.
Do not modify the power plug. Do not use an
extension cord. Do not use a power cord/plug that
is damaged.
IMPORTANT: 8IFOPQFSBUJOHUIFCSFXFSBU
higher elevations, reduce the factory set operating
temperature (200°F/92°C) by 2°F/1°C for each
1000 ft./300 m of elevation above 4000 ft./120 m.
See PROGRAMMING GUIDE.
((&.*/45"--"5*0/*/4536$5*0/4ø D

INSTALLATION INSTRUCTIONS II1
19 If the UCM is not already lit, push the ON/OFF button
POUIF6$.8IFOUIFXBUFSMFWFMJOUIFUBOLSJTFT
to the correct volume, the heating elements will turn
on automatically. Depending on the incoming water
UFNQFSBUVSFBOEUIFFMFDUSJDBMTQFDJmDBUJPOTUIF
water tank typically requires 20 to 30 minutes to
SFBDIUIFGBDUPSZTFUPQFSBUJOHUFNQFSBUVSF8IFO
the water has heated, “Ready to Brew” should be on
the display.
20 #FGPSFCSFXJOHGPSUIFmSTUUJNFEJTQFOTFP[
ml of hot water through the hot water faucet to help
purge air from the tubing inside the brewer.
21 Brew a cycle of at least 12 oz./350 ml, to purge any
remaining air from the tubing. See OPERATING
INSTRUCTIONS. During the initial brew cycle and
XIFOFWFSUIFmMUFSJTSFQMBDFEZPVNBZIFBSUIF
TPVOETPGBJSCFJOHQVSHFEGSPNUIFmMUFSUVCJOHBOE
water tank.
((&.*/45"--"5*0/*/4536$5*0/4ø D

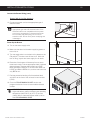
OPERATING INSTRUCTIONS OI50
(&.94*'5(&.95*'501&3"5*/(*/4536$5*0/4øø $
Brewing Instructions
Place an empty GEMX
IntelliFresh
satellite under the
brew basket. Make sure the
satellite is pushed all the way
back against the front cover
and is making contact with
the electrical socket.
*OTFSUBDMFBOQBQFSmMUFSJOUP
the brew basket.
4 Fill with the proper amount
of ground coffee. Level the
DPGGFFJOUIFmMUFS
5 4MJEFUIFmMMFECSFXCBTLFU
into the brew rails under the
control panel. Slide it all the
way back until it stops.
The brewer will brew coffee based on the settings programmed into the universal control module
(UCM). To change the settings, see the PROGRAMMING GUIDE section. When brewing starts,
the warmer will come on inside the satellite. Press the warmer button to change the heat setting
(low, medium, high).
The brewer should be ON.
$POmSNUIJTBUUIFSFBSUPHHMF
switch. “Ready to brew”
should be on the display.
6 Press the brew button. Brewing
will begin immediately.
WARNING - TO AVOID SCALDING, AVOID SPLASHING. Keep body parts clear of the brewer during
brewing. Do not remove the brew basket while “Brewing” appears on the display.
NOTICE - 0OMZVTF(&.9*'5*OUFMMJ'SFTI
®
satellites on GEMX
™
series IntelliFresh brewers.
The G3 GEMX Intellifresh brewer is factory preset for optimal performance.
Warmer Button

INTELLIFRESH
®
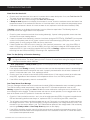
FEATURES IF2
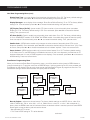
IntelliFresh Function and Features
The LED coffee level gauge on the front of the dispenser is
also the indicator for the IntelliFresh Quality Timer system.
When the quality timer is set to on (default), it alerts you to
when the coffee has exceeded the programmed freshness
time. The Quality Timer is activated via a signal sent
through corresponding connectors from the brewer to the
dispenser. When the warmer (automatically) shuts off, the
coffee level gauge turns blue, provided there is still coffee
in the dispenser. Otherwise the LEDs turn off completely.
See the PROGRAMMING GUIDE to change the Quality
Timer settings, including freshness (quality) time and LED
color.
GEM3XIFT SATELLITE, INTELLIFRESH FEATURES 060820A
/('VÁDVKDIWHUTXDOLW\WLPHUKDVH[SLUHG
DQGFRQWLQXHXQWLOZDUPHUVKXWVRII
4XDOLW\WLPHU/('VRQFRQVWDQW
6HWWLQJUDQJH0LQWR0LQ
%UHZF\FOH :DUPHU$XWR2II
+UVDIWHUTXDOLW\WLPHUKDVH[SLUHG
:DUPHU$XWR2II
+UVDIWHUEUHZF\FOHFRPSOHWHV
&RIIHH/HYHO*DXJH/('6WDWXV
&RIIHH/HYHO*DXJH/('6WDWXV
/('VÀDVKLQJ
2
LEDs blue
LEDs blue
LEDs
ÀDVKLQJ
1
/('VRQ
FRQVWDQW
1
1
&RORUFRႇHHLVIUHVK
2
&RORUFRႇHHLVQRORQJHUIUHVK
&RORUVDUHXVHUVHOHFWDEOH
see PROGRAMMING GUIDE
1
&RORU8VHUVHOHFWDEOHVHHPROGRAMMING GUIDE
LED Coffee Level Gauge - Intellifresh Quality Timer ON
LED Coffee Level Gauge - Quality Timer OFF
NOTE: After the brew cycle is complete, if the
GEMX dispenser is transferred from the brewer to
a Curtis IntelliFresh warmer stand, the following
dispenser settings will remain the same: Quality
Timer, Warmer Default (heat setting) and dispenser
(Intellifresh) Color Scheme.
/('VRQFRQVWDQW
1
/('VRQFRQVWDQW
1
/('&RႇHHOHYHOJDXJH
4XDOLW\7LPHU
1ò*DOORQV
1 *DOORQ
ò*DOORQ
¼*DOORQ
%UHZHUVW\OHYDULHV
ZLWKPRGHOQXPEHU
9ROXPHVDUHDSSUR[LPDWH
%UHZF\FOH

NOTICE - Do not use cleaning liquids, compounds or powders containing chlorine (bleach) or corrosives.
5IFTFQSPEVDUTQSPNPUFDPSSPTJPOBOEXJMMEBNBHFUIFmOJTIFT USE OF THESE PRODUCTS WILL VOID
THE WARRANTY.
CLEANING INSTRUCTIONS CI1
Cleaning The Brewer - Daily
BREWERS - GENERIC, CLEANING INSTRUCTIONS 080416B
WARNING: HOT SURFACES - To avoid injury, allow the brewer and dispenser(s) to cool before cleaning.
The brewer should be OFF.5VSOUIFCSFXFSPGGCZnJQQJOHUIFSFBSUPHHMFTXJUDIUPUIF0''QPTJUJPO
1 Remove the dispenser(s). Wipe exterior brewer surfaces with a damp cloth to remove spills and debris.
2 Remove the brew basket(s) and clean them in a mild detergent solution. Use a soft bristled brush for hard to
clean areas. Rinse with clean water, then dry.
3 Wipe the spray head area with a cloth soaked in a mild detergent solution. Rinse with a cloth soaked with
clean water removing any residual detergent. Use a clean, soft cloth to dry.
4 Dump out the drip tray(s) (if applicable). Rinse with clean water, then dry with a soft, clean cloth.
Cleaning The Brewer - Weekly
The brewer should be OFF.5VSOUIFCSFXFSPGGCZnJQQJOHUIFSFBSUPHHMFTXJUDIUPUIF0''QPTJUJPO
1 Remove the spray head(s), unscrewing counterclockwise from the dome plate.
2 Thoroughly clean and rinse the dome plate area.
3 Clean the brew basket rails with a brush soaked with a mild detergent solution. Rinse the area with a cloth
soaked with clean water, removing any residual detergent.
4 Dry the area with a soft, clean cloth.
5 Reattach the spray head(s).
WARNING: DO NOT immerse the brewer in water or any other liquid.

Cleaning the Liner
1 Remove the dispenser from the brewer and remove the
lid. Set the lid aside. Rinse out the liner.
2 Wash - Prepare a mild solution of detergent and warm
water. Wipe the exterior surfaces of the dispenser with
a sponge moistened with the detergent solution to
remove spills and debris. Fill the liner with the detergent
solution. Take a soft nylon brush and scrub out the
stainless steel liner.
3 Rinse - Rinse out the liner with clean, warm water.
4 Sanitize - Drop one TABZ Z95 tablet into the liner. Fill
to the top with hot water (122°F/50°C min.). Stir the
contents. Allow the liner to soak for 5 to 10 minutes.
5 Open the faucet and drain out the dispenser (to clean
the faucet shank).
6 Fill the liner to the top with clean, warm water and drain
through the faucet (to rinse the faucet shank).
7 Fill the liner to the top with water a second time and
drain through the faucet.
8 Disassemble the faucet - Unscrew the handle/bonnet
assembly from the top of the faucet and remove it.
Inspect the seat cup for wear. Replace the seat cup if it
is damaged.
9 Air Dry - Turn the dispenser upside down and allow to
air dry.
continued...
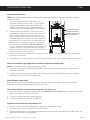
Cleaning the Dispenser (Daily)
CLEANING INSTRUCTIONS CI29
GEMX
™
SATELLITE, CLEANING INSTRUCTIONS 031521D
IMPORTANT: Clean the dispenser daily to avoid the build up of coffee oil residue on the Intellifresh
®
sensors inside the liner. Residue build up may cause the Intellifresh indicator to malfunction.
Seat cup
Handle
Bonnet
WARNING: DO NOT immerse the dispenser in water or any other liquid. Do not place the dispenser in a
dishwasher. Doing so will void the warranty. Do not use harsh powders or cleansers containing chlorine.
Do not use a wire brush or scouring pad to clean inside the liner. To avoid damage, DO NOT use a
brush to clean the faucet or the inside of the faucet shank (outlet).
The following cleaners are required to properly maintain the dispenser:
• Mild solution of dish-washing detergent and warm water
• TABZ
™
Z95 Coffee Equipment Cleaner Tablets (Curtis PN WC-79000)
• One-Pro Beverage Equipment Cleaner (Curtis PN WC-79001)
Style may vary

Label style may vary
Label style may vary
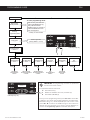
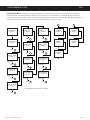
Entering
Programming Mode
Enter Code
- - - -
Wilbur Curtis
Wilbur Curtis
Ready to Brew*
Global Recipes
<-- Select -->
Language
<-- Select -->
Non-Brew Prog
<-- Select -->
Brew Button Prog
<-- Select -->
Model Select
<-- Select -->
Exit
<-- Select -->
Program menus
<-- Select -->
Program Menus
<-- Select -->
See Global
Recipes Menu
section
See Brew Button
Programming Menu
section
See Model
Select Menu
section
See
Language Menu
section
See Non-Brew
Programming Menu
section
Press
~
Press
~
Press
~
Press
~
Press
~
Press
~
* “Ready” on some models
With unit OFF, press and hold
bottom right BREW button (4).
Then press and release
ON/OFF button (2). Continue to
hold down BREW button until
Enter Code appears.
Enter 4 digit code.
(factory default = 1-2-3-4)
To enter programming mode:
PROGRAMMING GUIDE PG2
IMPORTANT: All programming functions are performed
with the three center buttons.
The symbols below the buttons are:
Ż Scroll LEFT/UP (1)
~ SELECT or ENTER to save new parameter (2)
Ź Scroll RIGHT/DOWN (3)
Once you enter programming mode, press
Ż or Źto scroll LEFT
or RIGHT to the various menus (Global Recipes, Non-Brew Prog,
Brew Button Prog, etc.). Press ~ (SELECT) to enter a menu. Then
press
Ż or Źto scroll UP or DOWN through a menu. When the
desired menu item appears on the screen, press ~ (SELECT) to
access. See Programming Options for detailed descriptions.
8$130(3"..*/((6*%&ø H

Programming Options
See the previous page for instructions on accessing each individual menu.
Some menus save and exit automatically when a parameter is updated. Other menus exit to the previous menu
when a parameter is saved. To exit, press Źuntil EXIT appears on the display, then press
~.
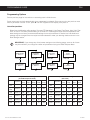
Global Recipes Menu
Select from the following coffee recipes: Gourmet STD (standard), Light Roast, Dark Roast, High Yield, Filter
Pack, or Decaf. The factory default setting is Gourmet STD. Selecting the recipe sets the temperature and
brew settings to the factory recommended settings for the recipe selected. If desired, the individual brew
settings may be changed once the recipe has been selected to meet your brewing needs as shown in the
Brew Settings section.
IMPORTANT: If you change any of the brewer settings on the following pages, some or all of them
NBZCFNPEJmFEJGZPVDIBOHFUIFDPGGFFSFDJQFBGUFSXBSEVTJOHUIFGlobal Recipes Menu.
Press
~
Filter Pack
<-- Select -->
Hight Yield
<-- Select -->
Dark Roast
<-- Select -->
Global Recipes
<-- Select -->
Gourmet STD
<-- Select -->
Select
~
Select
~
Select
~
Select
~
Select
~
Select
~
Light Roast
<-- Select -->
Press
~
Exit
<-- Select -->
Decaf
<-- Select -->
PROGRAMMING GUIDE PG2
8$130(3"..*/((6*%&ø H
Recipe Default Brew Settings
(all models except TP1 series)
Temperature
Pulse
Brew
Bypass
Large
Bypass
Medium
Bypass
Small
Pre-
Infusion
Gourmet
STD
200°F/92°C C 35% 10% 0% OFF
Light
Roast
200°F/92°C C 45% 15% 0% OFF
Dark
Roast
196°F/91°C OFF 25% 5% 0% 60/60
High
Yield
192°F/89°C OFF 35% 10% 0% 60/60
Filter
Pack
200°F/92°C C 0% 0% 0% OFF
Decaf 200°F/92°C C 0% 0% 0% OFF
Recipe Default Brew Settings
(TP1 series)
Temperature
Pulse
Brew
Bypass
Large
Bypass
Small
Pre-
Infusion
Gourmet
STD
200°F/92°C C 10% 0% OFF
Light
Roast
200°F/92°C C 15% 0% OFF
Dark
Roast
196°F/91°C OFF 5% 0% 60/60
High
Yield
192°F/89°C OFF 10% 0% 60/60
Filter
Pack
200°F/92°C C 0% 0% OFF
Decaf 200°F/92°C C 0% 0% OFF

PROGRAMMING GUIDE PG2
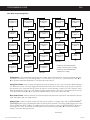
Non-Brew Programming Menu
Temperature - sets the brewing temperature of the water held in the water tank. The factory default setting is
'¡$(PVSNFU45%5IFTFUUJOHSBOHFJT'UP'¡$UP¡$0ODFBDDFTTFEQSFTTŻ or
Ź to choose the desired temperature. Then press
~ to set and exit.
Energy Save Mode - saves energy during periods when the brewer is not in use. The factory default setting is
0GG8IFOTFUUP0OPS0O'UIFCSFXFSBVUPNBUJDBMMZTIVUTPGGGPVSIPVSTUXPIPVSTPOPMEFSVOJUTBGUFS
UIFMBTUCSFXDZDMF1SFTTUIF0/0''CVUUPOUPSFUVSOUPOPSNBMPQFSBUJPO6TFUIF0O'TFUUJOHUPSFBDI
CSFXJOHUFNQFSBUVSFGBTUFS0O'LFFQTUIFXBUFSUFNQFSBUVSFBU'$EVSJOHQFSJPETPGOPOVTF
Once accessed, press Ż or Ź to choose the desired setting. Then press ~ to set and exit.
Brew Count Odom - When accessed, this feature displays the total brew cycles since the odometer was last
reset. Press Ż to exit or ~ reset and exit.
Quality Timer -(FNJOJNPEFMTOPUJmFTUIFVTFSUIBUUIFDPGGFFJTOPMPOHFSGSFTI4FFUIFINTELLIFRESH
®
FEATURES section for a complete description of how the timer operates. The factory default setting is 2 hours
0GGGPS(&.4BOE(&.5NPEFMT5IFTFUUJOHSBOHFJTNJOVUFTUPIPVSTGPS(&.4*'(&.5*'TFSJFTBOE
NJOVUFTUPIPVSTNJOVUFTGPS(&.9TFSJFT0ODFBDDFTTFEQSFTTŻ or Ź to choose the desired
setting. Then press ~ to set and exit.
continued...
8$130(3"..*/((6*%&ø H
Select
~
Select
~
Select
~
Select
~
Select
~
Select
~
Select
~
Select
~
Select
~
Select
~
Select
~
Select
~
Select
~
Select
~
Select
~
Select
~
Select
~
Press
~
Select
~
Select
~
Select
~
Select
~
Exit
<-- Select -->
Press
~
Energy Save Mode
<-- Select -->
Brew Count Odom
<-- Select -->
Brew Count Total
<-- Select -->
Master Reset
<-- Select -->
Temperature
<-- Select -->
Quality Timer
<-- Select -->
Cold Brew Lock
<-- Select -->
Non-Brew Prog
<-- Select -->
P-Maintenance
<-- Select -->
Warmers Default
<-- Select -->
Service Call
<-- Select -->
Access Code
<-- Select -->
Banner Name
<-- Select -->
Warmers Auto-Off
<-- Select -->
Beeper On/Off
<-- Select -->
Display Messages
<-- Select -->
Display Timers
<-- Select -->
Satellite Color
<-- Select -->
Server Lockout
<-- Select -->
Display Brew Time
<-- Select -->
QT Alarm On/Off
<-- Select -->
1
1,2
1,2
Drip-Out Mode
<-- Select -->
2
Visible only when model selected =
GEMX (Twin or Single)
1
Visible only when model selected =
Gemini or Gemini-IF (Twin or Single)

Non-Brew Programming Menu (cont.)
Brew Count Total - when accessed, displays the total brew cycles on the brewer. It cannot be reset. The
display returns to the previous screen automatically after a few seconds.
Cold Brew Lock - adjusts the temperature at which the brewer will brew coffee when the BREW button is
pressed (Ready to BrewBQQFBSTPOUIFEJTQMBZ5IFGBDUPSZEFGBVMUTFUUJOHJT'¡$CFMPXUIFXBUFSUBOL
temperature setting. This feature also adjusts the temperature at which the heating element turns on to reheat
UIFXBUFSJOUIFUBOL5IFBWBJMBCMFTFUUJOHTBSF¡'¡'¡$BOE0GG0ODFBDDFTTFEQSFTTŻ or Ź to
choose the desired setting. Then press ~ to set and exit.
Master Reset - resets the brewer universal control module (UCM) to the factory default settings. Once
accessed, “Are You Sure?” will appear on the display. Press Ż for Yes or Ź for No.
Service Call - sets the service phone number that appears on the display when the UCM detects a SENSOR
ERROR or WATER ERROR . Once accessed, press Ż or Ź to choose the number to be changed. Then press
~ repeatedly to change the number value. Press Ż or Ź to choose the next number to change or choose exit
and press ~.
Access Code - sets the access code entered to access programming mode. The factory default is 1-2-3-4.
Once accessed, press Ż or Ź to choose the number to change. Then press ~ repeatedly to change the
number value (the range is 1 to 4). Press Ż or Ź to choose the next number to change or choose exit and
press ~.
Banner Name - changes the company name that appears on the display. The factory default is Curtis. No
name appears when all blanks are entered. Once accessed, press Ż or Ź to choose the letter to change.
Then press
~ repeatedly to change the number value. Press Ż or Ź to choose the next number to change or
choose ex and press ~ to exit.
Warmer Auto-Off - (GEMS, GEMT, GEMSIF, GEMTIF models) adjusts the length of time that elapses before
the dispenser warmer shuts off automatically. This function takes priority over the quality timer. The factory
EFGBVMUTFUUJOHGPS(&.4*'(&.5*'JTIPVST'PS(&.4(&.5UIFEFGBVMUJTiEJTBCMFEw5IFTFUUJOHSBOHFJT
1 to 12 hours. Once accessed, press Ż or Ź to adjust the number of hours. Then press ~ to set and exit.
P-Maintenance - turns on/off and adjusts the P-Maintenance (preventive maintenance) brew monitor.
The factory default setting is Off. When On, the UCM measures the number of gallons brewed before the
1.BJOUFOBODFSFNJOEFSBQQFBSTPOUIFEJTQMBZ5IFTFUUJOHSBOHFJTUPHBMMPOTMJUFST0ODF
accessed, press Ż or Ź to choose the desired setting, then, press
~ to exit.
Beeper On/Off - turns the beeper that is heard each time a button is pressed on or off. The factory default
setting is On. Once accessed, press Ż or Ź to choose the desired setting. Then, press ~ to exit.
Drip-out Mode - TFUTUIFESJQPVUNPEFUJNFS"GUFSXBUFSTUPQTnPXJOHJUBMMPXTBEEJUJPOBMUJNFGPSUIFDPGGFF
to drain from the brew basket before the brew basket lock releases. The factory default is 2 min. This feature
SFEVDFTUIFDIBODFUIBUUIFCSFXCBTLFUXJMMCFSFNPWFEUPPFBSMZ5IFTFUUJOHSBOHFJTUPNJOVUFT0ODF
accessed, press Ż or Ź to choose the desired setting, then, press ~ to exit.
Warmers Default - (Gemini models) sets the warmer temperature. The factory default setting is MED. The
BWBJMBCMFTFUUJOHTBSF0GG)*()'¡$.&%'¡$PS-08'¡$0ODFBDDFTTFE
press Ż or Ź to choose the desired setting, then press ~. On twin brewers press Ż or Ź to choose the
desired setting for the second warmer, then press ~. Press ~ to exit.
*Off option not available on GEMX series models.
(&.*'BOE(&.9POMZCBTFEPOBCSFXUFNQFSBUVSFPG¡'¡$
continued...
PROGRAMMING GUIDE PG2
8$130(3"..*/((6*%&ø H

PROGRAMMING GUIDE PG2
8$130(3"..*/((6*%&ø H
Non-Brew Programming Menu (cont.)
Display Brew Time - turns the display of the brew time during brewing On or Off. The factory default setting is
On. Once accessed, press Ż or Ź to choose the desired setting, then press ~ to exit.
Display Messages - turns display of the message “Rinse Server Before Brewing” On or Off The factory default
setting is On. Once accessed, press Ż or Ź to choose the desired setting, then press
~ to exit.
[QT] Display Timers [On/Off] - (some models, QT Alarm must be on) turns the quality timer countdown
display On or Off. The factory default setting is Off. Once accessed, press Ż or Ź to choose the desired
setting. Then, press
~ to exit.
QT Alarm On/Off - (Gemini models) turns the quality timer audio alarm On or Off. The factory default setting
is On for GEMS/GEMT models, Off for GEMIF and GEMX models. An audible alarm goes off when the quality
timer has expired. Once accessed, press Ż or Ź to choose the desired setting. Then, press
~ to exit.
Satellite Color - (GEMX series models only) changes the color scheme of the quality timer LEDs on the
dispenser (satellite). Once accessed, press Ż or Ź to choose the desired color to indicate “fresh” (On). Press
~ to save, then press Ż or Ź to choose the desired color to indicate “expired”. Press ~ to save and exit.
Server Lockout - (GEMX series models only) turns the lockout feature On or Off. The factory default setting
JT0GG8IFOTFUUP0OUIF#3&8CVUUPOJTEJTBCMFEXIFOUIFSFJTnVJEJOUIFEJTQFOTFSQSPWJEFEUIBUBO*3
equipped dispenser is in use (LOCKED appears on the display). Once accessed, press Ż or Ź to choose the
desired setting. Press ~ to save and exit.
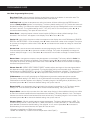
Brew Button Programming Menu
8IFOZPVmSTUFOUFSUIF#SFX#VUUPO1SPHSBNNJOHNFOVZPVXJMMCFBTLFEUPTFMFDUQSFTTB#3&8CVUUPOUP
DIBOHFUIFTFUUJOHTGPS5PQSPHSBNNPSFUIBOPOF#3&8CVUUPOmOJTIQSPHSBNNJOHUIFmSTUUIFOQSFTTŹ until
Exit appears on the display. Press
~ to exit, then re-enter the Brew Button Program to program the next one. The
default brew settings assume that the amber AFS spray head is installed.
Brew by Volume - BEKVTUTUIFWPMVNFCSFXFE5IFGBDUPSZEFGBVMUTFUUJOHTBSF-"3(&P[P[-
NM
.&%*6.P[P[-NM
4."--P[P[-NM8JUIBEJTQFOTFSJO
place, press the BREW button that is illuminated. When the desired volume is reached, press the same BREW
button again to stop the brew cycle and set the volume.
* Not applicable to TP1 series.
** This is the LARGE setting for TP1 series brewers.
continued...
Select
~
Select
~
Select
~
Select
~
Select Button...
<-- Select -->
Press BREW
Brew Button Prog
<-- Select -->
Pulse Brew
<-- Select -->
Brew by Time
<-- Select -->
Press
~
Exit
<-- Select -->
Pre-Infusion
<-- Select -->
Pulse Brew
<-- Select -->
Brew by Volume
<-- Select -->
Bypass On/Off
<-- Select -->
Press
~

PROGRAMMING GUIDE PG2
8$130(3"..*/((6*%&ø H
Brew Button Programming Menu (cont.)
Brew by Time - adjusts the amount of coffee brewed by time rather than by volume. The factory default
TFUUJOHTBSF-"3(&NJOTFD.&%*6.NJOTFD4."--NJOTFD0ODFBDDFTTFEQSFTT
Ż or ŹVOUJMUIFOVNCFSPGNJOVUFTJTnBTIJOH5IFOQSFTT
~ repeatedly to change the number value. Press
Ż or ŹVOUJMUIFOVNCFSPGTFDPOETJTnBTIJOH5IFOQSFTT~ repeatedly to change the number value. Press
Ż or ŹVOUJMiFYwJTnBTIJOHUIFOQSFTT~ to exit.
* Not applicable to TP1 series.
** This is the LARGE setting for TP1 series brewers.
Pre-Infusion - sets the brewer Pre-Infusion time (Pulse Brew must be off to access, the factory default setting is
%JTBCMFE1SF*OGVTJPOJODSFBTFTDPOUSPMPGDPGGFFDMBSJUZBOEFYUSBDUJPO8IFOUVSOFEPOUIFTFUUJOHSBOHFJTUP
TFDPOET0ODFBDDFTTFEQSFTTŻ or Ź to choose the desired setting, then, press ~ to exit. To turn off pulse
CSFXNPEFDIPPTFGPSUIFUJNF
When Pre-infusion is On, Pulse Brew disappears from the list of menu items.
Pulse Brew - selects the pulse brew pattern (Pre-Infusion must be off to access, the factory default setting
JT$5IFQVMTFCSFXQBUUFSOTFMFDUFEiUVOFTwPSDIBOHFTUIFnBWPSPGUIFDPGGFF0ODFBDDFTTFEQSFTTŻ or
Ź to choose the desired setting. Then, press ~ to exit.
8IFO1VMTF#SFXJT0O$PME#SFX-PDLJTTFUUPXJUIJO'¡$PGUIFXBUFSUFNQFSBUVSFMFWFMBOE
Cold Brew Lock and Pre-Infuson disappear from the list of program selections.
Pulse Brew Guidelines
• Filter pack type coffees typically extract better with the A and B pulse setting.
• Decaffeinated coffees typically extract better with the B pulse setting.
• High-yield coffees typically extract better with the C pulse setting. Of course, any of the A, B or C
TFUUJOHTNBZCFVTFEUPTVJUZPVSUBTUFQSPmMF
• Settings D and E are manual pulse counts.
By-Pass - IFMQTDPOUSPMFYUSBDUJPOXJUIMBSHFSCSFXT5IFGBDUPSZEFGBVMUTFUUJOHTBSF-"3(&GPS
51TFSJFT.&%*6.4."--0GG*USFEVDFTDPOUBDUUJNFUPBWPJEFYUSBDUJPOPGVOEFTJSBCMFCJUUFSBOE
IBSTInBWPSDPNQPVOET5IFTFUUJOHSBOHFJTUP0ODFBDDFTTFEQSFTTŻ or Ź to choose the
desired setting, then, press ~ to exit.
Language Menu - changes the language that appears on the display. The factory default setting is English. This
feature is programmable for changing and adding languages. Once accessed, press Ż or Ź to choose the
desired setting, then press ~ to exit.
continued...
Setting Description
A Toward the beginning of brew cycle: 4 cycles of 10 seconds on and 10 seconds off, then on until end of brew cycle.
B
Starts towards ends of brew cycle. 4 cycles of 10 seconds off and 4 cycles of 10 seconds on. Ends when brew
cycle ends.
C Starts at beginning of brew cycle. 5 cycles of 25 seconds on and 20 seconds off, then on until end of brew cycle.
D
Manually set. Starts at beginning of brew cycle. Number of pulses is adjustable from 1 to 20. Pulse on time and off
time are both adjustable from 5 to 150 seconds.
E
Manually set. Starts at beginning of brew cycle. Number of pulses is adjustable from 1 to 8. Pulse on time and off
time are both adjustable from 1 to 150 seconds.

PROGRAMMING GUIDE PG2
8$130(3"..*/((6*%&ø H
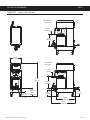
Model Select Menu - changes the model number and number of batches (to match the label on the universal
control module, the factory default is Gemini-Twin, One batch). Once accessed, press Ż or Ź until the model
number matching the model number label on the brewer appears, then press ~. Press Ż or Ź until the number of
CBUDIFTNBUDIFTUIFOVNCFSPGCBUDITJ[FTPOUIF6$.MBCFMUIFOQSFTT~ to exit.
Select
~
Go to
A
Select
~
Go to
A
Select
~
Go to
A
Select
~
Go to
A
Select
~
Go to
B
Select
~
Go to
B
Select
~
Go to
A
Select
~
Go to
A
Select
~
Go to
A
Select
~
Go to
A
Select
~
Go to
A
Select
~
Go to
A
Press
~
Press
~
Press
~
Press
~
Press
~
Press
~
TP/TPX Twin
<-- Select -->
One Batch
<-- Select -->
Two Batch
<-- Select -->
One Batch
<-- Select -->
Two Batch
<-- Select -->
Three Batch
<-- Select -->
TP/TPX - Single
<-- Select -->
Gemini - Twin
<-- Select -->
Gemini - Single
<-- Select -->
Milano Twin
<-- Select -->
Model Select
<-- Select -->
Milano Single
<-- Select -->
Gemini - Twin IF
<-- Select -->
Gemini - Single IF
<-- Select -->
GEMX - Twin
<-- Select -->
GEMX - Single
<-- Select -->
TPIG/TPXIG Twin
<-- Select -->
TPIG/TPXIG-Singl
<-- Select -->
A
B
* Factory default: Gemini
®
double - one batch
Page is loading ...
Page is loading ...
Page is loading ...
Page is loading ...
Page is loading ...
Page is loading ...
Page is loading ...
Page is loading ...
Page is loading ...
Page is loading ...
Page is loading ...
Page is loading ...
Page is loading ...
Page is loading ...
Page is loading ...
Page is loading ...
Page is loading ...
Page is loading ...
Page is loading ...
Page is loading ...
Page is loading ...
Page is loading ...
Page is loading ...
Page is loading ...
-
 1
1
-
 2
2
-
 3
3
-
 4
4
-
 5
5
-
 6
6
-
 7
7
-
 8
8
-
 9
9
-
 10
10
-
 11
11
-
 12
12
-
 13
13
-
 14
14
-
 15
15
-
 16
16
-
 17
17
-
 18
18
-
 19
19
-
 20
20
-
 21
21
-
 22
22
-
 23
23
-
 24
24
-
 25
25
-
 26
26
-
 27
27
-
 28
28
-
 29
29
-
 30
30
-
 31
31
-
 32
32
-
 33
33
-
 34
34
-
 35
35
-
 36
36
-
 37
37
-
 38
38
-
 39
39
-
 40
40
-
 41
41
-
 42
42
-
 43
43
-
 44
44


Curtis GEMXSIFT63A1000 User guide
- Category
- Coffee making accessories
- Type
- User guide
- This manual is also suitable for
Ask a question and I''ll find the answer in the document
Finding information in a document is now easier with AI
Related papers
-
Curtis G4GEMXTIFT10A1000 User guide
-
Curtis GEMSIF10A1000 User guide
-
-
-
-
-
Curtis GEMTS19A1000 User guide
-
-
Curtis GEMX 1.5 Gallon IntelliFresh FreshTrac Satellite User guide
-
Other documents
-
Bloomfield SS2-BD User manual
-
Grindmaster ICB-300 User manual
-
Newco Enterprises, Inc. ACE-D Datasheet
-
Cafe 98 B145-3 Operating instructions
-
Crathco / Grindmaster ICB-300 Operating instructions
-
 Wilbur Curtis Company TP2S User manual
-
 Wibur Curtis Company GEMSS SINGLE User manual
-
 Wilbur Curtis Company GEMSIF User manual
-
Tellur TLL171181 User manual
-
Reliable THE DIGITAL VELOCITY V100 User manual


