Page is loading ...

Self-Priming Portable Utility Pump
Pompe à auto-amorçage portative,
tout usage
Bomba portátil de servicio con sistema
de cebado automático
TP-500K
Model, Modèle, Modelo
OPERATING INSTRUCTIONS AND
PARTS MANUAL
MANUEL DE PIÈCES ET MODE
D’EMPLOI
MANUAL DE INSTRUCCIONES
DE FUNCIONAMIENTO Y PIEZAS
DE REPUESTO
¡
ADVERTENCIA!
LEA, ENTIENDA Y SIGA
TODAS LAS INSTRUCCIONES
DE ESTE MANUAL — NO LAS
DESECHE. El no entender
y no seguir el contenido de
este manual puede dar como
resultado un choque eléctrico,
incendios y/o lesiones graves.
AVERTISSEMENT!
LIRE, COMPRENDRE ET SUIVRE
TOUTES LES INSTRUCTIONS
DANS CE MANUEL — NE PAS
JETER. Ne pas comprendre et
ne pas suivre les contenus de ce
manuel peut avoir pour résultat
un choc électrique, de feux et/ou
de blessures personnelles graves.
WARNING
!
READ UNDERSTAND AND
FOLLOW ALL INSTRUCTIONS
IN THIS MANUAL — DO NOT
DISCARD. Failure to understand
and follow the contents of this
manual may result in electrical
shock, fire and/or serious
personal injury.
• Pour français voire page 9
• Para ver el castellano vea
la paginá 15

Ridge Tool Company
ii
ii
Table of Contents
General Safety Information
Work Area . . . . . . . . . . . . . . . . . . . . . . . . . . . . . . . . . . . . . . . . . . . . . . . . . . . . . . . . . . . . . . . . . . . . . . . . . . . . . . . . . . . . . . . . . . . . . . . . . . . . . . . . 1
Electrical Safety . . . . . . . . . . . . . . . . . . . . . . . . . . . . . . . . . . . . . . . . . . . . . . . . . . . . . . . . . . . . . . . . . . . . . . . . . . . . . . . . . . . . . . . . . . . . . . . . . . . 1
Personal Safety . . . . . . . . . . . . . . . . . . . . . . . . . . . . . . . . . . . . . . . . . . . . . . . . . . . . . . . . . . . . . . . . . . . . . . . . . . . . . . . . . . . . . . . . . . . . . . . . . . . . 2
Service . . . . . . . . . . . . . . . . . . . . . . . . . . . . . . . . . . . . . . . . . . . . . . . . . . . . . . . . . . . . . . . . . . . . . . . . . . . . . . . . . . . . . . . . . . . . . . . . . . . . . . . . . . 2
Specific Safety Information . . . . . . . . . . . . . . . . . . . . . . . . . . . . . . . . . . . . . . . . . . . . . . . . . . . . . . . . . . . . . . . . . . . . . . . . . . . . . . . . . . . . . . . 2
Utility Pump Safety . . . . . . . . . . . . . . . . . . . . . . . . . . . . . . . . . . . . . . . . . . . . . . . . . . . . . . . . . . . . . . . . . . . . . . . . . . . . . . . . . . . . . . . . . . . . . . . 2
Description And Specifications
Description . . . . . . . . . . . . . . . . . . . . . . . . . . . . . . . . . . . . . . . . . . . . . . . . . . . . . . . . . . . . . . . . . . . . . . . . . . . . . . . . . . . . . . . . . . . . . . . . . . . . . . . 3
Specifications . . . . . . . . . . . . . . . . . . . . . . . . . . . . . . . . . . . . . . . . . . . . . . . . . . . . . . . . . . . . . . . . . . . . . . . . . . . . . . . . . . . . . . . . . . . . . . . . . . . . . 3
Pump Application . . . . . . . . . . . . . . . . . . . . . . . . . . . . . . . . . . . . . . . . . . . . . . . . . . . . . . . . . . . . . . . . . . . . . . . . . . . . . . . . . . . . . . . . . . . . . . . . 3-4
Operation . . . . . . . . . . . . . . . . . . . . . . . . . . . . . . . . . . . . . . . . . . . . . . . . . . . . . . . . . . . . . . . . . . . . . . . . . . . . . . . . . . . . . . . . . . . . . . . . . . . . . . . . . 4
Maintenance Instructions . . . . . . . . . . . . . . . . . . . . . . . . . . . . . . . . . . . . . . . . . . . . . . . . . . . . . . . . . . . . . . . . . . . . . . . . . . . . . . . . . . . . . . . . 4-5
Parts Replacement Schedule . . . . . . . . . . . . . . . . . . . . . . . . . . . . . . . . . . . . . . . . . . . . . . . . . . . . . . . . . . . . . . . . . . . . . . . . . . . . . . . . . . . . . . . . . 4
Service and Repair . . . . . . . . . . . . . . . . . . . . . . . . . . . . . . . . . . . . . . . . . . . . . . . . . . . . . . . . . . . . . . . . . . . . . . . . . . . . . . . . . . . . . . . . . . . . . . . . . 5
Troubleshooting . . . . . . . . . . . . . . . . . . . . . . . . . . . . . . . . . . . . . . . . . . . . . . . . . . . . . . . . . . . . . . . . . . . . . . . . . . . . . . . . . . . . . . . . . . . . . . . . . . . 6
Replacement Parts List . . . . . . . . . . . . . . . . . . . . . . . . . . . . . . . . . . . . . . . . . . . . . . . . . . . . . . . . . . . . . . . . . . . . . . . . . . . . . . . . . . . . . . . . . . . 6
Recording Form for Pump Serial Number . . . . . . . . . . . . . . . . . . . . . . . . . . . . . . . . . . . . . . . . . . . . . . . . . . . . . . . . . . . . . . . . . . . . . . . . . . . 6
Notes . . . . . . . . . . . . . . . . . . . . . . . . . . . . . . . . . . . . . . . . . . . . . . . . . . . . . . . . . . . . . . . . . . . . . . . . . . . . . . . . . . . . . . . . . . . . . . . . . . . . . . . . . . . . 7-8
Warranty . . . . . . . . . . . . . . . . . . . . . . . . . . . . . . . . . . . . . . . . . . . . . . . . . . . . . . . . . . . . . . . . . . . . . . . . . . . . . . . . . . . . . . . . . . . . . . . . . . Back Cover
Table des matières
Informations générales de sécurité
Aire de travail . . . . . . . . . . . . . . . . . . . . . . . . . . . . . . . . . . . . . . . . . . . . . . . . . . . . . . . . . . . . . . . . . . . . . . . . . . . . . . . . . . . . . . . . . . . . . . . . . . . 9
Sécurité électrique . . . . . . . . . . . . . . . . . . . . . . . . . . . . . . . . . . . . . . . . . . . . . . . . . . . . . . . . . . . . . . . . . . . . . . . . . . . . . . . . . . . . . . . . . . . . . . . 9
Sécurité personnelle . . . . . . . . . . . . . . . . . . . . . . . . . . . . . . . . . . . . . . . . . . . . . . . . . . . . . . . . . . . . . . . . . . . . . . . . . . . . . . . . . . . . . . . . . . . . 9-10
Service . . . . . . . . . . . . . . . . . . . . . . . . . . . . . . . . . . . . . . . . . . . . . . . . . . . . . . . . . . . . . . . . . . . . . . . . . . . . . . . . . . . . . . . . . . . . . . . . . . . . . . . 10
Information de sécurité spécifique . . . . . . . . . . . . . . . . . . . . . . . . . . . . . . . . . . . . . . . . . . . . . . . . . . . . . . . . . . . . . . . . . . . . . . . . . . . . . . . 10
Sécurité de pompe . . . . . . . . . . . . . . . . . . . . . . . . . . . . . . . . . . . . . . . . . . . . . . . . . . . . . . . . . . . . . . . . . . . . . . . . . . . . . . . . . . . . . . . . . . . . . . . 10
Description et spécifications
Description . . . . . . . . . . . . . . . . . . . . . . . . . . . . . . . . . . . . . . . . . . . . . . . . . . . . . . . . . . . . . . . . . . . . . . . . . . . . . . . . . . . . . . . . . . . . . . . . . . . . 10
Spécifications . . . . . . . . . . . . . . . . . . . . . . . . . . . . . . . . . . . . . . . . . . . . . . . . . . . . . . . . . . . . . . . . . . . . . . . . . . . . . . . . . . . . . . . . . . . . . . . . . . 11
L'application de la pompe . . . . . . . . . . . . . . . . . . . . . . . . . . . . . . . . . . . . . . . . . . . . . . . . . . . . . . . . . . . . . . . . . . . . . . . . . . . . . . . . . . . . . . . . 11
Fonctionnement . . . . . . . . . . . . . . . . . . . . . . . . . . . . . . . . . . . . . . . . . . . . . . . . . . . . . . . . . . . . . . . . . . . . . . . . . . . . . . . . . . . . . . . . . . . . . . . . . . 12
Instructions d’entretien\ . . . . . . . . . . . . . . . . . . . . . . . . . . . . . . . . . . . . . . . . . . . . . . . . . . . . . . . . . . . . . . . . . . . . . . . . . . . . . . . . . . . . . . . . 12-13
Horaire de remplacement des pièces . . . . . . . . . . . . . . . . . . . . . . . . . . . . . . . . . . . . . . . . . . . . . . . . . . . . . . . . . . . . . . . . . . . . . . . . . . . . . . . 12
Service et réparation . . . . . . . . . . . . . . . . . . . . . . . . . . . . . . . . . . . . . . . . . . . . . . . . . . . . . . . . . . . . . . . . . . . . . . . . . . . . . . . . . . . . . . . . . . . . . 13
Dépannage . . . . . . . . . . . . . . . . . . . . . . . . . . . . . . . . . . . . . . . . . . . . . . . . . . . . . . . . . . . . . . . . . . . . . . . . . . . . . . . . . . . . . . . . . . . . . . . . . . . . . . . 13
Liste de Pièces de Rechange . . . . . . . . . . . . . . . . . . . . . . . . . . . . . . . . . . . . . . . . . . . . . . . . . . . . . . . . . . . . . . . . . . . . . . . . . . . . . . . . . . . . . 14
Formulaire d’enregistrement du numéro de série de la pompe . . . . . . . . . . . . . . . . . . . . . . . . . . . . . . . . . . . . . . . . . . . . . . . . . . . . . 14
Garantie . . . . . . . . . . . . . . . . . . . . . . . . . . . . . . . . . . . . . . . . . . . . . . . . . . . . . . . . . . . . . . . . . . . . . . . . . . . . . . . . . . . . . . . . . . . . . Couverture arrière
Índice
Información general sobre seguridad
Área de trabajo. . . . . . . . . . . . . . . . . . . . . . . . . . . . . . . . . . . . . . . . . . . . . . . . . . . . . . . . . . . . . . . . . . . . . . . . . . . . . . . . . . . . . . . . . . . . . . . . . . 15
Seguridad eléctrica . . . . . . . . . . . . . . . . . . . . . . . . . . . . . . . . . . . . . . . . . . . . . . . . . . . . . . . . . . . . . . . . . . . . . . . . . . . . . . . . . . . . . . . . . . . . . . 15
Seguridad personal . . . . . . . . . . . . . . . . . . . . . . . . . . . . . . . . . . . . . . . . . . . . . . . . . . . . . . . . . . . . . . . . . . . . . . . . . . . . . . . . . . . . . . . . . . . 15-16
Mantenimiento y reparación. . . . . . . . . . . . . . . . . . . . . . . . . . . . . . . . . . . . . . . . . . . . . . . . . . . . . . . . . . . . . . . . . . . . . . . . . . . . . . . . . . . . . . . . 16
Información específica sobre seguridad . . . . . . . . . . . . . . . . . . . . . . . . . . . . . . . . . . . . . . . . . . . . . . . . . . . . . . . . . . . . . . . . . . . . . . . . . . . 16
Aspectos de seguridad de la bomba. . . . . . . . . . . . . . . . . . . . . . . . . . . . . . . . . . . . . . . . . . . . . . . . . . . . . . . . . . . . . . . . . . . . . . . . . . . . . . . 16
Descripción y especificaciones
Descripción. . . . . . . . . . . . . . . . . . . . . . . . . . . . . . . . . . . . . . . . . . . . . . . . . . . . . . . . . . . . . . . . . . . . . . . . . . . . . . . . . . . . . . . . . . . . . . . . . . . . . 17
Especificaciones. . . . . . . . . . . . . . . . . . . . . . . . . . . . . . . . . . . . . . . . . . . . . . . . . . . . . . . . . . . . . . . . . . . . . . . . . . . . . . . . . . . . . . . . . . . . . . . . . 17
Aplacación de la bomba . . . . . . . . . . . . . . . . . . . . . . . . . . . . . . . . . . . . . . . . . . . . . . . . . . . . . . . . . . . . . . . . . . . . . . . . . . . . . . . . . . . . . . . 17-18
Funcionamiento. . . . . . . . . . . . . . . . . . . . . . . . . . . . . . . . . . . . . . . . . . . . . . . . . . . . . . . . . . . . . . . . . . . . . . . . . . . . . . . . . . . . . . . . . . . . . . . . . . . 18
Instrucciones de mantenimiento . . . . . . . . . . . . . . . . . . . . . . . . . . . . . . . . . . . . . . . . . . . . . . . . . . . . . . . . . . . . . . . . . . . . . . . . . . . . . . . 18-19
Programa para el recambio de piezas . . . . . . . . . . . . . . . . . . . . . . . . . . . . . . . . . . . . . . . . . . . . . . . . . . . . . . . . . . . . . . . . . . . . . . . . . . . . . . . . 18
Servicio y reparación. . . . . . . . . . . . . . . . . . . . . . . . . . . . . . . . . . . . . . . . . . . . . . . . . . . . . . . . . . . . . . . . . . . . . . . . . . . . . . . . . . . . . . . . . . . . . . 19
Corrección de fallas . . . . . . . . . . . . . . . . . . . . . . . . . . . . . . . . . . . . . . . . . . . . . . . . . . . . . . . . . . . . . . . . . . . . . . . . . . . . . . . . . . . . . . . . . . . . . . 20
Lista de Repuestos . . . . . . . . . . . . . . . . . . . . . . . . . . . . . . . . . . . . . . . . . . . . . . . . . . . . . . . . . . . . . . . . . . . . . . . . . . . . . . . . . . . . . . . . . . . . . . . 20
Formulario de registro para el número de serie de la bomba . . . . . . . . . . . . . . . . . . . . . . . . . . . . . . . . . . . . . . . . . . . . . . . . . . . . . . . 20
Notas . . . . . . . . . . . . . . . . . . . . . . . . . . . . . . . . . . . . . . . . . . . . . . . . . . . . . . . . . . . . . . . . . . . . . . . . . . . . . . . . . . . . . . . . . . . . . . . . . . . . . . . . . . . . 21
Garantía. . . . . . . . . . . . . . . . . . . . . . . . . . . . . . . . . . . . . . . . . . . . . . . . . . . . . . . . . . . . . . . . . . . . . . . . . . . . . . . . . . . . . . . . . . . . . . . . Contraportada
Operating Instructions and Parts Manual
Model, Modèle, Modelo – TP-500K Manuel de pièces et mode d’emploi
Manual de instrucciones de funcionamiento y piezas de repuesto

Ridge Tool Company
General Safety Information
Safety is a combination of common sense, staying alert
and understanding how your utility pump works.
Safety Signal Words
means if the safety
information is NOT followed someone WILL be
seriously injured or killed.
means if the safety
information is NOT followed someone COULD be
seriously injured or killed.
means if the safety
information is NOT followed someone MAY be injured.
indicates important
information, that if NOT followed, MAY cause damage
to the equipment or flooding.
Read and understand all
instructions. Failure to follow all instructions listed
below COULD result in fatal electric shock, fire,
property damage, and/or serious personal injury.
California Proposition 65
This product or its power
cord MAY contain chemicals known to the State of
California to cause cancer and birth defects or other
reproductive harm. Wash hands after handling.
SAVE THESE INSTRUCTIONS!
Unpacking
Inspect this unit before it is used. Occasionally,
products are damaged during shipment. If the pump
or components are damaged call our customer service
department at 1-877-9RIDGID.
Work Area
• Do NOT operate pump in explosive atmospheres,
such as in the presence of flammable liquids,
gases, or dust. Pump motors create sparks which
WILL ignite the dust or fumes.
• Keep by-standers, children, and visitors away
while operating pump. Distractions WILL result in
mistakes.
Electrical Safety
• Do NOT submerge motor or allow motor
to be exposed to water. Personal injury and/or
death WILL result.
• This pump must be plugged into a properly
installed and a grounded GCFI outlet in
accordance with all applicable codes and
ordinances. NEVER remove the grounding prong
or modify the plug in any way. Do NOT use any
adapter plugs. Check with a qualified electrician
if you are NOT sure the outlet is grounded. If the
pump should electrically malfunction or break down,
grounding provides a low resistance path to carry
electricity away from the user.
• Electrical wiring must be performed by a
qualified electrician. Improper wiring COULD
result in fatal electrical shock.
• Do NOT abuse cord. NEVER use the cord to
carry the pump or pull the plug from an outlet.
Keep cord away from heat, oil, sharp edges,
or moving parts. Replace damaged cords
immediately. Damaged cords increase the risk of
electrical shock.
• Before using, test the Ground Fault Circuit
Interrupter (GFCI) to insure it is operating
correctly. A GFCI reduces the risk of electrical
shock.
• Do NOT use an extension cord. This increases
the risk of electrical shock. If necessary, install a
properly grounded outlet closer to the pump.
TEST
RESET
Figure 1
Grounding Blade
Grounded GFCI
Outlet
Power Cord
Model TP-500K – Operating Instructions and Parts Manual
1

2
Ridge Tool Company
Personal Safety
• Stay alert, watch what you are doing, and use
common sense when operating this pump. Do
NOT attempt to operate this pump while tired
or under the influence of drugs, alcohol or
medications. A moment of inattention COULD
result in serious personal injury.
• Dress properly. Do NOT wear loose clothing
or jewelry. Contain long hair. Keep your hair,
clothing, and gloves away from moving parts.
Loose clothes, jewelry, or long hair COULD be
caught in moving parts.
• Do NOT overreach. Keep proper footing and
balance at all times. Proper footing and balance
enables better control in unexpected situations.
• Use safety equipment. ALWAYS wear eye
protection. Dust mask, non-skid safety shoes and
hard hat must be used for appropriate conditions.
Service
• Disconnect power and release all pressure
within the system before servicing any
component.
• Drain all liquids from system before servicing.
• Periodically inspect pump and system
components, checking for weak and/or worn
hoses. Insure all connections are secure.
• Provide a means of pressure relief in the case
of an obstructed discharge line.
• When servicing a pump, use only identical
replacement parts. Follow instructions in the
Maintenance Section of this manual. Use of
unauthorized parts or failure to follow maintenance
instructions may create a risk of electrical shock or
injury and may void the warranty.
Specific Safety Information
Risk of electric shock. This pump is
supplied with a grounding-type plug. To
reduce risk of electric shock be certain that it is
connected only to a properly grounded, grounding-
type GFCI receptacle.
For your own safety, before assembling and operating
this unit, read this operators manual carefully and
completely. Learn the operation, application, and
potential hazards peculiar to this unit.
Call the RIDGID Water Systems Customer Service
Department at 1-877-9RIDGID if you have any
questions.
Utility Pump Safety
• Do NOT use to pump flammable or
explosive fluids such as gasoline, fuel oil,
kerosene, solvents, thinners, etc. Do NOT use
in a flammable and/or explosive atmosphere.
Pump should only be used to pump clear water.
Improper use WILL result in personal injury and/or
death.
• If there is water or moisture on the floor, do
NOT walk on wet area until all power is turned
off. If the shut-off box is in the basement,
call an electrician. Failure to follow this warning
COULD result in fatal electrical shock.
• ALWAYS disconnect the power source before
attempting to operate, service, relocate, or
maintain the pump. NEVER handle a pump or
pump motor with wet hands or when standing
on a wet or damp surface or in water when the
pump is connected to power. Failure to follow
this warning COULD result in personal injury and/
or death.
• Do NOT allow this utility pump to operate
unattended. Failure to follow this warning COULD
result in personal injury and/or death.
Model TP-500K – Operating Instructions and Parts Manual

Ridge Tool Company
3
Description and Specifications
Description
This self-priming portable utility pump is designed to
be used as a transfer pump for such applications as
emptying water heaters, swimming pools, livestock
tanks, boats, etc. Pump can also be used for an
intermittent pressure boost for applications such as
washing cars, cleaning driveways, etc. The motor is
air cooled; it is NOT designed to operate under water.
NOTE: This pump is NOT intended for permanent
installation or long, extended periods of continuous
operation.
• This pump is NOT designed to handle salt water,
brine, laundry discharge, or any other application
which may contain caustic chemicals and/or
foreign materials. This pump is NOT suitable for
use with aquatic life. Pump damage or failure
COULD occur if used in these applications and will
void the warranty.
Specifications
Motor:
Rating . . . . . . . . . . . . . . . . . . . .115 V, 60 Hz
Single Phase, 1/2 HP
Pump:
1/2 HP . . . . . . . . . . . . . . . 1450 GPH @ 0 Ft.
Pump Housing . . . . . . . . . . . . . . . .Cast iron
Volute . . . . . . . . . . . . . . . . . . . . . . .Cast iron
Application:
Max Liquid Temperature . . . . . . . . . . 120˚F
Suction/Discharge Size . . . . . . . . . . . . . . 3/4”
Pump Application
• Pump should only be used to pump clear
water. Do NOT use to pump fluids such as
gasoline, fuel oil, or kerosene. Do NOT use in a
flammable or explosive atmosphere. Improper
use WILL result in personal injury and/or death.
To prevent property
damage, serious injury, or death, proper application
of the pump is required. The following procedures
SHOULD be followed:
• This pump operates on 115 V, 60 Hz AC, single
phase or 115 V DC.
• ALWAYS disconnect the power source before
attempting to operate, service, relocate, or
maintain the pump. NEVER handle a pump or
pump motor with wet hands or when standing
on a wet or damp surface or in water when
pump is connected to power source.
• Secure the discharge line before starting the
pump. An unsecured discharge line may whip.
Personal injury and/or property damage could
result.
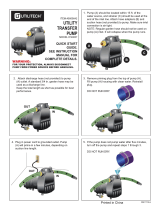
1. A ground fault circuit interrupter (GFCI) is required.
2. Figure 2 shows a typical application. Threaded
adapters are furnished for attaching garden hose
where conditions permit its use. In no case should
the pump be more than 15 feet above or away from
inlet source. Install a foot valve when suction lift is
over 10 feet or when suction line is over 10 feet long.
3. The inlet line may be galvanized pipe, plastic pipe,
or reinforced hose. Small leaks in suction line
greatly reduce efficiency of pump and may prevent
priming.
Ordinary garden hose
will collapse under suction pressure and should not be
used in the inlet but for pressure boosting only.
4. Use a strainer when pumping from a creek, pond,
or source where foreign objects may be sucked
into the pump. The strainer should prevent solids
from entering the inlet line.
5. A regular garden hose may be used as a discharge
line.
6. Inspect the power cord and plug for damage. If the
plug is missing the grounding prong or the cord is
damaged, do NOT use the pump until the cord has
been replaced.
• Risk of fatal electrical shock. NEVER cut off the
round grounding prong. Cutting the cord or plug will
void the warranty and make the pump inoperable.
Figure 2
Priming plug
Inlet
Hose
adapters
Outlet
Model TP-500K – Operating Instructions and Parts Manual

4
Ridge Tool Company
• Before using, test the Ground Fault Circuit
Interrupter (GFCI) to insure it is operating correctly.
7. When appropriate accessories are used correctly,
water can be pumped down to within 1/8 inch of
the surface.
8. As soon as the pump begins to take in air or
loses prime, unplug the pump. Failure to unplug
the pump at this point could damage the pump by
causing the pump to dry run.
Do NOT allow pump
to run dry. The shaft seal depends on water for
lubrication. Operating the pump without water will
damage the shaft seal and cause pump failure.
Risk of fatal electrical
shock. When routing electrical cord protect cord from
sharp objects, hot surfaces, oils, and chemicals. Do
NOT kink cord; replace any damaged cord immediately.
Operation
Pump must be filled
with water before operation. Running the pump dry
will cause damage to the shaft seal.
1. This unit is not waterproof or weatherproof and
is not intended to be used in showers, saunas,
or other potentially wet locations. The motor is
designed to be used in a clean, dry location
with access to adequate cooling air. Ambient
temperatures around the motor should NOT
exceed 104˚F (40˚C).
2. Remove priming plug and fill with water. Replace
plug.
3. Plug power cord into GFCI protected electrical
outlet. The pump will prime in a few minutes
depending on suction line length. Use of foot
valve on suction line is recommended.
4. In the case of pressure boosting, turn water
on before starting pump. This force primes the
pump. Then, plug power cord into GFCI protected
electrical outlet.
5. Unplug cord to turn unit off.
Maintenance Instructions
Always disconnect
the electrical supply or unplug the pump before
attempting to operate, service, relocate, or perform
any maintenance. If the power source is out of
sight, lock and tag in the open (OFF) position to
prevent unexpected power application. Failure
to do so COULD result in fatal electrical shock.
Only a qualified technician should repair this unit.
Improper repair COULD result in fatal electrical shock.
1. Check the operation of the Ground Fault Circuit
Interrupter (GFCI) each time the pump is used.
2. Keep pump inlet clean and free of all foreign
objects. Inspect inlet at beginning of each use.
3. Alteration of the power cord could result in fatal
electrical shock.
Part Replacement Schedule
Failure to follow
replacement schedule will void warranty.
Refer to page 6 - Parts Breakdown.
• Replace Brush Kit every 100 hours of use.
• Replace Impeller and Seal Kit every three years.
Pumps with excess of 100 hours of operation may
stop operating or fail to start. This could be due to
worn brushes or carbon build-up on commutator. The
brushes should be removed and carbon removed from
commutator. Worn brushes are not covered under
warranty.
BRUSH REPLACEMENT
1. Disconnect electrical cord from power supply.
2. Remove brush caps with screwdriver.
3. Remove old brush assembly.
4. Insert new brush assembly.
5. Replace brush caps making sure the brushes
seat evenly.
For other problems, consult troubleshooting chart.
ADDITIONAL REPAIRS
To replace bearings, shaft seal, gaskets, follow the
instructions listed below.
1. Disconnect electrical cord from power supply.
2. Relieve pressure in system.
3. Disconnect inlet and outlet lines.
4. Empty water from pump housing.
5. Place pump on bench with motor end up
and remove brushes as described in Brush
Replacement instructions. If brushes are to be
reused, mark the location from which each came.
Replace brushes in original orientation upon
completion of repair.
6. Remove the four cap screws holding motor
housing and pump housing together. Motor
housing is now free and can be removed. Take
care not to lose commutator bearing finger spring.
7. With a screwdriver, pry the rotor-backhead (see
page 6) assembly out of the pump housing.
Remove straight out.
8. Remove the impeller by turning counter clockwise
(right-hand thread on shaft).
Model TP-500K – Operating Instructions and Parts Manual

Ridge Tool Company
5
9. Remove backhead (the bearing is press fit into
the backhead).
10. Place backhead on flat surface with impeller side
down and press out shaft seal.
11. Place impeller on flat surface with vane side
down and with screwdriver and hammer break
ceramic seal ring into several pieces and remove.
Next, remove rubber seal ring cup from impeller.
12. Remove bearings from armature shaft (press-fit
on shaft).
13. Inspect the armature commutator bars. The
environment in which the unit has been operating
will have influence on the condition of the
commutator. Airborne dust an dirt will accelerate
wear. A rough or scarred appearance may
dictate having commutator reconditioned before
reassembly. Use a stiff nylon brush to clean
carbon from between commutator bars.
14. To reassemble, install new bearings on the shaft.
Always press against the inner race to prevent
bearing damage. Make sure bearings are tight
against the shaft shoulders.
15. Place rubber water slinger flat inside seal cavity
on front side of backhead
. Press shaft seal into
backhead. When pressing shaft seal into place,
apply force to the cup flange. Avoid touching the
polished seal surface; oil or scratches on this
surface may cause premature failure of the seal.
16. Press ceramic side of seal into impeller, ceramic
side out. Avoid touching ceramic with hands as oil
may cause premature failure of the seal. Wipe oil
off both sides of seal with a soft, lint-free cloth.
17. Reassemble unit in reverse order, beginning
with step 9. Use caution when sliding rotor shaft
through backhead and water slinger not to pinch
or damage water slinger (see page 6).
18. After reassembly check shaft for free rotation with
screwdriver in fan through air exit openings.
SERVICE AND REPAIR
Service and repair work
on this pump must be performed by qualified repair
personnel. Maintenance of the pump by persons
unfamiliar with the pump components COULD result in
serious personal injury.
When servicing this
pump, only identical RIDGID replacement parts should
be used. Failure to follow these steps COULD cause,
property damage, fatal electrical shock, or other
serious injury.
If you have any questions regarding the service or
repair of this machine, call or write to:
RIDGID Water Systems
Attn: Customer Service Department
101 Production Drive
Harrison, Ohio 45030
csridgid@waynewatersystems.com
For name and address of your nearest Independent
Authorized Service Center, contact the Ridge Tool
Company at http://www.RIDGID.com
For Customer Service, call 1-877-9RIDGID.
Model TP-500K – Operating Instructions and Parts Manual
TROUBLESHOOTING CHART
Symptom Possible Cause(s) Corrective Action
Pump will not
start or run
1. Blown fuse
2. Low line voltage
3. Worn brushes
4. Impeller obstructed
5. Defective motor
1. If blown, replace with proper sized fuse or reset breaker
2. If voltage is under 108 volts, check wiring size
3. Replace brushes
4. Remove blockage
5. Replace pump
Pump will not
prime or retain
prime after
operating
1. Air leak in suction line
2. Impeller obstructed
3. Worn seal
4. Suction lift too high
5. Hose kinked or looped
6. Fittings not tight
7. Suction hose out of water
8. Clogged inlet and/or suction line
1. Repair or replace suction line
2. Remove blockage
3. Replace seal
4. Lower pump
5. Straighten hose
6. Tighten fi ttings
7. Submerge suction hose end
8. Clean inlet and/or suction line
Flow rate is too
low
1. Piping or hose is fouled or
damaged
2. Low line voltage
1. Clean or replace
2. If voltage is under 108 volts, check wiring size
Seal leaks 1. Worn seal
2. Shaft grooved
3. Pump head loose on motor
1. Replace seal
2. Replace pump
3. Insure proper assembly and no obstruction, tighten bolts

6
Ridge Tool Company
Ref. No. Description Cat. Number
1 Brush kit 29633
2 Brush holder kit 29638
3 Fittings kit 29643
4 Impeller and seal kit 29648
5 Bearing kit 29653
6 Cord kit 29658
7 Volute kit 29663
8 Backhead kit 29673
NOTE: Replacement Parts are available in kit form only
3
3
6
2
7
2
1, 2
1, 2
7
4, 7, 8
4,8
4,8
5
5
8
5
TP-500K — Self Priming Portable Pump
Record Serial Number From Product Decal Below
Serial No.
Model TP-500K – Operating Instructions and Parts Manual
Backhead
Water Slinger

Model TP-500K – Operating Instructions and Parts Manual
Ridge Tool Company
7
Notes

Ridge Tool Company
8
Model TP-500K – Operating Instructions and Parts Manual
Notes

21
Ridge Tool Company
Notes/Notes/Notas
Modelo TP-500K
/